Xtreme Power 75036-XP VACUUM CLEANER User manual

Category
Above ground pool accessories
Type
User manual

This manual is also suitable for

SAVE THIS MANUAL: KEEP THIS MANUAL FOR SAFETY WARNINGS, PRECAUTIONS, ASSEMBLY,
OPERATING, INSPECTION, MAINTENANCE AND CLEANING PROCEDURES. WRITE THE PRODUCT’S
SERIAL NUMBER ON THE BACK OF THE MANUAL NEAR THE ASSEMBLY DIAGRAM (OR MONTH
AND YEAR OF PURCHASE IF PRODUCT HAS NO NUMBER)
OWNER’S MANUAL AND SAFETY INSTRUCTIONS
FOR QUESTIONS PLEASE CALL OUR CUSTOMER SUPPORT: (909) 628 0880 MON-FRI 9AM TO 3PM PST
AUTOMATIC SUCTION SWIMMING POOL VACUUM CLEANER
ITEM: 75036-XP & 75037-XP
GENERAL SAFETY WARNINGS
Read all safety warnings and instructions. Failure to follow the warnings and instructions may
result in electric shock, re and/or serious injury. Save all warnings and instructions for future
reference.
SAFETY
The warnings, precautions, and instructions discussed in this instruction manual cannot cover all
possible conditions and situations that may occur. It must be understood by the operator that common
sense and caution are factors which cannot be built into this product, but must be supplied by the
operator. Read carefully and understand all ASSEMBLY AND OPERATION INSTRUCTIONS before
operating. Failure to follow the safety rules and other basic safety precautions may result in serious
personal injury.
Read and understand all instructions. Failure to follow all instructions may result in serious injury or
property damage.
DO NOT allow persons to operate or assemble the product until they have read this manual and have
developed a thorough understanding of how it works.
DO NOT modify this product in any way. Unauthorized modication may impair the function and/or
safety and could affect the life of the product. There are specic applications for which the product
was designed.
If your pool is equipped with one, you MUST cover your dedicated suction port/vac port/automatic pool
cleaner port when not in use by the cleaner.
DO NOT play with cleaner or apply cleaner or hose to body, clothing, or hair. The hose and cleaner
can take hold of your body, hair, or clothing. The suction from the hose or cleaner, or just the hose or
cleaner alone, can trap a swimmer underwater. NEVER ALLOW ANYONE TO ENTER THE POOL
when the cleaner is in use.
DO NOT allow anyone, especially children, to use or play with or around the cleaner or hose. Educate
the pool users about the dangers of the hose, cleaner, and suction ports.
STOP PUMP Cleaner must be completely disabled by turning off the pool’s pump and suction before
cleaning or maintaining the cleaner. Moving parts and suction can injure ngers or body.
STOP PUMP before swimming. The moving pool cleaner, hose, and suction ports can injure or entrap
swimmers. STOP PUMP, detach hose, and move the cleaner and hose to an unused corner of the
pool. If the hose may interfere with the swimmers, remove it from the pool.
Carefully follow all instructions contained in this manual. Failure to do so may inhibit the cleaner’s
operation or damage your pool. The manufacturer disclaims any liability for repairs or replacement
to any structures or components in the customer’s pool. This cleaner was not designed to be the rst
clean after pool construction or at the beginning of the season. Check your vinyl pool for wear or tear,
or for roots, branches, rocks, or other obstructions under the liner. Gunite, plaster, and tile pools must
be free of deterioration, cracked or loose tiles, or other conditions that could damage the cleaner. All
pools must be cleaned of algae and debris prior to the cleaner’s rst use.
1
IMPORTANT SAFETY INFORMATION
This automatic pool cleaner is perfect for your in-
ground or above-ground pools regardless size, shape
and construction. The magnicent function design
helps the suction equipment attaches to the majority
pool surface, such as concrete and berglass.
The powerful suction ability is enough to pick up
everything from dirt and bug to pebbles and twigs. It
also attaches to all the ltration systems, which means
you can use your exist one but no need to change.
No electrical needed, no tools needed as well as no
wheels to jam, no gears to break and no diaphragms
to replace provides more relaxation and convenience.
The smart design allows you open it in seconds for
easy maintenance. This poor cleaner also is ideal for
above-ground and in-ground pools, whose sizes up
to 16’ x 34’ and require at least a HP swimming pool
pump or 1600GHP to function properly.
The Deluxe Inground Pool Cleaner can clean your
inground pool from top to bottom automatically.
This cleaner uses enough suction power to pick up
everything from dirt and bugs to pebbles and twigs.
This will allow you to spend more time swimming in
your pool instead of having to clean it. This cleaner
operates with only one moving part. There are no
wheels to jam, no gears to break and no diaphragms
to replace. Its smart design lets you open it in seconds
for easy maintenance. The Deluxe Inground Pool
Cleaner comes with 30 feet of hose and a 1-year
warranty. Vacuum inground pools regardless of size,
shape, or construction. No tools required. No need for
electricity. Attaches to your existing ltration system.
Includes 30’ of vacuum hose. Ideal for pools up to 16’
x 32’. Require at least a 3/4 hp swimming pool pump
or 1600ghp to function properly.
FEATURES:
Dimension: 18.9” (L) x 5.5” (W) x 40.6” (H)
Unit Net Weight: 14.99 lbs
Ideal for pools up to 16’ x 32’
Attaches to all ltration systems
No electricity required, No tool required
Vacuum all shapes and sized pools
Magnicent function suction system
Required a 3/4 HP swimming pool pump or
1600GHP to function properly
FEATURES:
Attaches to your existing ltration system
No tools required and no electricity needed
Require at least a 1 hp swimming pool
pump or 1600 GHP to function properly.
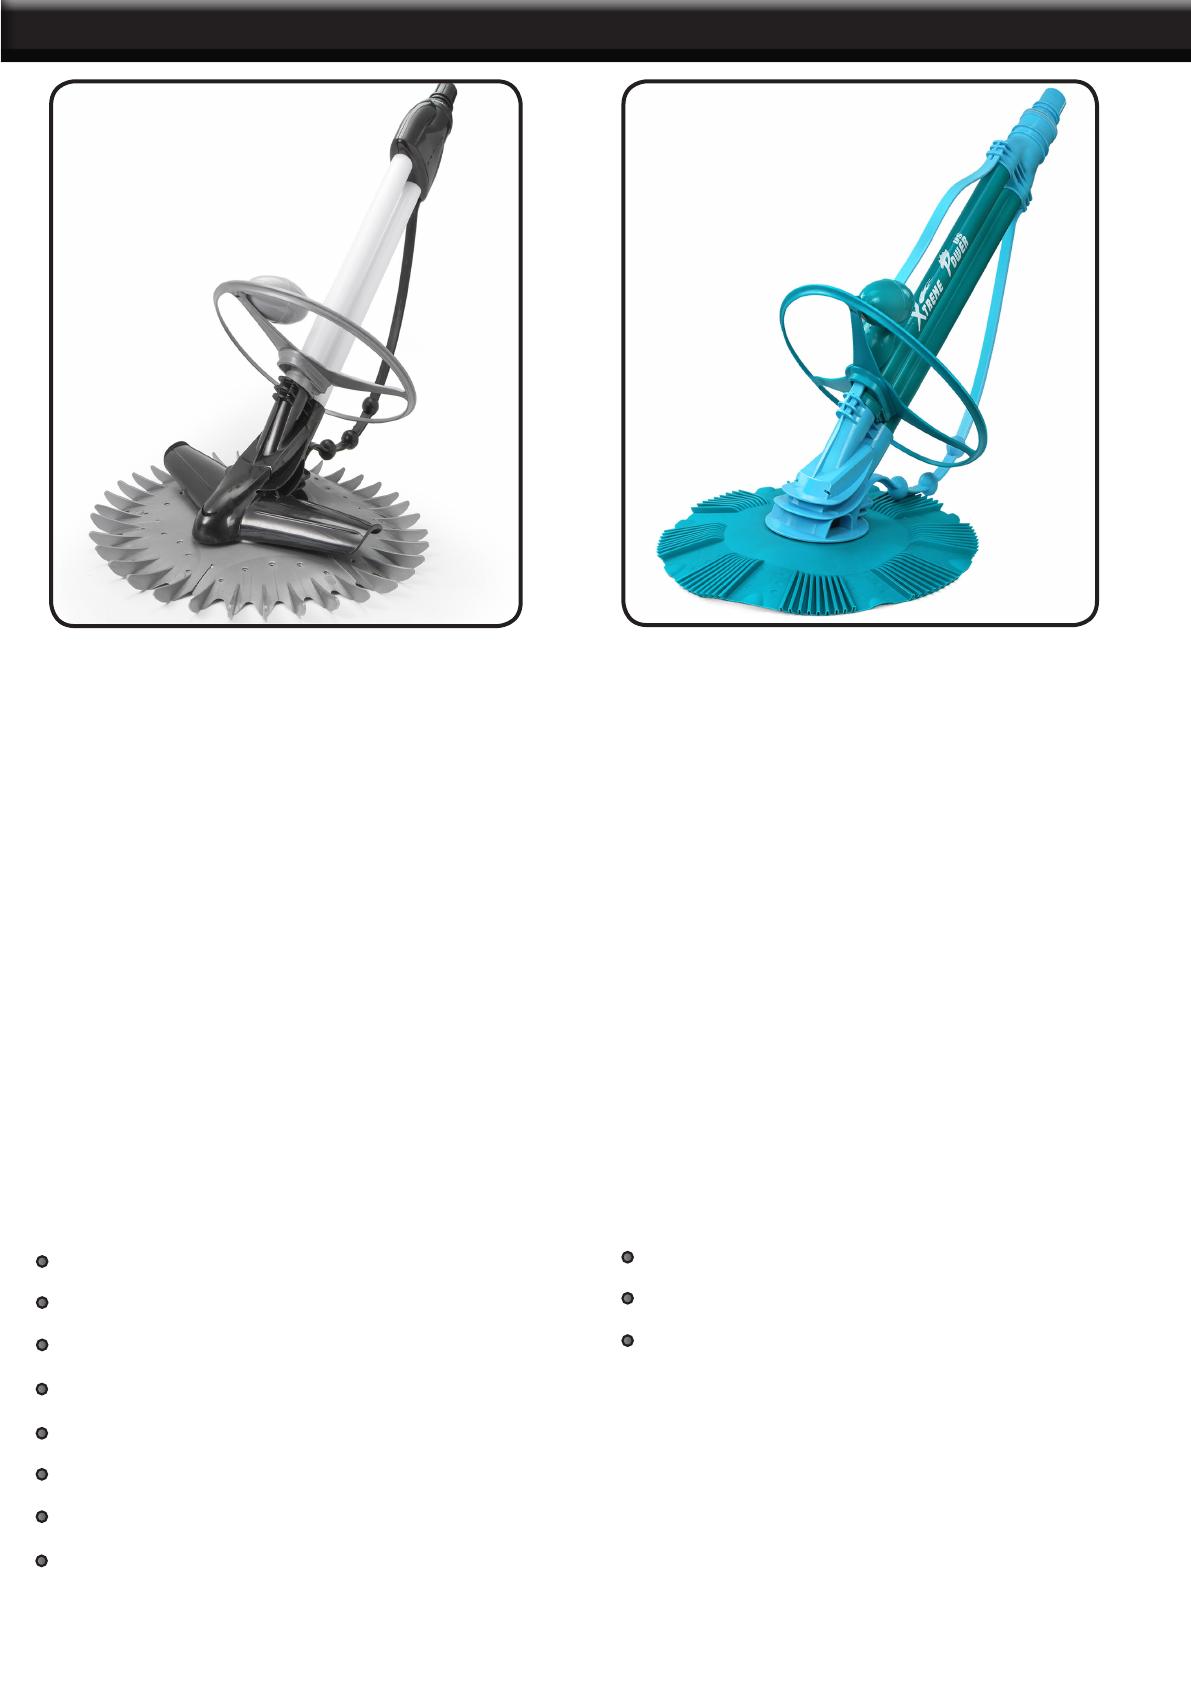
75036-XP: Automatic Pool Cleaner Stingray
In/Above Ground
75036-XP: Automatic Pool Cleaner In/Above
Ground Complete Set
2
FEATURES AND SPECIFICATIONS
3
Step 1: Attaching the Seal
To install the seal, locate the words “Up” or “Top” and face them
towards the main body. Slip the seal over the foot pad, at side down
towards the pool oor and pull gently until it seats itself on the other
side in its groove as illustrated in Figure 2.
Seal must be installed at side down, pleated side up. Once in
place, the seal should rotate and turn freely.
The seal is not reversible. The raised pleats on the pleated seal must
face upward. The at side of the seal should face down to rest against
the pool surface.
Step 2: Attaching the Adapter
The adapter is tted onto the body, see diagram.
NOTE: This step is applicable only to models A and C
Step 3: Attaching the Roller Bumper Strap
Insert the bottom end of the strap into the slot provided on the main body. Insert
the top end of the strap into the locking clip attached to the swivel head. See
Figure 3.
Step 4: Attach the Dive Float Restrictor
Insert the bottom end of the strap into the slot provided on the main body. Insert
the top end of the strap into the locking clip attached to the swivel head. See
Figure 3.
Step 5. Attach the Hose Weights and Assemble the Hose
The cleaner hose comes in sections that must be assembled. You will
need enough sections to reach from where the cleaner is connected, to the
farthest end of your pool, plus an extra section. You will have to attach hose
weights to the hose to neutralize the hose’s buoyancy in the water. The
number of hose weights required is determined by the maximum depth of
your pool. The deeper the pool the more weight will be needed. See Table
A to determine how many hose weights your pool will require.
ASSEMBLY
4
Twist and push the female ends into the male ends into the pool to wet
them. See Figure 5.
Continue until you’ve connected all the sections you need. After
connecting the hose weights to the hose described in Table A, connect
the hose to the cleaner. See Figure 6.
One of the hose sections has two female ends and a hose protector. This section should be tted
last and attached to the pool’s vacuum connection.
Your fully assembled cleaner should look like this.
The body is connecting with the hose, please refer to the right picture. Only
Model D needs to use an adapter to connect the hose.
III. Installation
The cleaner is designed to work in a variety of swimming pools. Which is why there are items such as
a 2” hose cone and valve cap for the regulator valve included with your cleaner. These may or may not
be necessary depending on the features of your pool. Both the standard in-skimmer installation and an
optional vacuum line installation are covered in this manual. Check to see which most closely t your pool
conguration and follow the directions
Standard Installation
For pools with one skimmer, using the automatic regulator valve. The advantage of this installation is
that the automatic regulator valve automatically balances the water ow between the skimmer and the
cleaner. We recommend the use of an automatic regulator valve for maximum safety and performance. The
valve automatically adjusts to changes in the amount of water ow to provide the cleaner with the power
necessary to ensure proper cleaning performance.
ASSEMBLY
5
1. Turn the pool pump off.
2. Close the main drain and all suction lines except the line from the skimmer
to which the cleaner will be connected.
3. Remove the skimmer basket
4. Press the 2” hose cone into the vacuum connection in the bottom of the
skimmer as shown in Figure 8.
5. Press the automatic regulator valve into the 2” hose cone. The end of the
valve marked “Attach Hose to This End” must point upwards. See Figure 7.
6. Place the cleaner into the pool and allow it to sink to the oor of the pool.
Continue to feed the hose vertically downward into the pool until it is lled with
water and purged of air.
7. Insert the end of the hose through the skimmer opening and connect the
hose directly onto the automatic regulator valve.
IV. Adjustments
After completing the installation, turn the pool pump on. Allow the pump to run for a couple minutes to
ensure all air completely cycles out of the system. The cleaner should be moving around the pool at a rate
of 8 to 12 feet per minute. Check each of the following initial adjustments to the cleaner at this time.
Hose Length
IMPORTANT: The pump must be on when you check the hose length. The hose contracts when the pump
is operating and will be longer when the pump is off.
With the cleaner operating, position it at the furthest point of the pool from where it is attached. It is easy to
position the cleaner by moving it around the pool with a pole. The cleaners hose should be long enough
to reach the furthest end of the pool, plus one hose section. If necessary, remove extra hose sections from
the center portion of the hose. Removing center hose sections avoids having to disturb the hose weight
placement. Save extra hose sections for use as needed for replacement. NOTE: Turn pool pump off when
adding or removing hose sections.
Hose Balance
To determine correct hose balance, turn the pump off and observe the cleaner. Hose balance is correct
when the cleaner’s seal rests at on the pool oor and the diver tubes make a 45° angle with the oor, as
shown in Figure 9. The cleaner achieves the best cleaning coverage when the hose neither weighs down
nor pulls up on the unit. Adjust hose weights one inch at a time as needed until proper hose balance is
achieved. In pools with both shallow and deep areas, adjust hose weights rst in the deep area and then in
the shallow area.
INSTALLATION
6
1. Hose too light: If the hose rises towards the surface at an angle greater
than 45° move the weights closer to the cleaner or move the rst two
weights closer to each other.
2. Hose Too Heavy: If the hose sags downward at an angle less than 45°,
move the weights away from the cleaner or separate the rst two weights
away from each other.
Note: Figure 9 shows only model B, a schematic diagram of the pool
balance. Model A, C and D with the same balance diagram of the pool.
Return Line Water Flow
IMPORTANT: The water ow from your return line can push the cleaner’s hose and affect its performance.
It may cause the cleaner to steer away from the end of the pool where the return line is located, or it may
cause the cleaner to remain in one section of the pool. To correct this, use the eyeball diverter included with
your cleaner.
1. First make sure your pool pump is off. Remove the original eyeball from the return line in the pool by
unscrewing the lock ring.
2. Replace the original eyeball with the cleaner’s eyeball diverter.
3. Replace the lock ring and tighten. Make sure the opening of the eyeball diverter points are facing in the
proper direction before tightening fully. See Figure 10.
To Install the Eyeball Diverter:
Eyeball Diverter Positions
Position the diverter opening to redirect the return line water ow so it does not interfere with the cleaners
movement. Try different positions to see which works best in your pool.
Flow directed along the side of the pool (the tile line)
Flow directed downward
Flow directed against the hose will help steer the cleaner away from obstructions such as stairs and
ladders.
After installing the eyeball diverter, turn the pool pump on. The cleaner should begin moving across the pool
oor vacuuming debris in its path.
INSTALLATION
6
VI. Troubleshooting
Because of the individual characteristics of your pool, some additional adjustments may be required to get
the best performance from your cleaner.
If the cleaner is not moving or pulsating:
Check to ensure that the main drain and all suction lines are closed except for the suction line to which
the cleaner is attached.
Check for debris in the lter and/or pump basket.
Check for debris in the cleaner’s apper. Debris may prevent apper movement or restrict ow.
Pool pump and lter system may be too small, incapable of providing 20 gallons per minute of water ow.
Consult a pool professional if you are unsure.
If the cleaner stays in one end of the pool:
Check the return line water ow and redirect as necessary with an eyeball diverter.
Check that the hose is long enough to reach the furthest end of the pool.
Check that the cleaner has proper hose balance.
If the cleaner stays on the main drain:
Check to ensure that the main drain is closed. A pool professional may need to assist you.
Check to make sure the main drain grate is installed.
If main drain is not ush with the pool oor, consult your pool professional.
If the cleaner slows and air bubbles enter the pool at the return line:
Find and correct the air leak that is causing the pump to lose its prime
Check the hose to ensure there are no leaks.
Check the vacuum connection, it should be submerged so no air enters the system.
Check the pump basket lid for looseness, cracks and/or worn or missing O-rings. If you need assistance,
consult your pool professional.
If the cleaner pulls air from, or remains at the waters surface:
Check to ensure the dive oat mechanism is operating freely and the dive oat restrictor is installed.
Check the automatic regulator valve for proper installation and ensure it is not clogged with debris.
Make sure the water level is at least 2 inches below the pool deck.
Check to ensure your cleaner is operating at the proper speed of 8-12 feet per minute.
TROUBLESHOOTING AND MAINTENANCE
7
If the cleaner stays at the shallow end of the steps:
Check the return line water ow and redirect as necessary with an eyeball diverter.
Check the automatic regulator valve for its proper installation and ensure it is not clogged with debris.
Check that the hose is long enough to reach the furthest end of the pool, including the pool steps.
Check that the cleaner has proper hose balance in the shallow end.
Check to ensure the dive oat mechanism is operating freely and the dive oat restrictor is installed.
Shorten the roller bumper strap by ½ inch. Pull out the upper end of the bumper strap from the locking
end clip attached to swivel head. Cut ½ inch off then return bumper strap into locking end clip.
If the cleaner tracks in a repetitive pattern:
Check the swivel on the top of the cleaner, it should turn freely.
Check the return line water ow and redirect as necessary with an eyeball diverter.
Check the cleaner’s hose to ensure it has not become bent or kinked, it only takes a bent or kinked hose
section to hinder the cleaning coverage. One way to check for kinks in your hose is to lay each section
at on your pool’s deck or other at surface. The hose should be perfectly straight and at. Do not coil the
hose when taking your cleaner out of the pool because it will retain the coil shape, forming a bend or kink.
To remove debris from the apper:
Sometimes debris may clog the bottom of the cleaner and prevent apper movement or restrict water
ow. The apper is located inside the main body and must always move freely. You can see the apper
through the opening in the bafe plate when you turn the cleaner upside down as shown in Figure 11.
Jiggle the apper with your nger or ush the cavity with a hose to force out any debris lodged inside the
main body.
If debris is still lodged inside, you must remove the apper. First remove
the four lids in the foot pad, unscrew it and remove it from the main
body. In succession, take out the screw from the pife plate, pull it out
and lastly, remove the apper. See Figure 12.
Once the debris is dislodged, insert the apper back into the main
body and snap the bafe plate back into position. Be sure that it is
securely in place. See Figure 12.
MAINTENANCE
Visually inspect your cleaner from time to time to make sure that:
The apper is moving freely and is not obstructed by debris.
The foot pad is not excessively worn. When the traction pads on the bottom have worn down it is time
for a replacement.
When storing the cleaner, do not coil the hose. Lay the hose at in an area protected from direct sunlight.
If hose sections are disconnected, try not to disturb the hose weight locations. The cleaner’s hose is
specically designed to ensure optimum performance from the cleaner. Should replacement be required, be
sure to get a genuine cleaner hose. Be sure to swap around the hoses every 3 months to prevent them
from getting stuck together. This can stop the cleaner from moving properly.
TROUBLESHOOTING AND MAINTENANCE
Disclaimer of Liability – About Your Pool and the Cleaner
There are a multitude of factors that contribute to the life of your pool. The Automatic Pool Cleaner is
a passive product that will have no impact on the life of your pool. Please be aware that over time,
deterioration, discoloration and brittleness of any pool nish can be caused separately by, or in combination
with, age, an imbalance in pool water chemistry, improper installation among other factors. An automatic
pool cleaner, such as this cleaner, will not remove or cause wear on “good” pool plaster. In fact, the opposite
is true. Pool plaster will eventually cause wear on the cleaner. The same situation holds true for vinyl lined
inground swimming pools because vinyl liners are also affected by the environment and factors such as
pool water chemistry, sunlight and the pool’s surroundings. Therefore, over time, vinyl can become brittle
and weak. In addition, vinyl line pools are affected by the workmanship, composition and installation of the
liner and the quality of construction of the supporting walls and pool base. These are all factors which can
contribute to liner failure. The existence of any of these types of conditions in your pool is not caused by
the use or operation of the cleaner. The manufacturer does not claim responsibility nor liability for repairs or
replacement of any of the above named structured or components of the customer’s pool. The pool owner
assumes all responsibility for the condition and maintenance of the pool’s surface, water and deck.
Cleaner must be completely disabled by turning off the pool’s pump and suction before cleaning or
maintaining the cleaner. Moving parts and suction can injure ngers or body.
STOP PUMP before swimming. The moving pool cleaner, hose, and suction ports can injure or entrap
swimmers. STOP PUMP, detach hose, and move the cleaner and hose to an unused corner of the pool. If
the hose may interfere with the swimmers, remove it from the pool.
This cleaner is not meant to replace chemical treatments. Continue chemical treatments; remove the
cleaner during shock treatments.
The cleaner is meant to vacuum small debris and dirt from your pool. Large debris and fallen objects will
need to be removed manually.
DO NOT wait until your pool is lthy to run the cleaner. The cleaner should be considered a preventative
maintenance for a clean pool.
DO NOT allow anyone, especially children, to use or play with or around the cleaner or hose. Educate the
pool users about the dangers of the hose, cleaner, and suction ports.
Carefully follow all instructions contained in this manual. Failure to do so may inhibit the cleaner’s
operation or damage your pool. The manufacturer disclaims any liability for repairs or replacement to any
structures or components in the customer’s pool.
This cleaner was not designed to be the rst cleaning after pool construction or at the beginning of the
season. Check your pool for wear or tear, for roots, branches, rocks, or other obstructions under the liner.
Pools must be free of deterioration, cracked or loose tiles, or other conditions that could damage the
cleaner. All pools must be cleaned of algae and debris prior to the cleaner’s rst use.
8
TROUBLESHOOTING
9
TROUBLESHOOTING
10
PARTS LIST
THE MANUFACTURER AND/OR DISTRIBUTOR HAS PROVIDED THE PARTS LIST AND ASSEMBLY
DIAGRAM IN THIS MANUAL AS A REFERENCE TOOL ONLY. NEITHER THE MANUFACTURER OR
DISTRIBUTOR MAKES ANY REPRESENTATION OR WARRANTY OF ANY KIND TO THE BUYER THAT
HE OR SHE IS QUALIFIED TO MAKE ANY REPAIRS TO THE PRODUCT, OR THAT HE OR SHE IS
QUALIFIED TO REPLACE ANY PARTS OF THE PRODUCT. IN FACT, THE MANUFACTURER AND/OR
DISTRIBUTOR EXPRESSLY STATES THAT ALL REPAIRS AND PARTS REPLACEMENTS SHOULD BE
UNDERTAKEN BY CERTIFIED AND LICENSED TECHNICIANS, AND NOT BY THE BUYER. THE BUYER
ASSUMES ALL RISK AND LIABILITY ARISING OUT OF HIS OR HER REPAIRS TO THE ORIGINAL
PRODUCT OR REPLACEMENT PARTS THERETO, OR ARISING OUT OF HIS OR HER INSTALLATION
OF REPLACEMENT PARTS THERETO.
Record Product’s Serial Number Here:
Note: If product has no serial number, record month and year of purchase instead.
Note: Some parts are listed and shown for illustration purposes only and are not available individually
as replacement parts.
PLEASE READ THE FOLLOWING CAREFULLY
11
PRODUCT MADE IN CHINA
WARRANTY
  • Page 1 1
  • Page 2 2
  • Page 3 3
  • Page 4 4
  • Page 5 5
  • Page 6 6
  • Page 7 7
  • Page 8 8
  • Page 9 9
  • Page 10 10
  • Page 11 11
  • Page 12 12
  • Page 13 13

Xtreme Power 75036-XP VACUUM CLEANER User manual

Category
Above ground pool accessories
Type
User manual
This manual is also suitable for

Ask a question and I''ll find the answer in the document

Finding information in a document is now easier with AI