Page is loading ...

ReadyBrake
Owners Manual
RV PRODUCTS INC
RV PRODUCTS INC
Limited Lifetime Guarantee
N.S.A. RV Products, Inc. warrants to the original owner only that this
products is free from defects in material and workmanship upon original
purchase.
The Lifetime Guarantee covers the ReadyBrake unit from front to back
100% replacement to original owner only. The Guarantee does not cover
any hardware, cables or any component of the DL-300 monitor system.
The Guarantee also does not cover damage resulting from tamper,
abuse, unreasonable use, mistreatment, negligence or accidental
breakage.
IN NO EVENT WILL NSA RV PRODUCTS, INC. BE LIABLE
FOR ANY SPECIAL INCIDENTAL OR CONSEQUENTIAL
DAMAGE RESULTING DIRECTLY FROM POSSESSION,
MISUSE OR IMPROPER CARE OF THE READY BRAKE
UNIT.
Return Policy
We have a 30 day money back guarantee that starts on the date of
shipment. Items returned after 30 days will be deducted a 20% restock
fee.
Anyone wishing to return merchandise must first obtain authorization to
do so by contacting us at [email protected] or (620) 365-7714.
When we receive a returned item our QC department will inspect it and a
refund amount is determined then issued.
Shipping charges are non-refundable and we do not pay the return
shipping fees. Items marked with free shipping will still have the actual
shipping cost deducted from a refund.
N.S.A. RV Products, Inc.
445 W. Lincoln Rd.
Iola, KS 66749
www.readybrake.com
(620) 365-7714
Made In USA

#1 #2
#1
#2
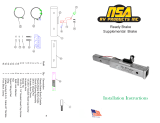
How to Install the ReadyBrake
Insert the ReadyBrake into the 2” receiver of the tow vehicle then
align the holes and use a 5/8” pin to secure it into place. Insert a
towbar into the female receiver end of the ReadyBrake (cut off excess if
more than 6” will be inserted (uncommon)). Connect towbar legs to the
towed vehicle base plate. The towbar should be within 2 inches of level
for the brake system to work properly. Measure from the ground to the
connection point on each vehicle for levelness. If a drop or riser hitch is
needed to level the towbar, insert it into the receiver
of the tow vehicle and put the ReadyBrake into the
drop/riser hitch. Only install towbars in the female
receiver end of the ReadyBrake, a
drop hitch on this end will bind the
moving parts and keep the brake
from working. With the towbar level,
legs extended and both vehicles aligned, the
ReadyBrake can be adjusted with the sling cable.
How to Adjust the Sling Cable
Loosen the nuts on both cable clamps. Connect the swaged cable
loop end to the clevis on the ReadyBrake lever (#1). Connect the spring
clip end to the loop of the cable connected to your brake pedal (#2).
Adjust the cable leaving enough slack that there is about a 2 inch drop in
the center. or it will pull your brakes DO NOT MAKE THE CABLE TIGHT
down the entire time. Tighten a cable clamp against the cable loop
sleeves (#2) so they can not move then tighten the other clamp toward
the middle. Before testing please install the DL-100 or DL-300 monitor
system. To test, tow the vehicle at least 20 mph then apply brakes until
stopped. The actuator arm should be in an upward position pulling the
brake pedal down until you drive forward a few inches to release it. Have
a friend ride in the towed vehicle to see that the brake pedal is pulling
down and releasing as you stop and go while in a safe area like an empty
parking lot.
General Use and Tips
The ReadyBrake can only be used on vehicles towed with all 4
wheels on the ground. Do not use with trailers or tow dollies. The
loaded weight of your towed vehicle must not exceed the weight rating
limits of any component used for towing it. Allow clearance for the
actuator arm to move toward the tow vehicle 3 1/2”, if there is not enough
room a hitch extension can be used. The actuator arm will not move by
hand, it takes a few hundred pounds to move it. In the unlikely event the
receiver on your tow vehicle is not deep enough for the ReadyBrake to
insert, 1” of the ReadyBrake can be cut off to make it fit. Never insert
more than 6” of a tow bar head into the ReadyBrake or the actuator arm
will be unable to move. Use a locking hitch pin on all connection points to
prevent theft or vandalism. Drop and riser hitches create a lever situation
so if your towbar is 2 inches from level it is within tolerance and we do not
recommend using a drop, if 4 inches from level we recommend using a 2
inch drop to stay in tolerance and create less of a lever and dragging
issue.
Maintenance
No maintenance is needed until the ReadyBrake has been used for
a season. Once a year spray white lithium grease under the actuator
arm (#7), spray into the open end of the ReadyBrake outside body (#1)
and the inside body (#2). Also spray the area that these two parts slide
against each other and the powder coating is probably wearing off from
use, around where the (#2) arrow is pointing in the image below.
Ref# Qty Description
1 1 Ready Brake Body Outside
2 1 Ready Brake Body Inside
3 1 Shock &Spring Assembly
4 1 3/8” X 1” Dowel Pin
5 1 Actuator Arm Clevis
6 4 1/4-20x1” Socket Head Cap Screw
7 1 Actuator Arm
8 1 Pivot Block Clamp
9 1 3/16” x 2” spring pin
10 1 3/8” x 2” Dowel Pin
1
2
9
10
3
4
5
6
7
8
/