
825125800
©2006 Dometic Corporation
LaGrange, IN 46761
INSTALLATION
MANUAL
REFRIGERATOR FOR LP-GAS
& ELECTRIC OPERATION
RM2852
RM2862
RM3862
NDR1062
RM2351
RM2354
RM2451
RM2454
RM2551
MO-M 0606
USA
Corporate Offi ce
CANADA
Service Offi ce 2320 Industrial Parkway Elkhart, IN 46515 Dometic Corporation
Dometic Corporation
48 Zatonski, Unit 3
2320 Industrial Pkwy. Brantford, ON N3T 5L8
Elkhart, IN 46516
For Service Center Assistance
CANADA
Phone: 574-294-2511 Call: 800-544-4881 Phone: 519-720-9578
®
®
RM2554
RM2652
RM2662
RM2663
FOR YOUR SAFETY
If you smell gas:
1. Open windows.
2. Don’t touch electrical switches.
3. Extinguish any open fl ame.
4. Immediately call your gas supplier.
POUR VOTRE SÉCURITÉ
Si vous sentez une odeur de gaz:
1. Ouvrez les fenêtres.
2. Ne touchez à aucun interrupteur.
3. Éteignez toute fl amme nue.
4. Avertissez immédiatement votre
fournisseur de gaz.
FOR YOUR SAFETY
Do not store or use gasoline or other
fl ammable vapors and liquids in the
vicinity of this or any other appliance.
POUR VOTRE SÉCURITÉ
Ne pas entreposer ni utiliser de l’essence
ni d’autres vapeurs ou liquides infl amma-
bles à proximité de cet appareil ou de tout
autre appareil.
Improper installation, adjustment, altera-
tion, service or maintenance can cause
injury or property damage. Refer to this
manual. For assistance or additional infor-
mation consult a qualifi ed installer, serv-
ice agency or the gas supplier.
Une installation, un réglage, une modifi -
cation, une réparation ou un entretien non
conforme aux normes peut entraîner des
blessures ou des dommages matériels.
Lisez attentivement le mode d’emploi
fourni avec l’appareil. Pour obtenir de
l’aide ou des renseignements supplémen-
taires, consultez un installateur ou un
service d’entretien qualifi é ou le fournis-
seur de gaz.
!
AVERTISSEMENT
WARNING
!

- 2 -
MOUNTING INSTRUCTIONS
____________________
9
R
eversing
the door swing
. . . . . . . . . . . . . . . . . . . . . . . . . . . . .
9
M
ounting
the door panel(s)
. . . . . . . . . . . . . . . . . . . . . . . . . . . .
9
REFRIGERATOR REMOVAL
____________________
1
0
APPENDIX A - REARVIEW EQUIPMENT
__________
1
1
APPENDIX B - WIRING DIAGRAMS
______________
1
3
This manual describes the installation procedure of the following refrigerator models: RM2351, RM2354, RM2451, RM2454,
RM2551, RM2554, RM2652, RM2662, RM2663, RM2852, RM2862, RM3862 and NDR1062. For information about mainte-
nance and operating instructions, refer to the
USER MANUAL (825 12 57-00)
.
The unit must be installed by qualifi ed personnel only. This manual should be read and understood before installation. Follow the
instructions and comply with installation specifi cations and dimensions to ensure that the refrigerator is installed safely and runs
effi ciently. Be aware of possible safety hazards when seeing alert symbols on the refrigerator as well as in this manual. Modifi ca-
tion of this product can be hazardous and could result in personal injury or property damage.
INTRODUCTION
CONTENTS
CONTENTS
CERTIFICATION AND CODE REQUIREMENTS
______
3
VENTILATION REQUIREMENTS
__________________
3
General information
. . . . . . . . . . . . . . . . . . . . . . . . . . . . . . . . . .
3
V
enti
VentiV
lation heights
. . . . . . . . . . . . . . . . . . . . . . . . . . . . . . . . . . .
4
Clearances
. . . . . . . . . . . . . . . . . . . . . . . . . . . . . . . . . . . . . . . .
4
Overall and recess d
imensions
. . . . . . . . . . . . . . . . . . . . . . . . .
5
INSTALLATION INSTRUCTIONS
__________________
6
Installing the refrigerator
. . . . . . . . . . . . . . . . . . . . . . . . . . . . . .
6
Securing the refrigerator
. . . . . . . . . . . . . . . . . . . . . . . . . . . . . .
6
Drain water hose
. . . . . . . . . . . . . . . . . . . . . . . . . . . . . . . . . . . .
7
Connections
. . . . . . . . . . . . . . . . . . . . . . . . . . . . . . . . . . . . . . . .
7
SYMBOLS
The following symbols are used throughout the manual:
Indicates a potentially hazardous situation, which, if not avoided, could result
in death or serious injury.
Indicates a potentially hazardous situation, which, if not avoided, may result in
minor or moderate injury.
Used without the safety alert symbol indicates, a potentially hazardous situation which, if not avoided
may result in property damage.
Information
Step-by-step instructions
CAUTION
!
WARNING
!
CAUTION

- 3 -
This appliance is certifi ed under the latest edition of ANSI Z21.19•CSA 1.4 Refrigerators using gas fuel. The installation
must conform with local codes, or in absence of local codes, the following standards as applicable.
In the U.S. the installation must conform with:
National Fuel Gas Code, ANSI Z223.1/NFPA 54
(latest edition).
Recreational Vehicles Code, ANSI A119.2 (latest edition).
Manufactured Home Construction and Safety Standard, Title
24 CFR, Part 3280.
If an external electrical source is utilized, the refrigerator, when
installed, must be electrically grounded in accordance with
local codes or, in the absence of local codes, the National Elec-
trical Code, ANSI/NFPA 70 - (latest edition).
•
•
•
In CANADA, the installation must conform with:
Natural Gas and Propane Installation Code, CSA B149.1
CSA Z240 RV Series, Recreational Vehicles.
Current CSA Z240.4, Gas-equipped Recreational Vehicles
and Mobile Housing.
If an external electrical source is utilized, the refrigerator,
when installed, must be electrically grounded in accordance
with local codes or, in the absence of local codes, the Canadian
Electrical Code, CSA C22.1, Parts I and II - (latest edition).
•
•
•
CERTIFICATION AND CODE REQUIREMENTS
VENTILATION REQUIREMENTS
Certifi ed Vent System Kits
Model
Kit No.
Components
Part no.
RM2351
RM2354
2A
3A
Roof Base
Roof Cover
Lower Side Vent
Lower Side Vent
Upper Side Vent
Lower Side Vent
Power Vent Asm.
Upper Side Vent
Upper Side Vent
Lower Side Vent
Lower Side Vent
3103633.XXX*
3103634.XXX*
3109350.XXX*
RM183
RM123A
RM183
3108705.751**
RM123A
3109492.003
RM183
3109492.003
RM2451
RM2454
RM2551
RM2554
3A
Roof Base
Roof Cover
Lower Side Vent
3103633.XXX*
3103634.XXX*
3109350.XXX*
RM2652
RM2662
RM2663
RM2852
RM2862
RM3862
NDR1062
4A
Roof Base
Roof Cover
Lower Side Vent
3103633.XXX*
3103634.XXX*
3109350.XXX*
GENERAL INFORMATION
Ventilation is one of the requirements for proper cooling
unit operation. The installation should be made in such a man-
ner as to separate the combustion system from the living space
of the mobile home or recreational vehicle. Openings for air
supply or for venting of combustion products should have a
minimum dimension of not less than 1/4 inch.
Proper installation requires one
lower fresh air intake
and one
upper exhaust vent
. Certifi ed installations require one
roof vent
and one
lower side vent.
The ventilation kits shown in this
manual have been certifi ed for use with the different models as
displayed in the “Certifi ed Vent System Kits” table
.
The ventilation kits must be installed and used without
modifi cation! An opening toward the outside at fl oor level
in the refrigerator compartment has be provided for ventila-
tion of heavier-than-air fuel gases. The lower vent of the
recommended kits is provided with proper size openings.
The fl ow of combustion and ventilating air must not be
obstructed.
The lower side vent is fi tted with a panel, which provides
an adequate access opening for ready serviceability of the
burner and control manifold of the refrigerator. This should
be centered on the back of the refrigerator.
* Replace “XXX” with the color code numbers. For color codes,
contact your supplier.
** Alternate instructions forwarded with the Ventilator Kit.
For further information, contact your dealer or distributor.

- 4 -
CLEARANCES
Minimum clearances (in inches) to combustible materials:
Top (
G
) 0
Side (
K
) 0
Bottom (
L
) 0
Rear (
M
1
) 0 / 1
(
RM2351 & RM2354
)
1
M: The distance b
etween the rearmost part of the refrigerator and the
wall behind it.
General view. Features may vary according to model.
VENTILATION HEIGHTS
It is essential that all maximum or minimum dimensions are
strictly maintained, as the performance of the refrigerator is de-
pendent on adequate fl ow of air over the rear of the refrigerator.
Minimum ventilation heights
Roof vent and
lower side vent
Upper and lower
side vent
RM2351
RM2354
inches
mm
inches
mm
31
787
34
864
RM2451
RM2454
37-3/4
960
RM2551
RM2554
44-1/2
1130
RM2652
RM2662
RM2663
57-3/4
1465
RM2852
RM2862
RM3862
NDR1062
63-3/4
1620
A
B
B
Minimum
ventilation
height
Condenser
Condenser
Condenser
Condenser
Condenser
A
Condenser
Condenser
Condenser
Condenser
Condenser
Condenser
The upper vent
should be centered
over the condenser
coil at the back of
the refrigerator.
Minimum
ventilation
height
VENTILATION REQUIREMENTS

- 5 -
VENTILATION REQUIREMENTS
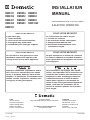
OVERALL AND RECESS DIMENSIONS
Dimensions
Dimensions
Model
Overall
Recess
Height A
Width B
Depth C
Height H
Width W
Depth D
RM2351
RM2354
inches
30-5/32
21-7/8
22-22/32
29-3/4
20-1/2
21-3/8
mm
766
556
577
756
521
542
RM2451
RM2454
inches
37-3/8
24-7/8
24-11/16
39-9/16
23-11/16
24
mm
948
632
627
928
602
610
RM2551
RM2554
inches
43-1/2
24-7/8
24-11/16
42-5/8
23-11/16
24
mm
1104
632
627
1083
602
610
RM2652
RM2662
RM2663
inches
54-21/32
24-7/8
26-1/32
53-3/4
23-11/16
24
mm
1388
632
661
1365
602
610
RM2852
RM2862
RM3862
inches
60-51/64
24-7/8
26-1/32
59-15/16
23-11/16
24
mm
1544
632
661
1522
602
610
NDR1062
inches
60-54/64
24-7/8
26-5/8
59-15/16
23-11/16
24
mm
1544
632
676
1522
602
610
Side view
View from above
General view. Features may vary according to model.

- 6 -
INSTALLATION INSTRUCTIONS
INSTALLING THE REFRIGERATOR
Be careful when installing the refrigerator model
NDR1062
. It is equipped with the latest vacuum
insulated panel technology. These insulating panels
are located on the top, back, bottom, sides and doors.
If the surface is punctured, loss of insulation will oc-
cur, resulting in poor refrigerator performance.
For a proper installation, follow these instructions:
Make sure the fl oor is solid and level.
The refrigerator must be level and installed in a substantial
enclosure.
Do not install the appliance directly on carpeting. Carpet-
ing must be removed or protected by a metal or wood panel
beneath the appliance, which extends at least full width and
depth of the appliance.
RM2451-2454-2551-2554-2652-2662-2663-2852-2862-
3862 & NDR1062
A
wood strip
must be in place across the
upper opening of the enclosure. The top
frame of the refrigerator will be anchored to
the wood strip with screws.
All areas within the recess have to be sealed. The sealing
should provide a provide a complete isolation of the appli-
ance’s combustion system from the vehicle interior.
Make sure there is a complete seal between the front frame
of the refrigerator and the top, sides and bottom of the enclo-
sure. A length of sealing strip is applied to the rear surface of
the front frame for this purpose.
RM2351
and
RM2354
: In addition, apply a sealing strip to
the foremost fl oor of the enclosure.
Be careful not to damage the sealing strip when the
refrigerator is put in place!
•
•
•
•
•
SECURING THE REFRIGERATOR
When installing the refrigerator, make sure the heat can not be
trapped in the space between the refrigerator and storage area.
This would make the top of the refrigerator hot and reduces the
effi ciency of the refrigerator. Any space between the counter,
storage area or ceiling and top of the refrigerator greater than
1½ inches should be blocked.
After the refrigerator has been installed (ensuring a combustion
seal at the front frame) it must be secured in the enclosure with
screws (not included). Note that it is important to follow the
sequence in securing refrigerator since failure in doing that can
cause leakage between the frame and cabinet!
RM2351-2354
Install the fi ve screws in the following order:
Four screws installed through the front frame.
(To cover the screw heads, use the plugs in the parts
bag.)
One screw installed in the rear base.
RM2451-2454-2551-2554-2652-2662-2663-2852-
2862-3862 & NDR1062
Install the six screws in the following order:
Two screws installed through the front base.
(Installation of the lower front strip.)
The refrigerator is provided with a lower front
strip (shipped as a loose part). The front strip is
to be attached after the
refrigerator is set into
the cutout opening.
Install the lower front
strip by sliding it
under the bottom
hinge plate.
The hinge plate can be
on the right or left side
depending on the door swing.
Once the lower front strip is slipped under the
hinge, the part is possible to swing into place.
1.
2.
1.
a)
RM2351-2354RM2451-2454-2551-2554-
2652-2662-2663-2852-
2862-3862 &NDR1062
2
1

- 7 -
INSTALLATION INSTRUCTIONS
Secure the refrigerator and the lower front strip
with two screws: One screw through the hinge
and on the opposite side and then, one screw
through the lower front strip.
Two screws installed in the top frame.
Remove the top decoration panel.
Open the door.
Gently push the tabs out
of the hole in the hinge
with a fl at blade screw-
driver (both sides).
Carefully tilt the top
decoration panel and
lift to remove from top
frame. Be careful not to
damage the circuit board and wires.
Install the two screws in the top frame, the holes
are accessible from underneath.
Seal the opening for the screws with aluminum
tape.
Replace the top decoration panel. Be careful not
to pinch the wires behind the panel. Make sure
the tabs snap back into the holes in the hinge
plate.
Two screws installed in the rear base.
b)
2.
a)
b)
c)
d)
e)
f)
3.
2
1
DRAIN WATER HOSE
A hole must be drilled through fl ooring and the installer needs
to make sure the hose does not kink when run through the fl oor.
Seal around the hose that goes through the drilled hole. If a
longer hose than supplied is required to get the water to drain
outside of the vehicle, the installer will have to supply the extra
length of hose.
CONNECTIONS
Gas connection
Hook up to the gas supply line is accomplished at the manual
gas valve, which is furnished with a 3/8” SAE (UNF 5/8” -18)
male fl are connection. All completed connections should be ex-
amined for leaks using a solution of liquid detergent and water.
Be very careful when working on or near the gas sys-
tem. Do not use an open fl ame to check for gas leaks!
The gas supply system must incorporate a pressure regulator
to maintain a supply pressure of not more than 11 inches water
column. When testing the gas supply system at test pressures:
> 1/2 psi
- the refrigerator and its individual shutoff valve
must be disconnected from the gas supply piping system.
≤ 1/2 psi
- the appliance must be isolated from the gas
supply piping system by closing its individual manual shut-
off valve.
If detailed instructions on the installation and connection to
the gas supply are required, please contact your dealer or
distributor.
•
•
WARNING
!
Hole for drain water hose
RM2351-2354
Hole for drain water hose
RM2451-2454-2551-2554-
2652-2662-2663-2852-
2862-3862 & NDR1062

- 8 -
INSTALLATION INSTRUCTIONS
Testing LP gas safety shut off
The gas safety shut off must be tested after the refrigerator is
connected to LP gas supply.
RM2354-2454-2554-2662-2663-2862-3862 &NDR1062
To test the gas safety shut off, follow these steps:
Start the refrigerator. Switch to GAS mode.
Check that the gas fl ame is lit and the GAS mode
indicator lamp is on.
Close the manual gas shutoff valve at the back of the
refrigerator.
Wait for approx. 6 minutes. The CHECK indicator
lamp should be lit and the GAS mode indicator lamp
should be off.
Remove the protection cover.
Open the manual gas shutoff valve. Do not change
any button positions on the control panel.
Apply a non corrosive commercial bubble solution
to the burner jet orifi ce. No bubbles should appear at
the opening of the burner jet orifi ce. The presence of
bubbles indicates a defective gas safety shutoff, and
service is required.
If no bubbles are present at the burner jet orifi ce,
rinse it with fresh water. Be careful not to damage
the burner jet orifi ce.
Put back the cover.
Press the ON/OFF button once to turn the refrigera-
tor off and then press it again to turn the it back on.
Normal operation of the burner should return.
Allow the burner to operate for a minimum of fi ve
minutes.
RM2351-2451-2551-2652-2852
To test the gas safety shut off, follow these steps:
Start the refrigerator without connecting to
120 V AC.
Check that the gas fl ame is lit. In AUTO mode the
AUTO mode indicator lamp is on.
Then, follow steps 3-11 in instruction above.
1.
2.
3.
4.
5.
6.
7.
8.
9.
10.
11.
1.
2.
3.
Electrical connection
120 V AC connection
The refrigerator is equipped with a grounded three-prong plug
for protection against shock hazards. It should be plugged di-
rectly into a properly grounded three-prong receptacle. Do not
cut or remove the grounding prong from this plug!
The free length of the cord is 2 feet. It should be routed to
avoid direct contact with the burner cover, fl ue cover or any
other components that could damage the cord insulation.
To allow easy access through the vent door, it is recommended
that the receptacle is placed:
To the left of the refrigerator. (On the opposite side of the
refrigerator burner assembly.)
3”
above the refrigerator mounting fl oor
(
RM2662-2663- 2862-3862 & NDR1062
).
4-6”
above the refrigerator mounting fl oor
(
RM2351-2354
)
6”
above the refrigerator mounting fl oor
(
RM2451-2454- 2551-2554-2652-2852
).
•
•
120 Volt AC
receptacle
3” / 6” from the bottom
of the plastic receptacle
above the fl oor
120 V AC
120 V AC
receptacle

- 9 -
INSTALLATION INSTRUCTIONS
12 V DC connection
RM2451-2551-2652-2852
: These refrigerator models are not
designed for 12 V DC operation of the cooling system. How-
ever, 12 V DC must be supplied to operate the controls.
RM2354-2454-2554-2662-2663-2862-3862 & NDR1062
:
These refrigerator models require a continuous 12 V DC sup-
ply to maintain the automatic energy system.
The connection is made to the positive (+) and negative (-)
terminals of the terminal block on back of the refrigerator, see
APPENDIX A - REARVIEW EQUIPMENT
. Correct polarity must
be observed when connecting to the DC supply. Do not use the
chassis or vehicle frame as one of the conductors. Connect two
wires at the refrigerator and route to the DC supply. Ensure the
connections are clean, tight and free from corrosion.
The distance the current must travel from the battery to the
refrigerator dictates the AWG wire size to be used. Should the
wire be too small for the distance, a voltage drop will result
causing a decreased cooling capacity.
CONDUCTOR WIRE SIZE AND LENGTH
WIRE
MODEL
Size
Length
AWG
ft
m
RM2351
RM2451
RM2551
RM2652
RM2662
RM2852
RM2862
RM3862
NDR1062
14
12
17
27
5
8
RM2354
RM2454
RM2554
RM2663
10
8
17
27
5
8
For 3-way models, the voltage drop affects the wattage output
of the 12V cartridge heater and the refrigerator performance.
The 12V DC heater is fused with a 30 amp. in-line blade fuse.
Recommended wire sizes are displayed in the following table:
REVERSING THE DOOR SWING
The refrigerator is equipped with hinges that makes it possible
to change the direction the door opens by moving the hinges to
the opposite side. A special hinge kit must be used in order to
change the door swing. For conversion kit number, refer to the
USER MANUAL (825125700), APPENDIX B - SPARE PARTS
.
MOUNTING THE DOOR PANEL(S)
Optional door insert panels are available for
RM2351-2354-2451-2454-2551-2554-2652-2662-
2663-2852-2862 & NDR1062
. The refrigerator is
normally delivered without door panel(s).
Before starting the mounting work, read this instruction thor-
oughly and check that the panel dimensions are in compliance
with those given in the “Panel dimensions” table
Panel dimensions
max. thickness 5/32" (4 mm)
Height
max
min
Width
max
min
UPPER
mm
403
401
527
524
inch
15-27/32
15-25/32
20-3/4
20-5/8
LOWER /
SINGLE
DOOR
RM2351
RM2354
mm
642
640
498
496
inch
25-9/32
25-3/16
19-5/8
19-17/32
RM2451
RM2454
RM2652
RM2662
RM2663
mm
827
825
527
524
inch
32-9/16
32-1/2
20-3/4
20-5/8
RM2551
RM2554
RM2852
RM2862
NDR1062
mm
983
981
527
524
inch
38-11/16
38-5/8
20-3/4
20-5/8
MOUNTING INSTRUCTIONS

- 10 -
Snap in
To mount the panel, follow these steps:
Open the door 90 degrees.
On new refrigerators,
the decoration strip are
taped inside the door;
if installed on the door,
remove the door decora-
tion strip (2) by gently
pushing the four tabs
away with a fl at blade
screwdriver (1).
Insert the vertical edges
into the grooves of the
door frame (3).
Push the panel down-
wards so that the lower
horizontal edge of the
panel (4) is fi tted into
the bottom grove (5).
Snap in the decoration
strip (2).
1.
2.
3.
4.
5.
RM2351-2354
We recommend to mount the panel on the door before the
refrigerator is installed in the enclosure.
To mount the panel, follow these steps:
Slide the panel from the bottom of the door into the
grooves on the vertical edges of the door .
Push the panel upwards.
Put the two plastic panel stops (from the parts bag)
in the two holes at the lower door frame.
Put the decoration strip across the door and fasten it
with three screws (from the parts bag).
RM2451-2454-2551-2554-2652-2662- 2663-2852-
2862 & NDR1062
With screws
To mount the panel, follow these steps:
Open the door 90 de-
grees.
On new refrigerators,
the decoration strip is
taped inside the door; if
installed on the door, re-
move the door decoration
strip (2) by removing its
three screws (1).
Insert the vertical edges
into the grooves of the
door frame (3).
Push the panel down-
wards so that the lower
horizontal edge of the
panel (4) is fi tted into the
bottom grove (5).
Put the decoration strip
across the door so that
the gap is covered. Se-
cure the decoration strip
with the three screws
removed in step 2.
1.
2.
3.
4.
1.
2.
3.
4.
5.
MOUNTING INSTRUCTIONS
1
1
1
2
1
1
1
3
3
4
5
1
2
2
To remove the refrigerator, follow these steps:
Cap the gas supply line.
Loosen the screws anchoring the refrigerator to the
enclosure.
Slide the refrigerator out of the compartment.
Replacement is the reverse of removal. When reinstalling the
refrigerator, make sure the sealing strips are properly posi-
tioned. Check all connections for gas leaks.
1.
2.
3.
Before removing the refrigerator:
Verify that the AC and DC voltage leads are disconnected.
Shut off the gas supply.
Disconnect the gas supply line at the rear of the refrigerator.
Always use a back up wrench when loosening and tighten-
ing connections.
•
•
•
REFRIGERATOR REMOVAL

- 11 -
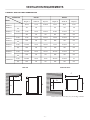
APPENDIX A - REARVIEW EQUIPMENT
RM2351
RM2354
Power module
cove
r
Flexible
cord
12
V DC
Terminal block
Inlet fitting
Manual
gas shutoff valve
Burner jet
Screw for protection cover
Protection
cover
Drain
water hose
Flue baffle
Heate
r
Power module
cove
r
Flexible
cord
12
V DC
Terminal block
Inlet fitting
Manual
gas shutoff valve
Burner jet
Screw
for protection cover
Protection
cover
Drain
water hose
Flue baffle
Hea
ters
Rela
y

- 12 -
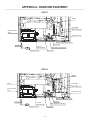
APPENDIX A - REARVIEW EQUIPMENT
12V DC
Relay,
3-
Way only
Power
module
cover
Flexible cord
12
volt DC
Terminal block
Drain
water hose
Inlet
fitting
Manual
gas
shu
toff valve
Burner
jet
Screw
for protection cover
Protectio
n
cover
Flue
baffle
Hea
ter(s)
Thermofuse
Flexible cord
Power
module
cove
r
Relay,
3-way only
12
volt
Terminal block
Drain
water hose
Inlet fitting
Manual gas shutoff valve
Burner
jet
Screw
for protection cover
Heate
r
Flue baffle
Protection cover
12V DC
RM2451-2454-2551-2554
RM2652-2662-2663-2852-2862-3862-NDR1062

- 13 -
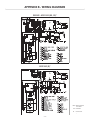
APPENDIX B - WIRING DIAGRAMS
RM2351-2451-2551
RM2354-2454-2554

- 14 -
APPENDIX B - WIRING DIAGRAMS
RM2652-2662-2852-2862
RM2663

- 15 -
APPENDIX B - WIRING DIAGRAMS
RM3862 - NDR1062 (BS, SS)*
* BS = Black stainless
steel doors
SS = Stainless
steel doors
B = Door insert
panels
NDR1062 (B)*

TO THE INSTALLER
PLEASE AFFIX THESE INSTRUCTIONS
TO THE REFRIGERATOR
—
TO THE CONSUMER
PLEASE RETAIN THESE INSTRUCTIONS
FOR FUTURE REFERENCE
-
 1
1
-
 2
2
-
 3
3
-
 4
4
-
 5
5
-
 6
6
-
 7
7
-
 8
8
-
 9
9
-
 10
10
-
 11
11
-
 12
12
-
 13
13
-
 14
14
-
 15
15
-
 16
16


Ask a question and I''ll find the answer in the document
Finding information in a document is now easier with AI
Related papers
-
Dometic RM2351 User manual
-
Dometic RM 2351 User manual
-
Dometic RM2662 User manual
-
-
-
-
-
-
-
Other documents
-
LG SIGNATURE LUPXS3186N Measurement Guide
-
Norcold N614E Installation guide
-
-
-
-
Balboa Cycle Valve 1, 2, & 3 User manual
-
Norcold N641F - Installation guide
-
-
Norcold N62/ N82 Owner's manual
-