Page is loading ...

661 Brea Canyon Rd., Suite 3
Walnut, CA 91789
tel: 909.598.7388, fax: 909.598.0218
© Copyright 2009 Acnodes, Inc.
All rights reserved. Product description and product specifications
are subject to change without notice. For latest product information,
please visit Acnodes’ web site at www.acnodes.com.
RMC 7130
1U Rackmount System
Installation Guide
RMC7130:1U Rackmount System

661 Brea Canyon Rd., Suite 3
Walnut, CA 91789
tel: 909.598.7388, fax: 909.598.0218
© Copyright 2005 Acnodes, Inc.
All rights reserved. Product description and product specifications
are subject to change without notice. For latest product information,
please visit Acnodes’ web site at www.acnodes.com.
RMC 7130
1U Rackmount System
Installing the System into a Rack
(Rack hardware optional)
This section provides information on installing the Acnodes RMC7130 into a rack unit. If the system has
already been mounted into a rack, you can skip ahead to Sections 2-5 and 2-6.
Basic Installation Procedure
The RMC7130 server comes with two rack mounting brackets, which are located on each side at the
front of the chassis. To mount the system into a rack, simply screw these brackets directly to the front of
the rack (two screws for each bracket).
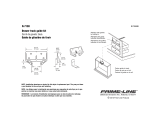
Installing with Rackmount Kit
This section is only for customers that have the optional rack mount kit (CSE-PT8). Each of these as-
semblies consist of two sections: an inner rail that secures to the chassis and an outer rail that secures
directly to the rack itself (see Figure 2-1).
This is a guideline for installing the unit into a rack with the optional rack kit. You should also refer to the
installation instructions that came with the rack unit you are using. Be aware that there are a variety of
rack units on the market, which may mean the assembly procedure will differ slightly.

661 Brea Canyon Rd., Suite 3
Walnut, CA 91789
tel: 909.598.7388, fax: 909.598.0218
© Copyright 2009 Acnodes, Inc.
All rights reserved. Product description and product specifications
are subject to change without notice. For latest product information,
please visit Acnodes’ web site at www.acnodes.com.
RMC 7130
1U Rackmount System
Installing the Chassis Rails
The two rail sections must be detached from each other prior to installation: depress the locking tab on
the inner rail to release it from its locked position then pull the two rails completely apart. Do this for both
the left and right side rack rail assemblies.
Position the fixed chassis rail sections you just removed along the side of the chassis making sure the
three screw holes line up. Note that these two rails are left/right specific. Screw the rail securely to the
side of the chassis (see Figure
2-2). Repeat this procedure for the other rail on the other side of the chassis. You will also need to attach
the rail brackets when installing into a telco rack.
Locking Tabs: Both chassis rails have a locking tab, which serves two functions. The first is to lock the
server into place when installed and pushed fully into the rack, which is its normal position. Secondly,
these tabs also lock the server in place when fully extended from the rack. This prevents the server from
coming completely out of the rack when you pull it out for servicing.
Installing the Rack Rails
Determine where you want to place the server in the rack (see Rack and Server Precautions in Section 2-
3). Position the fixed rack rail/sliding rail guide assemblies at the desired location in the rack, keeping the
sliding rail guide facing the inside of the rack. Screw the assembly securely to the rack using the brackets
provided. Attach the other assembly to the other side of the rack, making sure that both are at the exact
same height and with the rail guides facing inward.

661 Brea Canyon Rd., Suite 3
Walnut, CA 91789
tel: 909.598.7388, fax: 909.598.0218
© Copyright 2005 Acnodes, Inc.
All rights reserved. Product description and product specifications
are subject to change without notice. For latest product information,
please visit Acnodes’ web site at www.acnodes.com.
RMC 7130
1U Rackmount System
Installing the Server into the Rack
You should now have rails attached to both the chassis and the rack unit. The next step is to install the
server into the rack. Do this by lining up the rear of the chassis rails with the front of the rack rails. Slide the
chassis rails into the rack rails, keeping the pressure even on both sides (you may have to depress the
locking tabs when inserting). See Figure 2-3.
When the server has been pushed completely into the rack, you should hear the locking tabs "click".

661 Brea Canyon Rd., Suite 3
Walnut, CA 91789
tel: 909.598.7388, fax: 909.598.0218
© Copyright 2009 Acnodes, Inc.
All rights reserved. Product description and product specifications
are subject to change without notice. For latest product information,
please visit Acnodes’ web site at www.acnodes.com.
RMC 7130
1U Rackmount System
Installing the Server into a Telco Rack
To install the server into a Telco type rack, use two L-shaped brackets on either side of the chassis (four
total). First, determine how far the server will extend out the front of the rack. Larger chassis should be
positioned to balance the weight between front and back. If a bezel is included on your server, remove it.
Then attach the two front brackets to each side of the chassis, then the two rear brackets positioned with
just enough space to accommodate the width of the rack. Finish by sliding the chassis into the rack and
tightening the brackets to the rack. See Figure 2-5.

661 Brea Canyon Rd., Suite 3
Walnut, CA 91789
tel: 909.598.7388, fax: 909.598.0218
© Copyright 2005 Acnodes, Inc.
All rights reserved. Product description and product specifications
are subject to change without notice. For latest product information,
please visit Acnodes’ web site at www.acnodes.com.
RMC 7130
1U Rackmount System

661 Brea Canyon Rd., Suite 3
Walnut, CA 91789
tel: 909.598.7388, fax: 909.598.0218
© Copyright 2009 Acnodes, Inc.
All rights reserved. Product description and product specifications
are subject to change without notice. For latest product information,
please visit Acnodes’ web site at www.acnodes.com.
RMC 7130
1U Rackmount System
Checking the Motherboard Setup
After you install the RMC7130 in the rack, you will need to open the unit to make sure the motherboard is
properly installed and all the connections have been made.
Accessing the Inside of the System (Figure 2-7)
1. Grasp the two handles on either side and pull the unit straight out until it locks (you will hear a "click").
2. Remove the screws from the lips on either side of the chassis top cover, located at the front of the
chassis.

661 Brea Canyon Rd., Suite 3
Walnut, CA 91789
tel: 909.598.7388, fax: 909.598.0218
© Copyright 2005 Acnodes, Inc.
All rights reserved. Product description and product specifications
are subject to change without notice. For latest product information,
please visit Acnodes’ web site at www.acnodes.com.
RMC 7130
1U Rackmount System
3. Next, depress the two buttons on the top of the chassis to release the top cover while pushing the cover
away from you until it stops. You can then lift
the top cover from the chassis to gain full access to the inside of the server.
Checking the Components
1. You may have one processor already installed into the system board. The processor should have its
own heatsink attached. See Chapter 5 for instruc- tions on processor installation.
2. Your system may have come with system memory already installed. Make sure all DIMMs are fully
seated in their slots. For details on adding system memory, refer to Chapter 5.
3. If desired, you can install an add-on card to the system. See Chapter 5 for details on installing a PCI
add-on card.
4. Make sure all power and data cables are properly connected and not block- ing the airflow. See Chap-
ter 5 for details on cable connections. Also, check the air seals for damage. The air seals are located under
the blower fan and beneath the frame cross section that separates the drive bay area from the
motherboard area of the chassis.
/