Canon 5258B001AA User manual

Category
Label printers
Type
User manual

This manual is also suitable for

1
2
Installing the Machine and
Specifying Initial Settings
P. 6
3
Appendix
P. A-1
Installing the Drivers and
Connec
ting to a Computer
P. 18
Read this guide first.
Please read this guide before operating this
product.
The remarks for important safety
instructions are described in the Basic
Operation Guide. Read the guide also.
After you finish reading this guide, store it in
a safe place for future reference.
Starter Guide
Preface
P. 2
2
Setting Up the Machine
Copy Fax
The settings are now complete.
Registering the Sender Information
P. 14
Fax Settings
Selecting the Receive Mode
P. 15
Connecting a Telephone Line
P. 16
Preparing the Toner Cartridges P. 7
Connecting the Handset
P. 12
Specify settings related to the Copy, Print, Fax, and PC Fax functions. Follow the steps in the flowchart below.
Setting Up
Carrying the Machine to the Installation Site and Removing the Packing Materials
P. 6
Turning the Power ON and
Specifying the Initial Settings
Language Settings
Country and Region Settings
Current Time Settings
P. 13
Loading Paper
P. 10
Settings for paper sizes and paper types are required after turning the power ON.
P. 17
Print
PC Fax
USB
Connection
The machine offers the following features.
: Available : Not Available
Copy Print
Fax
(PC Fax)
ADF
(1-sided)
L100
Available Features
Required Operations
Connecting the Power Cord
P. 12
Settings in a Computer
Installing the Software
P. 18
Connecting a USB Cable
P. 19
Installing the Software
P. 21
Connecting a USB Cable to Add the
Machine to the Macintosh.
P.21
For Windows
For Macintosh
3
Checking the Supplied Accessories
1.
Confirm that all the supplied
accessories are contained in the box.
If an item is missing or damaged, please contact our Canon
Authorized Service Facilities or the Canon Customer Care
Center.
The machine unit
The following accessories
are included in the machine.
Small Paper Guide
Toner Cartridge
Basic Operation Guide
Telephone Cable
Supplied Toner Cartridge
The average yield of the included toner cartridge is as follows:
Canon Cartridge 128 Starter Average yield
*1
: 1,000 sheets
*1
The average yield is based on the “ISO/IEC 19752 Standard”
*2
when printing on A4 paper with the default print density setting.
*2
“ISO/IEC 19752” is the global standard related to “Method for the determination of toner cartridge yield for monochromatic electrophotographic printers
and multi-function devices that contain printer components” issued by ISO (International Organization for Standardization).
The average yield of the replacement toner cartridge varies from that of the supplied toner cartridge.
To purchase replacement toner cartridges, see "Replacement Toner Cartridges," in the e-Manual.
About the USB cable
The machine does not come with a USB cable.
Have a USB cable ready, if needed.
Registration Card
Preface
1
Installing the Machine and Specifying Initial Settings
2
Installing the Drivers and Connecting to a Computer
3
Appendix
Power Cord
Starter Guide (This manual)
Speed Dial Labels x2
Limited Warranty Notice
User Software CD-ROM
Small Paper Guide
Toner Cartridge
Basic Operation Guide
For information about advanced operations and
specifications, see the e-Manual included on the User
Software CD-ROM.
For information about machine setup and software
installation, see the Starter Guide.
Read this guide after finishing the
machine setup, for the basic use of the
machine.
Read Important Requirements and
Handling ILUVWĺS[[
Keep this manual for future reference.
Handset
Document Return Tray
Output Tray
1
2
Installing
the M
achine and
Specify
ing Initial Set
ting
s
P. 6
3
Appendix
P. A-
1
Connec
ting to
a Computer
and Install
ing the D
rivers
P. 18
Read this gu
ide rst.
Please re
ad this guide
before operati
ng this
product.
The remark
s f
or import
ant safety
ins
tructions are
desc
ribed
in the Bas
ic
Oper
ation Guide
. Read the guide al
so.
After you
nish read
ing this g
uide, store it in
a safe pl
ace
for future
reference.
Starter Guide
Prefac
e
P. 2
4
User Software CD-ROM
Drivers and Software
The drivers and software included in the CD-ROM supplied with this machine are as follows:
FAX L Drivers
Printer Driver You can print from an application to the machine once you install the printer driver on
your computer.
Fax Driver If you install the fax driver on your computer, you can select “Print” from an application,
select the Canon fax driver as a printer, and specify the output destination and options.
The fax driver converts the data into an image that conforms to standard fax protocols,
so that the data can be printed or saved using the recipients fax machine.
Additional Software Programs
Address Book
Import/Export Tool
You can import or export the address book entries that are registered to the machine
with the Address Book Import/Export Tool.
The Address Book Import/Export Tool is in the [AddressBookTool] folder on the User
Software CD-ROM.
: Supported
: Not Supported
Windows 2000/XP Windows Vista/7 Mac OS X
Printer Driver
(version 10.4.9 or later)
Fax Driver
(version 10.5.8 or later)
Address Book Import/Export Tool
Supported Operating Systems
The newest software:
Depending on the operating system you are using, some functions of the driver software included in the CD-ROM may
not be usable.
The newest software is posted on the Canon web site. Please verify the operating environment etc. and
download the appropriate software if required.
5
Supplied Manuals
Read this manual first.
This manual describes setting up the
machine and installing the software.
Be sure to read this manual before
using the machine.
Starter Guide
Basic Operation Guide
e-Manual
Read this manual next.
This manual describes the basic use of
the machine.
Read the desired chapter
to suit your needs.
The e-Manual is categorized by subject to
find desired information easily.
For details about using the e-Manual, refer
to “Using the e-Manual“ in Appendix.
Preface
Installing the Machine and Specifying Initial Settings
Installing the Drivers and Connecting to a Computer
Appendix
Basic Operation
Copy
Print
Fax
Maintenance and Management
Troubleshooting
Important Safety
Instructions
Setting Up the
Machine
Basic Operation
Using the e-Manual
*
Copy
Fax
Printing
*
Security
Troubleshooting
Maintenance
Specifications
Setting Menu List
Appendix
* The e-Manual is included in the User Software CD-ROM.
This manual
Preface
1
Installing the Machine and Specifying Initial Settings
2
Installing the Drivers and Connecting to a Computer
3
Appendix
1
2
Installing
the M
achine and
Specify
ing Initial Set
ting
s
P.
6
3
Appendix
P.
A-1
Connec
ting to
a Com
puter
and Install
ing the D
rivers
P. 18
Read this gu
ide rst
.
Please re
ad this gui
de before
operating this
prod
uct.
The remark
s for impo
rtant safety
instruc
tions are described in
the Basic
Oper
ation Gui
de. Read the guide al
so
.
After you
nish reading
this guide
, store it in
a s
afe pl
ace for future
reference.
Starter Guide
Prefac
e
P. 2
Basic Operation Guide
For information about advanced operations and
specifications, see the e-Manual included on the User
Software CD-ROM.
For information about machine setup and software
installation, see the Starter Guide.
Read this guide after finishing the
machine setup, for the basic use of the
machine.
Read Important Requirements and
Handling ILUVWĺS[[
Keep this manual for future reference.
Installation Space Requirements
28 1/2" (724 mm)
20 1/2"
(520 mm)
22 1/2"
(572 mm)
Paper
cassette
4" (100 mm)
4" (100 mm)
4"
(100 mm)
4"
(100 mm)
4" (100 mm)
* If you are a Macintosh user, see the following Driver Installation Guide or Help for more details on these functions.
You can find the Driver Guides from the following locations on the User Software CD-ROM.
Canon MF Printer Driver Guide: [UFR II] [us_eng] [Documents] [Guide] [index.html]
Canon Fax Driver Guide: [FAX] [us_eng] [Documents] [Guide] [index.html]
6
2.
Remove the packing materials.
* The location of the packing material may differ, depending on your model.
1.
Take the machine out of the plastic bag, and then carry it to the
installation site.
Hold the grips using both hands. Carry the machine using both hands. Do not attempt
to carry the machine using the only one hand.
Carrying the Machine to the Installation Site
and Removing the Packing Materials
Remove the tape (1 location).
* Do not remove the cap on
the USB port at this stage.
Uncap when installing for USB
connection.
Remove the tape (6 locations).
Make sure that the following
packing materials are all removed
from the machine:
Check!
Tape x 9
Remove the tape while opening
the paper cassette.
Remove the tape (1 location).
7
Preface
1
Installing the Machine and Specifying Initial Settings
2
Appendix
Installing the Drivers and Connecting to a Computer
3
Preparing the Toner Cartridges
1.
Lift the feeder.
Lift the upper unit. Hold the upper unit.
2.
Open the toner cover.
Open the toner cover. Hold the grip on the left front side of toner cover.
3.
Remove the packing materials from the toner cartridge, and then
distribute the toner.
Remove the packing material. Turn the sheet to the back. Remove the toner cartridge.
8
Gently shake the toner cartridge from side-to-
side five to six times.
This part (a plastic part
attached to the end of
paper) is also a packing
material. Be sure to
remove it.
Remove the packing material.
Lift the tab.
Place the toner cartridge on a flat surface,
and then lift the tab.
Pull the sealing tape completely out.
The full length of the sealing tape is
approximately 20” (50 cm).
Protrusion
Protrusion
Insert the toner cartridge.
Fit the protrusions on each side of the toner cartridge into
the guides located on each side of the machine. Slide the
toner cartridge into the machine.
Did you remove all the packing materials?
Check!
Packing materials x2
Packing material with a sheet x1
Sealing tape x1
Remove the packing material.
9
Preface
1
Installing the Machine and Specifying Initial Settings
2
Appendix
Installing the Drivers and Connecting to a Computer
3
4.
Close the toner cover, and then lower the upper unit.
The serial number is located on the rating label centered on
the rear side of the machine (a character string of 3 letters and
a 5-digit number).
Write down the information here (on the
back cover of the Basic Operation Guide).
Rating label
FT5-XXXX (XXX) XXXXXXXXXX © CANON INC. 2013 PRINTED IN xxxxxx
CANON INC.
30-2, Shimomaruko 3-chome, Ohta-ku, Tokyo 146-8501, Japan
CANON MARKETING JAPAN INC.
16-6, Konan 2-chome, Minato-ku, Tokyo 108-8011, Japan
CANON U.S.A., INC.
One Canon Park, Melville, NY 11747, U.S.A.
CANON EUROPA N.V.
Bovenkerkerweg 59, 1185 XB Amstelveen, The Netherlands
CANON CHINA CO. LTD.
15F Jinbao Building No.89, Jinbao Street, Dongcheng District, Beijing 100005, PRC
CANON SINGAPORE PTE LTD
1 HarbourFront Avenue, #04-01 Keppel Bay Tower, Singapore 098632
CANON AUSTRALIA PTY LTD
1 Thomas Holt Drive, North Ryde, Sydney NSW 2113, Australia
CANON GLOBAL WORLDWIDE SITES
http://www.canon.com/
Serial No.
Date of Purchase
Write down the serial number and purchase date on the back cover of the Basic Operation Guide enclosed in the package.
You need this information when contacting your local authorized Canon dealer or Canon Customer Care Center.
Lower the upper unit. Close the toner cover.
10
Loading Paper
2.
Load the paper, and then adjust the paper guides.
1.
Lift the dust cover.
Load limit guide
Load the paper.
Load the paper until the edge of the paper stack
meets the back of the paper cassette.
Spread the paper guides.
Spread the paper guides a little
wider than the paper size.
Adjust the paper guides tightly
to the length of the paper.
Adjust the paper guides tightly
to the width of the paper.
When using envelopes
For details on how to load media,
see “Basic Operation Guide.
Ensure that the
paper stack does not
exceed the load limit
guides.
Check!
When changing the size of the paper
to be loaded
Make sure to set the proper paper size
and type.
“Setting a Paper Size and Type” (P. 17)
11
Preface
1
Installing the Machine and Specifying Initial Settings
2
Appendix
Installing the Drivers and Connecting to a Computer
3
3.
Close the dust cover.
Lift the document
stopper.
Place the document tray
in the machine.
Additional preparations for printing
Place the output tray in the machine.
Lift the paper
stopper.
Pull out the document feeder tray.
12
Connecting the Handset
Connecting the Power Cord
Do not connect the USB cable. Connect the USB cable when installing the software.
Ensure that the machine is
turned off.
Plug the power plug into the
power socket on the machine.
Plug the power plug into an
AC power outlet.
OFF
Place the handset in the cradle. Connect the handset’s telephone line
to the handset jack.
13
Preface
1
Installing the Machine and Specifying Initial Settings
2
Appendix
Installing the Drivers and Connecting to a Computer
3
2.
Specify the initial settings.
Press [ ] or [ ] to highlight
an item, and then press [OK].
Read the messages, and then press [OK].
Open toner cover;see
if orange packing
material is removed.
Check that tabs/tape
are removed from
toner cartridge.
Check that paper is
loaded in Drawer 1.
Next NextNext
Language
English
French
Portuguese
Spanish
Press [ ] or [ ] to highlight
an item, and then press [OK].
Select Country/Region
United States (US)
Canada (CA)
Brazil (BR)
Mexico (MX)
Move the cursor by pressing [ ] or [ ].
Press [ ] or [ ] to select the number or
switch to <AM> or <PM>.
Enter the date and time,
and then press [OK].
Current Time Set.
Must rechg. battery
for 24 hrs. to save
time settings.
After turning main
Check the screen,
and then press [OK].
Current Time Set.
01/01/2011 12:52 AM
(0:00-12:59)
Turning On the Machine and Specifying the
Initial Settings
1.
Turn ON the machine.
ON
The machine enters the Sleep mode to conserve energy
when you do not operate the machine for a certain period
of time. To cancel the Sleep mode, press the [ ] (Energy
Saver) key on the operation panel.
14
3 .
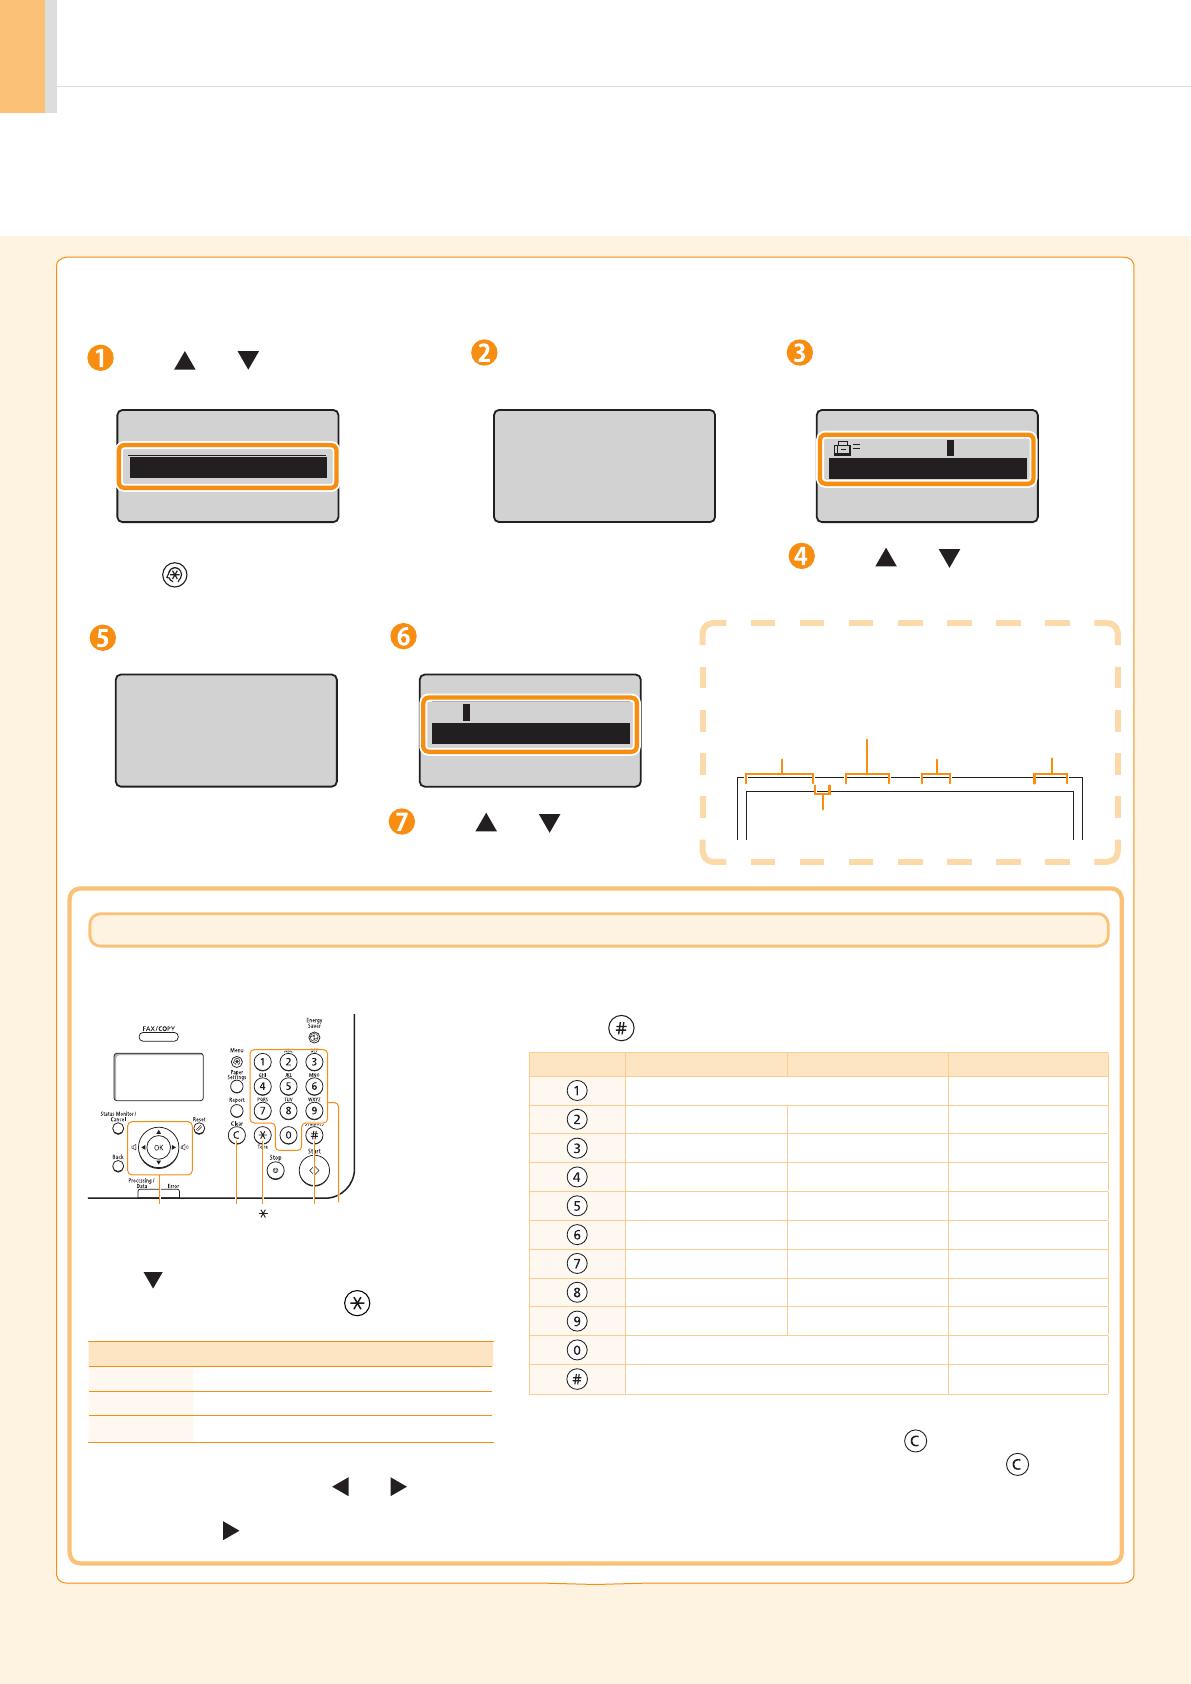
Register the fax number and unit name.
Press [ ] or [ ] to highlight
<Set Up Now>, and then press [OK].
To display the “Fax Setup Guide” if you highlight <Set Up Later>,
press [
] (Menu) <Fax TX Settings> <Fax Setup Guide>.
Press [ ] or [ ] to highlight
<Apply>, and then press [OK].
Press [OK].
Perform fax setup?
Set up Now
Set up Later
Enter the unit’s
telephone number.
Register Unit Tel No.
031234567
<Apply>
+
What happens with the unit name
Once the information has been registered, it is printed at
the top of each page that y
ou send.
Sending Date/Time
Fax/Telephone Number
(FAX No.)
Page Number
Sender Name
(Unit Name)
Telephone Number
Mark
01/01/2011 02:07 PM FAX 123XXXXXXX CANON P.0001
Enter information (text, symbols, and numbers)
using the following keys.
#C
Numeric
keys
ŸźŻ Ź
OK
Entering text, symbols, and numbers
Enter text, symbols, and numbers using the numeric keys
or press [
] (SYMBOLS).
Key Entry mode: <A> Entry mode: <a> Entry mode: <12>
@ . - _ / 1
ABC abc 2
DEF def 3
GHI ghi 4
JKL jkl 5
MNO mno 6
PQRS pqrs 7
TUV tuv 8
WXYZ wxyz 9
(Not available) 0
- . * # ! “ , ; : ^ ` _ = / | ‘ ? $ @ % & + \ ( ) [ ] { } < > (Not available)
Deleting text, symbols, or numbers
To delete text, numbers, and symbols, press [
] (Clear).
To delete all text, numbers, and symbols, press and hold [
] (Clear).
Entering Text
Changing the entry mode
Press [ ] to highlight <Entry Mode>, and then
press [OK]. You can also press [
] (Tone) to
change the entry mode.
Entry Mode Text that Can Be Entered
<A> Uppercase letters and symbols
<a> Lowercase letters and symbols
<12> Numbers
Moving the cursor (entering a space)
Move the cursor by pressing [ ] or [ ]. To enter
a space, move the cursor to the end of the text,
and then press [ ].
Register the unit
telephone number for
this machine.
*Next Screen: Press OK
Press [OK].
Press [ ] or [ ] to highlight
<Apply>, and then press [OK].
Enter.
Register Unit Name
ABC
<Apply>
Entry Mode: A
Register unit name.
(Sender name,
company name, etc.)
*Next Screen: Press OK
15
4.
Select the fax receive mode.
The receive mode is set to <Auto>.
Proceed to Step 5.
Receive faxes automatically.
A handset or an external telephone does not have to be connected.
Do you want to use
this machine for fax
only (no telephone)?
Yes
No
Do you want to auto-
receive faxes and
answer phone manually?
Yes
No
Do you want to use
an answering machine
to answer the phone?
Yes
No
The receive mode is set to <Fax/Tel Auto Switch>.
Proceed to Step 5.
Receive faxes automatically.*
You can respond to a telephone call by picking up the handset.
A handset or an external telephone must be connected to the
machine.
The receive mode is set to <Answer>.
Proceed to Step 5.
Receive faxes automatically.
You can respond to telephone calls using the built-in answering
function.
An external telephone must be connected.
The receive mode is set to <Manual>.
Proceed to Step 5.
Receive faxes automatically.
A handset or an external telephone must be connected to the
machine.
You can specify how the machine should operate for a fax call or telephone call.
By answering the prompts that appear on the display, you can set the machine
to one of the following four operation modes.
Yes
Yes
Yes
No
No
No
Preface
1
Installing the Machine and Specifying Initial Settings
2
Appendix
Installing the Drivers and Connecting to a Computer
3
For details about each fax receive mode:
See “RX Mode” in the e-Manual.
16
5.
Connect the telephone line.
Press [OK].
The screen that appears varies depending on the receive mode selected.
Connect the machine to the telephone line connector.
The fax settings and connections have been completed.
Restart the machine for the settings to take effect.
Turn OFF the machine, wait for at least 10 seconds, and then turn it back ON.
Press [
] to highlight <Yes>,
and then press [OK].
Press [OK] after the
telephone line has been
connected.
Press [OK].
OK
Setting is complete.
Turn the main power
OFF and ON.
End Fax Setup
Guide?
NoYes
Telephone line
connector
Connect an external telephone to the machine when using <Fax/Tel Auto Switch>,
<Answer>, or <Manual> mode and an external telephone.
To connect an external telephone that includes fax functions
Make sure to disable its automatic fax reception feature
so it does not receive faxes automatically.
Telephone
17
6.
Change the telephone line type.
By default, the telephone line type is set to tone dialing. Skip the following steps in the procedure below if you select tone
dialing.
Follow the steps in the procedure below to select pulse dialing.
Contact your local telephone company if you are not sure of the line type that you are using.
Press [
] (Menu).
Press [ ] or [ ] to highlight <Fax TX Settings>, and then press [OK].
Press [ ] or [ ] to highlight <Basic Settings>, and then press [OK].
Press [ ] or [ ] to highlight <Select Line Type>, and then press [OK].
Press [ ] or [ ] to highlight the line type that you are using, and then press [OK].
<Pulse>: Pulse dialing
<Tone>: Tone dialing (Default)
Press [
] (Menu) to close the Menu screen.
Preface
1
Installing the Machine and Specifying Initial Settings
2
Appendix
Installing the Drivers and Connecting to a Computer
3
Press [
] (Paper Settings).
Press [ ] or [ ] to highlight
<Drawer 1>, and then press [OK].
Paper Settings
Drawer 1
1
Setting a Paper Size and Type
Press [
] (Paper Settings) to
close the <Paper Settings> screen.
Press [ ] or [ ] to highlight
<Paper Type>, and then press [OK].
Paper Type
Plain (16 lb Bond-24
Plain L (16 lb Bond
...
Heavy 1 (24 lb Bond...
Heavy 2 (28 lb Bond...
Press [ ] or [ ] to highlight
<Paper Size>, and then press [OK].
Paper Size
LTR
LGL
STMT
EXEC
18
Installing the Software
1.
Turn on the computer, and then log on as a user with
administrative privileges.
If you are already logged on, exit all applications that are running.
Do not connect the USB cable yet.
Connect the USB cable after installing the software.
If you connected the USB cable to the machine before installing the drivers:
Windows 7
1. Disconnect the USB cable from the computer.
2. Follow the procedures below from step 1.
Windows Vista/XP
If the dialog box on the right appears:
1. Disconnect the USB cable from the computer.
If the dialog box disappears, follow the procedures below from step 1.
2. Click [Cancel].
3. Follow the procedures below from step 1.
2.
Install the FAX L Drivers.
Insert the CD-ROM.
If the CD-ROM Setup screen does not appear:
Windows XP
1. From the [Start] menu, select [Run].
2. Enter "D:\Minst.exe", and then click [OK].
Windows Vista/7
1. Enter "D:\Minst.exe" in [Start Search] or [Search programs and
files] under the [Start] menu.
2. Press the [ENTER] key on the keyboard.
* The CD-ROM drive name is indicated as "D:" in this manual. The CD-ROM drive
name may differ, depending on the computer you are using.
Click
Click
Read the contents of the License
Agreement.
(For Windows)
Click
[Easy Installation] installs the following software.
Printer driver
Fax driver
e-Manual
* For Windows 2000 users, see “For Windows 2000
Users” (P. A-5)
19
Preface
1
Installing the Machine and Specifying Initial Settings
2
Installing the Drivers and Connecting to a Computer
3
Appendix
Checking the Installation Results
P. 20
When a dialog box is displayed
Follow the on-screen instructions and complete the installation.
3.
Connect the USB cable.
(A)
(A)
(B)
Remove the cap plug(A).
Remove by pulling on the string.
Connect the cable.
Flat end (A):
Connect to the USB port
on the computer.
Square end (B):
Connect to the USB port
on the machine.
Click Click
Follow the on-screen instructions to
install the manual.
Read the displayed information.
Select
Click
Click
Ensure that [
] is selected.
Remove the CD-ROM once this
screen appears.
Select the [Restart Computer Now
(Recommended)] check box.
Click
20
Ensure that the FAX L Drivers or the e-manual are installed correctly.
Ensure that the icons for the installed software are added as follows.
Refer to the “User Software CD-ROM” ( P. 4) for the functions of each software.
Software Location Icon
Printer Driver
Printer folder
Windows 2000
From the [Start] menu, select [Settings] [Printers].
Windows XP Professional
From the [Start] menu, select [Printers and Faxes].
Windows XP Home Edition
From the [Start] menu, select [Control Panel] [Printers and Other Hardware]
[Printers and Faxes].
Windows Vista
From the [Start] menu, select [Control Panel] [Printers].
Windows 7
From the [Start] menu, select [Devices and Printers].
Fax driver
e-Manual Desktop
How to Use the Online Help
In the Online Help, all the functions of the driver software and information about options are included. If you want to
view descriptions of the functions and settings when using the driver software, use the Online Help.
How to display
the Help screen
(1) Select [File]
[Print] from the menu bar in the
application.
(2) Select the printer in [Select Printer] or [Name] in the
[Print] dialog box.
(3) Click [Preferences] or [Properties].
(4) Click [Help].
Checking the Installation Results
About Icons that Are Displayed:
Icons for each driver may be displayed separately or only representative icon may be displayed depending on the
operating system.
(For Windows)
  • Page 1 1
  • Page 2 2
  • Page 3 3
  • Page 4 4
  • Page 5 5
  • Page 6 6
  • Page 7 7
  • Page 8 8
  • Page 9 9
  • Page 10 10
  • Page 11 11
  • Page 12 12
  • Page 13 13
  • Page 14 14
  • Page 15 15
  • Page 16 16
  • Page 17 17
  • Page 18 18
  • Page 19 19
  • Page 20 20
  • Page 21 21
  • Page 22 22
  • Page 23 23
  • Page 24 24
  • Page 25 25
  • Page 26 26
  • Page 27 27
  • Page 28 28

Canon 5258B001AA User manual

Category
Label printers
Type
User manual
This manual is also suitable for

Ask a question and I''ll find the answer in the document

Finding information in a document is now easier with AI