Chromalox HVH Installation guide

Category
Space heaters
Type
Installation guide

Chromalox HVH is a versatile unit heater designed for both horizontal and vertical airflow, making it suitable for various heating applications. It features adjustable airflow direction, allowing you to target specific areas or distribute heat evenly throughout a large space. With its powerful heating capabilities, the HVH can efficiently warm up rooms, workshops, garages, and other large indoor areas. Its sturdy construction and multiple mounting options ensure easy installation and long-lasting performance.

Chromalox HVH is a versatile unit heater designed for both horizontal and vertical airflow, making it suitable for various heating applications. It features adjustable airflow direction, allowing you to target specific areas or distribute heat evenly throughout a large space. With its powerful heating capabilities, the HVH can efficiently warm up rooms, workshops, garages, and other large indoor areas. Its sturdy construction and multiple mounting options ensure easy installation and long-lasting performance.

1
Installation Instructions
Type HVH
Horizontal/Vertical
Unit Heater
PF505-10
161-305679-001
May 2019
2
3
HVH Horizontal/Vertical Unit Heater
Heater Location Instructions:
Arrange units so their discharge air streams:
A. Are subjected to a minimum of interference from
columns, machinery and partitions.
B. Wipe exposed walls without blowing directly at
them.
C. Are directed away from room occupants in comfort
heating.
D. Are directed along the windward side when in-
stalled in a building exposed to a prevailing wind.
E. See additional mounting limitations in Table D.
Locate thermostat on interior partition walls or posts
away from cold drafts, internal heat sources and away
from heater discharge air streams.
Small rooms can be heated by one unit heater. Where
two walls are exposed, the heater should be mounted
as shown in Figure 1.
Large rooms require multi-unit installation. Number and
capacity of units will be determined by volume of build-
ing and square feet of floor area to be heated. Arrange
units to provide perimeter air circulation where each
unit supports the air stream from another.
Exposed
Exposed
Exposed
Exposed
Exposed
Exposed
Figure 1 - Single and Multi Unit Mounting
Failure to understand and follow these installation in-
structions and the “WARNING” notes therein may re-
sult in serious personal injury from electrical shock, or
from the heater falling due to faulty installation.
This heater is not intended for use in hazardous
atmospheres where flammable vapors, gases,
liquids or other combustible atmospheres are
present as defined in the National Electric
Code. Failure to comply can result in explosion
or fire. For these applications see PDS CXH-
AEP (PF490).
ELECTRIC SHOCK HAZARD. Disconnect all
power before installing or servicing heater.
Failure to do so could result in personal injury
or property damage. Heater must be installed
or serviced by a qualified person in accordance
with the National Electrical Code, NFPA 70.
This heater is not intended for use in exposed
outdoor, marine, or wash-down environments
or in areas where corrosive liquids or fumes
exist under normal conditions.
ELECTRIC SHOCK HAZARD. Any installation
involving electric heaters must be performed
by a qualified person and must be effectiv-
ley grounded in accordance with the National
Electrical Code to eliminate shock hazard.
Do not mount mercury type thermostat directly on unit.
Vibration could cause heater to malfunction.
The heater must be mounted at least 7’ above the floor
to prevent accidental contact with the heating ele-
ments or fan blade which could cause injury.
Keep at least 5’ clearance in front of the heater. Refer to
Table D for side, top and back clearance requirements.
The ceiling mounting structure and the anchoring pro-
visions must be of sufficient strength to support the
combined weight of the heater and mounting bracket.
(Refer to Table B for weights of heater and bracket.)
General
Warning
4
The wall or mounting surface, and the anchoring pro-
visions must be capable of supporting the combined
weight of the heater and mounting brackets cantilevered
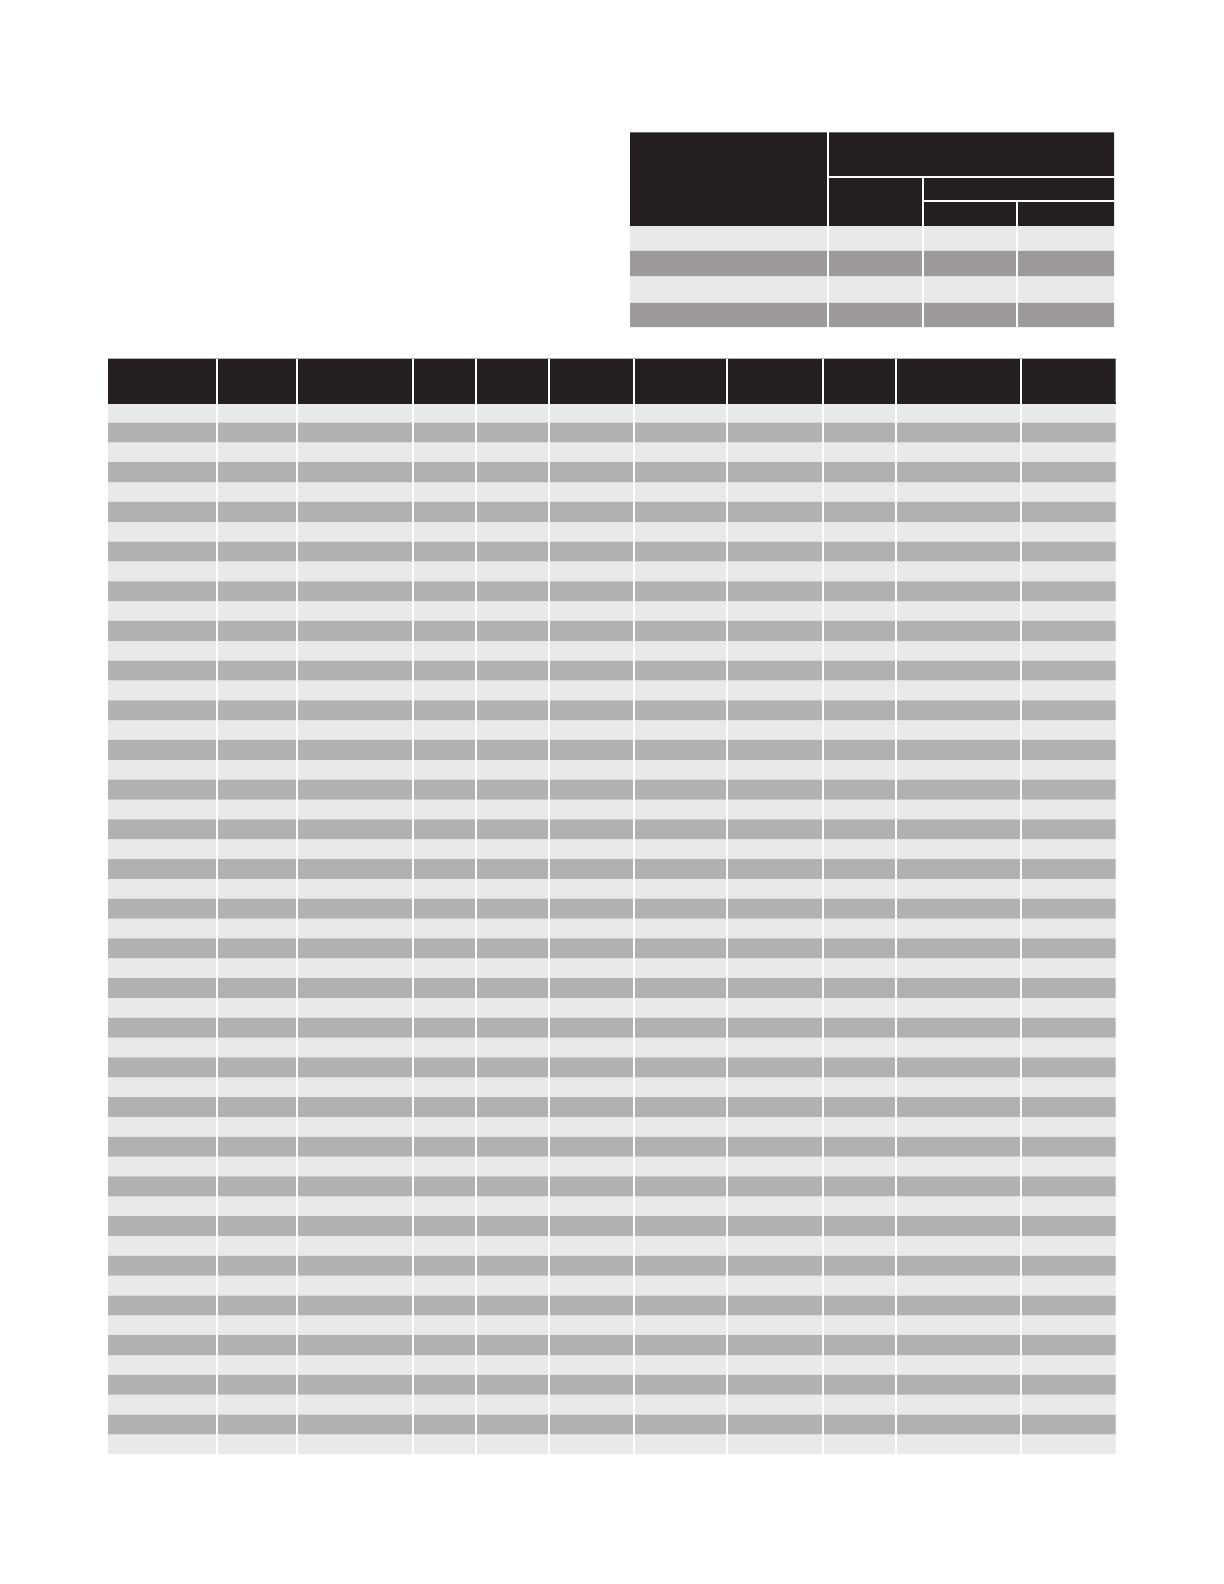
from the mounting surface. (Refer to Table B for weights
of heater and brackets and for cantilevered force ex-
pressed in foot-pounds.)
Fan blade rotation must be checked. If airflow is not mov-
ing out through the louvers, interchange any two of the
three customer power leads on three-phase units only.
Table B Weights of Heater & Bracket
Model
WEIGHT (Lbs.)
Heater and Brackets
Ceiling
Weight
Wall
Weight Ft.-Lbs.
HVH-02 to HVH-05 27 25-1/2 48
HVH-15 to HVH-20 55 67-1/4 112
HVH-25, 30, 35 108 105 126.3
HVH-40, 45, 50 118 115 138.4
Specifications Table A
Model Volts Watts Phase Amps BTU
A
Height
B
Width
C
Depth
Std. Contactor
Rating (Qty.)
Wiring
Dia. Figure
HVH-02-81 208 2,667 1 12.8 8,850 16-1/8 13 10 —— 10
HVH-02-21 208/240 2000/2,667 1 11.1* 8,850 16-1/8 13 10 —— 10
HVH-02-71 277 2,667 1 9.6 8,850 16-1/8 13 10 —— 10
HVH-04-81† 208 4,000 1 19.2 13,661 16-1/8 13 10 —— 10
HVH-04-83† 208 4,000 3 11.2 13,661 16-1/8 13 10 30A (1) 12
HVH-04-21† 208/240 3,000/4,000 1 16.7* 13,661 16-1/8 13 10 —— 10
HVH-04-23† 208/240 3,000/4,000 3 9.6* 13,661 16-1/8 13 10 30A (1) 12
HVH-04-71 277 4,000 1 14.5 13,661 16-1/8 13 10 —— 10
HVH-04-43 480 4,000 3 4.8 13,661 16-1/8 13 10 30A (1) 11
HVH-05-81† 208 5,000 1 24.0 17,076 16-1/8 13 10 —— 10
HVH-05-83† 208 5,000 3 13.8 17,076 16-1/8 13 10 30A (1) 12
HVH-05-21† 208/240 3,750/5,000 1 20.8* 17,076 16-1/8 13 10 —— 10
HVH-05-23† 208/240 3,750/5,000 3 12.1* 17,076 16-1/8 13 10 30A (1) 12
HVH-05-71 277 5,000 1 18.2 17,076 16-1/8 13 10 —— 10
HVH-05-43 480 5,000 3 6.0 17,076 16-1/8 13 10 30A (1) 13
HVH-07-81† 208 7,500 1 36.1 25,598 20-5/8 17-1/8 12-3/4 50A (1) 12
HVH-07-83 208 7,500 3 20.9 25,598 20-5/8 17-1/8 12-3/4 30A (1) 12
HVH-07-21† 208/240 5,625/7,500 1 31.1* 25,598 20-5/8 17-1/8 12-3/4 30A (1) 12
HVH-07-23 208/240 5,625/7,500 3 18.1* 25,598 20-5/8 17-1/8 12-3/4 30A (1) 12
HVH-07-71 277 7,500 1 27.2 25,598 20-5/8 17-1/8 12-3/4 30A (1) 12
HVH-07-43 480 7,500 3 9.0 25,598 20-5/8 17-1/8 12-3/4 30A (1) 13
HVH-10-81† 208 10,000 1 48.0 34,130 20-5/8 17-1/8 12-3/4 50A (1) 12
HVH-10-83 208 10,000 3 27.8 34,130 20-5/8 17-1/8 12-3/4 30A (1) 12
HVH-10-21† 208/240 7,500/10,000 1 41.7* 34,130 20-5/8 17-1/8 12-3/4 30A (1) 12
HVH-10-23 208/240 7,500/10,000 3 24.0* 34,130 20-5/8 17-1/8 12-3/4 30A (1) 12
HVH-10-43 480 10,000 3 12.0 34,130 20-5/8 17-1/8 12-3/4 30A (1) 13
HVH-12-83 208 12,500 3 34.8 42,663 20-5/8 17-1/8 12-3/4 50A (1) 12
HVH-12-23 208/240 9,375/12,500 3 30.1* 42,663 20-5/8 17-1/8 12-3/4 50A (1) 12
HVH-12-43 480 12,500 3 15.1 42,663 20-5/8 17-1/8 12-3/4 30A (1) 13
HVH-15-83 208 15,000 3 41.8 51,195 20-5/8 17-1/8 12-3/4 50A (1) 12
HVH-15-23 208/240 11,250/13,000 3 36.2* 51,195 20-5/8 17-1/8 12-3/4 50A (1) 12
HVH-15-43 480 15,000 3 18.1 51,195 20-5/8 17-1/8 12-3/4 30A (1) 13
HVH-20-23 208/240 14,758/19,500 3 47.0 66,534 20-5/8 17-1/8 14-1/16 50A (2) 15
HVH-20-43 480 19,500 3 23.5 66,534 20-5/8 17-1/8 14-1/16 50A (1) 14
HVH-20-63 600 19,500 3 18.8 66,534 20-5/8 17-1/8 14-1/16 50A (1) 14
HVH-25-23 208/240 18,720/24,900 3 60.0 84,959 29-3/16 26-1/16 14-5/8 50A (2) 15
HVH-25-43 480 25,000 3 30.2 85,300 29-3/16 26-1/16 14-5/8 50A (1) 14
HVH-25-63 600 25,000 3 24.1 85,300 29-3/16 26-1/16 14-5/8 50A (1) 14
HVH-30-23 208/240 22,400/29,900 3 72.1 102,019 29-3/16 26-1/16 14-5/8 50A (2) 15
HVH-30-43 480 30,000 3 36.2 102,360 29-3/16 26-1/16 14-5/8 50A (1) 14
HVH-30-63 600 30,000 3 29 102,360 29-3/16 26-1/16 14-5/8 50A (1) 14
HVH-35-23 208/240 25,600/34,000 3 81.9 116,008 29-3/16 26-1/16 14-5/8 50A (3) 15
HVH-35-43 480 34,000 3 41 116,008 29-3/16 26-1/16 14-5/8 50A (1) 14
HVH-35-63 600 34,200 3 33 116,690 29-3/16 26-1/16 14-5/8 50A (1) 14
HVH-40-23 208/240 28,000/37,400 3 90.1 127,609 29-3/16 26-1/16 14-5/8 50A (3) 16
HVH-40-43 480 37,400 3 45.1 127,609 29-3/16 26-1/16 14-5/8 50A (1) 14
HVH-40-63 600 37,500 3 36.2 127,950 29-3/16 26-1/16 14-5/8 50A (1) 14
HVH-45-23 208/240 33,700/44,800 3 107.9 152,858 29-3/16 26-1/16 14-5/8 50A (3) 16
HVH-45-43 480 44,800 3 54 152,858 29-3/16 26-1/16 14-5/8 50A (2) 15
HVH-45-63 600 45,200 3 43.6 154,222 29-3/16 26-1/16 14-5/8 50A (1) 14
HVH-50-23 208/240 38,400/50,000 3 123.1 174,353 29-3/16 26-1/16 14-5/8 50A (3) 16
HVH-50-43 480 50,000 3 61.6 174,353 29-3/16 26-1/16 14-5/8 50A (2) 15
HVH-50-63 600 50,000 3 49.5 175,036 29-3/16 26-1/16 14-5/8 50A (2) 15
*Note: 208V amperage is 86% of 240V value. † These models can be field changed from single phase to three phase or three phase to single phase.
5
NOTICE – These heaters are designed for wall and
ceiling mount.
Other modes of mounting void factory warranty.
Vertical Air Flow
1. Height above floor
A.
It is recommended that the heater only be used
with ceiling heights of 12 feet or greater. Minimum
spacing to ceiling is 6 inches, use 3/8-18” thread
stock (supplied by others) as shown in Figure 3.
B. Mimimum mounting height is 10 feet from floor
to bottom of heater.
2. Spacing to walls.
A.
Side of case to wall 6”. Top or bottom of case to
back wall is 10-1/4” (HVH-02 to HVH-05), 13” (HVH-
15 to HVH-20) and 15-1/2” (HVH-25 to HVH-50).
Figure 2 - Wall and Ceiling Clearance
CEILING (Vertical Airflow):
A. The heater can be rod mounted to the ceiling by
installing four (4) threaded mounting rods in the
threaded holes located on the top of the heater
as shown in Figure 3. (Refer to Table C for mount-
ing rod thread size.)
XX
L2
L1
CL
CL
Back Wall
Side Wall
ADDITIONAL THREADED
MOUNTING HOLES FOR
HVH-25 TO HVH-50
3/8-18 THREADED
MOUNTING HOLES
TERMINAL BOX ACCESS
DOOR
Figure 3 - Rod Spacing
B. Securely attach the four (4) mounting rods to
the ceiling. (Refer to Table D for wall and ceiling
clearances, and Figure 2 for mounting spacing
specifications.)
KO FOR CONTROL WIRING
KO FOR POWER WIRING
TERMINAL BOX
ACCESS DOOR
Figure 4 - Heater Back View
Knockout Sizes
HVH-02 - 05 1/2” 3/4” (1)
HVH-07 - 20 1/2” 1” (1)
HVH-25 - 50 1-1/4” 2” (1)
Table CRod Thread Type and Spacing Dimensions
(inches) for Vertical Discharge.
Unit
Rod
Thread Type
Dimensions – (In.)
L1 L2 X
2-5 kW 3/8-16 2-7/8 7-1/8 3-3/4
7-1/2 - 20 kW 3/8-16 4-5/16 9-3/8 5-1/2
25 - 50 kW 3/8-16 8-15/16 14 9-15/16
Table DClearance Requirements (Vertical Discharge)
Model
Mounting Limitations (In.)
Back to
Wall
Side to
Wall
Top to
Ceiling
HVH-02 thru HVH-05 10-1/4 6 6
HVH-07 thru HVH-20 13 6 6
HVH-25 thru HVH-50 15-1/2 6 6
Horizontal Air Flow
1. Height above floor
A. In areas where ceiling height is more that 12 feet,
recommended mounting height is approximately
10 feet to underside of heater.
B. For ceiling heights of 12 feet or less, maximum
mounting height is detemined by the use of the
mounting bracket offered for these heaters. Mini-
mum spacing to ceiling is 7-3/4”. (See Figure 5)
C. In either case, the mimimum mounting height is 7
feet from floor to bottom of heater.
2. Spacing to adjacent walls.
A. Rear of case to back wall 2” minimum.
B. Side of case to side wall 6” minimum.
Installation
6
CEILING – Horizontal Airflow (See Figure 5):
The ceiling mounting bracket is fastened to the top
of the heater using the four (4) bolts supplied with the
mounting bracket. The bracket is then mounted to the
ceiling using a 5/8” bolt (by others).
WALL – Horizontal Airflow (See Figure 6):
Wall mounting requires the HVW Bracket Kit. Follow
figure 6 to properly install the bracket adapter and
swivel bracket. The bracket kits include all hardware
require to install bracket to heater only. Complete in-
stallation requires additional bolts (not supplied) to se-
cure to wall. HVH heaters up to 20kW require 4 x 3/8”
bolts. Heaters above 20kW include a larger anti-sway
bracket that requires an additional two bolts for a total
of 6 x 3/8” bolts.
The heater may be rotated to discharge in the desired
direction. Open and adjust louvers to desired position.
See Figure 5 and 6 for additional mounting details.
A
B
V
N
W
C
M
U
CL OF BOLT
CEILING
CEILING
FOR SWIVEL MOUNTING
TO CEILING, USE ONE
5/8" LAG BOLT. FOR FIXED
MOUNTING TO CEILING, USE
FOUR 3/8" LAG BOLTS
WALL
W= MINIMUM DISTANCE FROM WALL TO ALLOW FOR FULL 180˚ SWIVEL
BACK OF HEATER
Bracket
Model No.
Dimensions (in.)
Wt.
(Lbs.) Use WithA B C M N U V W
HVC-1 16-1/8 13 10 8-3/8 5-3/4 7-3/4 9-3/4 12 4 HVH-02, 04, 05
HVC-2 20-5/8 17-1/8 12-3/4 10-3/4 6-3/4 7-3/4 13 12 8 HVH-07, 10, 12, 15
HVC-4 29-13/16 26-1/16 14-5/8 11-3/4 8-3/16 7-3/4 22-5/16 8-7/16 17 HVH-25, 30, 35, 40, 45, 50
Figure 5 - Optional Ceiling Swivel Mounting Bracket
HVH-02 to 15 (Note 1)
HVH-20
14-1/16 12-1/16 8-1/16 7-3/4HVC-3 20-5/8 17-1/8 13-5/16 8 7
Note 1: Bracket used on 380V, 400V, 415V, and 600V heaters rated 2kW to 15kW
7
Bracket
Model No.
Dimensions (in.)
Bracket
Wt. (Lbs.) Use WithP Q R S T
HVW1 16-1/16 18-7/8 7 5 17-5/8 3-3/4 HVH-02, 04, 05
HVW2 16-1/16 23-1/4 7 5 18-5/8 HVH-07, 10, 12, 15
HVW4 10-3/8
HVH-25, 30, 35, 40, 45, 50
ELECTRIC SHOCK HAZARD. Be sure electricity is
turned off at main switch first before wiring. Any
installation involving electric heaters must be
effectively grounded in accordance with the Na-
tional Electrical Code to eliminate shock hazard.
1. Use heater only on the voltage and frequency
specified on the nameplate.
2. All wiring should be done in accordance with local
codes and the National Electrical Code by a quali-
fied person as defined in the NEC.
3.
Two knockouts are provided on the back of the
heater for wire entry. See Fig. 4 for location of
knockouts.
4. Branch circuit wire for connection to heater must
be at least 60˚C wire.
5.
The bottom access door is hinged. There are two
screws that must be removed to gain access (Fig. 3).
6. A ground wire or ground lug is provided near the
power connection point (ground Wire on HVH-02
to HVH-20 and ground lug on HVH-25 to HVH-50).
7.
Terminals on contactor or on line voltage terminal
block are supplied to be connected to accept the
correct size power supply wire. Copper rated at 600V
and 60˚C is satisfactory for the heater branch circuit.
8. Electrical accessories, either kits or factory-in-
stalled options, are shown connected by a dash
line on the heater wiring diagram.
9. Wiring connections are to be made on designated
wire leads as shown in the wiring diagrams located
inside the access door.
10.
Louver adjustment (Do not attempt to adjust while
heater is operational): Louvers have been preset at
factory with the minimum open angle. Decreasing
the 45˚ angle may result in high temperatures and
functioning of the over temperature control. To in-
crease the opening angle, grasp the left end of louver
with the left hand using the index finger and thumb.
Grasp right end of louver with right hand in the same
manner. Twist louver to the desired position.
Wiring
14
HVW3
8 32-13/16
6 23-7/16
6-7/8
HVH-02 to 15 (Note 1)
HVH-20
6-1/2
4-15/16 20-1/16
9
Figure 6 - Optional Wall Swivel Mounting Bracket
8-1/2 22-7/16
Note 1: Bracket used on 380V, 400V, 415V, and 600V heaters rated 2kW to 15kW
8
ELECTRIC SHOCK HAZARD. Be sure electricity is
turned off at main switch first before wiring. Any
installation involving electric heaters must be
effectively grounded in accordance with the Na-
tional Electrical Code to eliminate shock hazard.
1. Use heater only on the voltage and frequency
specified on the nameplate.
2. All wiring should be done in accordance with local
codes and the National Electrical Code by a quali-
fied person as defined in the NEC.
3.
Two knockouts are provided on the back of the
heater for wire entry. See Fig. 4 for location of
knockouts.
4. Branch circuit wire for connection to heater must
be at least 60˚C wire.
5.
The bottom access door is hinged. There are two
screws that must be removed to gain access (Fig. 3).
6. A ground wire or ground lug is provided near the
power connection point (ground Wire on HVH-02
to HVH-20 and ground lug on HVH-25 to HVH-50).
7.
Terminals on contactor or on line voltage terminal
block are supplied to be connected to accept the
correct size power supply wire. Copper rated at 600V
and 60˚C is satisfactory for the heater branch circuit.
8. Electrical accessories, either kits or factory-in-
stalled options, are shown connected by a dash
line on the heater wiring diagram.
9. Wiring connections are to be made on designated
wire leads as shown in the wiring diagrams located
inside the access door.
10.
Louver adjustment (Do not attempt to adjust while
heater is operational): Louvers have been preset at
factory with the minimum open angle. Decreasing
the 45˚ angle may result in high temperatures and
functioning of the over temperature control. To in-
crease the opening angle, grasp the left end of louver
with the left hand using the index finger and thumb.
Grasp right end of louver with right hand in the same
manner. Twist louver to the desired position.
Top of Heater
45˚ Min.
All Louvers
Figure 7 - Louver Adjustment
POWER DISCONNECT SWITCH
(Available as a kit or factory installed option). This
switch disconnects the power to the power leads when
the handle is turned to its off position. Refer to Instruc-
tion Sheet PF207.
1. Use copper conductor supply wire only when con-
necting to the power line. (See Figure 8.)
2. Connection to the switch pigtails should be made
with compression connectors and the joint should
be then well insulated.
3. Consult the local wiring code in your area.
SUMMER FAN SWITCH - Refer to Instruction sheet
PF205 without relay, PF206 with relay.
(MOUNTED ON FRONT OF HEATER). When the switch
handle is pointing toward the Summer (Fan ON) position,
the fan will run continuously. When the switch handle is
pointing toward the WINTER (HEAT) position, the fan will
run only when the heating elements are hot.
REMOTE SUMMER FAN SWITCH
(MANUAL SWITCH-LINE VOLTAGE). The wall switch
is packed in the wiring compartment. The remote fan
switch is mounted external and remote from the HVH
unit heater. The voltage of the remote fan switch is the
same as the supply voltage to the HVH heater.
1. Use 14 gauge copper, NEC Class 1, 600V rated in-
sulated wire. Wiring must meet all Local and NEC
requirements for 480-volt service.
2. Install the remote fan switch in standard wall box in
any convenient location that is protected from traffic
or other accidental damage.
3. Connect the 14 gauge copper field wire to the switch
lead wires with suitable connectors.
Power
Disconnect
Switch
L1
L2
L3
S1
S2
S3
See Notes
Contactor
or Terminal
Block
To
Power
Supply
See
Note 2
Notes:
1. This illustration shows wiring hook up for three phase service. Remove lead
wires marked L3 and S3 when using single phase power service.
2. For units without contactors, disconnect switch is to be wired to terminal block
on heater power.
3. Use copper supply wire only with this switch.
Figure 8 - Power Disconnect Switch Wiring Diagram
9
REMOTE FAN SWITCH
480V + Heaters require an additional fan relay. (Avail-
able as a kit or factory installed option and standard on
heaters 20kW and above).
The wall switch is packed in the wiring compartment.
1. Use 18 gauge (min.) NEC Class 1, 600V wiring that
meets all Local and NEC requirements.
2. Install the wall switch in a standard wall box in any
convenient location that is protected from traffic or
other accidental damage.
3. Connect the field wire to the switch lead wires with
suitable connectors.
OPTIONAL THERMOSTAT (HVH-TK) Refer to In-
struction Sheet PF204.
Heaters can be equipped with an optional thermostat
of the Bulb and Capillary type for automatic tempera-
ture control (Figure 8). The thermostat controls the
heating elements and fan simultaneously to achieve
set temperature.
The “Lo” setting of the thermostat is approximately
40˚F, and the “Hi” setting is approximately 90˚F.
Figure 9 — Thermostat Location, Front View
CONTROL VOLTAGE WIRING — EXTERNAL RE-
MOTE THERMOSTATS AND FAN SWITCHES
ELECTRIC SHOCK HAZARD. Be sure electricity
is turned off at main switch first before wiring.
Any installation involving electric heaters must
be effectively grounded in accordance with the
National Electrical Code to eliminate shock
hazard.
1. Use 600 volt, NEC Class 1 insulated wiring with a
minimum gage of 18 for thermostats and minimum
gauge of 14 for line voltage motor switch (remote
fan switch without relay).
2. The thermostat should be located in the area to be
heated on an inside wall. The thermostat should
not be exposed to drafts, sunlight, radiation from
hot objects, or in a direct line with the discharge
from the unit heater.
3. Install the thermostat approximately 5 feet above
the floor line.
4. Install the remote fan switch in any convenient lo-
cation that is protected from traffic or likely acci-
dental damage.
5. Internal optional controls are shown on the unit
heater wiring diagrams by a dash line.
T1 T2 T3
L1 L2 L3
Terminal
Block
Cutout
Elements
1Ø Element wiring
(Omit for 2 element
heaters)
Optional disconnect switch
built-in or field installed
Power
60 Hz
Optional thermostat
built-in or field
installed
Blue
Blue
Motor
Cutout
NOTES:
1. Omit "L3" wiring for 1ø heaters
2. 3ø Motors used on all 480V, 7.5KV or higher
Remove jumper wire when
thermostat is used
Black
Red
Power 60 Hz
Pink
Optional
Disconnect
switch
built-in
or field
installed
T1 T2 T3
L1 L2 L3
Yellow
Blue
Sec
C1
C2
C3
3Ø Wiring
See Note #2
Optional Thermostat
Built-in or Field Installed
Motor
TO T1
TO T2
TO T3
Figure 10
Figure 11
10
Optional
disconnect
switch
built-in
or field
installed
Power 60 Hz
L1 L3
L2
T1 T3T2
Purple
Orange
Pink
C1
C3
C2
Remove jumper wire
when thermostat
is used
Cutout
Notes: 1 Omit "L3" wiring for 1ø heaters
3Ø Wiring
Optional
thermostat
built-in or
field installed
TO T1
TO T1
TO T2
TO T3
TO T3
TO T2
Motor
TO T2
TO T2
TO T2
TO T1
TO T1
TO T1
1Ø Wiring
Figure 12
Figure 13
Optional
disconnect
switch
built-in
or field
installed
Power 60 Hz
L1
T2
L2
T1
T3
Yellow
Blue
Pink
C1
C3
C2
Remove jumper wire
when thermostat is used
Cutout
Notes:
1. Omit "L3" wiring for 1ø heaters
2. 3Ø motors used on all 480V 7.5Kw or higher heaters.
All other heaters use 1ø motors.
TO T2
TO T2
TO T2
TO T1
TO T1
TO T1
1Ø Wiring
3Ø Wiring
Optional thermostat
built-in or field installed
TO T1
TO T1
TO T2
TO T3
TO T3
TO T2
Motor
L3
SEC
See Note #2
Black
Black/Red
Elements
3 Phase Wiring
Optional
Pliot
Light
Motor
Contactor
AR Cutout
Time Delay
Relay
Transformer
40VA
Built In or Remote
Thermostat
Termnal Block
(Control)
Refer to
Nameplate for
XFMR Primary
(Input) and
Seconday
Control) Voltage.
Line
Fusing
Built in
or External
Disconnect
Switch
Capacitor
Fusing
Alternate 1PH Motor Wiring
Fusing
Figure 14
11
Elements
3 Phase Wiring
Optional
Pliot
Light
Motor
Contactor
AR Cutout
Time Delay
Relay
Transformer
40VA
Built In or Remote
Thermostat
Termnal Block
(Control)
Refer to
Nameplate for
XFMR Primary
(Input) and
Seconday
Control) Voltage.
Line
Fusing
Line
Fusing
Built in or External
Disconnect Switch
Capacitor
Fusing
Alternate 1PH Motor Wiring
Fusing
Figure 15
Elements
3 Phase Wiring
Optional
Pliot
Light
Motor
Contactor
AR Cutout
Time Delay
Relay
Transformer
80VA
Built In or Remote
Thermostat
Termnal Block
(Control)
Refer to
Nameplate for
XFMR Primary
(Input) and
Seconday
Control) Voltage.
Line
Fusing
Line
Fusing
Built in or External
Disconnect Switch
Capacitor
Fusing
Fusing
Line
Fusing
Figure 16
12
Operating Heater
1. Once power is supplied to unit, both the fan motor
and heating elements will immediately turn on.
2. When operating without thermostat control, the
only way to manually turn unit on or off is via re-
mote/integral disconnect switch or circuit breaker.
3. All units are equipped with an automatic temper-
ature cutout switch. As such, units not equipped
with a thermostat may automatically shut off to
protect fan motor and heating elements.
4. Unit may also be provided with an optional fan de-
lay (standard on units above 20kW) which enables
the fan to run for approximately one minute after
heating elements are turned off.
Operating Integral Mechanical Thermostat
1. Thermostat controlled units will turn on and off
based on the set point of the thermostat.
2. To increase the temperature set-point, turn the
thermostat dial in the clockwise direction (Hi).
3. To decrease the temperature set-point, turn the dial
in the counterclockwise direction (Low).
4. To turn the unit off, turn the dial in the counterclock-
wise direction until it stops. You should be able to
hear the contactors de-energizing.
LO HI
OFF
Chromalox
R
Operating Integral Summer Fan Switch
1. Units equipped with fan switch can operate in two
modes: summer and winter. When operating in
summer mode, heating elements will not operate
(only fan). When operating in winter mode, both fan
motor and heating elements will operate.
2. To operate the unit in summer mode (Fan Only), flip
the toggle switch into the upward position.
3. To operate the unit in the winter mode (Fan + Heat),
flip the toggle switch into the downward position.
Operating Integral Disconnect Switch
1. Chromalox HVH models equipped with an integral
disconnect allow for power to be locally isolated
from the heater.
2. The disconnect switch used on HVH models is a
rotary style disconnect, designed for easy on/off
operation.
3. To disconnect power from the HVH heater simply
turn the rotary dial in the counterclockwise direc-
tion so it is pointing at “0”.
ELECTRIC SHOCK HAZARD. Disconnect all
power before installing or servicing heater.
Failure to do so could result in personal injury
or property damage. Heater must be installed
or serviced by a qualified person in accordance
with the National Electrical Code, NFPA 70.
Preventative Maintenance
To optimize performance and prevent downtime, it is
recommended that preventative maintenance be per-
formed on Chromalox model HVH heaters. Recom-
mended preventative maintenance includes:
1. Inspect and if necessary tighten fasteners attach-
ing mounting bracket to unit and wall/ceiling.
2. Inspect fan blade to make sure it is securely fas-
tened to motor shaft. Check set screw on collar
to ensure it is tightened to recommended torque of
165 inch-lbs.
3. Inspect fasteners on motor mount as it may be
possible for vibration to cause loosening.
4. Inspect inlet grills and outlet louvers and remove
any airborne debris that may have become stuck.
5. Inspect control panel for any loose wire connec-
tions and replace frayed or damaged wires.
6. It is recommended that the fan motor be replaced
after 5 years or 10,000 hours or operation (see fan
motor replacement instructions).
Maintenance and Troubleshooting
13
Troubleshooting
Problem Probable Cause Solution
Unit will not turn on
Thermostat set point too low.
Turn dial in clockwise direction to increase tem-
perature set point.
Improper or loose wire
connections.
Check control and power circuit to make sure
they are wired properly and for any loose wire
connections.
Disconnect switch in off position.
Make sure disconnect switch is in “on” position
by turning it in the clockwise direction.
Tripped circuit breaker or blown
fusing (located remotely from unit).
Check to see if circuit breaker has been tripped
or replace fusing.
Blown internal fusing (located on
units rated above 48 amps).
Replace fusing as needed.
Unit not producing heat
Thermostat set point too low.
Turn dial in clockwise direction to increase tem-
perature set point.
Summer fan switch is set to
“Summer” mode or wired incor-
rectly
If a summer fan switch is installed, check to
make sure it is switched to the “Winter” setting.
Check to make sure wires on switch are not
reversed.
Element Failure
Element failure can be confirmed by performing
a continuity test or by measuring the elements
resistance.
Unit turns off suddenly
or cycles off before
reaching temperature
set point
Low airflow is causing automatic
reset temperature cutout on ele-
ments to activate.
There are several reasons for low airflow and
most of them can be easily corrected.
The first reason for low airflow is stratification
of the air in a room. This can cause the ambi-
ent temperature around the heater to exceed
the maximum rated operating temperature.
The problem can usually be solved by mount-
ing the heater at a lower height.
Low airflow can also be caused by incorrect
rotation of the fan. Check that the fan motor is
rotating in the counterclockwise direction.
Finally, a common solution for low airflow is to
remove any objects located too close to the
inlet or outlet.
Low airflow is causing motor ther-
mal cutout to activate.
Figure 17:
Control Panel
14
Product
Type kW Volts Ø Control Voltage
Integral
Thermostat
Integral
Disconn.
Switch
Fan Only
Switch
Time
Delay
Power
On Pilot
Light
Outlet
Screen
hhh hh h h hh hh h hh h h h
Renewal Parts Identification (Have heater PN & Model before contacting Chromalox)
Limited Warranty:
Please refer to the Chromalox limited warranty applicable to this product at
http://www.chromalox.com/customer-service/policies/termsofsale.aspx.
Chromalox, Inc.
2150 N. Rulon White Blvd. • Odgen, UT 84404
1-800-368-2493 • www.chromalox.com
When ordering HVH heaters, specify the model number and corresponding PCN (Product Code Number). If controls (thermostat, fan switch,
transformer, disconnect) or other options are required, designate these options in the model number when ordering, as shown below. Al-
ways specify voltage, phase and kW by listing them on the purchase order specifications.
HVH Horizontal or Vertical Discharge Blower Heater
Code kW
02
2.6 kW 12 12.5 kW 35 33.3 kW
04
4.0 k W 15 15.0 kW 40 37.5 kW
05
5.0 kW 20 19.8 kW 45 45.0 kW
07
7.5 kW 25 25.0 kW 50 50.0 kW
10
10.0 kW 30 30.0 kW
Code Volts
2
240V A 220V
4
480V B 380V
6
600V C 400V
7
277V D 415V
8
208V
Code
Phase
1
1
3
3
Code
Control
00
No Contactor
30
Contactor with 24V Transformer
31
Contactor with 24V Externally Supplied
32
Contactor with 120V Transformer
33
Contactor with 120V Externally Supplied
34
Contactor with 208/240V Internally Supplied
35
Contactor with 277V Internally Supplied
Code Intergral Thermostat
0
None
45
40-100˚F Range (4° to 38°C)
Code Disconnect Switch
O
None
D
Yes
Code Fan Only Switch
00
None
FI
Internal (In Heater)
FE
External (On Wall)
Code Time Delay (Standard on 20kW and above)
0
None
R
Yes
Code Pilot Light
0
None
P
Yes
Code Outlet Screen
0
None
S
Yes
HVH 05 2 1 34 TL D FI -0 -0 -0 Typical Model Number
© 2016 Chromalox, Inc.
Part Code Description
1 Motor
2 Fan Blade
3 Heating Element
4 Element Contactor
5 Control Transformer
6 Fan Only Switch
7 Time Delay Relay
8 Thermostat
9 Disconnect Switch
10 Thermostat Knob Only
11 Pilot Light
12 Outlet Screen
13 High Limit, Automatic Reset
14 Fuse
15 Mounting Bracket
  • Page 1 1
  • Page 2 2
  • Page 3 3
  • Page 4 4
  • Page 5 5
  • Page 6 6
  • Page 7 7
  • Page 8 8
  • Page 9 9
  • Page 10 10
  • Page 11 11
  • Page 12 12
  • Page 13 13
  • Page 14 14

Chromalox HVH Installation guide

Category
Space heaters
Type
Installation guide

Chromalox HVH is a versatile unit heater designed for both horizontal and vertical airflow, making it suitable for various heating applications. It features adjustable airflow direction, allowing you to target specific areas or distribute heat evenly throughout a large space. With its powerful heating capabilities, the HVH can efficiently warm up rooms, workshops, garages, and other large indoor areas. Its sturdy construction and multiple mounting options ensure easy installation and long-lasting performance.

Ask a question and I''ll find the answer in the document

Finding information in a document is now easier with AI