EN 22
Boiling function*/**
This function brings the contents of the pan to the boil (100 °C) and
keeps it boiling. A beep can be heard when the content is cooking or
if food has to be added. This function works only without the lid on the
pan.
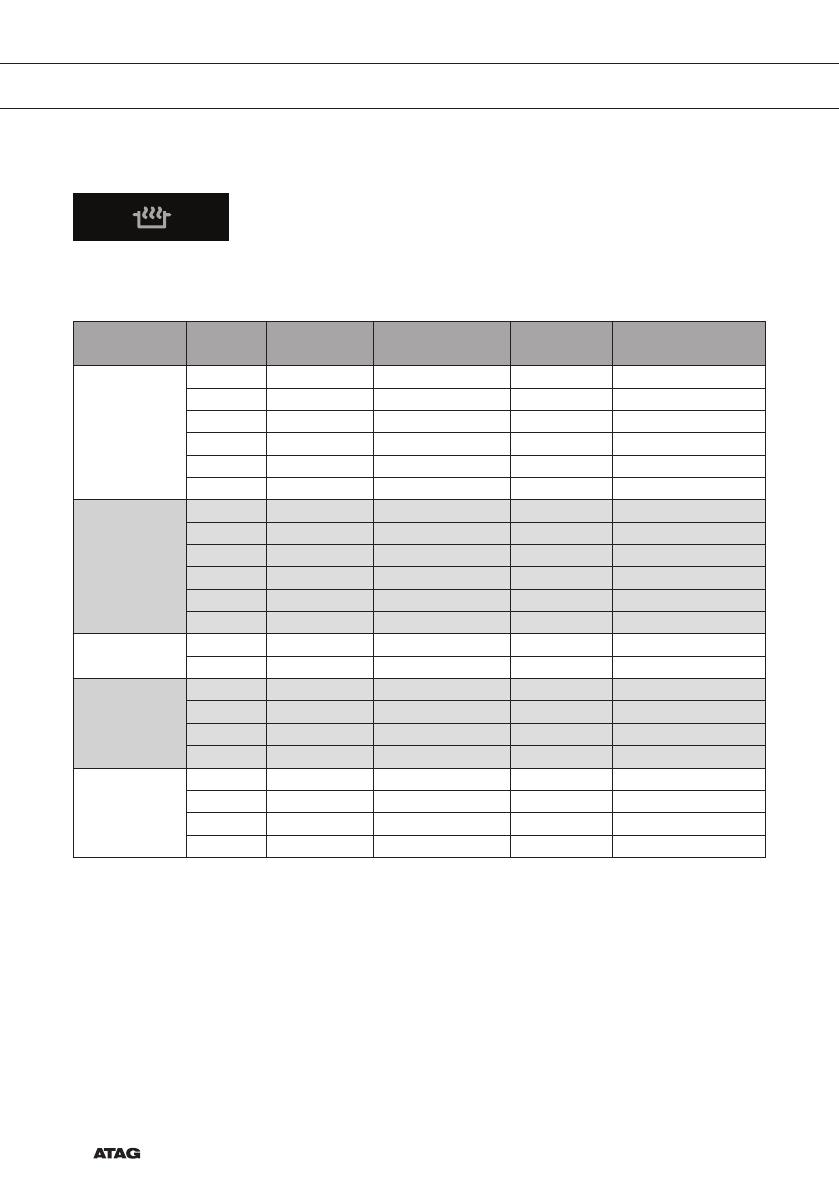
Dish Number of
people
Quantity Pan Zone Fill the pan to: (start
cooking process)
Cooked
potatoes
1 - 3 200 - 500 g Saucepan (Ø 200) Ø 145 1.0 l incl. potatoes
3 - 5 500 - 800 g Low pan (Ø 200) Ø 180 1.5 l incl. potatoes
3 - 5 500 - 800 g High pan (Ø 200) Ø 180 1.5 l incl. potatoes
6 - 8 1000 - 1,400 g High pan (Ø 200) Ø 210 / Vario 2.5 l incl. potatoes
9 - 15 1500 - 2,200 g Large pan (Ø 240) Ø 260 3.5 l incl. potatoes
9 - 15 1500 - 2,200 g Large pan (Ø 240) Ø 260 double 3.5 l incl. potatoes
Cooked (hard)
vegetables
1 - 3 150 - 250 g Saucepan (Ø 200) Ø 145 1.0 l incl. vegetables
3 - 4 300 - 500 g Low pan (Ø 200) Ø 180 1.5 l incl. vegetables
3 - 4 300 - 500 g High pan (Ø 200) Ø 180 1.5 l incl. vegetables
4 - 6 500 - 750 g High pan (Ø 200) Ø 210 / Vario 2.5 l incl. vegetables
6 - 8 750 - 900 g Large pan (Ø 240) Ø 260 3.5 l incl. vegetables
6 - 8 750 - 900 g Large pan (Ø 240) Ø 260 double 3.5 l incl. vegetables
Eggs
2 - 6 2 - 6 eggs Saucepan (Ø 200) Ø 145 1.0 l incl. eggs
8 - 12 8 - 12 eggs Low pan
(Ø 200) Ø 180 1.5 l incl. eggs
Rice
1 100 g Saucepan (Ø 200) Ø 145 1.0 l only water
1)
2 - 4 200 - 400 g Low pan (Ø 200) Ø 180 1.5 l only water
1)
2 - 4 200 - 400 g High pan (Ø 200) Ø 180 1.5 l only water
1)
4 - 5 400 - 500 g High pan (Ø 240) Ø 210 / Vario 2.0 l only water
1)
Pasta
1 - 2 100 - 200 g Low pan (Ø 200) Ø 180 1.0 l only water
1)
2 - 3 200 - 300 g High pan (Ø 200) Ø 210 / Vario 2.0 l only water
1)
4 - 6 400 - 600 g Large pan (Ø 240) Ø 260 3.0 l only water
1)
4 - 6 400 - 600 g Large pan (Ø 240) Ø 260 double 3.5 l only water
1)
1) After the beep the rice or pasta can be added.
* This function works best with pans recommended by ATAG (please
refer to www.atagservice.nl).
** These menu functions work best if they are started at the beginning
of the cooking process.
OPERATION


