Page is loading ...

Revision 812801-EN
4180, 4181
Precision Infrared Calibrator
Technical Guide

4180, 4181 Precision Infrared Calibrator
ii
Limited Warranty & Limitation of Liability
Each product from Fluke Corporation, Hart Scientic Division (“Hart”) is warranted to be free from defects
in material and workmanship under normal use and service. The warranty period is one year for Field Me-
trology Wells. The warranty period begins on the date of the shipment. Parts, product repairs, and services
are warranted for 90 days. The warranty extends only to the original buyer or end-user customer of a Hart
authorized reseller, and does not apply to fuses, disposable batteries or to any other product, which in Hart’s
opinion, has been misused, altered, neglected, or damaged by accident or abnormal conditions of operation
or handling. Hart warrants that software will operate substantially in accordance with its functional speci-
cations for 90 days and that it has been properly recorded on non-defective media. Hart does not warrant
that software will be error free or operate without interruption. Hart does not warrant calibrations on the
Field Metrology Well.
Hart authorized resellers shall extend this warranty on new and unused products to end-user customers only
but have no authority to extend a greater or different warranty on behalf of Hart. Warranty support is avail-
able if product is purchased through a Hart authorized sales outlet or Buyer has paid the applicable interna-
tional price. Hart reserves the right to invoice Buyer for importation costs of repairs/replacement parts when
product purchased in one country is submitted for repair in another country.
Hart’s warranty obligation is limited, at Hart’s option, to refund of the purchase price, free of charge repair,
or replacement of a defective product which is returned to a Hart authorized service center within the war-
ranty period.
To obtain warranty service, contact your nearest Hart authorized service center or send the product, with
a description of the difculty, postage, and insurance prepaid (FOB Destination), to the nearest Hart au-
thorized service center. Hart assumes no risk for damage in transit. Following warranty repair, the product
will be returned to Buyer, transportation prepaid (FOB Destination). If Hart determines that the failure was
caused by misuse, alteration, accident or abnormal condition or operation or handling, Hart will provide an
estimate or repair costs and obtain authorization before commencing the work. Following repair, the product
will be returned to the Buyer transportation prepaid and the Buyer will be billed for the repair and return
transportation charges (FOB Shipping Point).
THIS WARRANTY IS BUYER’S SOLE AND EXCLUSIVE REMEDY AND IS IN LIEU OF ALL OTH-
ER WARRANTIES, EXPRESS OR IMPLIED, INCLUDING BUT NOT LIMITED TO ANY IMPLIED
WARRANTY OF MERCHANTABILITY OR FITNESS FOR A PARTICULAR PURPOSE. HART SHALL
NOT BE LIABLE FOR ANY SPECIAL, INDIRECT, INCIDENTAL. OR CONSEQUENTIAL DAMAGES
OR LOSSES, INCLUDING LOSS OF DATA, WHETHER ARISING FROM BREACH OF WARRANTY
OR BASED ON CONTRACT, TORT, RELIANCE OR ANY OTHER THEORY.
Since some countries or states do not allow limitation of the term of an implied warranty, or exclusion or
limitation of incidental or consequential damages, the limitations and exclusions of this warranty may not
apply to every buyer. If any provision of this Warranty is held invalid or unenforceable by a court of compe-
tent jurisdiction, such holding will not affect the validity or enforceability of any other provision.
Fluke Corporation, Hart Scientific Division
799 E. Utah Valley Drive • American Fork, UT 84003-9775 • USA
Phone: +1.801.763.1600 • Telefax: +1.801.763.1010
E-mail: support@hartscientic.com
www.hartscientific.com
Specications subject to change without notice. • Copyright © 2007 • Printed in USA

i
Table of Contents
1 Before You Start .......................................................................1
1.1 Introduction ............................................................................................... 1
1.2 Unpacking ................................................................................................. 1
1.3 Symbols Used ........................................................................................... 2
1.4 Safety Information ..................................................................................... 3
1.4.1 Warnings .........................................................................................................4
1.4.2 Cautions ..........................................................................................................6
1.5 CE Comments ........................................................................................... 7
1.5.1 EMC Directive .................................................................................................7
1.5.2 Emission Testing ..............................................................................................7
1.5.3 Low Voltage Directive (Safety) ........................................................................7
1.6 Authorized Service Centers ...................................................................... 7
2 Specications and Environmental Conditions ......................9
2.1 Specifications ............................................................................................ 9
2.2 Environmental Conditions ......................................................................... 9
3 Quick Start .............................................................................. 11
3.1 Setup ....................................................................................................... 11
3.2 Parts and Controls ................................................................................... 11
3.2.1 Display Panel ................................................................................................11
3.2.2 Display ..........................................................................................................13
3.2.3 Back Panel ....................................................................................................14
3.3 Languages .............................................................................................. 16
3.3.1 Language Selection ......................................................................................16
3.4 Ice Buildup and Purge Procedure (4180 Only) ....................................... 16
3.4.1 Icing Warning ................................................................................................16
3.4.2 Purge Procedure ...........................................................................................16
3.4.3 Removing Ice Buildup on the Target .............................................................17
3.5 Emissivity Setting of the IR Thermometer ............................................... 17
3.5.1 Apparent Temperature Setting Limits ............................................................17
3.6 Forced Air and Convection ..................................................................... 18
4 Menu Structure .......................................................................19
4.1 Temperature Setup Menu ........................................................................ 19
4.2 Program Menu ......................................................................................... 20

4180, 4181 Precision Infrared Calibrator
ii
4.3 System Menu........................................................................................... 21
4.4 View Temperature Menu .......................................................................... 22
5 Controller operation...............................................................23
5.1 Main Screen ............................................................................................ 23
5.2 Main Menu............................................................................................... 24
5.2.1 TEMP SETUP .................................................................................................24
5.2.2 PROG MENU .................................................................................................26
5.2.3 SYSTEM MENU .............................................................................................28
5.2.4 VIEW TEMP ...................................................................................................32
6 Basic Infrared Thermometry Theory – Relating to the Use of
the 4180 and 4181 ..........................................................................33
6.1 Apparent Temperature Explanation ........................................................ 33
6.2 Spectral Response (Wavelength) ........................................................... 33
6.3 Emissivity ................................................................................................. 35
6.3.1 Uncertainty Caused by Emissivity .................................................................35
6.3.2 Effect of Background Temperature ...............................................................36
6.3.3 Effect of Angle on Emissivity .........................................................................37
6.4 Calibration Geometry .............................................................................. 38
6.4.1 Center of Spot ...............................................................................................38
6.4.2 Size of Spot, Size of Source and Scatter ......................................................38
6.4.3 Distance to target ..........................................................................................39
6.4.4 Knowing the Correct Geometry .....................................................................39
6.5 Traceability .............................................................................................. 39
6.6 Treatment of IR Thermometers ................................................................ 40
6.7 Use of the 4180 and 4181 in the Context of IR Theory ........................... 41
6.8 Example of 4180 and 4181 Spectral Emissivity and Calibration Spectral

iii
Response ........................................................................................................ 42
6.9 Example of an Uncertainty Budget for an IR Thermometer Calibration .. 43
6.9.1 Example IR Thermometer Uncertainty Budget .............................................43
6.9.2 Explanations ..................................................................................................44
6.10 Further Reading ...................................................................................... 45
7 Digital communication interface...........................................47
7.1 Wiring ...................................................................................................... 47
7.1.1 Setup .............................................................................................................47
7.1.2 Serial Operation ............................................................................................47
7.2 Command Syntax .................................................................................... 48
7.3 Commands by Function or Group ........................................................... 49
7.4 Serial Commands - Alphabetic Listing .................................................... 51
8 Calibration of Your Precision Infrared Calibrator ................65
8.1 General.................................................................................................... 65
8.2 Introduction ............................................................................................. 65
8.3 Terminology ............................................................................................. 65
8.4 Fundamentals.......................................................................................... 65
8.5 Environmental Conditions ....................................................................... 66
8.6 Calibration Equipment ............................................................................. 66
8.7 Procedure ................................................................................................ 68
8.7.1 Visual Inspection ...........................................................................................68
8.7.2 Manual IR Target Calibration .........................................................................68
9 Maintenance ...........................................................................77
10 Troubleshooting .....................................................................79

4180, 4181 Precision Infrared Calibrator
iv
Tables
Table 1 Symbols used ........................................................................................ 2
Table 2 Specifications ........................................................................................ 9
Table 3 Apparent temperature limits ................................................................ 18
Table 4 Commands by Function or Group ....................................................... 49
Table 5 Test Equipment Specifications ............................................................ 66
Table 6 Chiller Setting per UUT Set-Point ........................................................ 71
Table 7 Pre-Test UUT Configuration Settings .................................................. 72
Table 8 Pre-Test Controller/Calibration Constants Settings ............................. 72
Table 9 Intra-Test Controller Settings ............................................................... 73
Table 10 Post-Test UUT Settings ...................................................................... 73
Table 11 IR target Testing Sequence ............................................................... 74
Table 12 4180 Radiometric Accuracy Test Settings and Specs - Model 4180 74
Table 13 Radiometric Accuracy Test Settings and Specs – Model 4181 ........ 74
Table 14 IR target Accuracy Adjustment Specifications ................................. 76
Table 15 Troubleshooting, problems, causes and solutions ............................ 79

v
Figures
Figure 1 Display panel ..................................................................................... 12
Figure 2 Main screen ....................................................................................... 14
Figure 3 418X back panel ................................................................................ 15
Figure 4 Steps to language selection .............................................................. 16
Figure 5 Temperature setup menu ................................................................... 19
Figure 6 Program menu ................................................................................... 20
Figure 7 System menu ..................................................................................... 21
Figure 8 View temp menu ................................................................................ 22
Figure 9 Relation between Planck’s Law and Wien’s Displacement Law ........ 35
Figure 10 Effect of a 1% increase in emissivity in the 8-14μm band ............... 36
Figure 11 Effect of a 1% increase in background temperature
in the 8-14μm band ......................................................................... 37
Figure 12 Effect of Angular Emissivity ............................................................. 38
Figure 13 418X Traceability ............................................................................. 40
Figure 14 Typical results of FTIR testing on the 418X surface coating. ........... 42
Figure 15 Spectral Response of IR thermometer used to calibrate the 418X. 43
Figure 16 RS-232 wiring .................................................................................. 48
Figure 17 Flow chart for manual calibration .................................................... 67
Figure 18 4180 and 4181 Calibration Model ................................................... 70


1
Before You Start
Unpacking
Before You Start1
Introduction1.1
The Model 4180/4181 Portable IR Calibrator may be used as a portable instrument or
bench top temperature calibrator for calibrating point IR thermometers. The 4180/4181
is small enough to use in the eld, and accurate enough to use in the lab.
The instruments feature:
Rapid heating and cooling
RS-232 interface capability
Built in programmable features include:
Temperature scan rate control
Eight set-point memory
Adjustable readout in °C or °F
Adjustable Emissivity
The temperature is accurately controlled by Hart’s digital controller. The controller
uses a precision platinum RTD as a sensor and controls the surface temperature with a
solid state relay (triac) driven heater (4181) and FET driven Peltier modules (4180).
The LCD display continuously shows the current temperature. The temperature may
be easily set with the control buttons to any desired temperature within the specied
range. The instrument’s multiple fault protection devices insure user and instrument
safety and protection.
The 4180/4181 calibrators are designed for portability and ease of operation. Through
proper use the instrument will provide continued accurate calibration of IR tempera-
ture measurement devices. The user should be familiar with the safety guidelines and
operating procedures of the calibrator as described in this User’s Guide.
Unique patent pending safety features make the instruments the safest IR calibrators
available. The Block Temperature Indicator (Patent Pending) shows the user when
the target temperature is above 50°C letting the user know when it is safe to place the
target cover on the instrument and/or move it to a different location. The indicator
remains illuminated when the instrument is energized and above 50°C, but with mains
power removed, it will ash until the target temperature drops below 50°C.
Unpacking1.2
Unpack the calibrator carefully and inspect it for any damage that may have occurred
during shipment. If there is shipping damage, notify the carrier immediately.
Verify that the following components are present:

4180, 4181 Precision Infrared Calibrator
Symbols Used
2
4180
4180 IR Calibrator
Report of Calibration
Power Cord
User’s Guide
Documentation CD
Target Cover
Serial Cable
4181
4181 IR Calibrator
Report of Calibration
Power Cord
User’s Guide
Documentation CD
Serial Cable
If all items are not present, contact an Authorized Service Center (see Section 1.6
Authorized Service Centers on page 7).
Symbols Used1.3
Table 1 lists the International Electrical Symbols. Some or all of these symbols may be
used on the instrument or in this guide.
Table 1 Symbols used
Symbol Description
AC (Alternating Current)
AC-DC
Battery
Complies with European Union directives
DC

3
Before You Start
Safety Information
Symbol Description
Double Insulated
Electric Shock
Fuse
PE Ground
Hot Surface (Burn Hazard)
Read the User’s Guide (Important Information)
Off
On
Canadian Standards Association
C-TICK Australian EMC mark
The European Waste Electrical and Electronic Equipment (WEEE) Directive (2002/96/
EC) mark.
Safety Information1.4
The Portable IR Calibrators are designed in accordance with IEC 61010-1, IEC
61010-2-010 and CAN/CSA 22.2 No 61010.1-04. Use this instrument only as speci-
ed in this manual. Otherwise, the protection provided by the instrument may be
impaired.
The following denitions apply to the terms “Warning” and “Caution”.
“Warning” identies conditions and actions that may pose hazards to the user.
“Caution” identies conditions and actions that may damage the instrument
being used.

4180, 4181 Precision Infrared Calibrator
Safety Information
4
Warnings1.4.1
To avoid personal injury, follow these guidelines.
General
DO NOT use this instrument for any application other than calibration work. The
instrument was designed for temperature calibration. Any other use of the instrument
may cause unknown hazards to the user.
This instrument is intended for indoor use only.
Follow all safety guidelines listed in the User’s Guide.
Calibration Equipment should only be used by Trained Personnel.
If this equipment is used in a manner not specied by the manufacturer, the protection
provided by the equipment may be impaired.
Before initial use, or after transport, or after storage in humid or semi-humid environ-
ments, or anytime the instrument has not been energized for more than 10 days, the
instrument needs to be energized for a “dry-out” period of 2 hours before it can be as-
sumed to meet all of the safety requirements of the IEC 61010-1. If the product is wet
or has been in a wet environment, take necessary measures to remove moisture prior
to applying power such as storage in a low humidity temperature chamber operating at
50°C for 4 hours or more.
Overhead clearance is required for the 4181. At least 1 meter (39 inches) overhead
clearance is recommended. DO NOT place the instrument under a cabinet or other
structure. Allow at least 15 cm (6 inches) of clearance around the instrument.
DO NOT face the target towards a wall or other object. The target emits high amounts
of heat and will cause objects to heat up or catch re.
DO NOT use this instrument in environments other than those listed in the User’s
Guide.
DO NOT operate near ammable materials.
Use of this instrument at HIGH TEMPERATURES for extended periods of time
requires caution.
Completely unattended high temperature operation is not recommended due to safety
hazards that can arise.
Do not use the instrument if it operates abnormally. Protection may be impaired. When
in doubt, have the instrument serviced.
Burn Hazard
DO NOT touch the IR target surface or areas surrounding the target of the instrument.
If the instrument is set at 100°C, the display reads 100°C, the target surface may be
100°C or greater. The sheet metal of the instrument may exhibit extreme temperatures
for areas close to the IR target surface.

5
Before You Start
Safety Information
This instrument is equipped with a Block Temperature Indicator (front panel LED
HOT indicator – Patent Pending). When the indicator is ashing, the instrument is
disconnected from mains power and the temperature of the block is above 50°C. When
the indicator is illuminated, always on, the instrument is powered and the block tem-
perature is above 50°C.
Temperatures above 70°C (158°F) are considered hazardous. Use extreme care when
working with these temperatures. Observe all warnings and cautions given in this
manual.
DO NOT turn off the instrument at temperatures higher than 100°C. This could create
a hazardous situation. Select a set-point less than 100°C and allow the instrument to
cool before turning it off.
DO NOT operate instrument in any orientation other than vertical (target face perpen-
dicular to installation surface). Risk of re or burn hazard may result due to excessive
heat buildup.
The instrument can generate extreme temperatures. Precautions must be taken to pre-
vent personal injury or damage to objects.
The air around the instrument can reach temperatures greater that 100°C.
The high temperatures present in instruments designed to operate at 300°C and higher
may result in res and severe burns if safety precautions are not observed.
Electrical Hazard
These guidelines must be followed to ensure that the safety mechanisms in this instru-
ment will operate properly. This instrument must be plugged into an AC only outlet
according to Section 2.1 Specications on page 9. The power cord of the instrument
is equipped with a three-pronged grounding plug for your protection against electrical
shock hazards. It must be plugged directly into a properly grounded three-prong recep-
tacle. The receptacle must be installed in accordance with local codes and ordinances.
Consult a qualied electrician.
DO NOT use an extension cord or adapter plug.
DO NOT operate this instrument without a properly grounded, properly polarized
power cord.
DO NOT connect the instrument to a non-grounded outlet.
For installations with polarized outlets, insure that the polarity of the connection is
correct.
HIGH VOLTAGE is used in the operation of this equipment. Contact an Authorized
Service Center (see Section 1.6 Authorized Service Centers on page 7) for obtaining
service from a qualied technician. No user serviceable parts.
If supplied with user accessible fuses, always replace the fuse with one of the same
rating, voltage, and type.
Always replace the power cord with an approved cord of the correct rating and type.

4180, 4181 Precision Infrared Calibrator
Safety Information
6
Cautions1.4.2
Protect the target against dirt and damage – scrapes and scratches. A well kept target
surface, free from dirt and damage, produces better measurements. Use the target
cover whenever the instrument is not in use to protect the target. Always use the target
cover when transporting the instrument, but remember to never transport the instru-
ment when the target temperature is above 50°C.
DO NOT touch the target. Oils and salts from the skin will permanently damage the
target surface at high temperatures.
When ice forms on the target, change the instrument set-point higher than 50°C to
melt the excess ice. DO NOT wipe the front plate (target). Change the set-point to
100°C or higher to evaporate the excess water.
DO NOT use uids to clean the target surface.
DO NOT use shop air to clean the target surface. Oil and contaminants in the shop air
could contaminate the surface.
DO NOT use canned, compressed air (used to clean a computer) to clean the target
surface. Chemicals in the air could contaminate the target surface.
DO NOT force cool the surface. The surface should not be cooled by any method
other than natural convection. Forced air can often have oil or water in it. Even water
can leave mineral deposits on the surface. Trying to cool the surface too quickly can
also cause thermal shock to the emissive surface.
DO NOT use liquid nitrogen (LN2) to quick cool the target.
DO NOT plug the instrument into 230V if the fuse holder reads 115V. This action will
cause the fuses to blow and may damage the instrument.
Component lifetime can be shortened by continuous high temperature operation.
DO NOT change the values of the calibration constants from the factory set values.
Calibration constants shall only be changed by qualied and authorized personnel. The
correct setting of these parameters is important to the safety and proper operation of
the calibrator.
DO use a ground fault interrupt device.
Always operate this instrument at room temperatures as stated in Section 2.2 Environ-
mental Conditions on page 9.
The instrument is a precision instrument. Although is has been designed for optimum
durability and trouble free operation, it must be handled with care. It is important
to keep the calibration well and the IR target surface clean and clear of any foreign
matter.
Always carry the instrument in an upright position. The convenient pull-up handle al-
lows one hand carrying.
DO NOT operate the instrument in excessively wet, oily, dusty, or dirty environments.
DO NOT operate near ammable materials.

7
Before You Start
Authorized Service Centers
If a main supply power uctuation occurs, immediately turn off the instrument. Wait
until the power has stabilized before re-energizing the instrument.
Use the target cover at temperatures below ambient (25°C). If ice or liquid water
forms on the target, IR thermometers will not indicate the correct temperature.
1.5 CE Comments
EMC Directive1.5.1
Hart’s equipment has been tested to meet the European Electromagnetic Compatibil-
ity Directive (EMC Directive, 89/336/EEC). The Declaration of Conformity for your
instrument lists the specic standards to which the instrument was tested.
The instrument was designed specically as a test and measuring device. Compliance
to the EMC directive is through IEC 61326-1 Electrical equipment for measurement,
control and laboratory use.
As noted in the IEC 61326-1, the instrument can have varying congurations. The
instrument was tested in a typical conguration with shielded RS-232 cables.
Emission Testing1.5.2
The instrument fullls the limit requirements for Class A equipment. The instrument
was not designed to be used in domestic establishments.
Low Voltage Directive (Safety)1.5.3
In order to comply with the European Low Voltage Directive (2006/95/EC), Hart’s
equipment has been designed to meet the EN 61010-1 and EN 61010-2-010 standards.
1.6 Authorized Service Centers
Please contact one of the following Authorized Service Centers to coordinate service
on your Hart product:
Fluke Corporation
Hart Scientic Division
799 E. Utah Valley Drive
American Fork, UT 84003-9775
USA
Phone: +1.801.763.1600
Telefax: +1.801.763.1010
E-mail: support@hartscientic.com

4180, 4181 Precision Infrared Calibrator
Authorized Service Centers
8
Fluke Nederland B.V.
Customer Support Services
Science Park Eindhoven 5108
5692 EC Son
NETHERLANDS
Phone: +31-402-675300
Telefax: +31-402-675321
E-mail: ServiceDesk@uke.nl
Fluke Int’l Corporation
Service Center - Instrimpex
Room 2301 Sciteck Tower
22 Jianguomenwai Dajie
Chao Yang District
Beijing 100004, PRC
CHINA
Phone: +86-10-6-512-3436
Telefax: +86-10-6-512-3437
E-mail: xingye.han@uke.com.cn
Fluke South East Asia Pte Ltd.
Fluke ASEAN Regional Ofce
Service Center
60 Alexandra Terrace #03-16
The Comtech (Lobby D)
118502
SINGAPORE
Phone: +65-6799-5588
Telefax: +65-6799-5589
E-mail: anthony.ng@uke.com
When contacting a Service Centers for support, please have the following information
available:
Model Number
Serial Number
Voltage
Complete description of the problem

9
Specications and Environmental Conditions
Environmental Conditions
Specications and Environmental Conditions2
2.1 Specications
SpecificationsTable 2
4180 4181
Temperature range
(@ 23 °C ambient,
0.95 emissivity)
–15 °C to 120 °C 35 °C to 500 °C
Display accuracy
1
± 0.40 °C at –15 °C
± 0.40 °C at 0 °C
± 0.50 °C at 50 °C
± 0.50 °C at 100 °C
± 0.55 °C at 120 °C
± 0.35 °C at 35 °C
± 0.50 °C at 100 °C
± 0.70 °C at 200 °C
± 1.20 °C at 350 °C
± 1.60 °C at 500 °C
Stability ± 0.10 °C at –15 °C
± 0.05 °C at 0 °C
± 0.10 °C at 120 °C
± 0.05 °C at 35 °C
± 0.20 °C at 200 °C
± 0.40 °C at 500 °C
Uniformity
3
(5.0 in dia of center
of target)
± 0.15 °C at –15 °C
± 0.10 °C at 0 °C
± 0.25 °C at 120 °C
± 0.10 °C at 35 °C
± 0.50 °C at 200 °C
± 1.00 °C at 500 °C
Uniformity
3
(2.0 in dia of center
of target)
± 0.10 °C at -15 °C
± 0.10 °C at 0 °C
± 0.20 °C at 120 °C
± 0.10 °C at 35 °C
± 0.25 °C at 200 °C
± 0.50 °C at 500 °C
Heating time 15 min: –15 °C to 120 °C
14 min: 23 °C to 120 °C
20 min: 35 °C to 500 °C
Cooling time 15 min: 120 °C to 23 °C
20 min: 23 °C to –15 °C
100 min: 500 °C to 35 °C
40 min: 500 °C to 100 °C
Stabilization time 10 minutes 10 minutes
Nominal emissivity
3
0.95 0.95
Thermometer emissivity
compensation
0.9 to 1.0
Target diameter 152.4 mm (6 in)
Computer interface RS-232
Power 115 V ac (± 10%), 6.3 A,
50/60 Hz, 630 W
230 V ac (± 10%), 3.15 A,
50/60 Hz, 630 W
115 V ac (± 10%), 10 A,
50/60 Hz, 1000 W
230 V a (± 10%), 5 A,
50/60 Hz, 1000 W
Fuse(s) 115 V ac 6.3 A, 250 V, slow blow
230 V ac 3.15 A, 250 V, T
115 V ac 10 A, 250 V, fast blow
230 V ac 5 A, 250 V, F
Size (HxWxD) 356 mm x 241 mm x 216 mm
(14 in x 9.5 in x 8.5 in)
356 mm x 241 mm x 216 mm
(14 in x 9.5 in x 8.5 in)
Weight 9.1 kg (20 lb) 9.5 kg (21 lb)
Safety EN 61010-1:2001, CAN/CSA C22.2 No. 61010.1-04
1
For 8 mm to 14 mm spectral band thermometers with emissivity set between 0.9 and 1.0
2
The uniformity specication refers to how IR thermometers with different spot sizes both focused at
the center of the target will measure the same temperature.
3
The target has a nominal emissivity of 0.95, however it is radiometrically calibrated to minimize
emissivity related uncertainties.
2.2 Environmental Conditions
Although the instrument has been designed for optimum durability and trouble-free
operation, it must be handled with care. The instrument should not be operated in an

4180, 4181 Precision Infrared Calibrator
Environmental Conditions
10
excessively dusty or dirty environment. Maintenance and cleaning recommendations
can be found in the Maintenance section of this manual.
The instrument operates safely under the following conditions:
ambient temperature range: 5-35°C (41-95°F)
ambient relative humidity: maximum 80% for temperature <31°C, decreasing
linearly to 50% at 40°C
mains voltage within ±10% of nominal
vibrations in the calibration environment should be minimized
altitudes less than 2,000 meters
indoor use only

11
Quick Start
Parts and Controls
Quick Start3
Setup3.1
Note: The instrument will not heat, cool, or control until the "SET PT."
parameter is "Enabled".
Place the instrument on a at surface with at least 15 cm (6 inches) of free space
around the instrument. Overhead clearance is required. DO NOT place under a cabinet
or structure.
Plug the power cord of the instrument into a mains outlet of the proper voltage,
frequency, and current capability (see Section 2.1 Specications on page 9 for power
details). Observe that the nominal voltage corresponds to that indicated on the power
entry model at the back of the calibrator.
Turn on the power to the calibrator by toggling the switch on the power entry module.
After a brief self-test, the controller should begin normal operation. The main screen
will appear within 30 seconds. If the instrument fails to operate, please check the
power connection. The display will show the well temperature, and wait for user input
before further operation.
Press “SET PT.” and use the arrow keys to set the desired set-point temperature. Press
“ENTER” to save the desire set-point and enable the IR Calibrator. After ve (5) sec-
onds the instrument should start to operate normally and heat or cool to the designated
set-point.
Parts and Controls3.2
This section describes the exterior features of the IR Calibrator. All interface buttons
are found on the front of the IR Calibrator (Figure 1 on next page). Power connection
and serial connections are found on the back of the instrument (see Figure 3 on page
15).
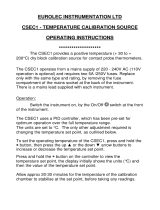
Display Panel3.2.1
Display (1)
The display is a 240 x 160 pixel monochrome graphics LCD device with a bright LED
backlight. The display is used to show current control temperature, measurements,
status information, operating parameters, and soft key functions.
SET PT. (2)
The SET PT. Key allows you to enable the instrument to heat or cool to a desired set-
point. Until this key is enabled, the instrument will not heat or cool. It is in a “sleep”
state for safety of the operator and instrument.

4180, 4181 Precision Infrared Calibrator
Parts and Controls
12
°C/°F Key (3)
The °C/°F Key allows you to change the displayed temperature units from °C to °F
and vice versa.
Menu Key (4)
The MENU key allows the user to access all parameter and settings menus. From the
main menu, the user can use the soft keys to access submenus and functions.
Exit Key (5)
The EXIT key allows you to exit menus and cancel newly entered values.
Arrow Keys (6)
The arrow keys allow you to move the cursor on the display, change the display lay-
out, and adjust the contrast of the display.
Enter Key (7)
The ENTER key allows you to select menus and accept new values.
Soft Keys (8)
The soft keys are the four buttons immediately below the display (labeled F1 to F4).
The functions of the soft keys are indicated on the display above the buttons. The
function of the keys may change depending on the menu or function that is selected.
Block Temperature Indicator (9) [Patent Pending]
The block temperature indicator allows users to know when it is safe (50°C to 60°C)
to install the target cover. The indicator illuminates when the target exceeds approxi-
mately 50°C. The indicator illuminates until the target cools to less than approximately
50°C. If the instrument is disconnected from mains power, the indicator ashes until
the target temperature is less than approximately 50°C.
Figure 1 Display panel
/