Page is loading ...
SPLIT-TYPE AIR CONDITIONERS
INDOOR UNIT
MSY-A24NA
Español
English
OPERATING INSTRUCTIONS For user
• To use this unit correctly and safely, be sure to read these operating
instructions before use.
MANUAL DE INSTRUCCIONES Para los clientes
• Para emplear correctamente este aparato y por razones de seguridad
debe leer este manual de instrucciones de manejo antes de su utilización.
NOTICE D’UTILISATION A l’attention des clients
• Pour avoir la certitude d’utiliser cet appareil correctement et en toute
sécurité, veuillez lire attentivement cette notice d’instructions avant de
mettre l’appareil en fonction.
Français
En-1
• OPERATING INSTRUCTIONS •
WARNING
Do not connect the power cord to an intermediate point,
use an extension cord, or connect multiple devices to a
single AC outlet.
• This may cause overheating, fi re, or electric shock.
Make sure the power plug is free of dirt and insert it se-
curely into the outlet.
• A dirty plug may cause fi re or electric shock.
Do not bundle, pull, or modify the power cord, and do not
apply heat or place heavy objects on it.
• This may cause fi re or electric shock.
Do not turn the breaker OFF/ON or disconnect/connect the
power plug during operation.
• This may create sparks, which can cause fi re.
• After the indoor unit is switched OFF with the remote con-
troller, make sure to turn the breaker OFF or disconnect the
power plug.
Do not expose your body directly to cool air for a prolonged
length of time.
• This could be detrimental to your health.
The unit should not be installed, relocated, or repaired
by the user.
• An improperly handled air conditioner may cause fi re or
electric shock.
Do not insert your fi nger, a stick, or other objects into the
air inlet or outlet.
• This may cause injury, since the fan inside rotates at high
speeds during operation.
• Since rotating parts and parts which could cause an electric shock are used
in this product, be sure to read these “Safety Precautions” before use.
• Since the cautionary items shown here are important for safety, be sure to
observe them.
• After reading this manual, keep it together with the installation manual in a
handy place for easy reference.
Marks and their meanings
WARNING : Incorrect handling could cause serious hazard, such as
death, serious injury, etc. with a high probability.
CAUTION : Incorrect handling could cause serious hazard depending
on the conditions.
In case of an abnormal condition (such as a burning smell),
stop the air conditioner and disconnect the power plug or
turn the breaker OFF.
• A continued operation in the abnormal state may cause a
malfunction, fi re, or electric shock. In this case, consult your
dealer.
When the air conditioner does not cool or heat, there is
a possibility of refrigerant leakage. In this case, consult
your dealer. If a repair involves recharging the unit with
refrigerant, ask the service technician for details.
• The refrigerant used in the air conditioner is safe. Normally,
it does not leak. However, if refrigerant leaks and comes in
contact with a heat source such as a fan heater, kerosene
heater, or cooking stove, it will create a harmful gas.
CAUTION
Do not touch the air inlet or the aluminum fi ns of the
indoor/outdoor unit.
• This may cause injury.
Do not use insecticides or fl ammable sprays on the unit.
• This may cause a fi re or deformation of the unit.
Do not expose pets or houseplants to direct airfl ow.
• This may cause injury to the pets or plants.
Do not place other electric appliances or furniture under
the indoor/outdoor unit.
• Water may drip down from the unit, which may cause damage
or malfunction.
Do not leave the unit on a damaged installation stand.
• The unit may fall and cause injury.
Meanings of symbols used in this manual
: Be sure not to do.
: Be sure to follow the instruction.
: Never insert your fi nger or stick, etc.
:
Never step onto the indoor/outdoor unit and do not put anything on them.
: Danger of electric shock. Be careful.
: Be sure to disconnect the power supply plug from the power out-
let.
: Be sure to shut off the power.
SAFETY PRECAUTIONS
CONTENTS
■ SAFETY PRECAUTIONS 1
■ NAME OF EACH PART 3
■ PREPARATION BEFORE OPERATION 4
■ SELECTING OPERATION MODES 5
■ FAN SPEED AND AIRFLOW DIRECTION ADJUSTMENT 6
■ ECONO COOL OPERATION 7
■ POWERFUL COOL OPERATION 7
■ TIMER OPERATION (ON/OFF TIMER) 7
■ CLEANING 8
■ WHEN YOU THINK THAT TROUBLE HAS OCCURRED 9
■ WHEN THE AIR CONDITIONER IS NOT GOING TO BE USED FOR A LONG TIME 10
■ INSTALLATION PLACE AND ELECTRICAL WORK 10
■ SPECIFICATIONS 10
En-2
CAUTION
Do not step on an unstable bench to operate or clean the
unit.
• This may cause injury if you fall down.
Do not pull the power cord.
• This may cause a portion of the core wire to break, which may
cause overheating or fi re.
Do not charge or disassemble the batteries, and do not
throw them into a fi re.
• This may cause the batteries to leak, or cause a fi re or explo-
sion.
Do not operate the unit for more than 4 hours at high humidity
(80% RH or more) and/or with windows or outside door left open.
• This may cause the water condensation in the air condition-
er, which may drip down, wetting or damaging the furniture.
• The water condensation in the air conditioner may contribute
to growth of fungi, such as mold.
Do not use the unit for special purposes, such as storing
food, raising animals, growing plants, or preserving preci-
sion devices or art objects.
• This may cause deterioration of quality, or harm to animals and
plants.
Do not expose combustion appliances to direct airfl ow.
• This may cause incomplete combustion.
Before cleaning the unit, switch it OFF and disconnect the
power plug or turn the breaker OFF.
• This may cause injury, since the fan inside rotates at high
speeds during operation.
When the unit will be unused for a long time, disconnect the
power plug or turn the breaker OFF.
• The unit may accumulate dirt, which may cause overheating
or fi re.
Replace all batteries of the remote controller with new ones
of the same type.
• Using an old battery together with a new one may cause over-
heating, leakage, or explosion.
If the battery fl uid comes in contact with your skin or clothes,
wash them thoroughly with clean water.
• If the battery fl uid comes in contact with your eyes, wash them
thoroughly with clean water and immediately seek medical
attention.
Ensure that the area is well-ventilated when the unit is oper-
ated together with a combustion appliance.
• Inadequate ventilation may cause oxygen starvation.
Turn the breaker OFF when you hear thunder and there is a
possibility of a lightning strike.
• The unit may be damaged if lightning strikes.
After the air conditioner is used for several seasons, per-
form inspection and maintenance in addition to normal
cleaning.
• Dirt or dust in the unit may create an unpleasant odor, contribute
to growth of fungi, such as mold, or clog the drain passage, and
cause water to leak from the indoor unit. Consult your dealer
for inspection and maintenance, which require specialized
knowledge and skills.
WARNING
Consult your dealer for installing the air conditioner.
• It should not be installed by the user since installation requires
specialized knowledge and skills. An improperly installed air
conditioner may cause water leakage, fi re, or electric shock.
Provide a dedicated power supply for the air conditioner.
• A non-dedicated power supply may cause overheating or
fi re.
Do not install the unit where fl ammable gas could leak.
• If gas leaks and accumulates around the unit, it may cause an
explosion.
Ground the unit correctly.
• Do not connect the ground wire to a gas pipe, water pipe,
lightning rod, or a telephone ground wire. Improper grounding
may cause electric shock.
CAUTION
Install a Ground Fault Interrupt (GFI) circuit breaker depend-
ing on the installation location of the air conditioner (such
as highly humid areas).
• If the Ground Fault Interrupt (GFI) circuit breaker is not installed,
it may cause electric shock.
Ensure that the drain water is properly drained.
• If the drain passage is improper, water may drip down from the
indoor/outdoor unit, wetting and damaging the furniture.
In case of an abnormal condition
Immediately stop operating the air conditioner and consult your dealer.
SAFETY PRECAUTIONS
Do not operate switches with wet hands.
• This may cause electric shock.
Do not clean the air conditioner with water or place an object
that contains water, such as a fl ower vase, on it.
• This may cause fi re or electric shock.
Do not step on or place any object on the outdoor unit.
• This may cause injury if you or the object falls down.
For installation
IMPORTANT
Dirty s cause condensation in the air conditioner which will contribute to
the growth of fungi such as mold. It is therefore recommended
to clean air fi lters every 2 weeks.

En-3
• OPERATING INSTRUCTIONS •
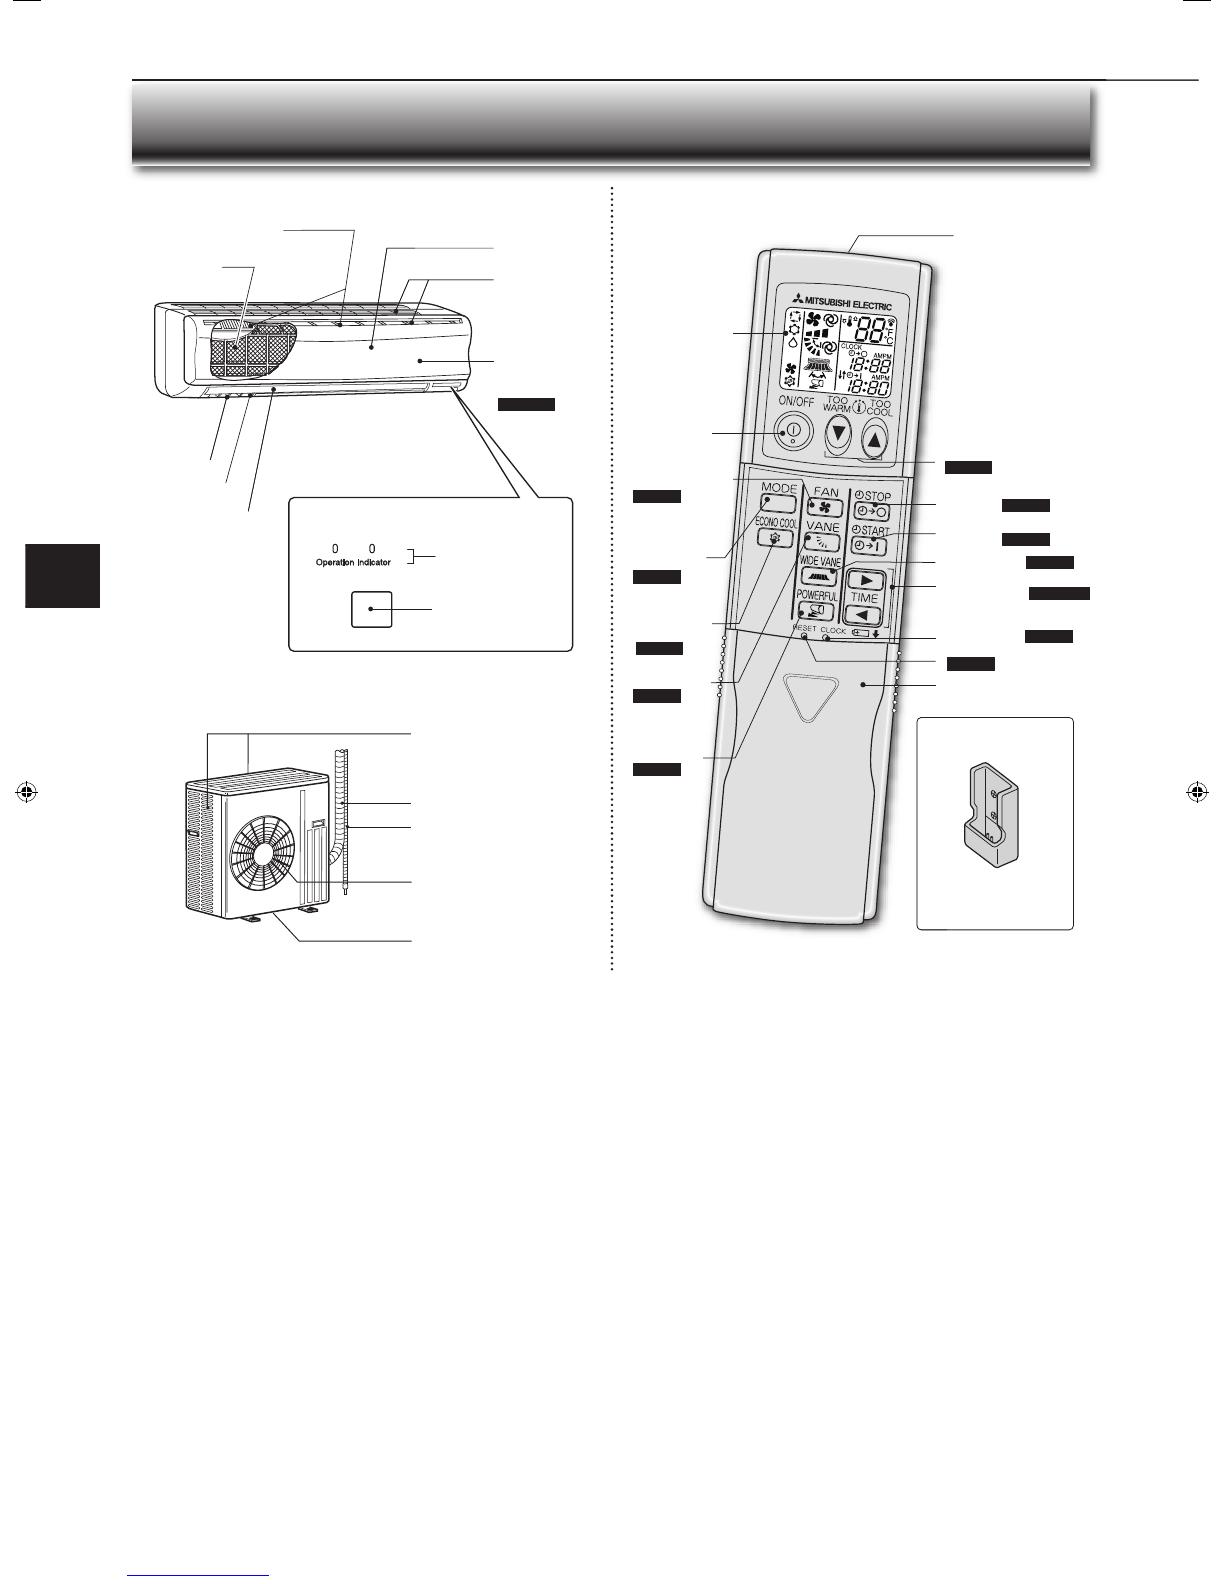
Temperature buttons
Page 5
Off-timer button Page 7
On-timer button Page 7
TIME set buttons Pages 4, 7
Increase time
Decrease time
CLOCK button Page 4
RESET button Page 4
Lid
Slide down to open
WIDE VANE button
Page 6
Display section
Operation indicator
lamp
Remote control
receiving section
Emergency
operation
switch Page 5
Air inlet (back and side)
Piping
Drainage hose
Air outlet
Drain outlet
Remote controller
holder
Signal transmitting
section
Distance of signal :
About 20ft(6 m)
Beep(s) is (are) heard
from the indoor unit when
the signal is received.
Operation display
section
Operation
select button
Page 5
ECONO
COOL
button
Page 7
FAN speed
control button
Page 6
VANE
control button
Page 6
• Install the remote control-
ler holder to a place where
the signal can be received
by the indoor unit.
Use the remote controller provided with the unit only.
Do not use other remote controllers.
Horizontal vane
Vertical vane
Air outlet
Air fi lter
(Catechin air fi lter) Air inlet
Front panel
Air cleaning fi lter
(Anti-Allergy Enzyme Filter)
Outdoor unit
NAME OF EACH PART
Indoor unit Remote controller
Appearance of the outdoor unit may differ from some models.
POWERFUL
COOL button
Page 7
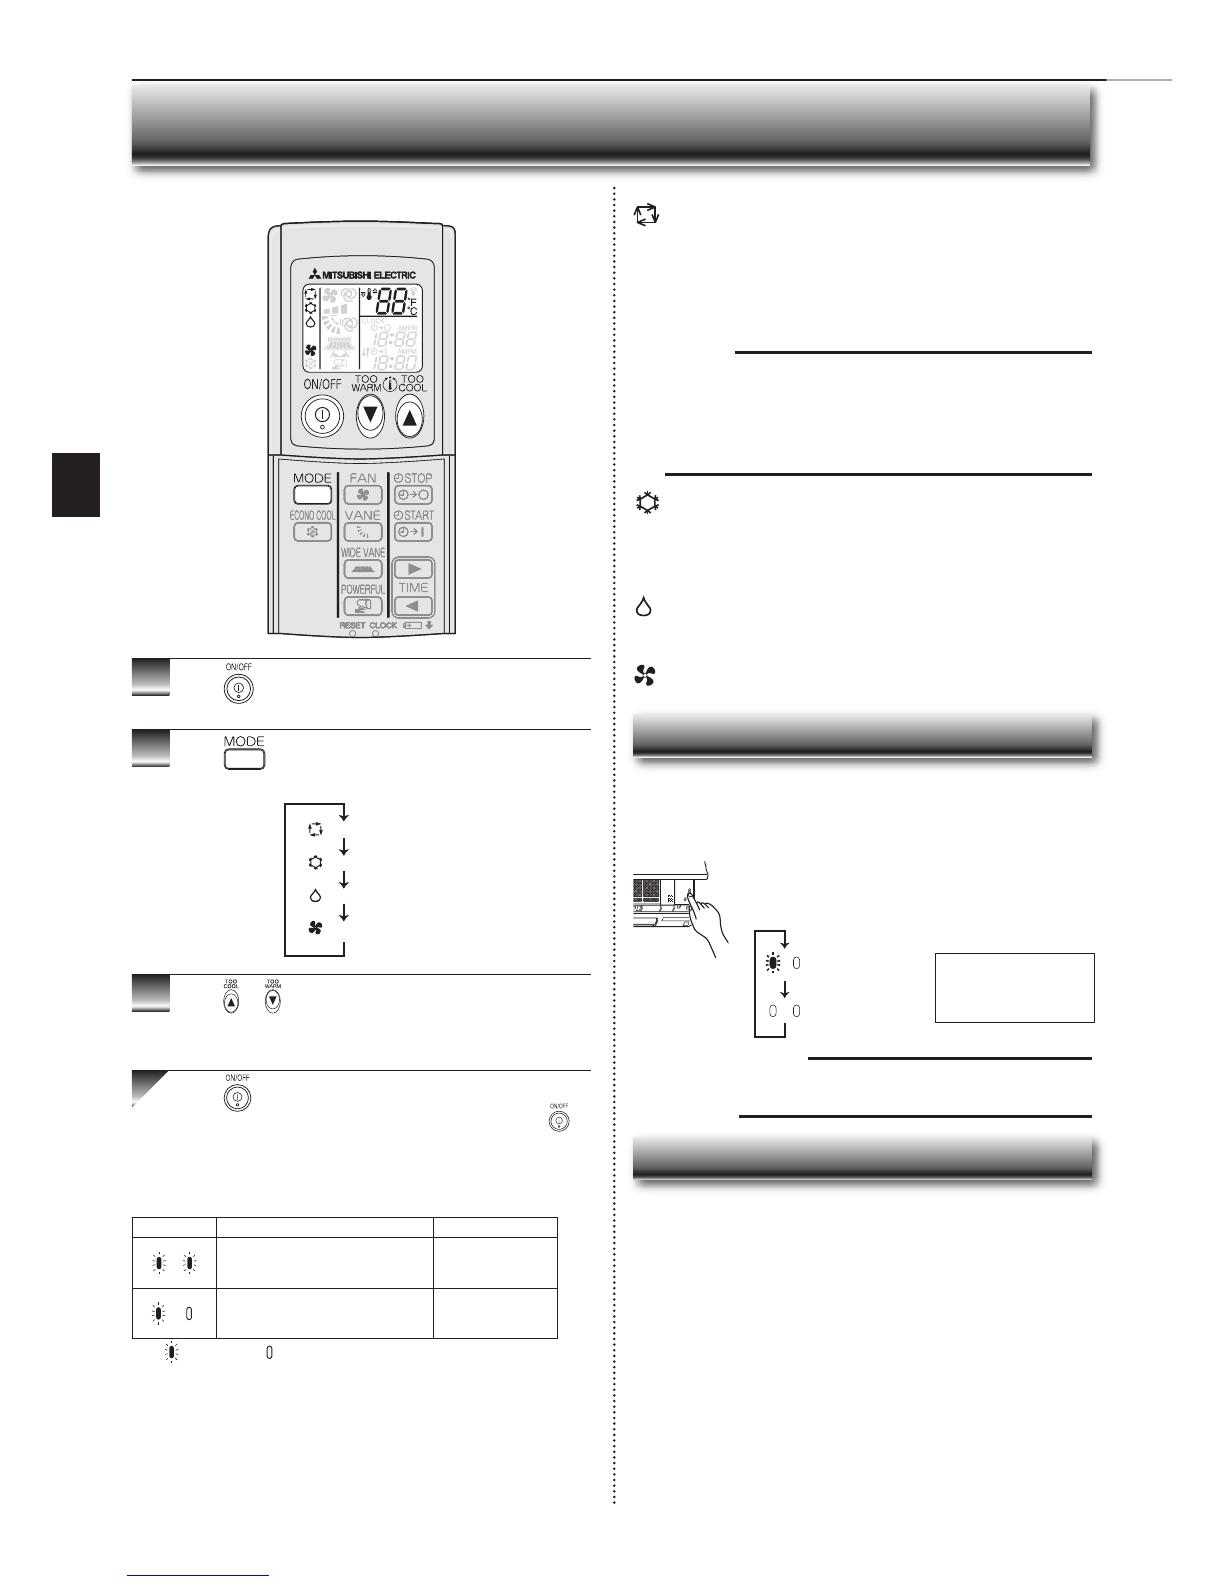
ON/OFF
(operate/stop)
button
En-4
• Make sure the polarity of the batteries is correct.
• Do not use manganese batteries. The remote controller could malfunction.
• Do not use rechargeable batteries.
• Replace all batteries with new ones of the same type.
• Batteries can be used for approximately 1 year. However, batteries with
expired shelf lives last shorter.
Before operation: Insert the power supply plug into the power outlet and/or
turn the breaker on.
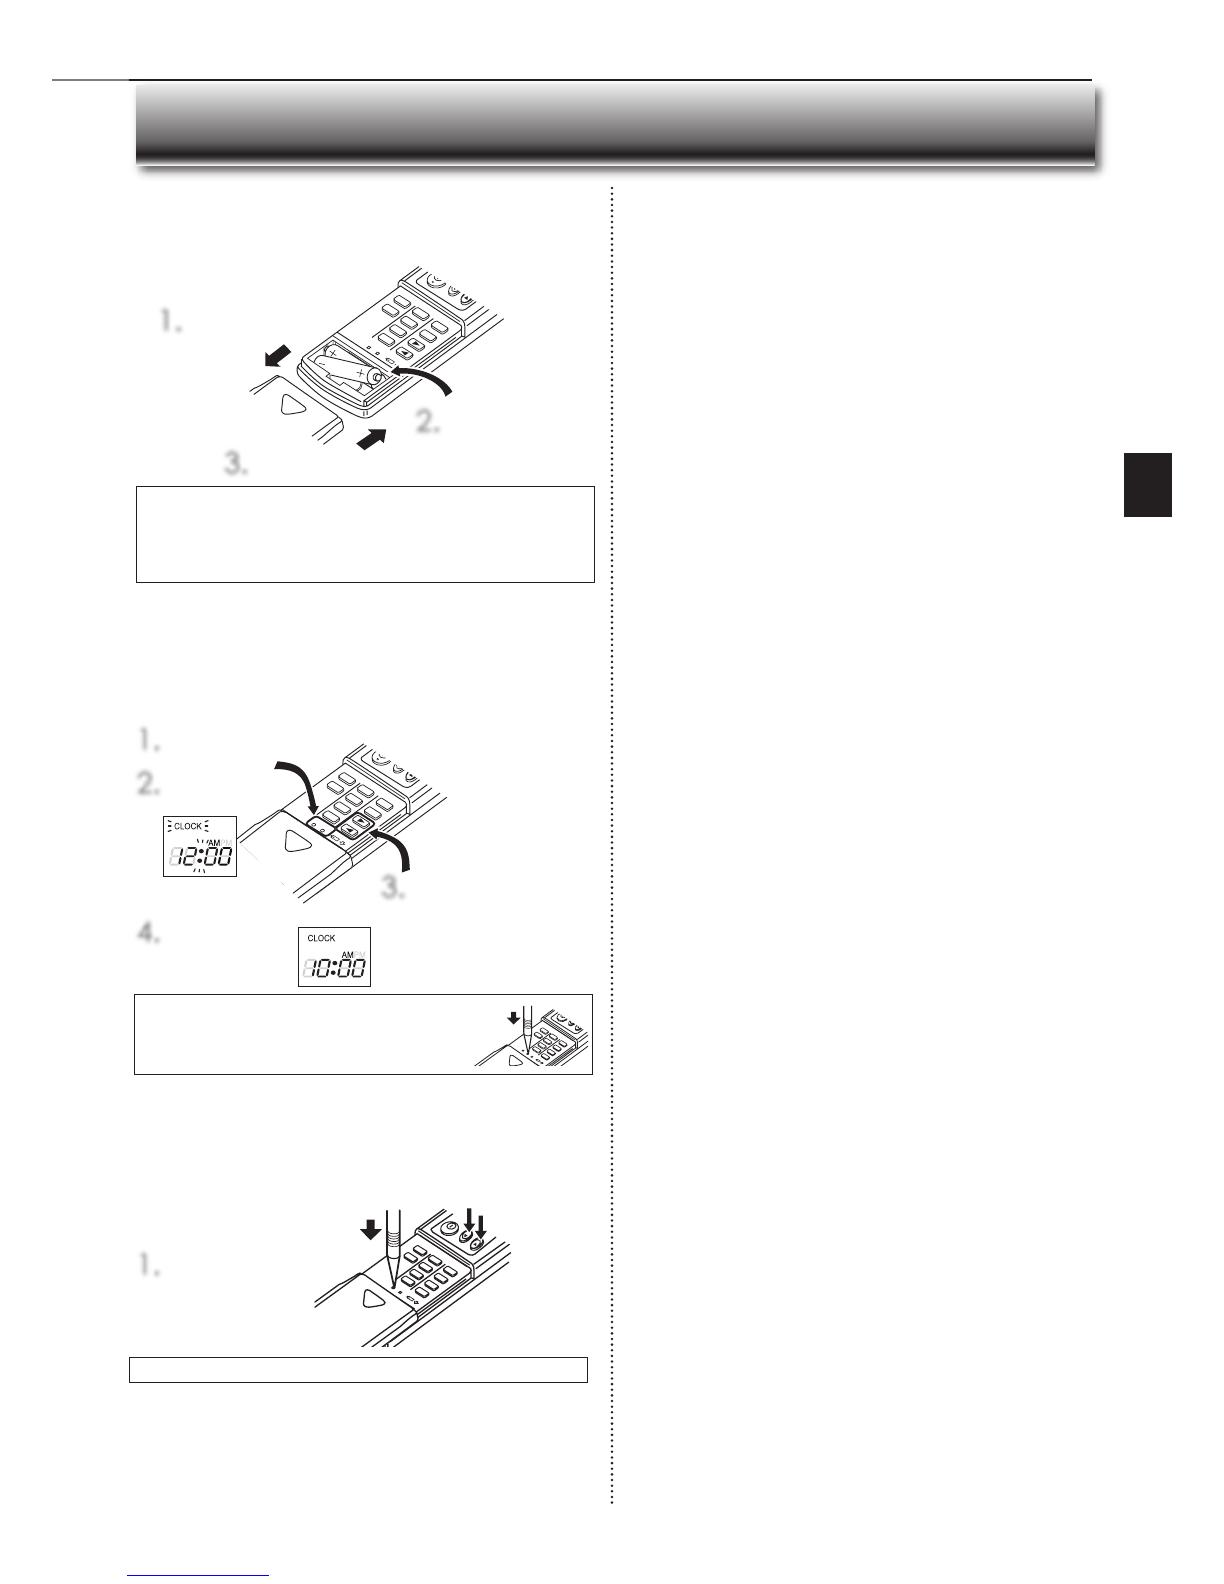
Installing the remote controller batteries
PREPARATION BEFORE OPERATION
RESET
CLOCK
1.
Remove the front lid
2. Insert AAA
alkaline batteries
3. Install the front lid
• Press RESET and CLOCK gently using a thin stick.
If the RESET button is not pressed, the remote
controller may not operate correctly.
RESET CLOCK
1. Press RESET
2. Press CLOCK
4. Press CLOCK again
3. Press the TIME buttons to set the
time
Each press increases/decreases
time by 1 minute (10 minutes
when pressed longer)
Setting current time
Changing temperature units (°F/°C)
1. Press RESET while
the temperature but-
tons are pressed.
• Press RESET gently using a thin stick.
The preset unit is °F.
En-5
• OPERATING INSTRUCTIONS •
I FEEL mode
The unit selects the operation mode according to the room temperature
when AUTO is selected. When the room temperature is higher than 77°F
(25°C), COOL is selected (set temperature: 75°F [24°C]). When the room
temperature is lower than 77°F (25°C), DRY is selected. However, when
operation is stopped and then started within 2 hours, the mode which has
been selected previously is operated.
Note:
• During COOL operation, the set temperature may not be changed when
the room temperature is more than 4°F (2°C) higher than the set tem-
perature. In this case, please wait until the room temperature drops to
within 4°F (2°C) of the set temperature.
• Auto Mode is not recommended if this indoor unit is connected to a MXZ
type outdoor unit.
COOL mode
Enjoy cool air at your desired temperature.
Do not operate COOL mode at low outside temperature
(less than 14°F [-10°C]).
Water condensed in the unit may drip and wet or damage furniture, etc.
DRY mode
Dehumidify your room. The room may be cooled slightly.
Temperature cannot be set during DRY mode.
FAN mode
Circulate the air in your room.
Operation indicator lamp
Operation indicator lamp
The operation indicator lamp shows the operation state of the unit.
Indication Operation state Room temperature
The unit is operating to reach the set
temperature
About 4°F (2°C) or
more away from set
temperature
The room temperature is approach-
ing the set temperature
About 2 to 4°F (1 to
2°C) from set tem-
perature
Lighted Not lighted
Emergency operation
When the remote controller cannot be used...
Emergency operation can be activated by pressing the emergency operation
switch (E.O.SW) on the indoor unit.
Each time the E.O.SW is pressed, the operation changes in
the following order:
1Press to start the operation.
2Press to select operation mode. Each press
changes mode in the following order:
3Press or to set the temperature.
Each press raises or lowers the temperature by 1°F
(1°C).
Press to stop the operation.
• The same setting is selected the next time by simply pressing .
Auto restart function
If a power failure occurs or the main power is turned off during operation, “Auto
restart function” automatically starts operation in the same mode as the one set
with the remote controller just before the shutoff of the main power. When
timer is set, timer setting is cancelled and the unit starts operation when power
is resumed.
If you do not want to use this function, please consult the service repre-
sentative because the setting of the unit needs to be changed.
SELECTING OPERATION MODES
Set temperature : 75°F
(24°C)
Fan speed : Medium
Horizontal vane : Auto
Emergency COOL
Stop
Note:
The fi rst 30 minutes of operation is test run. Temperature
control does not work, and fan speed is set to High.
(I FEEL)
(COOL)
(DRY)
(FAN)

En-6
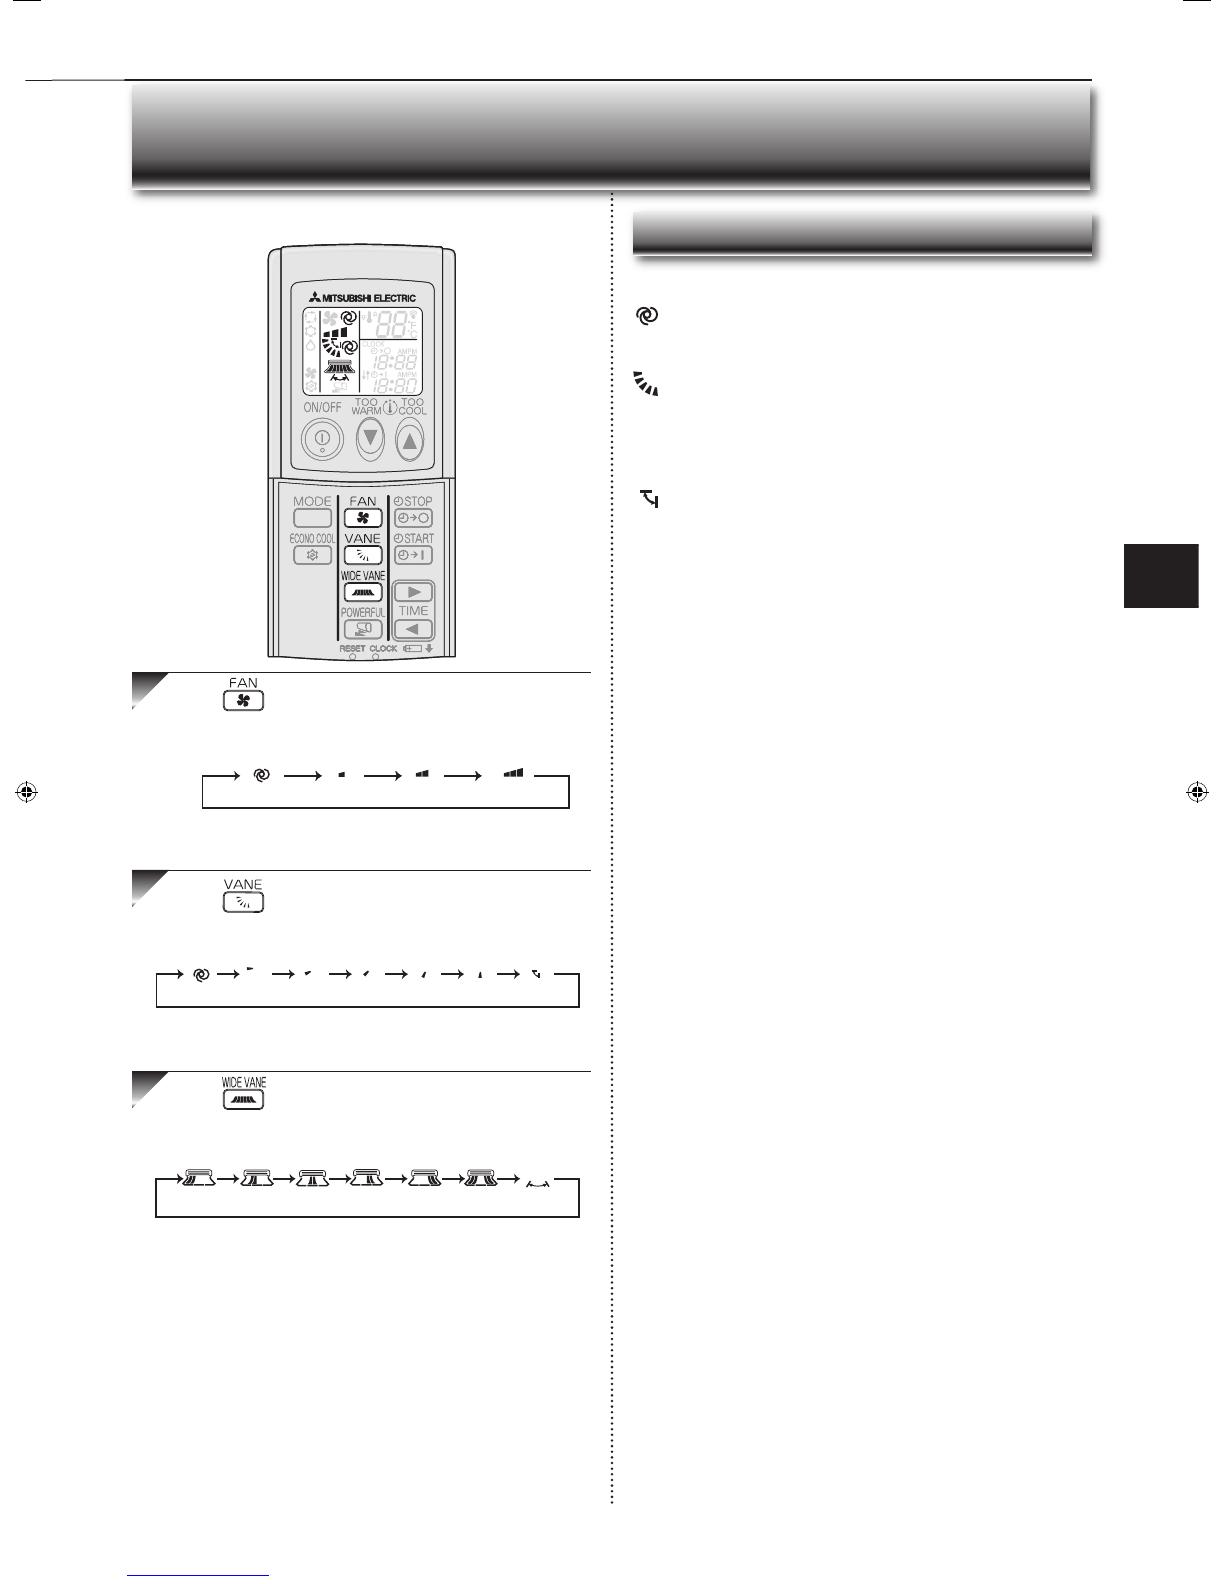
Press to select fan speed. Each press changes
fan speed in the following order:
• Two short beeps are heard from the indoor unit when set to AUTO.
Press to select airfl ow direction. Each press
changes airfl ow direction in the following order:
• Two short beeps are heard from the indoor unit when set to AUTO.
Press to select horizontal airfl ow direction. Each
press changes airfl ow direction in the following order:
Vertical airflow direction
(AUTO)
The vane is set to the most effi cient airfl ow direction: horizontal position.
(Manual)
For efficient air conditioning, select upper position for COOL/DRY. During
COOL/DRY, when the vane is set to position (4) or (5), the vane automati-
cally moves to horizontal position after 1 hour to prevent water dripping.
(Swing)
The vane moves up and down intermittently.
(AUTO) (Low) (Med.) (High)
(AUTO) (1) (2) (3) (4) (5) (SWING)
FAN SPEED AND AIRFLOW DIRECTION ADJUSTMENT
(
SWING
)

En-7
• OPERATING INSTRUCTIONS •
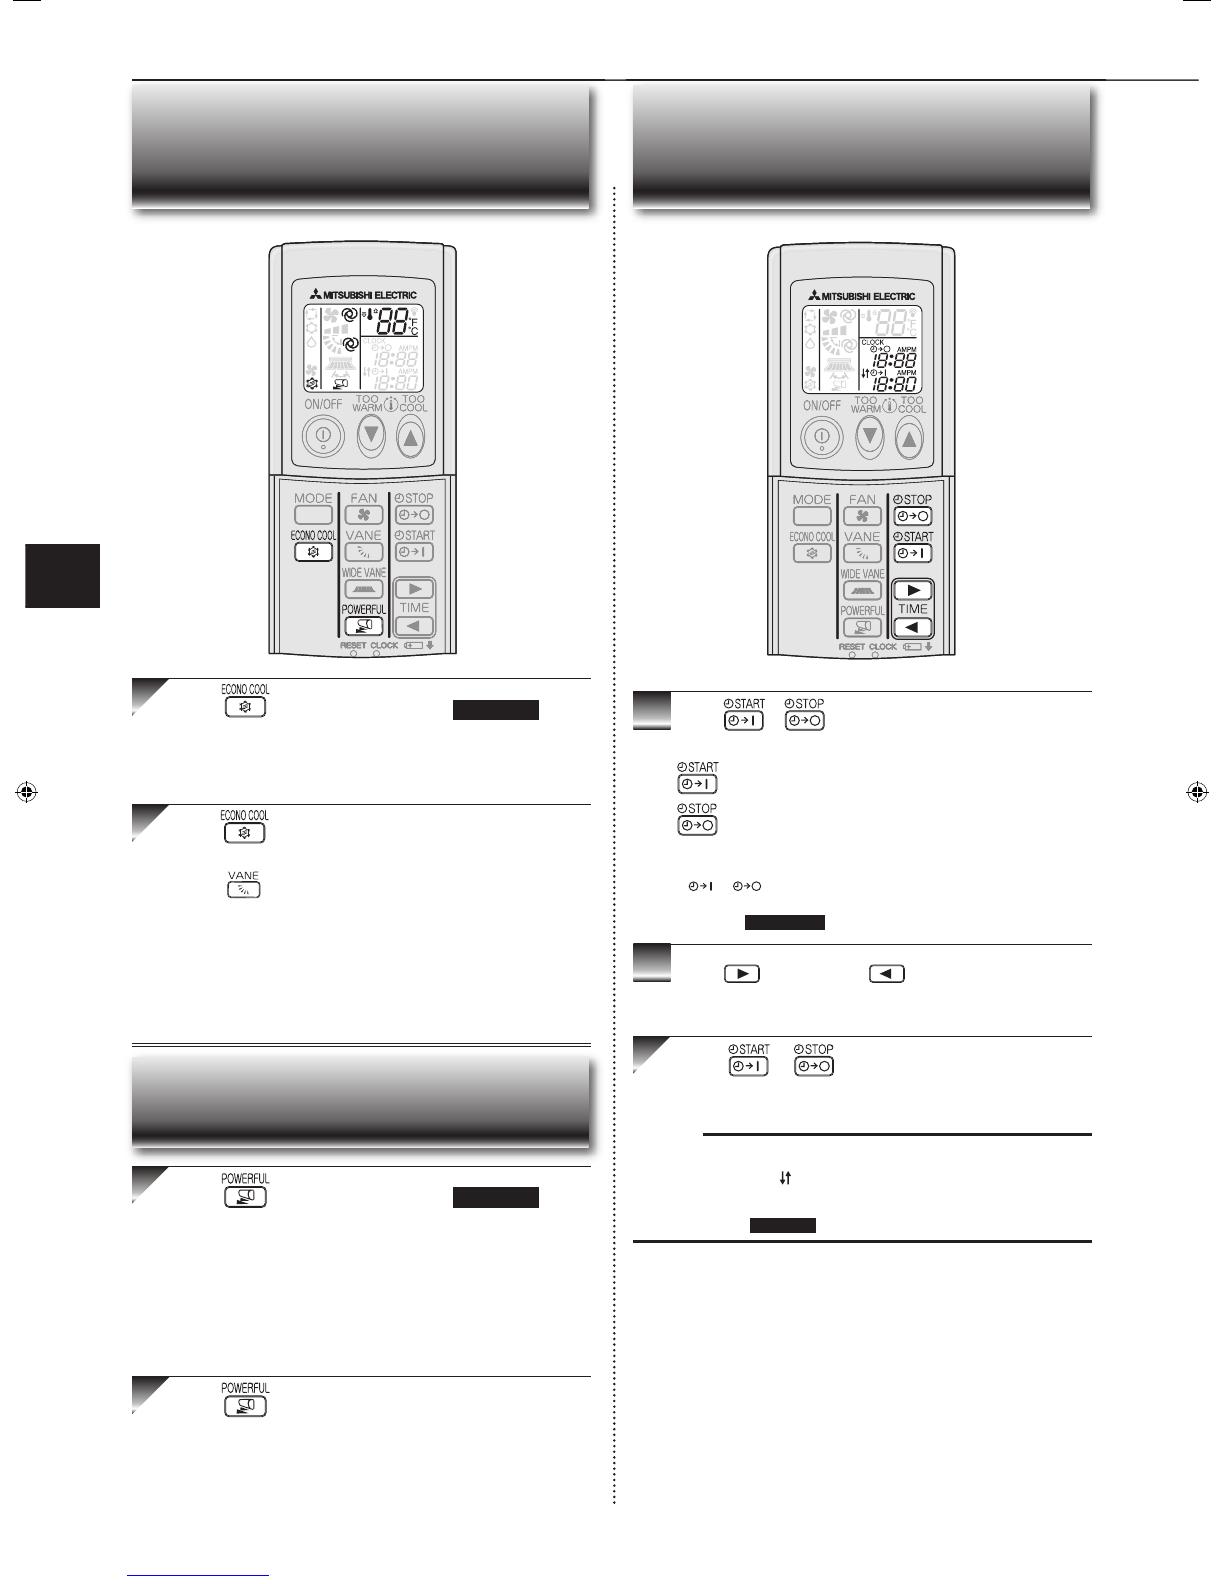
ECONO COOL OPERATION
Press during COOL mode page 5 to start
ECONO COOL operation.
The unit performs swing operation vertically in various cycle according
to the temperature of the unit. Set temperature is set 4°F (2°C) higher
automatically.
Press again to cancel ECONO COOL operation.
• Pressing also cancels ECONO COOL operation.
What is “ECONO COOL”?
Swing air fl ow (change of air fl ow) makes you feel cooler than constant air fl ow.
So, even though the set temperature is automatically set 4°F (2°C) higher, it is
possible to perform cooling operation with keeping comfort. As a result, energy
can be saved.
TIMER OPERATION (ON/OFF TIMER)
1Press or during operation to set the timer.
(ON timer) : The unit will turn ON at the set
time.
(OFF timer) : The unit will turn OFF at the set
time.
* or blinks.
* Make sure that the current time is set correctly. Page 4
2Press (Increase) and (Decrease) to set the
time of timer.
Each press increases or decreases the set time by 10 minutes.
Press or again to cancel timer.
Note:
• ON and OFF timers can be used in combination. mark indicates the order
of timer operations.
• If power failure occurs while ON/OFF timer is set, see page 5 “Auto restart
function”
Press during COOL mode page 5 to start
POWERFUL COOL operation.
Fan speed : POWERFUL-high (exclusive speed for POWERFUL
mode)
Horizontal vane : Set position, or downward airflow position during
AUTO setting
• Temperature cannot be set during POWERFUL COOL operation.
Press again to cancel POWERFUL COOL
operation.
• POWERFUL COOL operation is cancelled automatically in 15 minutes.
• POWERFUL COOL operation is cancelled when the following buttons
are pressed:
ON/OFF button, FAN button, ECONO COOL button
POWERFUL COOL OPERATION
En-8
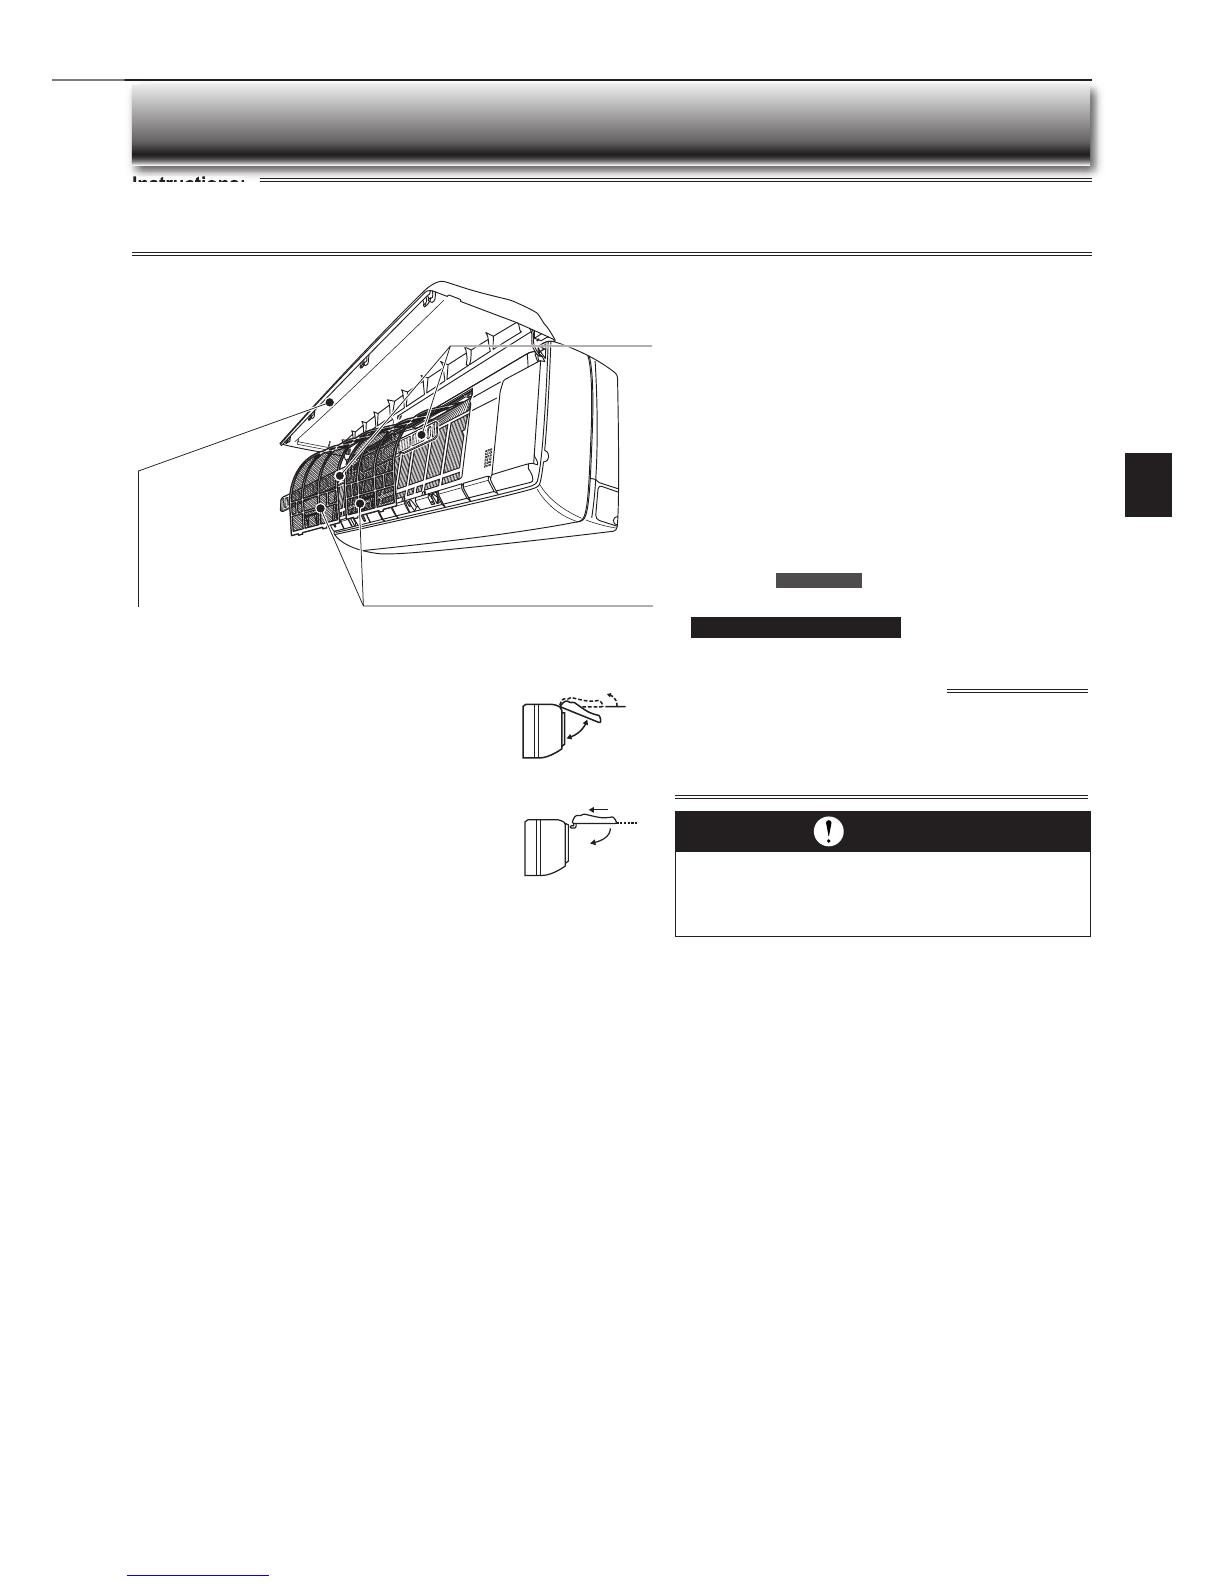
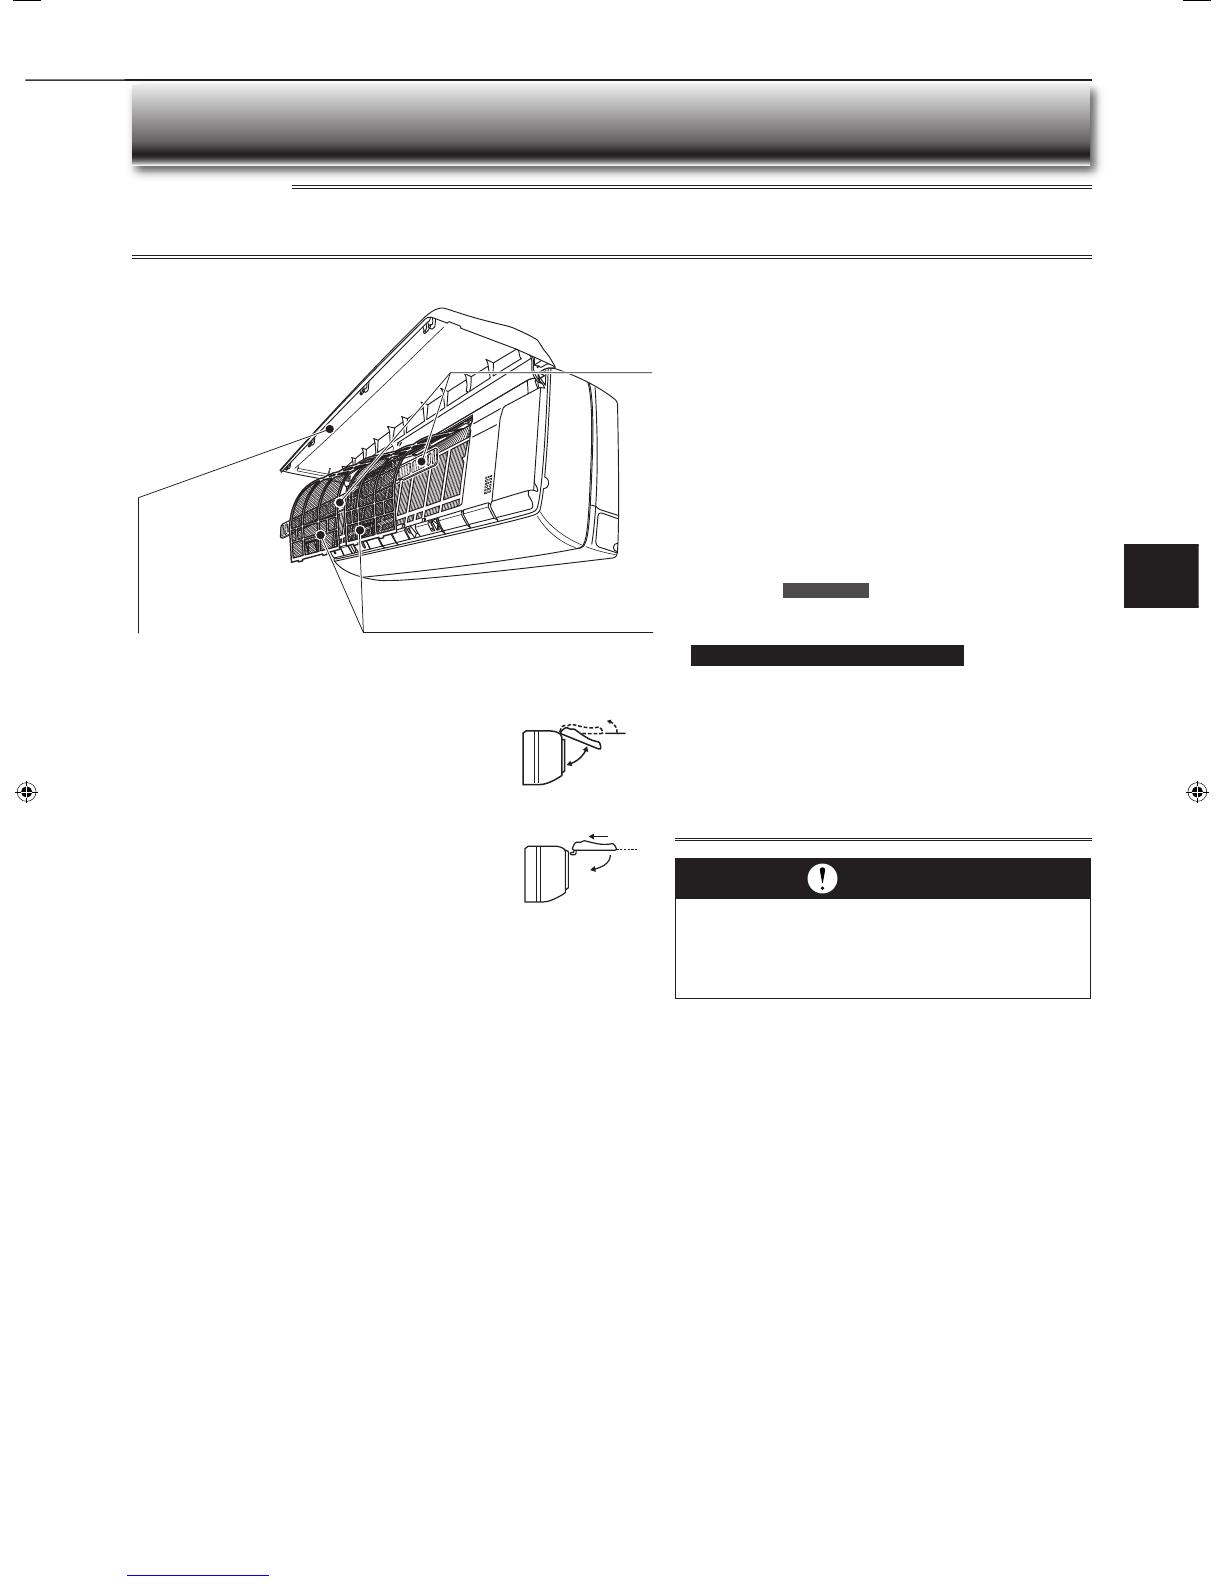
Instructions:
Air cleaning fi lter
(Anti-Allergy Enzyme Filter)
Back side of air fi lter
Clean every 3 months:
• Remove dirt by a vacuum cleaner
• Put it back to its original positions.
When dirt cannot be removed by vacuum cleaning:
• Soak the fi lter and its frame in lukewarm water before rinsing it.
(Diluted mild detergents can be used when dirt cannot be removed.)
•
After washing with water, dry it well in shade. Install all tabs of the air fi lter.
Every year:
• Replace it with a new air cleaning fi lter for best performance.
• Parts Number MAC-2300FT
Instructions:
CLEANING
• Switch off the power supply or turn off the breaker before cleaning.
• Be careful not to touch the metal parts with your hands.
• Do not use benzine, thinner, polishing powder, or insecticide.
• Use only diluted mild detergents.
• Do not expose parts to direct sunlight, heat, or fl ames to dry.
• Do not use water hotter than 120°F (50°C).
Air fi lter (Catechin air fi lter)
• Clean every 2 weeks
• Remove dirt by a vacuum cleaner, or wash with water.
• After washing with water, dry it well in shade.
What is “Catechin air fi lter” ?
Catechin is a biofl avonoid that is found in green tea that has both antivi-
ral and antioxidant qualities. In addition to these benefi ts, Catechin also
offers excellent deodorizing characteristics. Catechin air fi lter uses this
compound to not only improve air quality but also prevent the spread of
bacteria and viruses in the room.
Front panel
Do not open the front panel up past the level position.
• The panel may come off in order to prevent it from being dam-
aged.
• The panel may also come off if the upper part of the panel is
pulled down.
If the front panel comes off, attach it as explained
below.
1. Keep the front panel level with one hand, and insert the hinges
one by one with the other hand into the notches at the left,
right, and center of the top of the indoor unit until they click
into place.
2. Close the front panel.
2
1
Do not exceed
Movable
range
Important
• Clean the fi lters regularly for best performance and to reduce
power consumption.
• Dirty fi lters cause condensation in the air conditioner which
will contribute to the growth of fungi such as mold. It is
therefore recommended to clean air fi lters every 2 weeks.
En-9
• OPERATING INSTRUCTIONS •
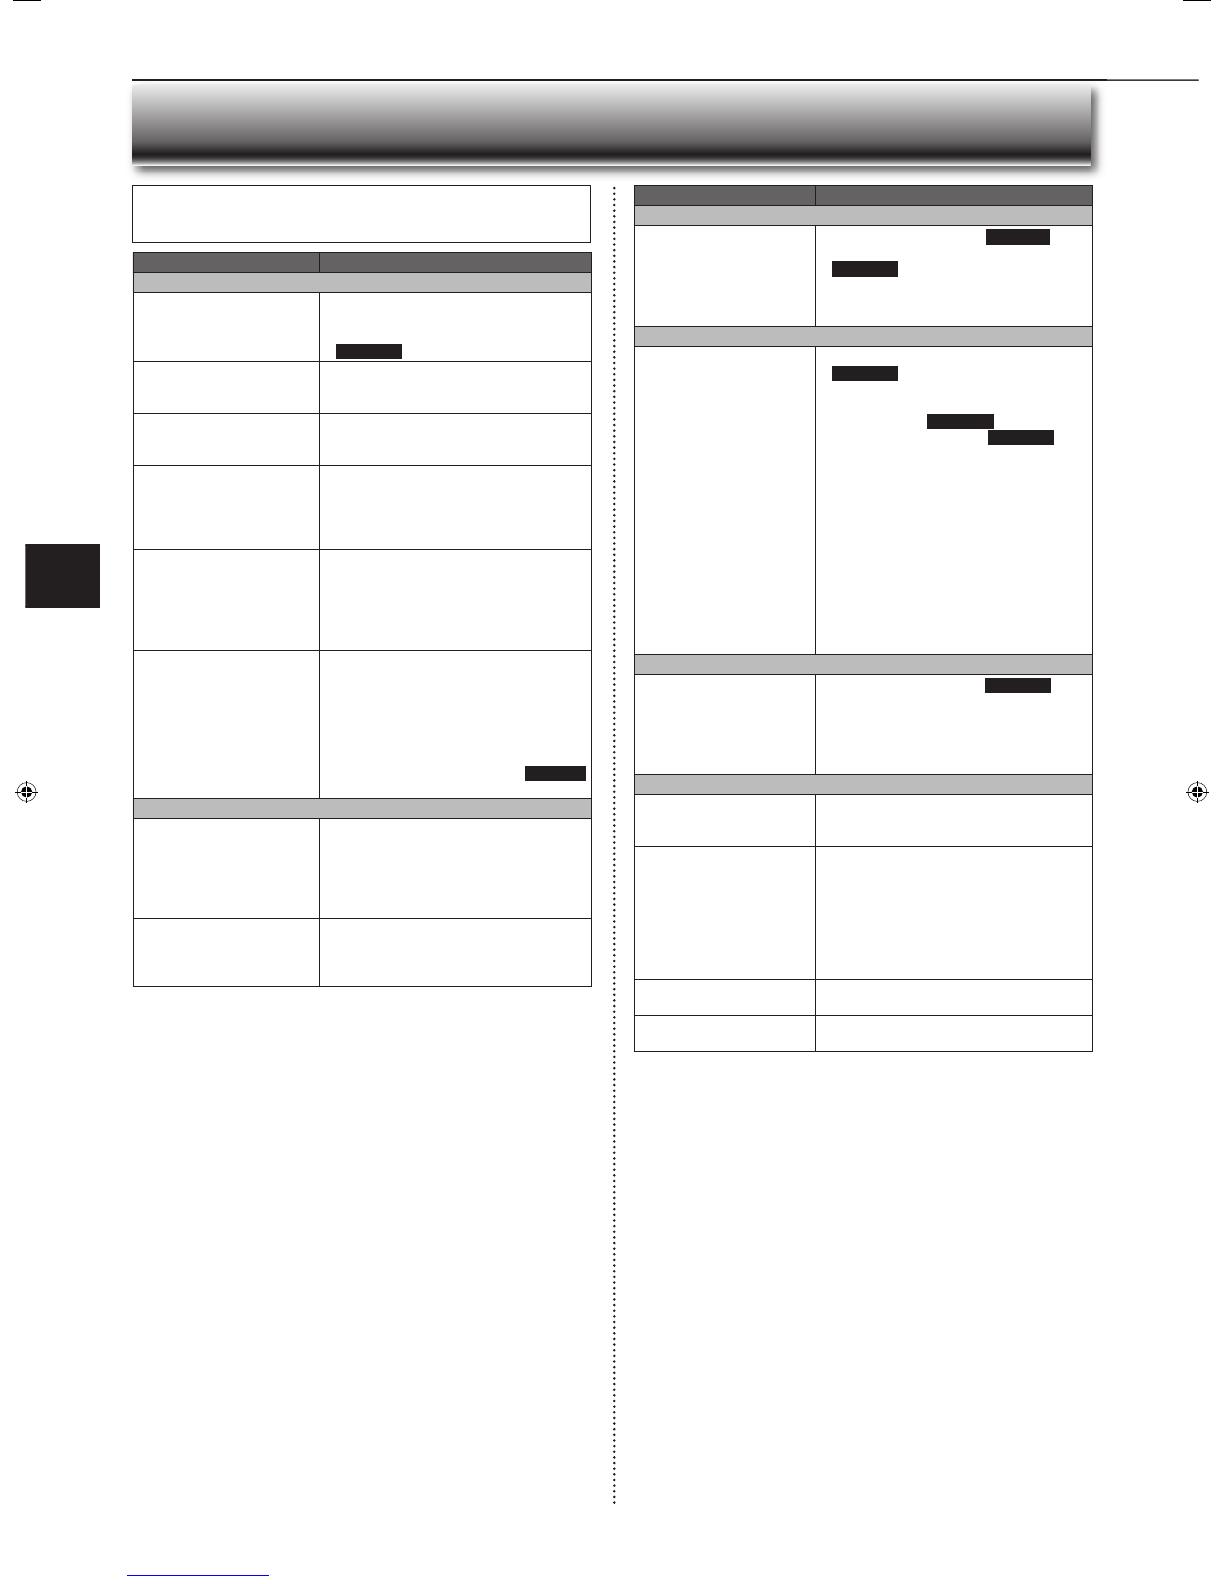
Even if these items are checked, when the unit does not recover from the trouble,
stop using the air conditioner and consult your dealer.
Symptom Explanation & Check points
Indoor Unit
The unit cannot be operated. • Is the breaker turned on?
• Is the power supply plug connected?
• Is the ON timer set? Page 7
The unit cannot be operated
for about 3 minutes when
restarted.
• This protects the unit according to instruc-
tions from the microprocessor. Please
wait.
Mist is discharged from the air
outlet of the indoor unit.
• The cool air from the unit rapidly cools mois-
ture in the air inside the room, and it turns
into mist.
The swing operation of the
HORIZONTAL / VERTICAL
VANE is suspended for a
while, then restarted.
• This is for the swing operation of the HORI-
ZONTAL / VERTICAL VANE to be performed
normally.
The air fl ow direction changes
during operation.
The direction of the horizontal
vane cannot be adjusted with
the remote controller.
• When the unit is operated in COOL or DRY
mode, if the operation continues with air
blowing down for 0.5 to 1 hour, the direction
of the air fl ow is automatically set to position
(1) to prevent water from condensing and
dripping.
The unit starts operation by
itself when the main power
is turned on, though it isn’t
operated with the remote
controller.
• These models are equipped with an auto re-
start function. When the main power is turned
off without stopping the unit with the remote
controller and is turned on again, the unit
starts operation automatically in the same
mode as the one set with the remote control-
ler just before the shutoff of the main power.
Refer to “Auto restart function” page 5 .
Outdoor Unit
The fan of the outdoor unit
does not rotate even though
the compressor is running.
Even if the fan starts to rotate,
it stops soon.
• When the outside temperature is low dur-
ing cooling operation, the fan operates
intermittently to maintain suffi cient cooling
capacity.
Water leaks from the outdoor
unit.
• During COOL and DRY operations, pipe or
pipe connecting sections are cooled and this
causes water to condense.
Symptom Explanation & Check points
Remote controller
The display on the remote
controller does not appear
or it is dim. The indoor unit
does not respond to the
remote control signal.
• Are the batteries exhausted? Page 4
• Is the polarity (+, -) of the batteries correct?
Page 4
• Are any buttons on the remote controller of
other electric appliances being pressed?
Does not cool
The room cannot be cooled
suffi ciently.
• Is the temperature setting appropriate?
Page 5
• Is the fan setting appropriate? Please
change fan speed to higher setting. Page 6
• Are the fi lters clean? Page 8
• Is the fan or heat exchanger of the indoor unit
clean?
• Are there any obstacles blocking the air inlet
or outlet of the indoor or outdoor unit?
• Is a window or door open?
• When a ventilation fan or a gas cooker is
used in a room, the cooling load increases,
resulting in an insuffi cient cooling effect.
• When the outside temperature is high, the
cooling effect may not be suffi cient.
Airfl ow
The air from the indoor unit
smells strange.
• Are the fi lters clean? Page 8
• Is the fan or heat exchanger of the indoor unit
clean?
• The unit may suck in an odor adhering to the
wall, carpet, furniture, cloth, etc. and blow it
out with the air.
Sound
Cracking sound is heard. • This sound is generated by the expansion/
contraction of the front panel, etc. due to
change in temperature.
The sound as burbling is
heard.
• This sound is heard when the outside air is
absorbed from the drain hose by turning on
the range hood or the ventilation fan, making
water fl owing in the drain hose to spout out.
This sound is also heard when the outside air
blows into the drain hose in case the outside
wind is strong.
Mechanical sound is heard
from the indoor unit.
• This is the switching sound in turning on/off
the fan or the compressor.
The sound of water fl owing
is heard.
• This is the sound of refrigerant or condensed
water fl owing in the unit.
In the following cases, stop using the air conditioner and consult your
dealer.
• When water leaks or drips from the indoor unit.
• When the left operation indicator lamp blinks.
• When the breaker trips frequently.
• The remote control signal is not received in a room where an electronic ON/OFF
type fl uorescent lamp (inverter-type fl uorescent lamp, etc.) is used.
• Operation of the air conditioner interferes with radio or TV reception. An ampli-
fi er may be required for the affected device.
• When an abnormal sound is heard.
WHEN YOU THINK THAT TROUBLE HAS OCCURRED

En-10
Installation place
Avoid installing the air conditioner in the following places.
• Where there is much machine oil.
• Salty places such as the seaside.
• Where sulfi de gas is generated such as a hot spring.
• Where oil is splashed or where the area is fi lled with oily smoke.
• Where there is high-frequency or wireless equipment.
• Where the air from the outdoor unit air outlet is blocked.
• Where the operation sound or air from the outdoor unit does not bother the
house next door.
Electrical work
• Provide an exclusive circuit for the power supply of the air conditioner.
• Be sure to observe the breaker capacity.
If you have any questions, consult your dealer.
Guaranteed operating range
INSTALLATION PLACE AND
ELECTRICAL WORK
SPECIFICATIONS
To prevent the effects
of a fl uorescent lamp,
keep as far apart as
possible.
wall, etc.
Inverter-type
fl uorescent lamp
Keep a space to
prevent the pic-
ture distortion or
the noise.
3 ft (1m)
or more
Radio
4 in (100 mm)
or more
Well-
ventilated dry
place
8 in (200 mm)
or more
TV
Cordless
phone or
Portable
phone
10 ft (3 m)
or more
3 ft
(1m)
or more
The installation location of the outdoor unit should
be at least 10ft (3 m) away from the antennas for TV
sets, radios, etc. In areas where the reception is weak,
provide greater space between the outdoor unit and
the antenna of the affected device if operation of the air
conditioner interferes with radio or TV reception.
1Set to the highest temperature in manual COOL mode,
and operate for 3 to 4 hours. Page 5
• This dries the inside of the unit.
• Moisture in the air conditioner contributes to favorable conditions for
growth of fungi, such as mold.
2Press to stop the operation.
3Turn off the breaker and/or disconnect the power sup-
ply plug.
4Remove all batteries from the remote controller.
When using the air conditioner again:
1Clean the air fi lters. Page 8
2Check that the air inlet and outlet of the indoor and
outdoor units are not blocked.
3Check that the ground is connected correctly.
WHEN THE AIR CONDITIONER IS NOT
GOING TO BE USED FOR A LONG TIME
Indoor Outdoor
Cooling
Upper limit 95°F (35°C) DB 115°F (46.1°C) DB
71°F (21.7°C) WB —
Lower limit 67°F (19.4°C) DB 14°F (-10°C) DB
57°F (13.9°C) WB —

Es-11
● MANUAL DE INSTRUCCIONES ●
ATENCIÓN
No emplee conexiones intermedias del cable de
alimentación ni tampoco un cable de extensión;
evite también conectar demasiados aparatos a una
sola toma de corriente alterna (CA).
• Eso podría sobrecalentamiento un incendio o descargas
eléctricas.
Asegúrese de que el enchufe de alimentación no
tiene suciedad e insértelo con seguridad en la
toma de corriente.
• Un enchufe sucio puede provocar fuego o descargas eléc-
tricas.
No ate, tire, o modifi que el cable de alimentación y
no appliqué calor ni coloque ningún objeto pesado
sobre él.
• Esto podría provocar fuego o una descarga eléctrica.
No active/desactive el interruptor ni desconecte/
conecte el enchufe de alimentación durante el
funcionamiento.
• Esto podría provocar un incendio a causa de las chispas.
• Asegúrese de desactivar el interruptor o desenchufar el cable
de alimentación inmediatamente después de apagar la unidad
interior con el mando a distancia.
Evite exponer la piel al aire frío durante un periodo
de tiempo prolongado.
• Podría ser nocivo para su salud.
El cliente no debe instalar ni reparar ni cambiar
de sitio la unidad.
• Un aire acondicionado manejado inadecuadamente puede
provocar fuego o descargas eléctricas.
No introduzca los dedos, palos, etc. en las entradas
/ salidas de aire.
• Podría hacerse daño, ya que el ventilador gira a alta veloci-
dad.
• Puesto que este producto tiene piezas rotatorias y piezas que pueden pro-
vocar descargas eléctricas, lea atentamente las “Medidas de seguridad”
antes de usarlo.
• Tome las precauciones aconsejadas en este manual, ya que son importantes
para una utilización segura del producto.
• Después de leer este manual, guárdelo a mano junto con el manual de
instalación para poder recurrir a él con facilidad.
Indicaciones y sus signifi cados
ATENCIÓN : Una manipulación incorrecta podría conllevar con toda
probabilidad un peligro grave, por ejemplo, de muerte o
de heridas graves.
CUIDADO : Una manipulación incorrecta podría conllevar, según las
condiciones, un peligro grave.
Cuando se produzca una anormalidad (por ejemplo,
olor a quemado), pare el acondicionador de aire y
desenchufe el cable de alimentación o desactive
el interruptor.
• Si la unidad sigue funcionando en condiciones anómalas
podría producirse un incendio u otro tipo de problemas. En
tal caso, consúlteselo a su distribuidor.
Si el aire acondicionado no refrigera ni calienta
de forma correcta, consulte con su distribuidor ya
que puede tratarse de una fuga de refrigerante.
Si una reparación implica recargar la unidad con
refrigerante, consulte los detalles al técnico de
servicio.
• El refrigerante cargado en el acondicionador de aire es seguro
y normalmente no tiene fugas. No obstante, si existe pérdida
de gas refrigerante en el interior y entra en contacto con las
llamas del calentador de un ventilador, calentador, horno o
aparato similar, se generarán sustancias nocivas.
CUIDADO
No toque la entrada de aire ni la aleta de aluminio
de la unidad exterior.
• Podría hacerse daño.
No aplique directamente insecticida u otros pro-
ductos infl amables a la unidad.
• Podría producirse un incendio o deformarse la caja.
No deje un animal doméstico ni una planta en un
lugar que quede expuesto directamente al fl ujo
de aire.
• Podría ser nocivo para el animal o la planta.
No coloque otros aparatos eléctricos o muebles
debajo de la unidad interior/exterior.
• El agua podría gotear desde la unidad y podría dañarlos o
estropearlos.
No instale la unidad en un soporte roto.
• La unidad podría caerse y provocar daños.
Símbolos utilizados en este manual y su
signifi cado
: Asegúrese de no hacerlo.
: Siga las instrucciones estrictamente.
: No introduzca nunca los dedos ni objetos, etc.
:
No se suba a la unidad interior/exterior ni ponga nada encima.
: Peligro de descarga eléctrica. Tenga cuidado.
: Asegúrese de desenchufar el enchufe de alimentación de la toma de
corriente.
: Asegúrese de desconectar la corriente.
MEDIDAS DE SEGURIDAD
ÍNDICE
■ MEDIDAS DE SEGURIDAD 11
■ NOMBRE DE LAS PARTES 13
■ PREPARACIÓN ANTES DE PONERLO EN FUNCIONAMIENTO 14
■ SELECCIÓN DE MODOS DE FUNCIONAMIENTO 15
■ VELOCIDAD DEL VENTILADOR Y AJUSTE DE DIRECCIÓN DE FLUJO DE AIRE 16
■ FUNCIÓN DE DESCONEXIÓN AUTOMÁTICA (ECONO COOL) 17
■ POTENTE OPERACIÓN DE REFRIGERACIÓN 17
■ ACCIONAMIENTO POR EL TEMPORIZADOR (TEMPORIZADOR DE CONEXIÓN/DESCONEXIÓN) 17
■ LIMPIEZA 18
■ SI CREE QUE SE HA PRODUCIDO UN PROBLEMA 19
■ CUANDO EL ACONDICIONADOR DE AIRE NO SE VAYA A UTILIZAR DURANTE MUCHO TIEMPO 20
■ LUGAR DE INSTALACIÓN Y TRABAJO ELÉCTRICO 20
■ CARACTERÍSTICAS TÉCNICAS 20
SG79Y962H03-ES.indd 11 11/17/08 4:44:03 PM
Es-12
CUIDADO
No se suba sobre un banquito inestable para soste-
ner la unidad o limpiarla.
• Si se cae podría hacerse daño.
No tire del cable de alimentación.
• El núcleo del cable de alimentación puede desconectarse y
provocar calentamiento y un incendio.
No cargue ni desmonte las pilas y no las arroje al
fuego.
• Esto puede provocar una fuga, un incendio o una explosión.
No utilice la unidad durante más de 4 horas a alta
humedad (80% HR o más) y/o con ventanas o puertas
exteriores abiertas.
• Esto puede causar condensación de agua en el aire
acondicionado, que podría gotear, mojando o dañando los
muebles.
• La condensacón de agua en el aire acondicionado puede
contribuir al aumento de hongos, como moho.
No utilice la unidad para fi nes especiales que no
sean los indicados como almacenar alimentos, criar
animales, cultivar plantas, conservar instrumentos
de precisión u objetos de arte.
• Esto podría deteriorar la calidad, o dañar a animals y plantas.
No coloque una estufa, etc. donde quede expuesta
al fl ujo de aire directo.
• Esto podría causar una combustión imperfecta.
Antes de limpiar la unidad, apague la unidad y des-
conecte la toma de corriente o el disyuntor.
• Esto podría provocar daños, ya que el ventilador de la unidad
interior gira a gran velocidad durante el funcionamiento.
Desconecte el interruptor o desenchufe el cable de
alimentación cuando no vaya a utilizar el equipo
durante un periodo de tiempo prolongado.
• Podría acumularse suciedad y producirse un incendio.
Cambie todas las pilas del mando a distancia con
nuevas del mismo tipo.
• Utilizar una pila nueva con una vieja puede provocar sobre
calentamiento, fugas o explosiones.
Si el líquido de una pila entra en contacto con su piel
o su ropa, lávelas bien con agua limpia.
•
Si el líquido de una pila entra en contacto con sus ojos, lávelos bien
con agua limpia y seguidamente busque asistencia médica.
Asegúrese de que la zona esté bien ventilada cuando
se utilice la unidad junto a una estufa.
•
Una ventilación inadecuada puede producir escasez de oxígeno.
Desconecte el interruptor cuando oiga un trueno
y exista la posibilidad que haya una tormenta con
rayos.
• Podría dañarse la unidad si le alcanza un rayo.
Después de que se utilice el aire acondicionado du-
rante muchas estaciones, realice una inspección y
un mantenimiento adicional a la limpieza normal.
• La suciedad o polvo en la unidad pueden crear un olor desagra-
dable, o contribuir a que crezcan hongos y pueden causar que
haya una pérdida de agua de la unidad interior. Consulte con
su distribuidor para realizar la inspección y el mantenimiento,
que necesita conocimientos especializados y técnica.
ATENCIÓN
Pida a su distribuidor que instale el aire acondicio-
nado.
• El usuario no debe realizar la instalación ya que ésta precisa
conocimientos y habilidades especializadas. Un aire acondicio-
nado instalado de manera no adecuada puede provocar fugas
de agua, fuego o descargas eléctricas.
Utilice una fuente de alimentación dedicada sola-
mente para el aire acondicionado.
• Una fuente de alimentación no dedicada puede provocar
calentamiento o fuego.
No instale la unidad donde pueda haber fugas de
gas infl amable.
• Si hay una fuga de gas alrededor de la unidad, podría pro-
ducirse una explosión.
Conecte la unidad a tierra correctamente.
• No conecte el cable de tierra a una tubería de gas, tubería de
agua, pararrayos o cable de tierra de un teléfono. Si la con-
exión de tierra es defectuosa podría producirse una descarga
eléctrica.
CUIDADO
Instale un interruptor de fallos de conexión a tierra
(GFI) dependiendo del lugar de instalación del aire
acondicionado (zonas como las muy húmedas).
• Si no está instalado el interruptor de fallos de conexión a tierra
(GFI), podría producirse una descarga eléctrica.
Asegúrese de drenar completamente el agua de
condensación.
• Si no se drena del todo, el agua podría gotear desde la unidad
y mojar y causar desperfectos en el mobiliario.
En caso de condición anormal
Cese inmediatamente el funcionamiento del aire acondicionado y consulte
con su distribuidor.
MEDIDAS DE SEGURIDAD
No utilice los mandos con las manos mojadas.
• Podrían producirse descargas eléctricas.
No limpie el aire acondicionado con agua o colo-
que un objeto que contenga agua, como un fl orero,
encima.
• Podría provocar fuego o una descarga eléctrica.
No se suba o ponga ningún objeto encima de la
unidad exterior.
• Podría provocar daños si usted o el objeto se cae.
Para la instalación
IMPORTANTE
Los fi ltros sucios pueden provocar condensación en el acondicionador
de aire que contribuye a la formación de hongos, como el moho.
Por lo tanto, es recomendable limpiar los fi ltros cada 2 semanas.
SG79Y962H03-ES.indd 12 11/17/08 4:44:06 PM
Es-13
● MANUAL DE INSTRUCCIONES ●
Botones de temperatura
Página 15
Botón de activación del
temporizador Página 17
Botón de desactivación del
temporizador Página 17
Botones de ajuste del TIME
(TEMPORIZADOR) Pages 14, 17
Aumentar tiempo
Disminuir tiempo
Botón de CLOCK Página 14
Botón de reinicialización (RESET)
Página 14
Cubierta
deslizar para abrir
Botón WIDE VANE Página 16
Sección de pantalla
Luz de indicación
de funcionamiento
Sección de recepción
del controlador remoto
Interruptor de
accionamiento
de emergencia
Página 15
Entrada de aire
(lado posterior y lateral)
Tubería
Manguera de drenaje
Salida de aire
Salida de drenaje
Soporte de mando
a distancia
Sección de transmisión de
señales
Distancia de señal:
Alrededor de 20ft(6 m) El/los
pitido(s) es (son) oídos desde
la unidad interna cuando se
recibe la señal.
Sección de pantalla de
accionamiento
Botón ON/OFF
(activación/
desactivación de
funcionamiento
Botón de selección
del modo de
funcionamiento
Página 15
Botón de descon-
exión automática
(ECONO COOL)
Página 17
Botón de control de
velocidad del ventilador
Página 16
Botón de control
de las lamas
Página 16
• Instale el soporte del mando
a distancia en un lugar
donde la unidad interior
pueda recibir la señal.
Use únicamente el controlador remoto suministrado con la unidad.
No use otro controlador remoto.
Defl ector horizontal
Defl ector vertical
Salida de aire
Filtro de aire
(Taninos fi ltro de
aire) Entrada de aire
Panel frontal
Filtro de limpieza del aire
(Filtro de enzimas antialérgico)
Unidad exterior
NOMBRE DE LAS PARTES
Unidad interior Controlador remoto
La apariencia de la unidad exterior puede ser diferente de algunos modelos.
Botón
POWERFUL
(modo potente)
Página 17
SG79Y962H03-ES.indd 13 11/17/08 4:44:08 PM

Es-14
• Asegúrese de que la polaridad de las pilase s la correcta.
• No utilice pilas de manganeso. El mando a distancia podría no funcionar
bien.
• No utilice pilas recargables.
• Cambie todas las pilas por pilas nuevas del mismo tipo.
• Las pilas se pueden utilizar aproximadamente durante un año. No obstante
las pilas con caducidad duran menos.
Antes de la operación: inserte el enchufe de suministro de corriente en la
toma y/o conecte el interruptor.
Instalación de las pilas del mando a
distancia
PREPARACIÓN ANTES DE PONERLO EN FUNCIONAMIENTO
RESET
CLOCK
1.
Quite la cubierta
delantera
2. Ponga pilas alcalinas
AAA
3. Instale la cubierta delantera
• Pulse RESET y CLOCK con suavidad utilizando un
palito. Si no se pulsa el botón RESET el mando a
distancia no funcionará correctamente.
RESET CLOCK
1. Pulse RESET
2. Pulse CLOCK
4. Pulse CLOCK de
nuevo
3. Pulse los botones TIME para
ajustar la hora
Cada pulsación aumenta/
disminuye la hora en 1 minuto
(10 minutos cuando se pulsa
más tiempo)
Ajuste de la hora actual
Cambio de las unidades de temperatura
(ºF/ºC)
1. Pulse RESET
mientras se pulsan
los botones de
temperatura.
• Pulse el RESET suavemente utilizando un palito.
La unidad por defecto es °F.
SG79Y962H03-ES.indd 14 11/17/08 4:44:11 PM

Es-15
● MANUAL DE INSTRUCCIONES ●
Modo I FEEL
La unidad selecciona el modo de operación según la temperatura de la ha-
bitación cuando el modo AUTO está seleccionado. Cuando la temperatura
de la sea superior a 77°F (25°C), COOL está seleccionado (set temperatura
preestablecida: 75°F [24°C]). Cuando la temperatura de la habitación sea
inferior a 77°F (25°C), se selecciona DRY . No obstante, cuando la opera-
ción se para y se inicia de nuevo dentro de 2 horas, el modo que se pone
en funcionamiento el modo seleccionado previamente.
Nota:
•
Durante la operación COOL, la temperatura preestablecida no se cambiará
cuando la temperatura de la habitación sea superior en 4°F (2°C) a la tem-
peratura preestablecida. En este caso, espere hasta que la temperatura de
la habitación baje 4°F (2°C) de la temperatura preestablecida.
• No se recomienda el modo Auto si esta unidad interior está conectada a
una unidad exterior tipo MXZ.
Modo COOL
Disfrute del aire frío a la temperatura que desee. No opere el modo COOL a
temperaturas exteriores bajas (inferiores a 14°F [-10°C]). Agua condensada
en la unidad puede fi ltrarse y mojar o dañar los muebles, etc.
Modo DRY
Deshumidifi que su habitación. La habitación puede estar un poco fría.
No se puede fi jar la temperatura no se puede fi jar durante el modo DRY.
Modo FAN
Reparte el aire en su habitación.
Luz indicadora de operación
Luz de indicación del funcionamiento
La luz indicadora de operación muestra el estado de la operación de la unidad.
Indicación Estado de funcionamiento Temperatura de la
habitación
La unidad está funcionando para
alcanzar la temperatura fi jada
Alrededor de 4°F (2°C) o
más diferente de la tem-
peratura preestablecida
La temperatura de la habitación
alcanza la temperatura fi jada
Alrededor de 2 a 4°F
(1 a 2°C) de la temper-
atura preestablecida
Luz encendida Luz apagada
Operación de Emergencia
Cuando no se puede utilizar el mando a distancia...
La operación de emergencia se puede activar pulsando el interruptor de operación
de emergencia (E.O.SW) en la unidad interior.
Cada vez que se pulsa el E.O.SW, cambia la operación en
el siguiente orden:
1Pulse para iniciar la operación.
2Pulse para seleccionar el modo de operación.
Cada pulsación cambia el modo en el siguiente orden:
3Pulse o para fi jar la temperatura.
Cada pulsación aumenta o disminuye la temperatura
en 1°F (1°C).
Pulse para parar la operación.
• Se selecciona el mismo ajuste la próxima vez pulsando
simplemente .
Función reinicio automático
Si hay un corte de corriente o la corriente principal se apaga durante la operación,
La Función de reinicio automático inicia automáticamente la operación del
mismo modo que el fi jado con el mando a distancia justo antes de la desconexión
de la corriente principal. Cuando se fi ja el temporizador, se cancela el ajuste del
temporizador y la unidad inicia la operación cuando se reinicia la corriente.
Si no desea utilizar esta función, consulte al representante de
servicio ya que el ajuste de la unidad necesita cambiarse.
SELECCIÓN DE MODOS DE FUNCIONAMIENTO
Temperatura
determinada : 75°F (24°C)
Velocidad del ventilador : Media
Pala horizontal : Automática
COOL de
emergencia
Paro
Nota:
Los primeros 30 minutos de operación es de prueba. El con-
trol de temperatura no funcionan, y la velocidad del ventilador
es demasiado alta.
(I FEEL)
(COOL)
(DRY)
(FAN)
SG79Y962H03-ES.indd 15 11/17/08 4:44:16 PM
Es-16
Pulse para seleccionar la velocidad del ventila-
dor. Cada pulsación cambia la velocidad en el siguien-
te orden:
• Se escuchan dos pitidos cortos desde la unidad interior cuando se
ajuste AUTO.
Pulse para seleccionar la dirección del fl ujo de
aire. Cada pulsación cambia la dirección del fl ujo de
aire en el siguiente orden:
• Se escuchan dos pitidos cortos desde la unidad interior cuando se fija
a AUTO.
Pulse para seleccionar la dirección del fl ujo de
aire horizontal. Cada pulsación cambia la dirección del
fl ujo de aire en el siguiente orden:
Dirección veritical del flujo de aire
(AUTO)
El pala se fi ja en la dirección más efi caz del fl ujo del aire: posición horizontal.
(Manual)
Para un acondicionamiento de aire eficaz, seleccione la posición superior
para COOL/DRY. Durante COOL/DRY, cuando el pala se fija a la posición
(4) o (5), el pala se mueve automáticamente a la posición horizontal después
de 1 hora para evitar la filtración de agua.
(Swing)
El pala se mueve arriba y abajo intermitente.
(AUTO) (Bajo) (Med.) (Alto)
(AUTO) (1) (2) (3) (4) (5) (SWING)
VELOCIDAD DEL VENTILADOR Y AJUSTE DE DIRECCIÓN DE
FLUJO DE AIRE
(
SWING
)
SG79Y962H03-ES.indd 16 11/17/08 4:44:21 PM
Es-17
● MANUAL DE INSTRUCCIONES ●
FUNCIÓN DE DESCONEXIÓN
AUTOMÁTICA (ECONO COOL)
Pulse durante el modo COOL Página 15 para
empezar la operación ECONO COOL.
La unidad ejecuta la operación de balanceo verticalmente en varios ci-
clos según la temperatura de la unidad. La temperatura preestablecida
se fija en 4°F (2°C) más automáticamente.
Pulse de nuevo para cancelar la operación
ECONO COOL.
• Pulsar también cancela la operación ECONO COOL.
¿En qué consiste la función de “función de
desconexión automática (ECONO COOL)”?
Si la dirección del aire cambia cada cierto tiempo (vaivén del aire), el ambiente
se refresca más que si la dirección se mantiene siempre fi ja. Así pues, aunque
la temperatura establecida aumente automáticamente en 2 °C, puede utilizar
esta función cuando el aparato esté en modo de refrigeración y así sentirse
cómodo. Además, podrá ahorrar energía.
ACCIONAMIENTO POR EL
TEMPORIZADOR (TEMPORIZADOR DE
CONEXIÓN/DESCONEXIÓN)
1Pulse o durante la operación para ajustar
el temporizador.
(temporizador ON ) : La unidad se pondrá se
conectará a la hora fi jada.
(temporizador OFF ) : La unidad se pondrá se
desconectará a la hora
fi jada.
* o parpadea.
* Asegúrese de que la hora actual está fijada correcta-
mente . Página 14
2Pulse (Aumentar) y (Disminuir) para fi jar la
hora del temporizador.
Cada pulsación aumenta o disminuye la hora fijada en 10 minutos.
Pulse o de nuevo para cancelar el tem-
porizador.
Nota:
• Los temporizadores de conexión y desconexión se pueden utilizar de forma
combinada. La marca muestra el orden en el que se activarán los tempo-
rizadores.
• Si hay un corte de la corriente mientras está activado el temporizador ON/
OFF, consulte la Página 15 “Función de reinicio automática”
Pulse durante el modo COOL Página 15 para
iniciar la operación POWERFUL COOL.
Velocidad del ventilador : POWERFUL-alta (velocidad exclusiva para el
modo POWERFUL)
Pala horizontal : Posición preestablecida, o posición de flujo de
aire hacia abajo durante el ajuste AUTO
• La temperatura no se puede fijar durante la operación POWERFUL
COOL.
Pulse de nuevo para cancelar la operación
POWERFUL COOL.
• La operación POWERFUL COOL se cancela automáticamente des-
pués de 15 minutos.
• La operación POWERFUL COOL se cancela cuando se pulsan los si-
guientes botones: - Botón ON/OFF, botón FAN, botón ECONO COOL
POTENTE OPERACIÓN DE
REFRIGERACIÓN
SG79Y962H03-ES.indd 17 11/17/08 4:44:29 PM
Es-18
Limpieza del fi ltro de aire
(Filtro de enzimas antialérgico)
Parte posterior del fi ltro de aire
Limpie cada 3 meses:
• Elimine la suciedad con un aspirador
• Vuélvalo a poner a sus posiciones originales.
Cuando no pueda eliminar la suciedad con un aspirador:
• Moje el fi ltro y su marco en agua tibia antes de lavarlo.
(Los detergentes neutros diluidos se pueden utilizar cuando no se
pueda eliminar la suciedad.)
•
Después de lavarlo con agua, déjelo secar bien en la sombra. Instale todas
las pestañas del fi ltro de aire.
Cada año:
• Sustitúyalo por un nuevo fi ltro de limpieza de aire para un rendimiento
máximo.
• Piezas número MAC-2300FT
LIMPIEZA
Filtro de aire (Filtro de aire Taninos)
• Límpielo cada dos semanas
• Quite la suciedad con un aspirador, o lávelo con agua.
• Después de lavarlo con agua, déjelo secar bien en la sombra.
¿Qué es un “fi ltro de aire Taninos” ?
Taninos es un biofl avonoide que se encuentra en el té verde que tiene
cualidades antivirales y antioxidantes. Además de estos benefi cios,
Taninos también tiene excelentes características. El fi ltro de aire Taninos
utiliza este componente no solo para mejorar la calidad del aire, también
para evitar la propagación de bacterias y virus en la habitación.
Panel frontal
No abra el panel frontal por encima de la posición horizontal.
• El panel puede sacarse para evitar que sufra daños.
• También puede sacarse si se tira de la parte superior hacia
abajo.
Si el panel delantero se desprende, colóquelo tal
como se explica abajo.
1. Sujete el panel frontal con una mano e inserte los goznes uno a uno en los orifi cios a
la izquierda, derecha y centro de la parte superior de la unidad
interior hasta que hagan clic en su posición
2. Cierre el panel frontal.
2
1
No exceder
Rango
móvil
Instrucciones:
• Desconecte la corriente o desconecte el interruptor antes de realizar la limpieza.
• Tenga cuidado de no tocar partes metálicas con sus manos.
• No utilice gasolina, disolvente, polvo de pulimentación, ni insecticidas.
• Utilice sólo detergentes blandos diluidos.
• No exponga partes directamente a la luz del sol, calor o llamas para secar.
• No utilice agua más caliente de 120°F (50°C).
Importante
• Limpie los fi ltros regularmente para obtener un mejor
rendimiento y para reducir consumo de corriente.
•
Los fi ltros sucios causan condensación en el aire acondicionado
que puede contribuir al crecimiento de hongos como el moho.
Por lo tanto, se recomienda limpiar los fi ltros de aire cada 2
semanas.
SG79Y962H03-ES.indd 18 11/17/08 4:44:34 PM
Es-19
● MANUAL DE INSTRUCCIONES ●
Incluso si se comprueban estos objetos, cuando la unidad no
se recupera de un problema, deje de utilizar el aparato de aire
acondicionado y consulte con su distribuidor.
Síntoma
Explicación y puntos de comprobación
Unidad Interior
La unidad no puede ponerse
en funcionamiento.
• ¿Está encendido el interruptor?
• ¿Está conectado el enchufe?
• ¿Está puesto el temporizador ON?
Página 17
No se puede operar con la
unidad durante 3 minutos
cuando se reinicia.
• Esto protege la unidad según las instruc-
ciones del microprocesador. Por favor,
espere.
El vapor se descarga a través
de la salida de aire de
la unidad interior.
• El aire frío de la unidad enfría rápidamente la
humedad en el aire dentro de la habitación
y se convierte en bruma.
La operación de balanceo
de la VANE HORIZONTAL /
VERTICAL se suspende du-
rante un instante, y después
se reanuda.
• Esta es una operación que se ejecuta
normalmente en la operación de balanceo
HORIZONTAL / VERTICAL VANE.
La dirección del fl ujo de
aire cambia en pleno
funcionamiento.
La dirección del defl ector
horizontal no puede ajustarse
con el controlador remoto.
• Cuando se opera la unidad en modo COOL o
DRY, si la operación continúa con aire hacia
abajo durante de 0,5 a 1 hora, la dirección
del fl ujo de aire se fi ja automáticamente en
la posición (1) para evitar que el agua se
condense y gotee.
La unidad inicia su operación
por si sola cuando se conecta
la corriente principal, a pesar
de que no se encienda con el
mando a distancia.
• Estos modelos están equipados con una
función de reinicio automática. Cuando se
apaga la corriente principal sin apagar la
unidad con el mando a distancia y se encien-
de de nuevo, la unidad inicia su operación
automáticamente del mismo modo que con
el mando a distancia justo antes de apagar
la corriente principal. Consulte la Página 15
“Función de reinicio automático”.
Unidad Exterior
El ventilador de la unidad
exterior no gira aunque el
compresor está funcionando.
Aunque el ventilador
empiece a girar, se para en
seguida.
• Cuando la temperatura exterior sea baja
durante la operación de refrigeración, el
ventilador funcionará intermitente para
mantener sufi cientemente la capacidad de
refrigeración.
En la unidad exterior hay
una fuga de agua.
• Durante la REFRIGERACIÓN o la DESHU-
MIDIFICACIÓN, el enfriamiento de los tubos
y de las conexiones de los tubos hace que
se condense el agua.
Síntoma
Explicación y puntos de comprobación
Controlador remoto
La pantalla del controlador
remoto no aparece o se
oscurece.
La unidad interior no respon-
de a la señal del
controlador remoto.
• ¿Están agotadas las pilas? Página 14
• ¿Es correcta la polaridad (+, -) de las pilas?
Página 14
• ¿Se ha pulsado algún botón del controlador
remoto de otros aparatos eléctricos?
No refrigera
La habitación no se refrigera
lo sufi ciente.
• ¿La temperatura es la adecuada?
Página 15
• ¿El ajuste del ventilador es el adecuado?
Cambie la velocidad del ventilador a un
ajuste más alto. Página 16
• ¿Los fi ltros están limpios? Página 18
• ¿Están limpios el ventilador o el intercambia-
dor de calor de la unidad interior?
• ¿Hay algún obstáculo bloqueando la entrada
o la salida de aire de la unidad interior o
exterior?
• ¿Hay alguna ventana o puerta abiertas?
• Cuando se utilice un ventilador o cocina de
gas en una habitación, la carga de refrige-
ración aumenta, resultando en un efecto de
refrigeración insufi ciente.
• Cuando la temperatura exterior sea elevada,
el efecto de refrigeración podría no ser sufi -
ciente.
Flujo de aire
El aire de la unidad interior
tiene un olor raro.
• ¿Están limpios los fi ltros? Página 18
• ¿Están limpios el ventilador o el intercambia-
dor de calor de la unidad de interior?
• La unidad podría aspirar olores de las
paredes, alfombras, muebles, ropa, etc. y
transmitirlo al expulsar aire.
Ruido
Se oye un ruido de rotura. • Se trata de un sonido provocado por la di-
latación/contracción del panel frontal, etc. a
causa de los cambios de temperatura.
Se oye un ruido burbujeante. • Se escucha ruido cuando el aire exterior se
absorbe de la manguera de desagüe encen-
diendo el tubo del extractor o el ventilador,
provocando que agua fl uya por la manguera
de desagüe hacia afuera. Este ruido también
se escucha cuando el aire de fuera golpea
con la manguera de desagüe cuando hay
viento fuerte.
Se escucha un sonido mecá-
nico en la unidad interior.
• Corresponde al sonido de encendido/apaga-
do del ventilador o del compresor.
Se oye correr agua. • Este es el ruido de refrigerante o agua con-
densada fl uyendo en la unidad.
En los casos siguientes pare el equipo y póngase en contacto
con su distribuidor.
• Cuando cae agua de la unidad interior.
• Cuando la luz del indicador izquierdo de funcionamiento parpadee.
• Cuando el disyuntor se desconecta con frecuencia.
• La señal del mando a distancia no se recibe en una habitación donde se utilice
un tipo de luz fl uorescente ON/OFF (luz fl uorescente tipo invertidor, etc.).
• Operación del aire acondicionado interfi ere con la recepción de radio o TV.
Se necesita un amplifi cador para el dispositivo afectado.
• Cuando se escucha un sonido extraño.
SI CREE QUE SE HA PRODUCIDO UN PROBLEMA
SG79Y962H03-ES.indd 19 11/17/08 4:44:35 PM
/