Page is loading ...

2
CONTENTS
I WARRANTY......................................................1
II ASSEMBLY........................................................3
III INSTALLATION.................................................7
IV OPERATION....................................................11
V MAINTENANCE..............................................13
MANUAL
TINYWOODSTOVE.COM
1
Congratulations on your new Dwarf Small Wood
Stove! We are excited about your little space and we
are honored you have chosen the Dwarf!
WARRANTY
We created the Dwarf with quality, efficiency and
affordability in mind. With proper operation &
maintenance your stove should give you many
years of trouble free use. We stand behind our
stove with a 5 year warranty on defective parts. If
you have any issue with your stove contact us at:
APPLICATIONS
The Dwarf was made specifically for small spaces
less than 500sq’ like: tents, trailers, boats and tiny
houses. This stove is not currently certified (UL /
CSA) for residential heating and only offered for rec-
reational use.
WARNING
Improper use or installation of a wood burning stove
can cause fire, injury and death. Use only solid fuel
rated vent pipe and installation by a professional is
highly recommended.
3

4
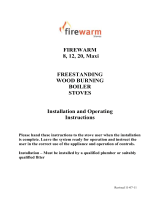
PARTS LIST
1. Cast iron door with handle
2. Tertiary air supply / air wash
3. Coal bar
4. Primary & secondary air gate valve & lever
5. 4” Stock Legs
6. Stove bottom plate (5/16th’s steel plate)
7. Fire grate support x 2
8. Stove body (3/16th’s steel plate)
9. Direct-Air Box
10. Flue flange
11. Rear air plate
12. Baffle
13. Stove top plate (5/16th steel plate)
14. Flue cover plate
15. Fire bricks x 4
16. Fire grate (cast iron) with mechanical rid-
dling grate
5
ASSEMBLY / UNBOXING
For a detailed un-boxing video check out our videos page
on our website: https://www.tinywoodstove.com/videos/
1. Unscrew the (4) phillips screws at the bottom of the
crate. Remove crate.
2. Remove box, cover plastic and paper. Remove the coal
bar, baffle, wrapped flue flange and legs from inside the
firebox. TO REMOVE BAFFLE: life up and forward until
the bottom is free from the rear air plate. Once the baffle
is clear from the air plate remove from the firebox.
3. Close door and gently set stove on it’s back. NOTE: It’s
best to lay stove on a raised surface so the crate bottom is
off the ground when the stove is on it’s back.
4. Using a 10mm socket remove the (4) bolts on the bot-
tom of the crate. Remove crate bottom.
5. Unwrap the stove’s legs and use the given bolts and
washers to secure the legs to the bottom of the stove. If
you are installing the direct-air box bolt this on next. The
direct-air box gets bolted on over the primary & second-
ary air gate valve. Stand stove up on it’s legs.
6
ASSEMBLY / UNBOXING
6. Using a phillips screwdriver install the flue flange.
If installing the flue flange on the top of the stove use
the short hardware that’s installed with the flue flange
cover plate (#14 on parts diagram). If you use the longer
hardware the baffle will not fit. Install the flue flange
cover plate on whichever opening the flue flange is not
installed on.
7. Reinstall the baffle. Lift up and forward until bottom of
the baffle is above the rear air plate then set on top of the
rear air plate.
8. Reinstall coal bar.
9. Once you stove is assembled it’s a good idea to slide in
a small section of pipe and do a initial fire outside. As the
paint cures and oils from manufacturing process burn-
off the stove will smoke. It’s best to do this outside your
space. If you do the initial fire inside it’s wise to keep win-
dows and doors open.
7
INSTALLATION
If you have any doubts about installing your small wood
stove it’s highly recommended to get a professional in-
staller. For safe installation maintain the following clear-
ances from combustibles:
CLEARANCES
Sides: 16” from combustibles
Rear: 18” from combustibles
Single Wall Stove Pipe: 18” from combustibles
Insulated Chimney Pipe: 2” from combustibles
*Clearances can be reduced by 2/3 with a non-combustible
heat shield.
HEAT SHIELD
A basic heat shield should be composed of non-combusti-
ble material (metal or cement board) and have at least a
1” air gap behind, above, below and beside the shield. A
heat shield can be as simple as a piece of sheet metal with
a 1” air gap behind and around. The, “air wash” behind
the shield is very effective but there has to be at least a
1” gap on all sides of the shield. Ceramic spacers can be
purchased for installing your shield.

10
8
SAFETY PRECAUTIONS
HEARTH
If you are using the add-on tall legs or wood storage
stand all you need for a hearth is ember protection. This
is some type of non-combustible material (metal, glass,
tile, stone, etc) to shield combustible flooring from any
embers or coals that could potentially fall from the stove.
If you’re using the stock legs you’ll need to add a little bit
of insulation under your ember protection. This can be
achieved by placing a layer of mineral fiber board under
your non-combustible material.
Hearth Pad Recommended dimensions
Rear & sides (match clearances)
Front 12”
SAFETY PRECAUTIONS
Along with a proper stove installation it’s import to use
the follow tools as safety precautions:
Smoke Alarm
CO2 Detector / Alarm - Installed at ground level
Fire Extinguisher
Flue Thermometer
Chimney Brusv
9
It can be a challenge to find solid fuel pipe in diameter
less than 5” in North America. Most small diameter (3” &
4”) vent pipes are made for pellet or gas appliances and
do not have the temperature ratings suitable for solid-fu-
el wood burning stoves. While this pellet or gas pipe may
fit the stove it’s not rated for the high temps of solid-fuel
and it includes a galvanized outer pipe which can off-gas
at higher temperatures.
Solid Fuel Pipe is rated up to 2100 degrees for a 10min
chimney fire and pellet pipe is only rated to 570 degrees.
In the event you had a chimney fire which can often start
and end without you ever knowing it you want pipe that’s
made for the high temps of solid fuel.
We want to offer the best and safest pipe with our stoves
so we are working with a manufacturer to build us cus-
tom stove pipe, chimney pipe and components in 3”, 4” &
5” diameters.
3” PARTS https://www.tinywoodstove.com/product-category/3in-flue-parts/
4” PARTS https://www.tinywoodstove.com/product-category/4in-flue-parts/
5” PARTS https://www.tinywoodstove.com/product-category/5in-flue-parts/
For more in-depth installation info checkout our videos:
https://www.tinywoodstove.com/videos/
11
OPERATION
LIGHTING FIRE
Step 1 - Clean off fire grate from previous fire if needed.
Empty ash pan if needed. Open primary air 100% (lever
pulled completely out from the stove). Open air wash
100% (gate valve above the door slid completely to the
right).
Step 2 - Add kindling to fire box. (I like to build a log
cabin or tipi) Light fire starter and add to kindling. Leave
door cracked until fire starter has caught the kindling on
fire. Close door.
Step 3 - Add fuel to kindling. Leave air setting 100% until
your first load of fuel is a nice and hot coal bed.
FIREWOOD LENGTH
5kw 10-12”
4kw 8-10”
3kw 6-8”
ADJUSTING AIR SUPPLY
You can adjust the air settings on your stove to increase
the heating efficiency & lengthen your burn time. Burn-
ing the stove wide open (both air settings open 100%)
makes for a very hot and fast fire which sends a lot of
heat out the flue and requires more frequent stoking.

13
MAINTENANCE
The main point of maintenance on your stove is checking
and periodically cleaning your flue system. Depending on
your installation this can be done from inside your stove by
removing the baffle (part #12 on page 3). The baffle sets on
the rear air plate and the air wash manifold. To remove lift
up and forward until the baffle is clear of the air plate then
drop down into the fire box. You will need to turn the baffle
90 degrees to get it out the door. NOTE after a fire the baffle
will be dirty.
To inspect from inside the stove you can use a flashlight
and mirror or perhaps a phone camera to see if there is any
build up on the interior walls of the pipe. If you have build
up more than a 1/4” thick you need to clean the flue.
Or if you have access to the roof simple remove the rain cap
and inspect the interior of the pipe.
CLEANING FLUE
To clean the flue use a chimney brush that will fit your
diameter of pipe. Brush the interior of pipe until buildup is
removed.
Failure to maintain the flue system can lead to poor stove
performance and potential chimney fire. Signs of a dirty flue
system are very poor draft and puffs of smoke entering the
room when you open the door.
15
THANK-YOU!
Our business is much more than selling wood
stoves. Tiny living has given our family free-
dom to live life on our terms. We are passionate
about Tiny Living and would love to see your
little space! Share your pictures with us on
facebook, instagram or email.
INSTAGRAM: @tinywoodstove
FACEBOOK: /tinywoodstove
EMAIL: support@tinywoodstove.com
14
CHECKOUT OUR GROWING
SUPPLY OF ACCESSORIES!
Heat Fans, Firestarters, Flue-Brushes, Stove
Thermometers, Firewood Bags & More!
https://www.tinywoodstove.com/product-category/accessories/
12
OPERATION
After a good hot coal bed is formed you can close both the
primary/secondary + air-wash to slow the rate of burn. A
good starting point is around 50%.
If you dampen down the stove too soon or too much
there won’t be enough heat for thorough combustion
(you’ll see black smoke coming out the flue) and you’ll
potentially have creosote problems. It’s a good idea to use
a flue/stove thermometer and dampen your stove accord-
ing to thermometer readings.
Flue Thermometer - best operating range: 400-800 degrees F.
Stove Thermometer - best operating range: 400-650 degrees F.
Going to far above or below these temperature readings can cause problems.
RIDDLING GRATE
The lever on the bottom left of the stove is to activate the
mechanical riddling grate. This feature is made specifi-
cally for coal use but is handy for use with any fuel. You
can periodically pull the lever which sifts ash from the
firebox into the ash pan. This keeps your primary air
feeding the fire for an efficient burn.
ASH PAN
The ash pan should be cleaned between fires. If you need
to empty the ash pan during the fire use the given ash
pan tool and empty the pan in a heat proof container.
/