
Su accesorio para podar setos ha sido diseñada y fabricada de
conformidad con las estrictas normas para brindar fiabilidad,
facilidad de uso y seguridad para el operador. Con el debido cuidado,
le brindará muchos años de sólido y eficiente funcionamiento.
ADVERTENCIA: Para reducir el riesgo de lesiones,
el usuario debe leer y comprender el manual del operador antes
de usar este producto.
Le agradecemos su compra.
BATTERIES AND CHARGERS SOLD SEPARATELY
PILES ET CHARGEUR VENDUS SÉPARÉMENT
LAS BATERÍAS Y EL CARGADOR SE VENDEN POR SEPARADO
OPERATOR’S MANUAL
MANUEL D’UTILISATION/MANUAL DEL OPERADOR
RY40060
HEDGE TRIMMER ATTACHMENT
FOR USE WITH RY24001 24 V
OR RY40001B 40 V POWER HEAD
ACCESSOIRE DE TAILLE-HAIES RY40060
A UTILISER AVEC LE BLOC-MOTEUR RY24001 DE 24 V OU RY40001B DE 40 V
ACCESORIO PARA PODAR SETOS RY40060
PARA USAR CON LA CABEZAL MOTOR RY24001 24 V O RY40001B 40 V
ALL VERSIONS
TOUTES LES VERSIONS/TODAS LAS VERSIONES
Votre accessoire de taille-haies a été conçue et fabriquée
conformément à nos strictes normes de fiabilité, simplicité d’emploi
et sécurité d’utilisation. Correctement entretenue, elle vous donnera
des années de fonctionnement robuste et sans problème.
AVERTISSEMENT : Pour réduire les risques de
blessures, l’utilisateur doit lire et veiller à bien comprendre le
manuel d’utilisation avant d’employer ce produit.
Merci de votre achat.
CONSERVER CE MANUEL POUR
FUTURE RÉFÉRENCE
GUARDE ESTE MANUAL PARA
FUTURAS CONSULTAS
SAVE THIS MANUAL FOR FUTURE REFERENCE
Your hedge trimmer attachment has been engineered and manufactured to our high standard for dependability, ease of
operation, and operator safety. When properly cared for, it will give you years of rugged, trouble-free performance.
WARNING: To reduce the risk of injury, the user must read and understand the operator’s manual before using
this product.
Thank you for your purchase.

ii
See this fold-out section for all the figures
referenced in the operator’s manual.
Voir que cette section d’encart pour toutes les
figures a adressé dans le manuel d’utilisation.
Vea esta sección de la página
desplegable para todas las figuras mencionó
en el manual del operador.

iii
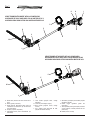
HEDGE TRIMMER ATTACHMENT WITH 24 V POWER HEAD
ACCESSOIRE DE TAILLE-HAIES AVEC LE BLOC-MOTEUR DE 24 V
ACCESORIO PARA PODAR SETOS CON CABEZAL MOTOR DE 24 V
Fig. 1
A - Blade cover (fourreau de lame, cubierta de la
hoja)
B - Guard (garde, protección)
C - Hedge trimmer attachment shaft (arbre de
l’accessoire de taille-haies, eje del accesorio
para podar setos)
D - Coupler (coupleur, acoplador)
E - Intermediate shaft (arbre intermédiaire, eje
intermedia)
C
C
M
M
B
B
F - Front handle (poignée avant, mango
delantero)
G - Lock-out (verrouillage, seguro)
H - Rear handle (poignée arrière, mango
trasero)
I - 24 V battery pack (bloc-piles de 24V,
paquete de baterías de 24V)
J - 40 V battery pack (bloc-piles de 40V, paquete
de baterías de 40V)
K - Switch trigger (gâchette, gatillo del
interruptor)
L - Three-position pivoting head (tête pivotante
à trois positions, cabezal pivotante de tres
posiciones)
M- Blades (lames, cuchilla)
F
L
L
A
D
D
K
K
G
J
F
G
D
D
HEDGE TRIMMER ATTACHMENT WITH 40 V POWER HEAD
ACCESSOIRE DE TAILLE-HAIES AVEC LE BLOC-MOTEUR DE 40 V
ACCESORIO PARA PODAR SETOS CON CABEZAL MOTOR DE 40 V
H
I
H
E
E

iv
A - 24 V power head (24 V battery, 24 V battery)
B - 40 V power head (40 V battery, 40 V battery)
C - Lock-out (verrouillage, seguro)
D - Switch trigger (gâchette, gatillo del
interruptor)
Fig. 6
C
D
A
B
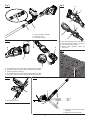
Fig. 2
Fig. 3
C
A
A - Coupler (coupleur, acoplador)
B - Base (base, base)
C - Arrow (flèche, flecha)
B
A - 24 V power head (arbre moteur de 24V, cabezal motor eje de 24V)
B - 24 V battery pack (bloc-piles de 24V, paquete de baterías de 24V)
C - Latch(es) [loquet(s), pestillo(s)]
D - 40 V power head (arbre moteur de 40V, cabezal motor eje de 40V)
E - 40 V battery pack (bloc-piles de 40V, paquete de baterías de 40V)
A - Knob (bouton, perilla)
A
Fig. 4
C
D
B
E
C
C
B
A
Fig. 5
A - Pivot button (bouton de pivot, botón
del pivote)
B - Notches (enchoches, muescas)
A
D
Fig. 7

v
Fig. 9
NORMAL EXTENDED REACH OPERATING POSITION
PORTÉE PROLONGÉE NORMALE FONCTIONNANT LA POSITION
ALCANCE EXTENDIDO NORMAL QUE OPERA POSICIÓN
Fig. 10
Fig. 11
A - Cutting teeth (dents de coupe, dientes de
corte)
B - Guard teeth (dents de coupe, dientes de
proteción)
Fig. 12
A - Blade cover (fourreau de lame, cubierta de la
hoja)
A
B
A
Fig. 8

2 — English
Introduction ......................................................................................................................................................................2
Introduction / Introducción
General Power Tool Safety Warnings ............................................................................................................................3-4
Instructions de sécurité générales pour outils électriques / Advertencias de seguridad para herramientas eléctricas
Specific Safety Rules ........................................................................................................................................................ 4
Règles de sécurité particulières / Reglas de seguridad específicas
Symbols ............................................................................................................................................................................ 5
Symboles / Símbolos
Features ............................................................................................................................................................................6
Caractéristiques / Características
Assembly .......................................................................................................................................................................... 7
Assemblage / Armado
Operation ....................................................................................................................................................................... 8-9
Utilisation / Funcionamiento
Maintenance ................................................................................................................................................................9-10
Entretien / Mantenimiento
Troubleshooting .............................................................................................................................................................. 11
Dépannage / Corrección de problemas
Warranty ......................................................................................................................................................................... 12
Garantie / Garantía
Parts Ordering and Service ...............................................................................................................................Back Page
Commande de pièces et réparation / Pedidos de piezas y servicio ......................................................... Page arrière / Pág. posterior
TABLE OF CONTENTS
TABLE DES MATIÈRES / ÍNDICE DE CONTENIDO
INTRODUCTION
INTRODUCTION / INTRODUCCIÓN
This product has many features for making its use more pleasant and enjoyable. Safety, performance, and dependability
have been given top priority in the design of this product making it easy to maintain and operate.
* * *
Ce produit offre de nombreuses fonctions destinées à rendre son utilisation plus plaisante et satisfaisante. Lors de la
conception de ce produit, l’accent a été mis sur la sécurité, les performances et la fiabilité, afin d’en faire un outil facile à
utiliser et à entretenir.
* * *
Este producto ofrece numerosas características para hacer más agradable y placentero su uso. En el diseño de este producto
se ha conferido prioridad a la seguridad, el desempeño y la fiabilidad, por lo cual se facilita su manejo y mantenimiento.

3 — English
GENERAL POWER TOOL SAFETY WARNINGS
WARNING
Read all safety warnings and all instructions. Failure to
follow the warnings and instructions may result in electric
shock, fire and/or serious injury.
Save all warnings and instructions for future reference.
The term “power tool” in the warnings refers to your mains-
operated (corded) power tool or battery-operated (cordless)
power tool.
WORK AREA SAFETY
Keep work area clean and well lit. Cluttered or dark
areas invite accidents.
Do not operate power tools in explosive atmospheres,
such as in the presence of flammable liquids, gases
or dust. Power tools create sparks which may ignite the
dust or fumes.
Keep children and bystanders away while operating a
power tool. Distractions can cause you to lose control.
ELECTRICAL SAFETY
Power tool plugs must match the outlet. Never modify
the plug in any way. Do not use any adapter plugs with
earthed (grounded) power tools. Unmodified plugs and
matching outlets will reduce risk of electric shock.
Avoid body contact with earthed or grounded surfaces
such as pipes, radiators, ranges and refrigerators.
There is an increased risk of electric shock if your body is
earthed or grounded.
Do not expose power tools to rain or wet conditions.
Water entering a power tool will increase the risk of electric
shock.
Do not abuse the cord. Never use the cord for carrying,
pulling or unplugging the power tool. Keep cord away
from heat, oil, sharp edges or moving parts. Damaged
or entangled cords increase the risk of electric shock.
When operating a power tool outdoors, use an exten-
sion cord suitable for outdoor use. Use of a cord suitable
for outdoor use reduces the risk of electric shock.
If operating a power tool in a damp location is unavoid-
able, use a ground fault circuit interrupter (GFCI) pro-
tected supply. Use of a GFCI reduces the risk of electric
shock.
PERSONAL SAFETY
Stay alert, watch what you are doing and use com-
mon sense when operating a power tool. Do not use
a power tool while you are tired or under the influence
of drugs, alcohol or medication. A moment of inattention
while operating power tools may result in serious personal
injury.
Use personal protective equipment. Always wear eye
protection. Protective equipment such as dust mask, non-
skid safety shoes, hard hat, or hearing protection used for
appropriate conditions will reduce personal injuries.
Prevent unintentional starting. Ensure the switch is in
the off-position before connecting to power source
and/or battery pack, picking up or carrying the tool.
Carrying power tools with your finger on the switch or ener-
gising power tools that have the switch on invites accidents.
Remove any adjusting key or wrench before turning
the power tool on. A wrench or a key left attached to a
rotating part of the power tool may result in personal injury.
Do not overreach. Keep proper footing and balance at
all times. This enables better control of the power tool in
unexpected situations.
Dress properly. Do not wear loose clothing or jewellery.
Keep your hair, clothing and gloves away from moving
parts. Loose clothes, jewellery or long hair can be caught
in moving parts.
If devices are provided for the connection of dust
extraction and collection facilities, ensure these are
connected and properly used. Use of dust collection
can reduce dust-related hazards.
POWER TOOL USE AND CARE
Do not force the power tool. Use the correct power
tool for your application. The correct power tool will
do the job better and safer at the rate for which it was
designed.
Do not use the power tool if the switch does not turn
it on and off. Any power tool that cannot be controlled
with the switch is dangerous and must be repaired.
Disconnect the plug from the power source and/or
the battery pack from the power tool before making
any adjustments, changing accessories, or storing
power tools. Such preventive safety measures reduce
the risk of starting the power tool accidentally.
Store idle power tools out of the reach of children and
do not allow persons unfamiliar with the power tool
or these instructions to operate the power tool. Power
tools are dangerous in the hands of untrained users.
Maintain power tools. Check for misalignment or bind-
ing of moving parts, breakage of parts and any other
condition that may affect the power tool’s operation.
If damaged, have the power tool repaired before use.
Many accidents are caused by poorly maintained power
tools.
Keep cutting tools sharp and clean. Properly main-
tained cutting tools with sharp cutting edges are less
likely to bind and are easier to control.
Use the power tool, accessories and tool bits etc.,
in accordance with these instructions, taking into
account the working conditions and the work to be
performed. Use of the power tool for operations different
from those intended could result in a hazardous situation.
BATTERY TOOL USE AND CARE
Recharge only with the charger specified by the
manufacturer. A charger that is suitable for one type
of battery pack may create a risk of fire when used with
another battery pack.

4 — English
Use power tools only with specifically designated battery
packs. Use of any other battery packs may create a risk of
injury and fire.
When battery pack is not in use, keep it away from other
metal objects, like paper clips, coins, keys, nails, screws
or other small metal objects, that can make a connection
from one terminal to another. Shorting the battery terminals
together may cause burns or a fire.
GENERAL POWER TOOL SAFETY WARNINGS
Under abusive conditions, liquid may be ejected from the
battery; avoid contact. If contact accidentally occurs,
flush with water. If liquid contacts eyes, additionally seek
medical help. Liquid ejected from the battery may cause
irritation or burns.
SERVICE
Have your power tool serviced by a qualified repair
person using only identical replacement parts. This will
ensure that the safety of the power tool is maintained.
HEDGE TRIMMER SAFETY WARNINGS
Keep all parts of the body away from the cutter blade. Do
not remove cut material or hold material to be cut when
blades are moving. Make sure the switch is off when
clearing jammed material. Blades coast after turn off.
A moment of inattention while operating the hedge trimmer
may result in serious personal injury.
Carry the hedge trimmer by the handle with the cutter
blade stopped. Proper handling of the hedge trimmer will
reduce possible personal injury from the cutter blades.
Hold the power tool by insulated gripping surfaces only,
because the cutter blade may contact hidden wiring or its
own cord. Cutter blades contacting a “live” wire may make
exposed metal parts of the power tool “live” and could give
the operator an electric shock.
DANGER — Keep hands away from blade. Contact with
blade will result in serious personal injury.
WARNING — Only use with handle and guard properly
assembled to hedge trimmer. The use of the hedge trimmer
without the proper guard or handle provided may result in
serious personal injury.
ADDITIONAL SAFETY RULES
Do not wear loose clothing or jewelry. Contain long hair.
Loose clothes, jewelry, or long hair can be drawn into air
vents.
Do not use on a ladder, rooftop, or unstable support.
Stable footing on a solid surface enables better control of
the power tool in unexpected situations.
Wear heavy, long pants, long sleeves, boots, and gloves.
Do not wear loose fitting clothing, short pants, sandals, or
go barefoot. Do not wear jewelry of any kind.
Use both hands when operating the hedge trimmer. Using
one hand could cause loss of control and result in serious
personal injury.
Before starting the hedge trimmer, make sure the blade is
not in contact with any object.
Stop the unit, remove the battery pack, and make sure the
blade has stopped before setting the unit down.
Never cut any material with a diameter larger than
5/8 in.
Always stop the motor when cutting is delayed or when
walking from one cutting location to another.
Keep unit clean of grass clippings and other materials. They
may become lodged in the cutting blades.
If hedge trimmer is equipped with a debris remover, do not
use the debris remover as a gripping surface.
Store the unit inside in a dry place, either locked up or up
high to prevent unauthorized use or damage. Keep out of
the reach of children or untrained individuals.
Replace blade cover when unit is not in use.
Never douse or squirt the unit with water or any other liquid.
Keep handles dry, clean, and free from debris. Clean after
each use; see storage instructions.
Secure the unit while transporting.
Battery operated units do not have to be plugged into an
electrical outlet; therefore, they are always in operating
condition. Be aware of possible hazards even when unit is
not operating.
Remove the battery pack before making any adjustments,
cleaning, storing, or removing material from the unit, or when
not in use.
When transporting or storing the hedge trimmer always
fit the cutting device cover.
Keep cable away from cutting area. During operation the
cable may be hidden in shrubs and can be accidentally cut
by the blade.
Wear eye protection with side shields, which is marked to
comply with ANSI Z87.1 when operating this product. Wear
head protection when operating this product above shoulder
level.
Keep all bystanders, children, and pets at least 50 feet away.
Bystanders should be encouraged to wear eye protection.
Use only with battery and charger listed.
• When using with 24 V power head, use 24 V lithium-ion
battery packs. See Tool/Appliance/Battery Pack/Charger
Correlation Supplement 988000-446.
• When using with 40 V power head, use 40 V lithium-ion
battery packs. See Tool/Appliance/Battery Pack/Charger
Correlation Supplement 988000-842.
Save these instructions. Refer to them frequently and use
them to instruct others who may use this tool. If you loan
someone this tool, loan them these instructions also.

5 — English
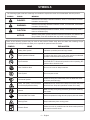
SYMBOLS
The following signal words and meanings are intended to explain the levels of risk associated with this product.
SYMBOL SIGNAL MEANING
DANGER:
Indicates an imminently hazardous situation, which, if not avoided, will result
in death or serious injury.
WARNING:
Indicates a potentially hazardous situation, which, if not avoided, could result
in death or serious injury.
CAUTION:
Indicates a potentially hazardous situation, which, if not avoided, may result in
minor or moderate injury.
NOTICE:
(Without Safety Alert Symbol) Indicates important information not related to an
injury hazard, such as a situation that may result in property damage.
Some of the following symbols may be used on this product. Please study them and learn their meaning. Proper
interpretation of these symbols will allow you to operate the product better and safer.
SYMBOL NAME EXPLANATION
Safety Alert Symbol Indicates a potential personal injury hazard.
Read Operator’s Manual
To reduce the risk of injury, user must read and understand
operator’s manual before using this product.
Eye Protection
Always wear eye protection with side shields marked to comply
with ANSI Z87.1. Wear head protection when operating this
product above shoulder level.
Wet Conditions Alert Do not use in wet or damp locations.
Rain Symbol Do not expose to rain.
No Hands Symbol
Failure to keep your hands away from the blade will result
in serious personal injury.
Keep Tool Away from Electrical
Lines/Keep Bystanders Away
DANGER! Risk of electrocution! Keep tool 50 feet away from
electrical lines. Keep all bystanders at least 50 ft. away.
Gloves
Wear non-slip, heavy-duty protective gloves when handling
the blades.
Operate With Two Hands Hold and operate the hedge trimmer properly with both hands.
Moving Parts Keep hands away from moving parts.
Electric Shock
Failure to use in dry conditions and to observe safe practices
can result in electric shock.

6 — English
FEATURES
KNOW YOUR PRODUCT
See Figure 1.
The safe use of this product requires an understanding of
the information on the tool and in this operator’s manual as
well as a knowledge of the project you are attempting. Before
use of this product, familiarize yourself with all operating
features and safety rules.
BLADE COVER
The blade cover keeps the operator from coming in contact
with the sharp blades when the tool is not in use. It also helps
keep the blades from being nicked or damaged when the
tool is in storage.
THREE-POSITION PIVOTING HEAD
The hedge trimmer head can be adjusted with the pivot
button.
IF PURCHASED WITH A RYOBI 24 V OR 40 V POWER
HEAD, YOUR UNIT ALSO FEATURES:
ADJUSTABLE FRONT HANDLE
The front handle assembly can be adjusted for ease of
operation and to help prevent loss of control, and can be
positioned above or below the coupler.
HANDLE OVERMOLD
Handle overmold provides added user comfort.
LOCK-OUT
The lock-out prevents accidental starting.
VARIABLE SPEED SWITCH TRIGGER
This tool has a variable speed switch that delivers higher
speed with increased trigger pressure. Speed is controlled
by the amount of switch trigger depression.
PRODUCT SPECIFICATIONS
Blade Length .............................................................. 18 in.
Cutting Capacity...............................................up to 5/8 in.
Cutting Speed ............................................ 3,000 cuts/min.
Weight ................................................................... 6.26 lbs.
Compatible With .............Ryobi 24 V and 40 V Power Head
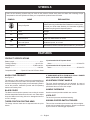
SYMBOLS
Some of the following symbols may be used on this product. Please study them and learn their meaning. Proper
interpretation of these symbols will allow you to operate the product better and safer.
SYMBOL NAME EXPLANATION
Recycle Symbol
This product uses lithium-ion (Li-ion) batteries. Local, state, or
federal laws may prohibit disposal of batteries in ordinary trash.
Consult your local waste authority for information regarding
available recycling and/or disposal options.
V Volts Voltage
hrs Hours Time
Direct Current Type or a characteristic of current
n
o
No Load Speed Rotational speed, at no load
.../min Per Minute Revolutions, strokes, surface speed, orbits etc., per minute
If purchased with 24 V power head:
Motor ............................................................ 24 Volts DC
If purchased with 40 V power head:
Motor ............................................................ 40 Volts DC

7 — English
WARNING:
Hedge trimmer blades are extremely sharp. Do not
remove the blade cover until the hedge trimmer is fully
assembled and ready to use. Always use caution when
removing the blade cover. Failure to comply could result
in possible serious personal injury.
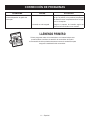
CONNECTING THE HEDGE TRIMMER
ATTACHMENT TO THE POWER HEAD
See Figure 2.
WARNING:
Never install, remove, or adjust any attachment while
power head is running or with the battery pack installed.
Failure to stop the motor or remove the battery pack can
result in serious personal injury.
The attachment connects to the power head by means of
a coupler device.
Remove the battery pack if installed.
Align the arrows on the attachment shaft and the
intermediate shaft and insert the plug on the attachment
into the opening on the coupler. Make sure the plug is
fully seated.
Slide the threaded coupler on the intermediate shaft onto
the threaded base on the attachment and turn the coupler
clockwise. Tighten securely.
Align the arrows on the intermediate shaft and the power
head and insert the plug on the intermediate shaft into
the opening on the coupler. Make sure the plug is fully
seated.
Slide the threaded coupler on the power head onto the
threaded base on the intermediate shaft and turn the
coupler clockwise. Tighten securely.
NOTE: Once assembled correctly, the hedge trimmer
attachment and power head should not separate when pulled.
Repeat above steps if pieces can be separated.
If extended reach application is not desired, it is not
necessary to install the intermediate shaft. The hedge trimmer
attachment can be connected directly to the power head.
WARNING:
Failure to secure the attachment and power head as
instructed above could result in serious personal injury.
REMOVING THE ATTACHMENT FROM THE
POWER HEAD
Remove the battery pack.
Turn the couplers counterclockwise to unlock, then
remove the attachment shaft and the intermediate shaft
from the power head.
ASSEMBLY
UNPACKING
This product requires assembly.
Carefully remove the product and any accessories from
the box. Make sure that all items listed in the packing list
are included.
WARNING:
Do not use this product if any parts on the Packing List
are already assembled to your product when you unpack
it. Parts on this list are not assembled to the product by
the manufacturer and require customer installation. Use
of a product that may have been improperly assembled
could result in serious personal injury.
Inspect the product carefully to make sure no breakage
or damage occurred during shipping.
Do not discard the packing material until you have carefully
inspected and satisfactorily operated the product.
If any parts are damaged or missing, please call
1-800-860-4050 for assistance.
PACKING LIST
Hedge Trimmer Attachment
Intermediate Shaft
Blade Cover
Operator’s Manual
Some models may also include Ryobi 24 V or 40 V Power
Head.
WARNING:
If any parts are damaged or missing do not operate this
product until the parts are replaced. Use of this product
with damaged or missing parts could result in serious
personal injury.
WARNING:
Do not attempt to modify this product or create
accessories not recommended for use with this product.
Any such alteration or modification is misuse and could
result in a hazardous condition leading to possible serious
personal injury.
WARNING:
To prevent accidental starting that could cause serious
personal injury, always remove the battery pack from the
product when assembling parts.

8 — English
OPERATION
WARNING:
Do not allow familiarity with products to make you care-
less. Remember that a careless fraction of a second is
sufficient to inflict serious injury.
WARNING:
Always wear eye protection with side shields marked to
comply with ANSI Z87.1. Failure to do so could result in
objects being thrown into your eyes resulting in possible
serious injury.
APPLICATIONS
You may use this product for the purpose listed below:
Trimming and shaping hedges and shrubbery
Depending on the power head your are using, this product
will accept either Ryobi 24 V or Ryobi 40 V battery packs.
For complete charging instructions, refer to the Operator’s
Manuals for your Ryobi battery pack and charger models.
TO INSTALL BATTERY PACK
See Figure 3.
WARNING:
Always remove battery pack from your tool when you are
assembling parts, making adjustments, cleaning, or when
not in use. Removing battery pack will prevent accidental
starting that could cause serious personal injury.
Insert the battery pack into the product as shown.
WARNING:
Make sure the latch (or latches) on the battery pack snap
in place and the battery pack is fully seated and secure in
the power head battery port before beginning operation.
Failure to securely seat the battery pack could cause the
battery pack to fall out, resulting in serious personal injury.
TO REMOVE BATTERY PACK
See Figure 3.
Depress the latch (or latches) on the battery pack.
Remove the battery pack.
WARNING:
To avoid serious personal injury, always remove the bat-
tery pack and keep hands clear of the lock-out when
carrying or transporting the tool.
ADJUSTABLE FRONT HANDLE
See Figure 4.
The angle of the front handle can be adjusted 180°.
Remove the battery pack.
Set the hedge trimmer on a flat surface and turn the knob
counterclockwise to loosen the handle.
Adjust the handle as desired.
Turn the knob clockwise until the handle is securely
tightened before reinstalling the battery pack.
ADJUSTING PIVOTING HEAD
See Figure 5.
Remove the battery pack.
Place the hedge trimmer on a sturdy flat surface.
Push pivot button and adjust trimmer head until it snaps
securely into place at one of the three positions indicated
by the notches.
WARNING:
Do not place hand between pivoting head and threaded
base. Placement of your hand or fingers in this area could
result in a pinch point injury.
STARTING/STOPPING THE HEDGE TRIMMER
See Figure 6.
To start:
Press and hold the lock-out.
Depress the switch trigger.
To stop:
Release the switch trigger to stop the hedge trimmer.
Upon release of the switch trigger, the lock-out will
automatically reset to the locked position.
CUTTING TIPS
See Figure 7 - 9.
DANGER:
Never cut near power lines, electric cords, or other elec-
tric sources. If blade jams on any electrical cord or line,
DO NOT TOUCH THE BLADE! IT CAN BECOME ELEC-
TRICALLY LIVE AND VERY DANGEROUS. Continue to
hold the hedge trimmer by the insulated rear handle or lay
it down and away from you in a safe manner. Disconnect
the electrical service to the damaged line or cord before
attempting to free the blade from the line or cord. Con-
tact with the blade, other conductive parts of the hedge
trimmer, or live electric cords or lines will result in death
by electrocution or serious injury.

9 — English
OPERATION
WARNING:
Clear the area to be cut before each use. Remove all
objects such as cords, lights, wire, or loose string which
can become entangled in the cutting blade and create a
risk of serious personal injury.
Before starting the hedge trimmer, hold the unit with both
hands with the cutting blades directed away from you.
Always use the hedge trimmer properly.
Do not force the hedge trimmer through heavy shrubbery.
This can cause the blades to bind and slow down. If the
blades slow down, reduce the pace.
Do not try to cut stems or twigs that are larger than
5/8 in. thick, or those obviously too large to feed into the
cutting blade. Use a non-powered hand saw or pruning
saw to trim large stems.
If blades do become jammed, stop the motor, allow
the blades to stop and remove the battery pack before
attempting to remove the obstruction.
If desired, you can use a string to help cut your hedge
level. Decide how high you want the hedge. Then, stretch
a piece of string along the hedge at this height. Trim the
hedge just above this guide line of string. Trim the side
of a hedge so that it will be slightly narrower at the top.
More of the hedge will be exposed when shaped this way,
and it will be more uniform.
Always hold hedge trimmer with both hands when
operating. Use a firm grip on the handles. The unit is used
for cutting in either direction in a slow, sweeping action
from side to side.
Wear gloves when trimming thorny or prickly growth.
When trimming new growth, use a wide sweeping action,
so that the stems are fed directly into the cutting blade.
Older growth will have thicker stems and will be trimmed
easiest by using a sawing movement.
MAINTENANCE
WARNING:
When servicing, use only identical replacement parts.
Use of any other parts could create a hazard or cause
product damage.
WARNING:
Always wear eye protection with side shields marked to
comply with ANSI Z87.1. Failure to do so could result in
objects being thrown into your eyes resulting in possible
serious injury.
WARNING:
To avoid serious personal injury, always remove the
battery pack from the tool when cleaning or performing
any maintenance.
GENERAL MAINTENANCE
Before each use, inspect the entire product for damaged,
missing, or loose parts such as screws, nuts, bolts, caps, etc.
Tighten securely all fasteners and caps and do not operate
this product until all missing or damaged parts are replaced.
Please call 1-800-860-4050 or contact an authorized service
center for assistance.
Avoid using solvents when cleaning plastic parts. Most
plastics are susceptible to damage from various types of
commercial solvents and may be damaged by their use. Use
clean cloths to remove dirt, dust, oil, grease, etc.
WARNING:
Do not at any time let brake fluids, gasoline, petroleum-
based products, penetrating oils, etc., come in contact
with plastic parts. Chemicals can damage, weaken or
destroy plastic which could result in serious personal injury.
Only the parts shown on the parts list are intended to be
repaired or replaced by the customer. All other parts should
be replaced at an Authorized Service Center.
TRANSPORTING AND STORING
Remove the battery pack.
Always place the blade cover on the blade before storing
or transporting the hedge trimmer. Use caution to avoid
the sharp teeth of the blade.
Clean the hedge trimmer thoroughly before storing.
Store the hedge trimmer indoors, in a dry place that is
inaccessible to children. Keep away from corrosive agents
such as garden chemicals and de-icing salts.

10 — English
MAINTENANCE
WARNING:
Always allow the blades of the hedge trimmer to come to
a stop and remove the battery pack before lubricating or
sharpening the blade. Failure to do so could result in ac-
cidental starting causing possible serious personal injury.
LUBRICATING THE BLADE
See Figure 10.
For easier operation and longer blade life, lubricate the hedge
trimmer blade before and after each use.
Remove the battery pack from the hedge trimmer.
Lay the hedge trimmer on a flat surface. Apply light weight
machine oil along the edge of the top blade.
NOTE: If you will be using the hedge trimmer for an extended
time, it is advisable to oil the blade periodically.
Stop the hedge trimmer.
Remove the battery pack.
Lubricate the hedge trimmer as described above.
Reinstall the battery pack and resume use.
SHARPENING THE BLADE
See Figure 11.
Allow the blades of the hedge trimmer to come to a stop
in the position shown. This will allow clearance for the
file between the cutting teeth and the guard teeth.
Remove the battery pack from the hedge trimmer.
Clamp the blade assembly in a vise and file the exposed
cutting surface of each blade tooth with an 8 in. smooth
round file, 1/4 in. or 7/32 in. in diameter. Be sure to retain
the original angle of the tooth when filing.
Remove the hedge trimmer from the vise, replace the
battery pack, and restart the hedge trimmer. Allow the
blades of the hedge trimmer to come to a stop so that
the unsharpened edges on the other side of the cutter
blade teeth are exposed.
Remove battery pack from hedge trimmer and repeat the
sharpening procedure as described above.
CLEANING THE HEDGE TRIMMER
Remove the battery pack.
Slide the blade cover over the blade.
Clean dirt and debris from the body of the hedge trimmer,
using a damp cloth with a mild detergent.
NOTE: Do not use any strong detergents on the plastic
housing or the handle. They can be damaged by certain
aromatic oils such as pine and lemon, and by solvents
such as kerosene.
Moisture can cause a shock hazard. Wipe off any moisture
with a soft dry cloth.
Use a small brush or the air discharge of a small vacuum
cleaner brush to clear dust or debris from the air vents
on the motor housing.
STORING THE HEDGE TRIMMER
See Figure 12.
Remove the battery pack and store it out of the reach of
children when storing the hedge trimmer.
Clean the hedge trimmer thoroughly before storing. Store
the hedge trimmer in a dry, well-ventilated place that is
inaccessible to children. Keep away from corrosive agents
such as garden chemicals and de-icing salts.
Always place the blade cover on the cutting blades before
storing.
BATTERY PACK REMOVAL AND PREPARATION
FOR RECYCLING
WARNING:
Upon removal, cover the battery pack’s terminals with
heavy-duty adhesive tape. Do not attempt to destroy or
disassemble battery pack or remove any of its compo-
nents. Batteries must be recycled or disposed of properly.
Also, never touch both terminals with metal objects and/
or body parts as short circuit may result. Keep away from
children. Failure to comply with these warnings could
result in fire and/or serious injury.

11 — English
TROUBLESHOOTING
PROBLEM POSSIBLE CAUSE
SOLUTION
Motor fails to start when switch
trigger is depressed.
Battery is not secure.
Battery is not charged.
To secure the battery pack, make sure the latch
(or latches) snap into place.
Charge the battery pack according to the
instructions included with your model.
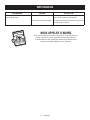
CALL US FIRST
For any questions about operating or maintaining your product,
call the Ryobi® Help Line!
Your product has been fully tested prior to shipment to ensure
your complete satisfaction.

12 — English
LIMITED WARRANTY STATEMENT
Techtronic Industries North America, Inc., warrants to the
original retail purchaser that this RYOBI® brand outdoor
product is free from defect in material and workmanship
and agrees to repair or replace, at Techtronic Industries
North America, Inc.’s, discretion, any defective product
free of charge within these time periods from the date of
purchase.
Three years if the product is used for personal, family
or household use;
90 days, if used for any other purpose, such as
commercial or rental.
This warranty extends to the original retail purchaser
only and commences on the date of the original retail
purchase.
Any part of this product found in the reasonable judgment
of Techtronic Industries North America, Inc. to be defective
in material or workmanship will be repaired or replaced
without charge for parts and labor by an authorized service
center for RYOBI® brand outdoor products (Authorized
Ryobi Service Center).
The product, including any defective part, must be returned
to an authorized Ryobi service center within the warranty
period. The expense of delivering the product to the service
center for warranty work and the expense of returning it
back to the owner after repair or replacement will be paid
by the owner. Techtronic Industries North America, Inc.’s,
responsibility in respect to claims is limited to making the
required repairs or replacements and no claim of breach of
warranty shall be cause for cancellation or rescission of the
contract of sale of any RYOBI® brand outdoor product. Proof
of purchase will be required by the dealer to substantiate
any warranty claim. All warranty work must be performed
by an authorized service dealer.
This warranty is limited to ninety (90) days from the date
of original retail purchase for any RYOBI® brand outdoor
product that is used for rental or commercial purposes, or
any other income-producing purpose.
This warranty does not cover any product that has been
subject to misuse, neglect, negligence, or accident, or that
has been operated in any way contrary to the operating
instructions as specified in this operator’s manual. This
warranty does not apply to any damage to the product that
is the result of improper maintenance or to any product
that has been altered or modified. The warranty does not
extend to repairs made necessary by normal wear or by the
use of parts or accessories which are either incompatible
with the RYOBI® brand outdoor product or adversely affect
its operation, performance, or durability. In addition, this
warranty does not cover:
A. Tune-ups – Spark Plugs, Carburetor, Carburetor
Adjustments, Ignition, Filters
B. Wear items – Bump Knobs, Outer Spools, Cutting
Lines, Inner Reels, Starter Pulleys, Starter Ropes, Drive
Belts, Tines, Felt Washers, Hitch Pins, Mulching Blades,
Blower Fans, Blower and Vacuum Tubes, Vacuum Bag
and Straps, Guide Bars, Saw Chains
Techtronic Industries North America, Inc., reserves the
right to change or improve the design of any RYOBI® brand
outdoor product without assuming any obligation to modify
any product previously manufactured.
ALL IMPLIED WARRANTIES ARE LIMITED IN DURATION
TO THE STATED WARRANTY PERIOD. ACCORDINGLY,
ANY SUCH IMPLIED WARRANTIES INCLUDING
MERCHANTABILITY, FITNESS FOR A PARTICULAR
PURPOSE, OR OTHERWISE, ARE DISCLAIMED
IN THEIR ENTIRETY AFTER THE EXPIRATION OF
THE APPROPRIATE THREE-YEAR OR NINETY-DAY
WARRANTY PERIOD. TECHTRONIC INDUSTRIES
NORTH AMERICA, INC.’S, OBLIGATION UNDER THIS
WARRANTY IS STRICTLY AND EXCLUSIVELY LIMITED TO
THE REPAIR OR REPLACEMENT OF DEFECTIVE PARTS
AND TECHTRONIC INDUSTRIES NORTH AMERICA,
INC., DOES NOT ASSUME OR AUTHORIZE ANYONE
TO ASSUME FOR THEM ANY OTHER OBLIGATION.
SOME STATES DO NOT ALLOW LIMITATIONS ON HOW
LONG AN IMPLIED WARRANTY LASTS, SO THE ABOVE
LIMITATION MAY NOT APPLY TO YOU. TECHTRONIC
INDUSTRIES NORTH AMERICA, INC., ASSUMES NO
RESPONSIBILITY FOR INCIDENTAL, CONSEQUENTIAL,
OR OTHER DAMAGES INCLUDING, BUT NOT LIMITED
TO, EXPENSE OF RETURNING THE PRODUCT TO AN
AUTHORIZED RYOBI SERVICE CENTER AND EXPENSE
OF DELIVERING IT BACK TO THE OWNER, MECHANIC’S
TRAVEL TIME, TELEPHONE OR TELEGRAM CHARGES,
RENTAL OF A LIKE PRODUCT DURING THE TIME
WARRANTY SERVICE IS BEING PERFORMED, TRAVEL,
LOSS OR DAMAGE TO PERSONAL PROPERTY, LOSS
OF REVENUE, LOSS OF USE OF THE PRODUCT, LOSS
OF TIME, OR INCONVENIENCE. SOME STATES DO NOT
ALLOW THE EXCLUSION OR LIMITATION OF INCIDENTAL
OR CONSEQUENTIAL DAMAGES, SO THE ABOVE
LIMITATION OR EXCLUSION MAY NOT APPLY TO YOU.
This warranty gives you specific legal rights, and you may
also have other rights which vary from state to state.
This warranty applies to all RYOBI® brand outdoor products
manufactured by or for Techtronic Industries North America,
Inc., and sold in the United States and Canada.
To locate your nearest Authorized Ryobi Service Center,
dial 1-800-860-4050.
WARRANTY

13 — English
NOTES

3 — Français
AVERTISSEMENT
Lire tous les avertissements et toutes les instructions.
Ne pas suivre l’ensemble des avertissements et des instruc-
tions peut entraîner une électrocution, un incendie ou des
blessures graves.
Conserver les avertissements et les instructions à des fins
de référence ultérieure.
Le terme « outil motorisé », utilisé dans
tous les avertissements ci-dessous désigne tout outil fonctionnant
sur secteur (câblé) ou sur piles (sans fil).
SÉCURITÉ DU LIEU DE TRAVAIL
Garder le lieu de travail propre et bien éclairé. Les endroits
encombrés ou sombre s sont propices aux accidents.
Ne pas utiliser d’outils électriques dans des atmosphères
explosives, par exemple en présence de liquides, gaz ou
poussières inflammables. Les outils électriques produisent
des étincelles risquant d’enflammer les poussières ou vapeurs.
Garder les enfants et badauds à l’écart pendant l’utilisation
d’un outil électrique. Les distractions peuvent causer une
perte de contrôle.
SÉCURITÉ ÉLECTRIQUE
Les fiches des outils électriques doivent correspondre à
la prise secteur utilisée. Ne jamais modifier la fiche, de
quelque façon que ce soit. Ne jamais utiliser d’adaptateurs
de fiche avec des outils mis à la terre. Les fiches et prises
non modifiées réduisent le risque de choc électrique.
Éviter tout contact du corps avec des surfaces mises
à la terre, telles que tuyaux, radiateurs, cuisinières et
réfrigérateurs. Le risque de choc électrique est accru lorsque
le corps est mis à la terre.
Ne pas exposer les outils électriques à l’eau ou l’humidité.
La pénétration d’eau dans ces outils accroît le risque de choc
électrique.
Ne pas maltraiter le cordon d’alimentation. Ne jamais
utiliser le cordon d’alimentation pour transporter l’outil et
ne jamais débrancher ce dernier en tirant sur le cordon.
Garder le cordon à l’écart de la chaleur, de l’huile, des
objets tranchants et des pièces en mouvement. Un cordon
endommagé ou emmêlé accroît le risque de choc électrique.
Pour les travaux à l’extérieur, utiliser un cordon
spécialement conçu à cet effet. Utiliser un cordon conçu
pour l’usage extrérieur pour réduire les risques de choc
électrique.
S’il est nécessaire d’utiliser l’outil électrique dans un
endroit humide, employer un dispositif interrupteur de
défaut à la terre (GFCI). L’utilisation d’un GFCI réduit le risque
de décharge électrique.
SÉCURITÉ PERSONNELLE
Rester attentif, prêter attention au travail et faire preuve
de bon sens lors de l’utilisation de tout outil électrique. Ne
pas utiliser cet outil en état de fatigue ou sous l’influence
de l’alcool, de drogues ou de médicaments. Un moment
d’inattention pendant l’utilisation d’un outil électrique peut
entraîner des blessures graves.
Utiliser l’équipement de sécurité. Toujours porter une
protection oculaire. L’équipement de sécurité, tel qu’un
masque filtrant, de chaussures de sécurité, d’un casque
ou d’une protection auditive, utilisé dans des conditions
appropriées réduira le risque de blessures.
Éviter les démarrages accidentels. S’assurer que le
commutateur est en position d’arrêt avant de brancher
l’outil. Porter un outil avec le doigt sur son commutateur ou
brancher un outil dont le commutateur est en position de
marche peut causer un accident.
Retirer les clés de réglage avant de mettre l’outil en
marche. Une clé laissée sur une pièce rotative de l’outil peut
causer des blessures.
Ne pas travailler hors de portée. Toujours se tenir bien
campé et en équilibre. Ceci permettra de mieux contrôler
l’outil en cas de situation imprévue.
Porter une tenue appropriée. Ne porter ni vêtements
amples, ni bijoux. Garder les cheveux, les vêtements et les
gants à l’écart des pièces en mouvement. Les vêtements
amples, bijoux et cheveux longs peuvent se prendre dans les
pièces en mouvement.
Si les outils sont équipés de dispositifs de dépoussiérage,
s’assurer qu’ils sont connectés et correctement utilisés.
L’usage de ces dispositifs de dépoussiérage peut réduire les
dangers présentés par la poussière.
UTILISATION ET ENTRETIEN DES OUTILS
ÉLECTRIQUES
Ne pas forcer l’outil. Utiliser l’outil approprié pour
l’application. Un outil approprié exécutera le travail mieux et de
façon moins dangereuse s’il est utilisé dans les limites prévues.
Ne pas utiliser l’outil si le commutateur ne permet pas de
le mettre en marche ou de l’arrêter. Tout outil qui ne peut
pas être contrôlé par son commutateur est dangereux et doit
être réparé.
Débrancher l’outil et/ou retirer le bloc-piles avant
d’effectuer des réglages, de changer d’accessoire ou de
remiser l’outil. Ces mesures de sécurité préventives réduisent
les risques de démarrage accidentel de l’outil.
Ranger les outils motorisés hors de la portée des enfants
et ne laisser personne n’étant pas familiarisé avec l’outil ou
ces instructions utiliser l’outil. Dans les mains de personnes
n’ayant pas reçu des instructions adéquates, les outils sont
dangereux.
Entretenir les outils motorisés. Vérifier qu’aucune pièce
mobile n’est mal alignée ou bloquée, qu’aucune pièce
n’est brisée et s’assurer qu’aucun autre problème ne
risque d’affecter le bon fonctionnement de l’outil. En cas
de dommages faire réparer l’outil avant de l’utiliser de
nouveau. Beaucoup d’accidents sont causés par des outils
mal entretenus.
Garder les outils bien affûtés et propres. Des outils
correctement entretenus et dont les tranchants sont bien
affûtés risquent moins de se bloquer et sont plus faciles à
contrôler.
Utiliser l’outil, les accessoires et embouts, etc.,
conformément à ces instrutions pour les applications
pour lesquelles ils sont conçus, en tenant compte des
conditions et du type de travail à exécuter. L’usage d’un
outil motorisé pour des applications pour lesquelles il n’est
pas conçu peut être dangereux.
UTILISATION ET ENTRETIEN DE LA PILE
Ne recharger qu’avec l’appareil spécifié par le fabricant. Un
chargeur approprié pour un type de pile peut créer un risque
d’incendie s’il est utilisé avec un autre type de pile.
INSTRUCTIONS IMPORTANTES CONCERNANT LA SÉCURITÉ
INSTRUCTIONS DE SÉCURITÉ GÉNÉRALES
POUR OUTILS ÉLECTRIQUES

4 — Français
INSTRUCTIONS IMPORTANTES CONCERNANT LA SÉCURITÉ
INSTRUCTIONS DE SÉCURITÉ GÉNÉRALES
POUR OUTILS ÉLECTRIQUES
AVERTISSEMENTS DE SÉCURITÉ RELATIFS TAILLE-HAIES
Éloigner toute partie du corps des lames. Ne retirer les
matériaux coincés ou suspendus ou de les tenir lorsque
les lames sont en mouvement. S’assurer que l’interrupteur
est à la position OFF (éteint) lorsque l’on déloge les débris
de matériaux. La lame termine son mouvement une fois
l’outil éteint. Un moment d’inattention pendant l’utilisation du
taille-haie peut occasionner une blessure grave.
Transporter le taille-haie par la poignée et s’assurer que la
lame est immobile. Une manipulation adéquate du taille-haie
réduira les risques de blessures dues aux lames.
Soutenir l’outil électrique par les prises isolées seulement,
car les lames peuvent toucher un fil camouflé ou son propre
cordon d’alimentation. Le contact des lames avec un fil sous
tension « électrifie » les pièces métalliques exposées de l’outil
et peut électrocuter l’utilisateur.
DANGER — Éloigner les mains des lames. Le contact avec
les lames peut provoquer des blessures graves.
AVERTISSEMENT — Seulement l’usage avec la poignée et le
garde est assemblé se couvrir convenablement la taille-haies.
L’usage de la taille-haies sans le garde ou la poignée correct
fournie peut avoir pour résultat sérieuse personnelle la blessure.
RÈGLES DE SÉCURITÉ SUPPLÉMENTAIRES
Ne porter ni vêtements amples, ni bijoux. Attacher ou
couvrir les cheveux longs. Les vêtements amples, bijoux et
cheveux longs peuvent se prendre dans les ouïes d’aération.
Ne pas utiliser l’outil sur une échelle, toits ou un support
instable. Une bonne tenue et un bon équilibre permettent de
mieux contrôler l’outil en cas de situation imprévue.
Porter des pantalons longs, manches longues, des
chaussures de travail et des gants épais. Ne pas porter de
vêtements amples, bijoux, shorts, sandales et ne pas travailler
pieds nus. Ne porter aucun bijou.
L’utilisation du taille-haie doit se faire avec les deux mains.
Le travail effectué avec une seule main peut provoquer la perte
de contrôle de l’outil et provoquer des blessures graves.
Avant de lancer le moteur, s’assurer que la lame n’est en contact
avec aucun objet.
Arrêter le moteur, retirer le bloc-piles et s’assurer que la lame
est immobilisée avant de poser l’outil.
Ne jamais couper de tiges de plus de 15,9 mm (5/8 po) de
diamètre.
Arrêter le moteur quand l’outil n’est pas en train de tailler ou
lorsqu’il est transporté d’un endroit à un autre.
Garder l’outil propre. Les débris d’herbe et autres
peuvent se prendre dans les lames.
Si le taille-haies est équipé d’un éjecteur de débris, ne pas se
servir d’éjecteur comme d’une surface de préhension.
Remiser l’outil dans un endroit sec, sous clé ou en hauteur,
pour éviter des dommages ou utilisations non autorisées. Le
garder hors de portée des enfants et des personnes n’étant pas
familières avec son utilisation.
Remettre le fourreau de lame en place lorsque l’outil n’est pas
en usage.
Ne jamais arroser ou asperger l’outil avec de l’eau ou tout autre
liquide. Garder les poignées sèches, propres et exemptes de
débris. Nettoyer après chaque utilisation. Voir les instructions
de remisage.
Arrimer le produit avant de le transporter.
Les outils fonctionnant sur piles n’ayant pas besoin d’être
branchés sur une prise secteur, ils sont toujours en état de
fonctionnement. Rester conscient des dangers lorsque l’outil
n’est pas en usage.
Retirer le bloc-piles avant tout réglage, nettoyage, remisage ou
déblocage et lorsque l’outil n’est pas en usage.
Toujours installer le dispositif de protection des lames lors
du transport ou du remisage du taille-haie.
Garder le câble à l’écart des lames. Pendant le fonctionnement
que le câble pourrait être caché dans les arbrisseaux et peut
être coupé accidentel par la lame.
Toujours porter une protection oculaire avec écrans latéraux
certifiée conforme à la norme ANSI Z87.1 lors de l’utilisation de
produit. Porter la protection de tête en fonctionnant cet produit
au-dessus du niveau d’épaule.
Garder tous les passants, les enfants, et caresse au moins 50
pieds loin. Les passants devraient être encouragés à porter la
protection oculaire.
Utiliser seulement la pile et le chargeur indiqués.
• Utiliser les blocs-piles de 24 V au lithium-ion lors de l’utilisation
du bloc-moteur de 24 V. Consulter le supplément de raccorde-
ment pour chargeur/outils/piles/appareil n˚ 988000-446.
• Utiliser les blocs-piles de 40 V au lithium-ion lors de l’utilisation
du bloc-moteur de 40 V. Consulter le supplément de raccorde-
ment pour chargeur/outils/piles/appareil n˚ 988000-842.
Conserver ces instructions. Les consulter fréquemment et les
utiliser pour instruire les autres utilisateurs éventuels. Si cet
produit est prêté, il doit être accompagné de ces instructions.
Utiliser exclusivement le bloc-pile spécifiquement indiqué
pour l’outil. L’usage de tout autre bloc peut créer un risque de
blessures et d’incendie.
Lorsque le bloc-piles n’est pas en usage, le garder à l’écart
d’articles tels qu’attaches trombones, pièces de monnaie,
clous, vis ou autres petits objets métalliques risquant
d’établir le contact entre les deux bornes. La mise en court-
circuit des bornes de piles peut causer des étincelles, des
brûlures ou un incendie.
En cas d’usage abusif, du liquide peut s’échapper des
piles. Éviter tout contact avec ce liquide. En cas de contact
accidentel, rincer immédiatement les parties atteintes avec
de l’eau. En cas d’éclaboussure dans les yeux consulter un
médecin. Le liquide s’échappant des piles peut causer des
irritations ou des brûlures.
DÉPANNAGE
Les réparations doivent être confiées à un technicien qualifié,
utilisant exclusivement des pièces identiques à celles
d’origine. Ceci assurera le maintien de la sécurité de l’outil.

5 — Français
SYMBOLES
Les termes de mise en garde suivants et leur signification ont pour but d’expliquer le degré de risques associé à l’utilisation
de ce produit.
SYMBOLE SIGNAL SIGNIFICATION
DANGER:
Indique une situation extrêmement dangereuse qui, si elle n’est pas évitée,
aura pour conséquences des blessures graves ou mortelles.
AVERTISSEMENT :
Indique une situation potentiellement dangereuse qui, si elle n’est pas évitée,
pourrait entraîner des blessures graves ou mortelles.
ATTENTION :
Indique une situation potentiellement dangereuse qui, si elle n’est pas évitée,
pourraît entraîner des blessures légères ou de gravité modérée.
AVIS :
(Sans symbole d’alerte de sécurité) Indique une information importante
ne concernant pas un risque de blessure comme une situation pouvant
occasionner des dommages matériels.
Certains des symboles ci-dessous peuvent être utilisés sur ce produit. Veiller à les étudier et à apprendre leur signification.
Une interprétation correcte de ces symboles permettra d’utiliser l’outil plus efficacement et de réduire les risques.
SYMBOLE NOM DÉSIGNATION / EXPLICATION
Alerte de sécurité Indique un risque de blessure potentiel.
Lire le manuel d’utilisation
Pour réduire les risques de blessures, l’utilisateur doit lire et
veiller à bien comprendre le manuel d’utilisation avant d’utiliser
ce produit.
Protection oculaire
Toujours porter une protection oculaire avec écrans latéraux
certifiée conforme à la norme ANSI Z87.1. Porter la protection de
tête en fonctionnant cet produit au-dessus du niveau d’épaule.
Avertissement concernant l’humidité Ne pas utiliser dans endroits mouillés ou humides.
Symbole pluie Ne pas exposer à la pluie.
Symbole mains à l’écart
Le non-respect de cette mise en garde peut entraîner des
blessures graves.
La tenir à l’écart de lignes électriques
et ne laisser personne s’approcher
DANGER ! Risque d’électrocution ! Ne pas travailler à moins de
15m (50 pi) de lignes électriques. Ne jamais laisser quiconque
se tenir à moins de 15 m (50 pi) de l’outil.
Gants
Porter des gants antidérapants épais lors de la manipulation
des lames.
Tenir la scie à deux mains Tenir la taille-haies à deux mains et l’utiliser correctement.
Pièces en mouvement Garder les mains à l’écart des pièces en mouvement.
Choc électrique
Ne pas utiliser l’équipement dans des conditions sèches et ne
pas respecter des méthodes sans danger peut entraîner un
choc électrique.
Page is loading ...
Page is loading ...
Page is loading ...
Page is loading ...
Page is loading ...
Page is loading ...
Page is loading ...
Page is loading ...
Page is loading ...
Page is loading ...
Page is loading ...
Page is loading ...
Page is loading ...
Page is loading ...
Page is loading ...
Page is loading ...
Page is loading ...
Page is loading ...
Page is loading ...
Page is loading ...
-
 1
1
-
 2
2
-
 3
3
-
 4
4
-
 5
5
-
 6
6
-
 7
7
-
 8
8
-
 9
9
-
 10
10
-
 11
11
-
 12
12
-
 13
13
-
 14
14
-
 15
15
-
 16
16
-
 17
17
-
 18
18
-
 19
19
-
 20
20
-
 21
21
-
 22
22
-
 23
23
-
 24
24
-
 25
25
-
 26
26
-
 27
27
-
 28
28
-
 29
29
-
 30
30
-
 31
31
-
 32
32
-
 33
33
-
 34
34
-
 35
35
-
 36
36
-
 37
37
-
 38
38
-
 39
39
-
 40
40


Ryobi RY40060 User manual
- Category
- Cordless hedge trimmers
- Type
- User manual
Ask a question and I''ll find the answer in the document
Finding information in a document is now easier with AI
in other languages
- français: Ryobi RY40060 Manuel utilisateur
- español: Ryobi RY40060 Manual de usuario
Related papers
Other documents
-
Greenworks G24HT54 - 2201207 Owner's manual
-
Remington HEDGE WIZARD User manual
-
-
Alpina Garden H5648Li Operating instructions
-
-
-
-
Earthwise Power Tools HT10017 Owner's manual
-
-
RIDGID R01401B User manual