Page is loading ...

SINGLE CORRUGATED
WATER TANK
ASSEMBLY MANUAL
®

SIGN-OFF FORM
Meridian Manufacturing Inc. follows the general Safety Standards specified by the American Society of
Agricultural Engineers (ASAE), and the Occupational Safety and Health Administration (OSHA). Anyone
who will be using or maintaining the bin must read and clearly understand ALL Safety and Maintenance
information presented in this manual.
Review this information annually, before the season start-up.
Make these periodic reviews of SAFETY and USAGE a standard practice for all of your equipment.
This form is provided for your record keeping to show that all personnel who will be working with the
equipment have read and understand the information in this manual. Copy this page to continue record.
Date Employee’s Signature Employer’s Signature

Attention Dealers:
You can register products online through the Dealer Login: http://dealers.meridianmfg.com/login/
It is mandatory to register your product in order to qualify for future warranty claims that may arise. Knowingly
falsifying information on this form will result in the voiding of the product warranty.
You may scan/photograph this completed form (must be legible), email it to: [email protected]
A copy of this form may also be mailed to Meridian Manufacturing Inc.
Buyer’s Name ________________________________ Dealer’s Name ________________________________
Address ______________________________________ Address _____________________________________
City, Prov/State _______________________________ City, Prov/State _______________________________
Postal/Zip Code ______________________________ Postal/Zip Code ______________________________
Phone Number _______________________________ Phone Number _______________________________
Note: Registering a product in multiple entry format is only allowed when the product has the same model
number and the same dealer, however each serial number must be legibly listed for each unit. Delivery dates
for a multiple entry must be within a one month time frame.
Product Information _____________________________________________________________________________
Model Number ________________________________ Serial Number ________________________________
Invoice Date __________________________________
PRODUCT REGISTRATION FORM
Important: Please send this form to the Meridian Manufacturing Inc. location which built this product being
registered. If you require further assistance call you’re dealer or the Meridian outlet nearest to your location.
We want to thank you for purchasing a Meridian manufactured product. Whether this is your first Meridian
purchase or you have been a customer for years, you are now part of the Meridian community of customers and
we appreciate your business.
It is important that you now complete the product registration information and this form indicating you have
received delivery. This registration and information is necessary to ensure you have access to warranty and product
updates in the event it be required in the future.
Registration can be completed by using this form or visiting your dealer who will complete the form online. You will
be given access to the Meridian Community and become eligible for updates, special offers and prizes.
Again thank you for choosing Meridian.
I have thoroughly instructed the buyer on the above described equipment. The review included the content of this
manual, equipment care, adjustments, safe operation and warranty policy.
Date _______________________ Dealer’s Signature __________________________________________________
The above equipment and this manual have been received by me. I have been thoroughly instructed as to care,
adjustments, safe operation and applicable warranty policy.
Date _______________________ Buyer’s Signature ___________________________________________________

This page intentionally left blank

Revised 06.2021 iii
Assembly Manual: Single Corrugated Water Tank
®
TABLE OF CONTENTS
DESCRIPTION PAGE
Section 1: INTRODUCTION ....................... 1-1
Section 2: SAFETY.............................. 2-1
2.1 General Safety . . . . . . . . . . . . . . . . . . . . . . . . . . . . 2-2
2.2 Assembly Safety .......................... 2-2
2.3 Work Safety .............................. 2-2
2.4 Personal Protective Equipment ............... 2-2
2.5 Safety Decals ............................. 2-3
2.5.1 Applying Decals ........................ 2-3
2.6 Safety Decal Location ...................... 2-3
Section 3: BEFORE YOU START ................... 3-1
3.1 Tank Design .............................. 3-1
3.2 Site and Assembly ......................... 3-2
3.3 Method of Erection......................... 3-2
3.4 Critical Assembly Requirements .............. 3-3
3.5 Planning and Timing ....................... 3-4
3.6 Product Storage........................... 3-5
3.6.1 Rust on Galvanized Parts................. 3-5
3.6.2 Storage Guidelines...................... 3-5
3.6.3 If Parts Become Wet .................... 3-6
3.7 Important Notes ........................... 3-6
Section 4: ASSEMBLY ........................... 4-1
4.1 Check Your Shipment ...................... 4-1
4.2 Shortage and Damaged Parts . . . . . . . . . . . . . . . . 4-1
4.3 Tools and Equipment ....................... 4-1
4.4 Order Optional Equipment ................... 4-2
4.5 Roof Assembly............................ 4-3
4.5.1 Preparation for Roof Assembly ............ 4-3
4.5.2 Recom. Procedure for Roof Assem ......... 4-4
4.5.3 Roof Stiffening Ring Assembly............. 4-5
4.5.4 Roof Ladder Assembly................... 4-6
4.5.5 Roof Cap Assembly ..................... 4-7
4.5.6 Manway Hatch Lid Assembly.............. 4-7
continued on next page

iv Revised 06.2021
Assembly Manual: Single Corrugated Water Tank
®
TABLE OF CONTENTS
DESCRIPTION PAGE
4.6 Wall Sheet Assembly . . . . . . . . . . . . . . . . . . . . . . . 4-8
4.6.1 Wall Sheet Matrix ....................... 4-8
4.6.2 Water Tank Roundness .................. 4-8
4.6.3 Preparation of Foundation ................ 4-9
4.6.4 Wall Sheet Orientation/Assem. Detail .......4-10
4.6.5 First Tier ..............................4-11
4.6.6 Prior to Installing Liner/Lifting Tank .........4-12
4.6.7 Raising Water Tank......................4-12
4.6.8 Recom. Proc. for Wall Sheet Assem-Sm Dia ..4-13
4.7 Water Tank Liner ..........................4-14
4.8 Water Tank Sign Installation..................4-15
4.9 Base Angle and Anchor .....................4-16
4.9.1 Base Ring Angle........................4-16
4.9.2 Anchor Chairs .........................4-16
4.10 Techniques for Tank Jacks..................4-16
4.11 Optional Accessories ......................4-17
4.11.1 Fitting Wall Flange .....................4-17
4.11.2 Anti-Vortex Assembly Kit ................4-17
Section 5: PARTS............................... 5-1
5.1 Roof .................................... 5-1
5.2 Roof Stiffening Ring ........................ 5-2
5.3 Roof Cap ................................ 5-3
5.4 Manway Hatch lid ......................... 5-4
5.5 Roof Ladder .............................. 5-5
5.6 Hardware Where Used...................... 5-7
5.7 Recommended Bolt Assembly ............... 5-8
5.8 Appendix A: Wall Sheet Layouts .............. 5-9
5.9 Appendix B: Water Tank Specifications.........5-12
Warranty Statement

Revised 09.2020 1-1
Assembly Manual: Single Corrugated Water Tank
®
Section 1: INTRODUCTION
Congratulations on your choice of a Meridian Manufacturing Inc. Water Tank for your environmental
containment needs.
This product has been designed and manufactured to meet the exacting standards for such equipment
in the industry and will keep your operation working at optimum efficiency.
Safe, efficient and trouble free usage of your water tank requires that you and anyone else who will
be working with or maintaining the tank, read and understand the Safety, Usage and Maintenance
information contained within this manual.
Keep this manual handy for future reference. Call your Meridian dealer or distributor if you need
assistance, information or additional/replacement copies, or a digital copy of this document.
Information provided herein is of a descriptive nature. Consistent with Meridian’s policy of continued
research and development of our products, we reserve the right to modify the equipment design and
specifications and change information contained in this publication without any preliminary notice.
Tank specifications, features and available options may vary depending on the region.
Disclaimer:
These instructions are based on standard assembly. A few popular options are described.
Many options change the location and arrangement of parts.
Your situation may necessitate a change from the described instructions.
IMPORTANT:
Parts lists, drawings and schematics are shipped, along with this manual.
Refer to them, as you read this manual for specific details;
such as, measurements, fasteners to use, and position of components.

1-2 10.2019
Assembly Manual: Single Corrugated Water Tank
®
This page intentionally left blank

10.2019 2-1
Assembly Manual: Single Corrugated Water Tank
®
Section 2: SAFETY
The Safety Alert Symbol means:
ATTENTION!
BECOME ALERT!
YOUR SAFETY IS INVOLVED!
The Safety Alert Symbol
identifies important safety
messages on the tank
and in this manual.
3 Big Reasons why safety
is important to you:
• Accidents Disable and Kill
• Accidents Cost
• Accidents Can Be Avoided
The following signal words are used in this manual to express
the degree of hazard for areas of personal safety.
When you see the symbol and/or the signal words described below,
obey the accompanying message to avoid possible injury or death.
Indicates a hazardous situation that, if not avoided, will result
in death or serious injury. This signal word is limited to the
most extreme situations. Typically for machine components
which, for functional purposes, cannot be guarded.
Indicates a hazardous situation, if not avoided, could result in
death or serious injury. This word identifies hazards that are
exposed when guards are removed. It may be used to alert
against unsafe practices.
Indicates a hazardous situation, if not avoided, could result
in minor or moderate injury. It may be used to alert against
unsafe practices.
Indicates practices or situations which may result in the
malfunction of, or damage to equipment.
Safety instructions (or equivalent) signs indicate specific
safety-related instructions or procedures.

2-2 10.2019
Assembly Manual: Single Corrugated Water Tank
®
2.1 GENERAL SAFETY
You are responsible for the safe use and
maintenance of this water tank. Good safety
practices not only protect you, but also those
around you. All accidents can be avoided.
• Use this water tank for its intended purposes.
• This water tank is not intended for use by
children.
• Do not modify the tank in any way without
written permission from the manufacturer. Any
unauthorized modification of the water tank
will void the warranty.
2.2 ASSEMBLY SAFETY
• All platforms, ladders, stairways, fixed ladders,
cages, handrails, and guardrails must be clean
and free of all debris. Remove anything which
may cause accidental tripping and/or falling.
Keep the assembly area clean and orderly.
• Keep all persons not involved in assembly
away from work area.
• Stay away from overhead obstructions.
• Provide adequate space for forklifts and hoists
to move components, large and small, around
the structure.
• Components can be heavy and awkward.
Always wear protective equipment to prevent
cuts, scrapes, and pinching.
2.3 WORK SAFETY
• Keep all platforms, ladders, stairways, fixed
ladders, cages, handrails, and guardrails clean
and free of all debris. Remove anything which
may cause accidental tripping and/or falling.
Keep the work area clean and orderly.
• This structure holds liquid and is a drowning
hazard. Keep ladder guards, manway hatch lid,
and barriers locked to prevent unauthorized
persons or children from climbing and/or
entering the structure.
• Mount signage around structure to indicate
that this structure is off limits. No unauthorized
persons allowed.
• Keep structure in good repair, to prevent sharp
edges and corners from becoming hazards.
2.4 PERSONAL PROTECTIVE
EQUIPMENT
The following Personal Protective Equipment
(PPE) should be worn at all times when
assembling or working the area:
Safety Glasses
Coveralls
Hard Hat
Steel-Toe Boots
Work Gloves

Revised 09.2020 2-3
Assembly Manual: Single Corrugated Water Tank
®
Fig 1 - Safety decal
2.5 SAFETY DECALS
• Keep safety decals clean and legible at all
times.
• Replace safety decals that are missing or have
become illegible.
• Replaced parts must display the same decal(s)
as the original parts.
• Replacement safety decals are available free
of charge from your distributor, dealer, or the
factory.
2.5.1 Applying Decals:
1. Be sure the application area is clean and
dry. Ensure the surrounding temperature is
above 10°C (50°F).
a. Remove all dirt, grease and wax from the
surface.
b. Clean the area with a non-ammonia
based cleaner.
c. Wipe the clean surface with isopropyl
alcohol on paper towel, and allow to dry.
2. Determine the exact position before you
remove the backing paper.
3. Peel a small portion of the split backing paper.
4. Align the decal over the specified area. Use
a squeegee to carefully press the small
portion, with the exposed adhesive backing,
into place.
5. Slowly peel back the remaining paper and
carefully smooth the rest of the decal into
place.
6. Small air pockets can be pierced with a pin
and smoothed out using the squeegee, or a
piece of sign backing paper.
2.6 SAFETY DECAL LOCATION
Safety decals are attached to the structure in a
visible and convenient location for readability.
A safe workplace requires that you familiarize
yourself with the various safety decals and the
areas or functions that the decals apply to. You
should also be aware of the safety precautions
that must be taken to avoid injury, death, or
damage.

2-4 10.2019
Assembly Manual: Single Corrugated Water Tank
®
This page intentionally left blank

10.2019 3-1
Assembly Manual: Single Corrugated Water Tank
®
Section 3: BEFORE YOU START
3.1 TANK DESIGN
The following design specifications are for
standard Meridian® Water Tanks. Design
upgrades may be available, please contact
Meridian directly for more information.
1. Containment of liquids with specific gravity
of less than or equal to 1.0.
2. Maximum factored horizontal gusted wind
speed of 169 km/h (105 mph).
3. Zero seismic activity.
Note:
Seismic resistance of a water tank varies with
height and diameter. Many standard designs
have significant seismic capabilities. Designs
can be reviewed and/or modified for local
requirements.
4. Roof Snow Load (RSL) capacities vary with
diameter and peak load. See Table 1 for
maximum RSL by diameter.
The correlation between Ground Snow Load
(GSL) and RSL for grain bin and water tank
designs are as follows:
a. The rule of thumb for the United States is
RSL = 0.55 * GSL
(See ASCE 7-10 Section 7.4)
b. The rule of thumb for Europe is
RSL = 0.8 * GSL
(See EN 1991-1.3-2003 Section 5.2)
c. There is no rule of thumb for Canada, the
calculation is site specific.
Table 1 - Maximum Roof Snow Load
ROOF DIAMETER
(ft)
PEAK LOAD
(lb [kN])
STANDARD ROOF RSL
(psf) (kPa)
12
4000 [17.8]
80.0 3.8
15 80.0 3.8
18 47.0 2.3
21 28.5 1.4
24 18.5 0.9
27 13.0 0.6
30
5000 [22.2]
29.0 1.4
33 24.0 1.2
36 20.0 1.0
39 17.0 0.8
42 14.5 0.7

3-2 10.2019
Assembly Manual: Single Corrugated Water Tank
®
3.2 SITE AND ASSEMBLY
Unless otherwise specifically provided in writing,
Meridian does not take responsibility for any
defects or damages to any property, or injury to
any persons, arising from or related to any site
or assembly considerations, including but not
limited to:
• Water tank location and water tank siting.
• Soil conditions and corresponding foundation
requirements.
• Water tank assembly. Meridian recommends
the use of qualified water tank installers;
contact Meridian for information on installers
in your area.
• Field modifications or equipment additions
that affect the tank structure.
• Interconnections with neighbouring structures.
• Compliance with all applicable safety
standards, including but not limited to, fall
restraint systems (ladders or other systems).
Local safety authorities should be contacted
as standards vary between jurisdictions.
3.3 METHOD OF ERECTION
Recommendations for installing Meridian
structures should be closely followed to achieve
the full strength of the structure, and to achieve
adequate weather sealing. Warranty is void if
the recommendations are not followed including
but not limited to:
• Wall sheets that are not specified for a given
tier are used.
• Foundations are found to be inadequate or
out-of-level.
• Anchor bolts (cast-in-place, drill-in, chemical
type or other) are found to be inadequate.
If using jacks, choose a hoist with a suitable
capacity for the expected empty structure
deadload. Make sure the rated capacity of the
hoist is not exceeded.
See Section 4.10 Techniques for Tank Jacks.

10.2019 3-3
Assembly Manual: Single Corrugated Water Tank
®
To ensure a successful, safe and reliable
outcome you must comply with the following
assembly techniques and practices:
• Local code and jurisdictional requirements
that are applicable to the structure installation
must be adhered to.
• Foundations must be designed for the loads
being imparted to them, and for local soil
conditions.
• Foundations must provide uniform and level
support to the structure being supported.
Surface imperfections causing gapping must
be remedied. This may involve, but is not
limited to, grouting under the bottom ring
angle or shimming under anchor chairs.
• Ensure that proper hardware is utilized for all
bolted connections.
Refer to Table 13: Hardware Where Used.
• Comply with all assembly instructions provided
in the appropriate assembly manual to make
sure the structure is constructed safely.
IMPORTANT:
Do not deviate from the
wall sheet layouts provided.
• When installing roof stiffening rings, if it is
necessary to shorten the stiffening ring tubes,
shorten them as little as possible. Initially, the
nuts on the expansion bolts should be centred,
and as close together as possible.
A
√2√1
DESCRIPTIONPART #QTYITEM
8349-1001
Roof
Center Post
12
8349-1002
Wall Sheet
63
Ring Roof Sakundiak 27in8349-1003
Peak Ring
14
Sheet - Roof - S tandard 18'8349-701
Roof Sheet
15
Stiffener8349-1301
Roof R ib
Stiffener
2ROO
F
RIB
STIF
FEN
ER
√2√1
DESCRIPTIONPART #QTYITEM
8349-1002
Wall Sheet
63
Ring Roof Sakundiak 27in8349-1003
Peak Ring
14
Sheet - Roof - S tandard 18'8349-701
Roof Sheet
245
8349-14
02
Roof
Reinforcing
Ring Tube
4ROO
F
REIN
FOR
CING
RING
TUB
E
EXTERIOR SUPPORT BRACKET8349-1401
Roof R ing
Bracket
48ROO
F
RING
BRA
CKE
T
8349-1403
Roof
Expansion
Bolt
4ROO
F
EXP
ANSI
ON
BOL
T
8349-1404
Roof
Expansion
Nut
8ROO
F
EXP
ANSI
ON
NUT
Raw - Cap Tank Roof
8349-1405
Peak Ring
Cap
111
E
8349-1300 Roof Sheet with Stiffener
THIS DRAWING IS THE EXCLUSIVE PROPERTY OF MERIDIAN MANUFACTURING GROUP
AND MAY NOT BE DUPLICATED BY ANY MEANS WITHOUT THE SPECIFIC PERMISSION
FROM AN AUTHORITY OF MERIDIAN MANUFACTURING GROUP
PROJECT NAME:
PART DESCRIPTION:
A
PART/DRAWING NUMBER:
A - SIZE
REV:
www.meridianmfg.com
2019-02-21
SCALE:CHECKED BY DATE:CHECKED BY:
TS
SHEET SIZE:DRAWN BY DATE:DRAWN BY:
PART WEIGHT: 690.81 lbmass
MATERIAL:
Meridian
Ma nufa cturing group
REVISION HISTORY
REV DESCRIPTION DATE DESIGNER
A TS
Tolerances unless otherwise specified:
X/X = 0.03
.X = 0.1
.XX = 0.03
.XXX = 0.01
= 0.5°
Symbol
Tolerance
= 0.005
= 0.015
= 0.015
Dimensions and tolerances shall
be interpreted in accordance
with ASME Y14.5-2009.
ROOF R IB STIFFENER
ROOF REINFORCING RING TUBE
ROOF RING BR ACKE T
ROOF RING BRACKET
ROOF EXPANSION NUT
ROOF RING BRACKET
ROOF REINFORCING RING TUBE
ROOF EXPANSION BOLT
ROOF STIFFENING RING TUBEROOF STIFFENING RING TUBE
Fig 2 - Stiffening Ring Tube detail
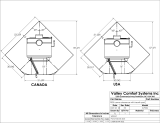
Tighten the nuts evenly, alternating from one
to the other, so that they remain centred on
the bolts. The amount of tightening must be
shared between all expansion bolts on the
same stiffening ring, so they are all equal.
• Before anchoring the structure to the foundation,
ensure that the structure is round. The maximum
variation from perfect roundness is 3/4” on
the radius. Position anchor bolts towards the
outside of the anchor bolt holes (away from the
structure) to permit the incremental expansion
that can occur with the initial filling.
3.4 CRITICAL ASSEMBLY REQUIREMENTS

3-4 10.2019
Assembly Manual: Single Corrugated Water Tank
®
Before unpacking the product and before
construction begins, pre-planning is
recommended.
Meridian® Water Tanks are generally constructed
from the top down. The top ring of wall sheets
and the roof are installed first. Then the tank is
raised and other wall sheet rings are sequentially
added. The best time to install components and
accessories are when those sections of the
tank are readily accessible, before the tank is
raised such that the installation location is out
of reach. It is advisable to construct a diagram
of accessories and their relative location before
construction.
• If a stencil wall sheet is being used, consult
with the owner as to preferred location. The
sheet is usually set to face the road or the yard.
• Orientation of the manway hatch is usually on
one side or the other of the roof ladder.
• Orientation of the roof ladder is usually located
in line with the sidewall ladder, however, lining
up the sidewall ladder with the roof panel with
manway hatch, is another alternative.
• If equipped with sidewall spiral stairs, the
location of the top platform must be given
similar consideration.
• Consideration of the locations of accessories,
such as but not limited to water level gauges
and pipe penetrations, relative to other
components and features, must be given.
• Penetrations through wall sheets must not be
made on a vertical or horizontal bolt seam.
Penetrations should be located towards
the centre of a wall sheet, so that any holes
and collars/flanges do not interfere with
any structural bolt hole locations. It is also
necessary to support any equipment that is
attached to the water tank if it is excessively
heavy and cannot support itself.
Some things to consider during construction of
the water tank:
• Position the geotextile bag and liner in the
centre of the water tank before installation of
wall sheets.
• Before the liner is attached to the top ring wall
sheets, make sure the roof ladder and top tier
sidewall ladder or stairs (and any associated
parts like platforms, cages, etc.) are installed,
as well as any roof-mounted accessories.
• Penetrations should also be installed while the
corresponding wall sheet ring is still at ground
level.
• As the water tank is being raised, remember
to continue assembling the sidewall ladder,
cages, and spiral stairs, as you go.
3.5 PLANNING AND TIMING

10.2019 3-5
Assembly Manual: Single Corrugated Water Tank
®
3.6.1 Rust on Galvanized Parts:
• Galvanized surfaces will develop a durable
zinc oxide layer naturally over time as the
surface interacts with carbon dioxide. The
zinc oxide layer is characterized as the dull
grey appearance that weathered galvanized
surfaces get.
• White rust may form when moisture is allowed
to collect on galvanized surfaces that have yet
to develop this durable zinc oxide layer. This
may happen when parts are not well-ventilated
or well-drained.
• White rust is not a structural concern if its
development is stopped in the early stages. A
light film or powder residue can occur after a
period of heavy rainfall or temporary improper
storage.
If white rust begins to develop:
- First, ensure proper storage, separate parts
and wipe off any moisture.
- Second, apply a thin layer of petroleum jelly
or food-grade oil to the entire part using a
clean cloth.
Due to safety concerns with installation and
use, this is not recommended for such parts
as roof sheets and ladders.
• If parts are left exposed to moisture, white
rust can progress into red rust. Red rust can
cause degradation in the steel and become a
structural concern. Any part that has red rust
should be replaced immediately.
8349-600 Wall Sheet Bundle
THIS DRAWING IS THE EXCLUSIVE PROPERTY OF MERIDIAN MANUFACTURING GROUP
AND MAY NOT BE DUPLICATED BY ANY MEANS WITHOUT THE SPECIFIC PERMISSION
FROM AN AUTHORITY OF MERIDIAN MANUFACTURING GROUP
PROJECT NAME:
PART DESCRIPTION:
A
PART/DRAWING NUMBER:
A - SIZE
REV:
www.meridianmfg.com
2019-02-20
SCALE:CHECKED BY DATE:CHECKED BY:
TS
SHEET SIZE:DRAWN BY DATE:DRAWN BY:
PART WEIGHT: 3201.15 lbmass
MATERIAL:
Meridian
Manufacturing group
REVISION HISTORY
REV DESCRIPTION DATE DESIGNER
A TS
Tolerances unless otherwise specified:
X/X = 0.03
.X = 0.1
.XX = 0.03
.XXX = 0.01
= 0.5°
Symbol
Tolerance
= 0.005
= 0.015
= 0.015
Dimensions and tolerances shall
be interpreted in accordance
with ASME Y14.5-2009.
Fig 3 - Wall sheets elevated and hump up
Fig 4 - Roof sheets sloped so peak is elevated
3.6.2 Storage Guidelines:
• Start assembly as soon as possible.
• If considerable time is involved between
delivery and erection time, inside storage is
recommended.
• Keep all bundles dry before assembly. All
hardware boxes should be stored inside, as
they are not waterproof and will allow parts
inside to become wet.
• Keep bundles off of the bare ground by raising
them 6 - 8” off the ground on wood blocks or
timbers.
• Store curved wall sheets “hump up.”
See Figure 3.
All other bundles should be stored so they
are well-sloped to promote good drainage.
Specifically, roof sheets must be elevated at
least 12” at the narrow end of the sheets.
See Figure 4.
• Temporary storage can be provided by a
simple frame supporting a waterproof tarp.
See Figure 5.
3.6 PRODUCT STORAGE

3-6 10.2019
Assembly Manual: Single Corrugated Water Tank
®
3.7 IMPORTANT NOTES
• Store wall sheets in a dry place. Keep your
wall sheets in good condition by separating
them and allowing air circulation between
them. Always store them “hump-up”.
See Figure 3.
• Follow minimum power line clearances by
contacting local power officials.
• Refer to Section 3.1 Tank Design, for
information about what can be stored in this
tank.
• Refer to Section 5.7 Recommended Bolt
Assembly, for information on how to tighten
the bolts.
• In areas with high snow loads, do not locate
the water tank close to high buildings, as this
may cause snow to fall onto or build up on
the roof of the tank. Consider future expansion
and allow space for filling and draining of the
water tank. Your dealer can help you plan your
storage system for maximum efficiency.
3.6.3 If Parts Become Wet:
• If bundles become submerged or wet, they
should be opened as soon as possible and
separated to dry until assembly. Allow parts
to drain while maintaining proper bracing to
avoid damage or injury from parts falling over.
See Figure 6.
An optional thin layer of petroleum jelly or
food-grade oil may be applied to the entire
part using a clean cloth.
Due to safety concerns with installation and
use, this is not recommended for such parts
as roof sheets and ladders.
• If hardware boxes become submerged or wet,
parts should be removed, dried, and stored in
a new box that is dry.
8349-600 Wall Sheet Bundle
THIS DRAWING IS THE EXCLUSIVE PROPERTY OF MERIDIAN MANUFACTURING GROUP
AND MAY NOT BE DUPLICATED BY ANY MEANS WITHOUT THE SPECIFIC PERMISSION
FROM AN AUTHORITY OF MERIDIAN MANUFACTURING GROUP
PROJECT NAME:
PART DESCRIPTION:
A
PART/DRAWING NUMBER:
A - SIZE
REV:
www.meridianmfg.com
2019-02-20
SCALE:CHECKED BY DATE:CHECKED BY:
TS
SHEET SIZE:DRAWN BY DATE:DRAWN BY:
PART WEIGHT: 3201.15 lbmass
MATERIAL:
Meridian
Manufacturing group
REVISION HISTORY
REV DESCRIPTION DATE DESIGNER
A TS
Tolerances unless otherwise specified:
X/X = 0.03
.X = 0.1
.XX = 0.03
.XXX = 0.01
= 0.5°
Symbol
Tolerance
= 0.005
= 0.015
= 0.015
Dimensions and tolerances shall
be interpreted in accordance
with ASME Y14.5-2009.
Fig 5 - Tarp over frame
Fig 6 - Parts draining while braced

10.2019 4-1
Assembly Manual: Single Corrugated Water Tank
®
Section 4: ASSEMBLY
4.1 CHECK YOUR SHIPMENT
• Upon delivery, check all parts and packages
against the packing list. Ensure that all items
have arrived and that none are damaged.
• Do not begin installation with missing or
damaged parts.
• When you are satisfied that all parts are in
good condition, lay the parts out for convenient
access.
• Carefully read and understand this installation
manual before proceeding with assembly.
4.2 SHORTAGE AND DAMAGED
PARTS
• Report shortages or damaged parts
immediately to the delivery carrier, followed
within ten days by a confirmation letter
requesting inspection by that carrier, if
required.
• Order necessary parts immediately to ensure
that assembly will not be held up.
• All parts will be charged for and credit will
be issued by the party at fault. No credit will
be issued if delivery invoices are signed and
received in good condition.
4.3 TOOLS AND EQUIPMENT
Use quality tools and equipment. Use them
safely and correctly for their intended use. The
tools and safety equipment for this application
should include, but are not limited to:
• Tools:
- Impact tools
- Power drills and drill bits
- Sockets
- Large-pocket carpenter pouch
- 8” (20 cm) metal tapered punches (for
aligning bolt holes)
- Construction grade step and extension ladders
- 6-point wrenches (Imperial, box end)
- Metal-cutting saw suitable for cutting roof
stiffening ring tubes and wind ring tubes
- Scaffolding
- Centre-post support stand
- Crane and/or bin jacks
• Safety Equipment:
- Properly-stocked first-aid kit
- Personal protective equipment (PPE) like
safety glasses, steel-toed boots, hard hats,
work gloves
- Cable, chain, or rope to tie down tank or
jacks in case of wind during assembly

4-2 10.2019
Assembly Manual: Single Corrugated Water Tank
®
4.4 ORDER OPTIONAL EQUIPMENT
• Optional equipment such as inlet/outlet
flanges, fittings, liner, anchor bolts, ladders
and accessories, etc. should all be on site and
checked before assembly starts.
• Plan your assembly in advance, so all
equipment and supplies are on site and no
delays will be experienced.
• For details, see installation manuals supplied
with the optional equipment.
/