Page is loading ...

Z515E, Z530M, Z530R, and Z545R
ZTrak™
(Serial No. 010001 -XXXXXX)
OPERATOR'S MANUAL
Z500 Series ZTrak™
OMUC28763 ISSUE K0 (ENGLISH)
*OMUC28763*
CALIFORNIA
Proposition 65 Warning
Diesel engine exhaust and some of its constituents
are known to the State of California to cause cancer,
birth defects, and other reproductive harm.
If this product contains a gasoline engine:
WARNING
The engine exhaust from this product contains
chemicals known to the State of California to cause
cancer, birth defects or other reproductive harm.
The State of California requires the above two warnings.
Additional Proposition 65 Warnings can be found in this manual.
John Deere Power Products
North American Edition
PRINTED IN THE U.S.A.
*SELF**omuc28763*

Thank You for Purchasing a John Deere Product
We appreciate having you as a customer and wish you many years of
safe and satised use of your machine.
MX00654,000020B-19-10MAY17
Using Your Operator’s Manual
Read this operator’s manual, watch the safety video, and review the
safety signs on your machine before use. They all contain important
safety information and operating instructions that must be followed to
help keep you and others safe. Be sure everyone who uses the
machine has read the manual, reviewed the safety signs, and knows
how to use the machine safely and properly.
Your machine was designed and built to be operated in accordance
with all the safe operating instructions. Since it was designed to cut
grass, it can amputate hands and feet and throw objects. If you do not
follow safety instructions, serious injury or death can occur.
This operator manual is organized in sections to help you nd
information quickly. You can use this manual to nd answers to many
of your operating and servicing questions. An index at the end of this
book helps you nd needed information quickly. Contact your dealer if
this manual does not answer your questions.
Before using your machine:
● Know how to operate the machine. The Operating Controls section
helps you understand the controls of your machine and what they
do.
● Prepare your machine and the mowing area by performing required
daily checks outlined in the General Instructions section.
● Follow instructions in the Preventing Injuries section, especially
related to:
- Keeping children safe by following instructions in the Protect
Children section.
- Avoiding injury on slopes and near terrain hazards by following
instructions in the Operating on Slopes and Near Terrain
Hazards section.
- Follow the instructions in the Avoid Thrown Objects section and
keep all guards in place, including discharge chute.
- Cleaning machine during use and before storing as outlined in
the Prevent Fires section.
● Understand how to service and inspect your machine.
If you do not understand the instructions or have questions, contact
your dealer.
The machine shown in this manual can dier slightly from your
machine.
RIGHT-HAND and LEFT-HAND sides are determined by facing in the
direction that the machine travels when going forward. When you see
a broken line (------), the item referenced is hidden from view.
Before delivering this machine, your dealer performed a predelivery
inspection to ensure best performance.
This manual is an important part of your machine. Keep this manual
with the machine when you sell it.
OUO2005,000078D-19-11FEB20
Spark Arrestor
The California Public Resources Code, Section 4442.5 provides as
follows:
No person shall sell, oer for sale, lease, or rent to any person any
internal combustion engine subject to Section 4442 or 4443, and not
subject to Section 13005 of the Health and Safety Code, unless the
person provides a written notice to the purchaser or bailee, at the time
of sale or at the time of entering into the lease or rental contract,
stating that it is a violation of Section 4442 or 4443 to use or operate
the engine on any forest-covered, brush-covered, or grass-covered
land unless the engine is equipped with a spark arrestor, as dened in
Section 4442, maintained in eective working order or the engine is
constructed, equipped, and maintained for the prevention of re
pursuant to Section 4443. Cal. Pub. Res. Code 4442.5. Other states or
jurisdictions may have similar laws. A spark arrestor for your machine
may be available from your authorized dealer. An installed spark
arrestor must be maintained in good working order by the operator.
OUO2005,00006F6-19-19MAY19
Special Messages
Your manual contains special messages to bring attention to potential
safety concerns and machine damage, as well as helpful operating
and servicing information. Please read all the information carefully to
avoid injury and machine damage.
CAUTION: Avoid injury! This symbol and text highlight
potential hazards or death to the operator or bystanders
that may occur if the hazards or procedures are ignored.
IMPORTANT: Avoid damage! This text is used to tell the operator
of actions or conditions that might result in damage to the
machine.
NOTE: General information is given throughout the manual that may
help the operator in the operation or service of the machine.
MX00654,000020D-19-05JUN17
Parts
We recommend John Deere quality parts and lubricants, available at
your John Deere dealer.
When you order parts, your John Deere dealer needs the serial
number or product identication number (PIN) for your machine or
attachment. These are the numbers that you recorded in the Product
Identication section of this manual.
Order Service Parts Online
Visit http://JDParts.deere.com for your Internet connection to parts
ordering and information.
TC00531,00000E9-19-06MAR15
Service Literature
If you would like to purchase a copy of the Parts Catalog or Technical
Manual for this machine, visit The John Deere Technical Information
Store at:
https://techpubs.deere.com/
or call:
● U.S. & Canada: 1-800-522-7448.
● All Other Regions: Your John Deere dealer.
TH84124,0000199-19-05FEB20
Introduction
2

CCoonntteennttss
Introduction............ . . ........ . ........ . . ....... . . ........ . . 2
Product Identication.. . ........ . ........ . . ....... . . ........ . . 3
Safety Labels with Text.. . . ....... . . ........ . ........ . . ...... 4
Safety Labels without Text. . ....... . . ........ . ........ . . .... 7
Safety......... . . ....... . . ........ . ........ . . ....... . . ........ . . 9
Machine Cleanout...... . . ....... . . ........ . . ....... . . ....... 13
Operating Controls... . . ........ . ........ . . ....... . . ........ . 15
Operating... . . ....... . . ........ . ........ . . ....... . . ........ . .. 17
Service Intervals.... . . ........ . ........ . . ....... . . ........ . .. 29
Service Lubrication.. . ........ . ........ . . ....... . . ........ . .. 30
Service Engine.. . ........ . . ....... . . ........ . ........ . . ..... 31
Service Transmission.. . . ....... . . ........ . . ....... . . ....... 40
Service Mower... . ........ . . ....... . . ........ . ........ . . ..... 43
Service Electrical. . . ........ . . ....... . . ........ . ........ . . ... 49
Service Miscellaneous....... . ........ . . ....... . . ........ . .. 51
Troubleshooting..... . . ........ . ........ . . ....... . . ........ . .. 55
Storage. . . ........ . ......... . ....... . . ........ . .......... ..... 56
Specications..... . . ........ . . ....... . . ........ . ........ . . ... 57
Warranty........ . ........ . . ....... . . ........ . . ....... . . ....... 59
John Deere Quality Statement.. . ........ . . ....... . . ....... 62
Service Record.. . ........ . . ....... . . ........ . ........ . . ..... 63
Slope Gauge. ....... . . ........ . ........ . . ....... . . ........ . .. 64
Index.. . . ........ . ........ . . ....... . . ........ . . ....... . . ....... 65
Product Identication
Record Identication Numbers
Zero Turn Mowers
PIN (010001-)
If you need to contact an Authorized Service Center for information on
servicing, always provide the product model and identication
numbers.
You will need to locate the model and serial number for the machine,
engine, and transmission/transaxle of your machine and record the
information in the spaces provided below.
DATE OF PURCHASE:
_________________________________________
DEALER NAME:
_________________________________________
DEALER PHONE:
_________________________________________
MX101417—UN—22APR20
Product Identication Number (A):
__ __ __ __ __ __ __ __ __ __ __ __ __ __ __ __ __
Engine Serial Number:
All - On engine blower housing.
__ __ __ __ __ __ __ __ __ __ __ __ __ __ __ __ __
Transaxle Serial Numbers:
S/N tag on forward side of each transaxle housing.
LEFT SIDE:
__ __ __ __ __ __ __ __ __ __ __ __ __ __ __ __ __
RIGHT SIDE:
__ __ __ __ __ __ __ __ __ __ __ __ __ __ __ __ __
SB31882,00003EA-19-20JUL20
Register Your Product and Warranty Online
To register your product through the Internet, simply go to www.
JohnDeereWarrantyRegistration.com. Completing the information,
either online or with the product warranty card, will ensure that your
product will receive all post sales, service, and important product
information.
MP47322,00F45FF-19-05JUN17
Original Instructions. All information, illustrations and specications in this
manual are based on the latest information available at the time of
publication. The right is reserved to make changes at any time without
notice.
COPYRIGHT © 2020
DEERE & COMPANY
Moline, Illinois
All rights reserved.
Contents
3

Safety Labels with Text
Safety Label Location
MX101343—UN—08MAY20
Z515E, Z530M, Z530R, and Z545R
A—WARNING - UC27013
B—CAUTION - UC26988
C—WARNING - M156577
D—DANGER, CAUTION, WARNING - UC22274
E—DANGER - M118610
F—DANGER - M156388
G—DANGER - M139128
SB31882,00003AC-19-16JUN20
Safety Labels with Text
4

Understanding the Machine Safety Labels
MXAL42363—UN—22MAY13
The machine safety labels shown in this section are placed in
important areas on your machine to draw attention to potential safety
hazards. DANGER or WARNING safety labels are located near
specic hazards.
The operator’s manual also explains any potential safety hazards
whenever necessary in special safety messages that are identied
with the word, CAUTION, and the safety-alert symbol.
On your machine safety labels, the words DANGER, WARNING, and
CAUTION are used with this safety-alert symbol. DANGER identies
the most serious hazards:
● DANGER; The signal word DANGER indicates a hazardous
situation which, if not avoided, will result in death or serious injury.
● WARNING; The signal word WARNING indicates a hazardous
situation which, if not avoided, could result in death or serious
injury.
● CAUTION; The signal word CAUTION indicates a hazardous
situation which, if not avoided, could result in minor or moderate
injury. CAUTION may also be used to alert against unsafe practices
associated with events which could lead to personal injury.
Replace missing or damaged safety labels. Use this operator’s manual
for correct safety label placement.
There can be more safety information contained on parts and
components sourced from suppliers that is not reproduced in this
operator’s manual.
French or Spanish Safety Labels and Operator’s Manual
Operator’s manuals and safety labels with content in French or
Spanish are available for this machine through authorized John Deere
dealers. See your John Deere dealer.
NOTE: Both text and no-text labels are shown. Your machine is only
equipped with one of these types of labels.
MP47322,00F4601-19-24APR19
WARNING
MX101380—UN—30MAR20
Avoid Crushing
● Keep protective structure in raised position
● Do not jump if machine tips
● Use seat belt
When protective structure must be down:
● DO NOT use seat belt
● Drive with extra care
SB31882,00003C1-19-16JUN20
WARNING
MXAL42769—UN—09APR13
To avoid injury from loaded spring, read operator’s manual before
changing attachments.
TH84124,000017E-19-28OCT16
DANGER
MX101349—UN—17MAR20
ROTATING BLADES CUT OFF ARMS AND LEGS
● Do not mow when children or others are around.
● Do not mow in reverse.
● Look down and behind before and while backing.
● Look in the direction the machine is traveling.
● Never carry children even while blades are o.
SB31882,00003AE-19-17MAR20
WARNING
MX101350—UN—17MAR20
AVOID INJURY OR DEATH FROM ROLLOVER
● Do not drive where the machine could slip or tip, on steep slopes,
near water, or drop-os.
● Drive across slopes, not up and down.
Safety Labels with Text
5

● If machine loses traction on a slope, stop blades, and proceed
slowly o slope.
● Avoid sudden starts, turns, and stops.
SB31882,00003B0-19-17MAR20
CAUTION
MX101351—UN—17MAR20
Read operator’s manual and watch safety video.
Keep safety devices (guards, shields, and switches) in place and
working.
Pick up objects that can be thrown by blades.
When leaving machine:
- Stop engine.
- Set park brake.
- Remove key.
SB31882,00003AF-19-04JUN20
DANGER
MXT008504—UN—01NOV16
ROTATING BLADE
Do not put hands or feet under or into mower when engine is running.
TH84124,00000CB-19-01NOV16
DANGER
MXAL42773—UN—09APR13
To avoid injury from rotating blades and thrown objects:
Keep hands and feet away from rotating blades. Keep bystanders a
safe distance away. Do not operate mower without discharge chute or
entire grass catcher in place.
TH84124,000017F-19-01NOV16
DANGER
MXT008505—UN—01NOV16
ROTATING BLADE
DO NOT PUT HANDS OR FEET UNDER OR INTO MOWER WHEN
ENGINE IS RUNNING.
THROWN OBJECTS
BEFORE MOWING, CLEAR AREA OF OBJECTS THAT MAY BE
THROWN BY BLADE.
DO NOT OPERATE MOWER WITHOUT DISCHARGE CHUTE OR
ENTIRE GRASS CATCHER IN PLACE.
TH84124,0000162-19-01NOV16
Safety Labels with Text
6

Safety Labels without Text
Safety Label Location
MX101528—UN—25JUN20
Z515E, Z530M, Z530R, and Z545R
A—WARNING - UC27008
B—CAUTION - UC26989
C—DANGER, WARNING, CAUTION - UC25540
D—WARNING - M146611
E—DANGER - M118041
F—DANGER - M118040
G—DANGER - M138631
H—DANGER - M136436
SB31882,00003AD-19-13JUL20
Safety Labels without Text
7

Understanding the Machine Safety Labels without
Text
TCT005498—UN—11SEP12
At several important places on this machine, safety signs are axed
which signify potential danger. The hazard is identied by a pictorial in
a warning triangle. An adjacent pictorial provides information on how
to avoid personal injury. These safety signs, their placement on the
machine, and a brief explanatory text are shown in this Safety section.
There can be additional safety information contained on parts and
components sourced from suppliers that is not reproduced in this
operator’s manual.
MX00654,0000389-19-21JUN18
Avoid Injury from Crushing
MX101381—UN—30MAR20
Avoid Crushing
● Keep protective structure in raised position
● Do not jump if machine tips
● Use seat belt
When protective structure must be down:
● DO NOT use seat belt
● Drive with extra care
SB31882,00003C2-19-04JUN20
Avoid Injury from Loaded Spring
MXAL42777—UN—09APR13
● Keep ngers and hands away from pinch point.
● Read operator’s manual.
MX00654,000038C-19-24APR19
Avoid Injury from Equipment Fires
MXT018019—UN—04MAY16
● Avoid equipment res.
● Accumulation of grass, leaves, and debris on or near hot or moving
parts can cause a re.
● Inspect and clean the entire machine before, during and after use.
● Shut o engine and allow machine to cool before cleaning.
● Carefully read operator’s manual Machine Cleanout section for
details.
MX00654,0000390-19-30MAR20
Avoid Injury from Getting Caught in Belts
MXT018017—UN—03MAY16
● Stay clear of moving belts.
● Do not operate machine without shields in place.
MX00654,0000391-19-24APR19
Avoid Injury from Rotating Blades
MXT018016—UN—03MAY16
● Do not put hands or feet under or into mower when engine is
running.
● Do not operate mower without discharge chute/deector or entire
grass catcher in place.
MX00654,0000392-19-24APR19
Read Operator’s Manual
MX101345—UN—09JUL20
Safety Labels without Text
8

● This operator’s manual contains important information necessary
for safe machine operation.
● Carefully read operator’s manual before operating machine or
attachment. Observe all safety rules to avoid accidents.
SB31882,00003B1-19-18MAR20
Avoid Injury from Thrown Objects
MX101346—UN—09JUL20
● Keep a safe distance from the machine as long as the engine is
running.
SB31882,00003B2-19-18MAR20
Keep Children Away from Mower
MX101347—UN—09JUL20
● Mower can cause dismemberment or death.
● Stay a safe distance from the machine.
● Make sure that children stay clear of mower at all times when the
engine is running.
SB31882,00003B3-19-18MAR20
Avoid Serious Injury or Death from Tipping
MX101348—UN—09JUL20
● Do not drive where machine could slip, tip, or rollover.
● In some congurations, do not drive or operate on a slope of more
than 10 degrees.
● Refer to Operating on Slopes for more information.
SB31882,00003B4-19-28MAY20
Safety
Use Your Mower Safely
General Instructions
● Read this operator’s manual, watch the safety video, and review
the safety signs on your machine before use. They all contain
important safety information and operating instructions that must be
followed to help keep you and others safe. Be sure everyone who
uses the machine has read the manual, reviewed the safety signs,
and knows how to use the machine safely and properly.
● Age, physical ability, and mental capacity can be factors in
equipment-related injuries. Operators must be mentally and
physically capable of operating the machine properly and safely.
Never allow a child to operate the machine.
● Do not operate the machine while under the inuence of alcohol or
drugs or when distracted or fatigued. Proper operation requires
your full attention.
● Always wear eye protection, hearing protection, close-tting
clothing, and substantial footwear while operating the machine.
Never operate while wearing sandals or when barefoot.
● Do not wear radio or music headphones. Both safe operation and
service require your full attention.
● Never tamper with safety devices.
● Operate the machine only in daylight or good articial light.
● Only operate the engine in well-ventilated areas. Exhaust gasses
contain carbon monoxide, a deadly poison.
● Never leave a running machine unattended.
● Look both ways when approaching roadways and use caution
when turning around on public roadways. You can be struck by a
vehicle and suer serious injury or death.
Before Using Your Machine
● Know how to operate the machine. The Operating Controls section
helps you understand the controls of your machine and what they
do.
● Prepare your machine and the mowing area by performing required
daily checks outlined in the General Instructions section.
● Follow instructions in the Preventing Injuries section, especially
related to:
- Keeping children safe by following instructions in the Protect
Children section.
- Avoiding injury on slopes and near terrain hazards by following
instructions in the Operating on Slopes and Near Terrain
Hazards section.
- Follow the instructions in the Avoid Thrown Objects section, and
keep all guards in place, including discharge chute.
- Cleaning machine during use and before storing as outlined in
the Prevent Fires section.
● Understand how to service and inspect your machine.
Inspection and Daily Checklist
● Inspect machine before you operate. Be sure that hardware is tight,
and all guards and shields are in good condition and fastened in
place. Make all necessary adjustments before you operate. Repair
or replace damaged, badly worn, or missing parts.
● Visually inspect that mower blades, blade bolts, and the mower
assembly are not worn or damaged. To prevent machine damage,
replace worn or damaged blades and bolts in sets.
● Make sure that the fuel cap and air cleaner are in place before
starting engine.
Safety
9

Fuel
● Use care when handling fuel. Fuel is ammable and fuel vapors can
be explosive. Do not smoke when handling fuel. Only use an
approved fuel container. Clean up spilled fuel immediately.
● Check fuel lines, tank, cap, and ttings frequently for cracks or
leaks. Replace if necessary.
Check the Mowing Area
● Keep bystanders and pets out of the mowing area.
● Clear the area of objects such as rocks, wire, or toys, which can be
thrown by the blades. Remove low-hanging branches or other
obstacles, which can interfere with your travel path.
● Study the mowing area. Set up a safe mowing path. Do not mow
where traction or stability is doubtful.
● Slopes and terrain hazards are major factors related to loss-of-
control and tipover accidents. Operation on slopes and near terrain
hazards requires extra caution. Follow instructions in the Operating
on Slopes and Near Terrain Hazards section.
Weights and Attachments
● Some attachments require ballast weights. Follow
recommendations for wheel weights or counterweights.
● Use only accessories and attachments approved by John Deere.
● If you do not understand the instructions or have questions, contact
your dealer.
OUO2005,0000784-19-09MAR20
Preventing Injuries
Protect Children
MXT005340—UN—06JUN13
● Children can be killed or seriously injured by riding mowers when
operators do not follow safe operating practices.
● Do not mow in reverse. Operating with the mower engaged while
backing up is discouraged.
● Never give children a ride on a mower or in a cart behind the
mower, even when the blades are o. They can fall o and be run
over or cut by the mower blades. Children can interfere with mower
operation. Children who have been given rides in the past can
suddenly appear in the mowing area for another ride. If you are not
aware, they can be run over or backed over by the mower.
● Children are often attracted to lawn mowers and mowing activities,
especially if they have been given rides before. They do not know if
the blades are rotating or understand that they can be killed or
seriously injured even if the blades are not rotating.
● Keep children indoors and out of the mowing area when the mower
is being operated. Keep children under the watchful eye of a
responsible adult, other than the operator. If there is not a
responsible adult to ensure that children stay indoors, DO NOT
mow.
● Be alert to the presence of children or others. Turn o the mower
blades and stop the machine if someone enters the mowing area.
● Look in the direction the machine is traveling. Before and while
backing, turn o the mower blades and look down and behind the
machine carefully, especially for children.
● Use extreme care when approaching objects that block your view,
such as blind corners, shrubs, or trees, especially while backing.
They can hide a child.
Avoid Thrown Objects
● Clear the mowing area of all bystanders when using this machine.
Thrown objects could cause serious injury or death.
● Clear the area of objects such as rocks, wire, or toys, which can be
thrown by the blades.
● Never direct discharged material toward anyone.
● Avoid discharging material against a wall or obstruction such as a
fence or retaining wall. Material can ricochet towards the operator.
● Avoid discharging material towards a street or roadway.
● Stop the blades when crossing gravel surfaces.
OUO2005,000078C-19-15FEB20
Operating on Slopes and Near Terrain Hazards
● Slopes are a major factor related to loss-of-control and tip-over
accidents, which can result in serious injury or death. Use caution
and common sense when operating on slopes.
● If you feel uneasy on a slope, do not mow or operate the machine
on it.
● Mow across slopes, not up and down.
● Watch for holes, ruts, bumps, rocks, or other hidden objects. Tall
grass can hide obstacles.
● Drive slowly so you do not have to stop while on a slope.
● Do not mow on wet grass. Tires can slip on wet grass even if the
brakes are working normally.
● Keep all movement on slopes slow and gradual. Do not make
sudden changes in speed or direction, which can cause the ride-on
mower to roll over.
● If the tires lose traction, disengage the PTO and proceed slowly and
carefully o the slope.
● Do not shift to neutral and coast downhill.
Identify Safe Slopes
● Before using your machine, measure slopes of all mowing areas to
determine which slopes are safe for mowing with a ride-on mower.
Use good judgment and common sense when performing this
survey.
Measuring Slopes
● Suggested method 1: Lay a straight piece of sturdy lumber 1.2 m (4
ft) long on the slope and measure the angle with an angle gauge or
protractor level.
● Suggested method 2: Refer to the slope gauge provided at the end
of the manual.
Slope Limits
● Exceeding the recommended maximum slope angle increases the
risk of rollover accidents that can result in serious injury or death.
Safety
10

GX100108—UN—14FEB20
● Never mow or operate this ride-on mower on slope angles greater
than 13° with ride-on mower in its basic conguration. The basic
conguration is the ride-on mower with a mower deck and no other
attachments. (A 13° slope is a slope that rises 1.4 m [4.6 ft] over a
horizontal distance of 6.1 m [20 ft].)
GX100111—UN—19FEB20
● Attachments such as material collection systems, weather
enclosures, or other attachments increase the risk of a rollover.
When using attachments, never mow or operate this ride-on mower
on slope angles greater than 10°. (A 10° slope is a slope that rises 1
m [3.5 ft] over a horizontal distance of 6.1 m [20 ft].)
● The risk of rollover is low on slopes of 10° or less. As the slope
angle increases to the recommended maximum, the risk increases
to a medium level.
Operating Near Terrain Hazards
GX100105—UN—01FEB20
● Terrain hazards such as ditches and drop os are a factor related to
loss-of-control and tip-over accidents, which can result in serious
injury or death. Use caution and common sense when operating
near terrain hazards.
● Do not mow or operate the machine in areas adjacent to hazards
that can cause the machine to roll over. If a wheel goes over an
edge or if the edge breaks away, the machine can suddenly lose
traction, slide, and/or roll over.
● Hazards (A) include but are not limited to ditches, drop-os,
embankments, or areas near bodies of water.
● Maintain a buer area (B) at least as wide as the machine between
hazards (A) and the mowing area (C). Do not mow or operate the
machine in the hazard area or buer area.
● Only mow or operate in the mowing area (C). Do not exceed the
recommended slope operating angle. Refer to the Slope Limits
section.
OUO2005,000078A-19-09MAR20
Use Seat Belt Properly
TCAL42361—UN—08MAR13
● Use a seat belt when operating with the folding Roll-Over Protective
Structure (ROPS) in the raised position to minimize chance of injury
from an accident, such as an overturn.
● Do not use a seat belt when operating with the folding ROPS in the
folded position. Return the folding ROPS to the raised position as
soon as possible.
● Never modify, disassemble or attempt to repair the seat belt.
● Replace entire seat belt if mounting hardware, buckle, belt, or
retractor show signs of damage.
● Inspect seat belt and mounting hardware at least once a year. Look
Safety
11

for signs of loose hardware or belt damage, such as cuts, fraying,
extreme or unusual wear, discoloration, or abrasion. Replace only
with John Deere-approved replacement parts.
● Layers of heavy clothing can interfere with proper positioning of the
seat belt and can reduce the eectiveness of the seat belt.
SB31882,000049F-19-09JUL20
Rollover Protection System (ROPS) - Use and
Maintenance
● Conforms to ISO21299:2009 for energy absorbing ROPS
requirements.
● Never operate the machine without the ROPS installed.
● DO NOT remove the ROPS.
● The ROPS is an integral and eective safety device. Keep a folding
ROPS in the raised and locked position and use the seat belt when
operating the machine.
● Lower a folding ROPS temporarily only when necessary. Do not
wear the seat belt when folded down.
● Be aware there is no rollover protection when a folded ROPS is in
the down position.
● Be certain that the seat belt can be released quickly in the event of
an emergency.
● Check the area to be mowed and never fold down a folding ROPS
in areas where there are slopes, drop os, ditches, or
embankments or bodies of water.
● Check carefully for overhead clearances (that is, branches,
doorways, electrical wires) before driving under any objects and do
not contact them.
● Keep the ROPS in safe operating condition by periodically
thoroughly inspecting for damage and keeping all mounting
hardware tight. Make certain all parts of the ROPS are installed
correctly if the ROPS structure is loosened or removed for any
reason. All ROPS hardware should be tightened to the proper
torque.
● Replace a damaged ROPS. Do not repair or revise. The protection
provided by the ROPS will be impaired if the ROPS is subjected to
structural damage, is involved in an overturn incident, or is in any
way altered by welding, bending, drilling, or cutting. It must be
replaced to maintain the manufacturer’s certication of the structure
● Any alteration of ROPS must be approved by manufacturer.
● The seat is part of the ROPS safety zone. Replace only with a John
Deere-approved seat.
MX00654,0000200-19-08APR20
Prevent Fires
TS227—UN—15APR13
● Do not mow tall, dry grass or through piles of leaves. Combustible
materials can contact hot components and increase the risk of re.
● Debris can build up anywhere on the machine, especially on
horizontal surfaces. While using your machine, periodically check
for and remove debris, especially in dry or heavy debris conditions,
such as when collecting leaves.
● After operating, completely remove any combustible materials from
equipment before storing. Use compressed air, a leaf blower, or
water to keep the machine clean.
● Allow machine to cool in an open area before storing. Do not park
machine near ammable materials, such as straw, mulch, cloth, or
chemicals. Do not park near an open ame or other sources of
ignition, such as a water heater or furnace.
● Excess lubrication or fuel/oil leaks or spills on the machine can also
provide collection sites for debris. Promptly cleaning up spills and
repairing leaks reduces the potential for debris collection.
● Refer to the Machine Cleanout section for more information on
checking for debris buildup and locations to inspect.
● Always park the machine safely before cleaning or servicing a
machine. See the Parking Safely section.
OUO2005,0000787-19-15FEB20
Parking Safely
Always apply the park brake and remove the key before leaving the
machine unattended. Children or others may attempt to move or
operate an unattended machine.
● Stop the machine on a level surface.
● Disengage mower blades or other attachments.
● Lower attachments to the ground.
● Apply the park brake.
● Stop the engine.
● Remove the key.
● Wait for engine and all moving parts to stop before you leave the
seat.
OUO2005,0000788-19-15FEB20
Additional Safety Information
Towing Loads Safely
● Stopping distance increases with speed and weight of towed load.
Travel slowly and allow extra time and distance to stop.
● Total towed weight must not exceed Towing Capacity stated in
Specications of this manual.
● Excessive towed load can cause loss of traction and loss of control
on slopes. Reduce towed weight when operating on slopes.
● Never allow children or others in or on towed equipment.
● Use only approved hitches. Tow only with a machine that has a
hitch designed for towing. Do not attach towed equipment except at
the approved hitch point.
● Towed equipment increases the risk of rollover on slopes. Refer to
the Operating on Slopes and Near Terrain Hazards section for more
information.
● Do not turn sharply. Use additional caution when turning or
operating on adverse surface conditions. Use care when reversing.
Safe Transportation
Follow instructions in the Transporting Machine on Trailer section.
● Use a full-width loading ramp at least 30 cm (12 in) wider than the
machine, never two separate ramps.
Service and Maintenance
● Proper service and maintenance of the machine is essential.
● Keep all parts in good condition, keep all nuts and bolts tight, and
repair any damage immediately. Stop and inspect the machine
immediately if you strike an object.
● Ensure that all safety devices, discharge chute, and grass catcher
components are in good condition and replace when necessary.
● Understand service procedures thoroughly before working on the
machine. If you do not understand the service procedures or are
Safety
12

uncomfortable working in your machine, contact your servicing
dealer.
● Disconnect the battery or all spark plug wires before servicing the
machine. Disconnect negative terminal rst and positive last. Install
positive terminal rst and negative last.
● Some components could have stored energy in springs or hydraulic
components. Servicing procedures described in the Service section
describe how to perform service and maintenance tasks safely.
● Support any machine elements that must be raised for service
work. Use jack stands or service locks to support components
when needed.
Disposing of Waste Products and Chemicals
● Waste products, such as used oil, fuel, coolant, brake uid, and
batteries can harm the environment and people.
● Do not use beverage containers for waste uids – someone can
mistakenly drink from them.
● A Safety Data Sheet (SDS) provides specic details on chemical
products: Physical and health hazards, safety procedures, and
emergency response techniques. The seller of the chemical
products used with your machine is responsible for providing the
SDS for that product.
● To learn how to recycle or properly dispose of waste products
generated from service, see your local recycling center or
authorized dealer. If you wish to discard the machine, contact your
local recycling center or authorized dealer.
OUO2005,0000789-19-15FEB20
Machine Cleanout
General Cleaning Guidelines
Machine must be inspected periodically throughout the day. Buildup of
debris must be removed to ensure proper machine function and to
reduce the risk of re. Frequency of these inspections and cleanings
vary depending on a number of factors including operating conditions,
machine conguration, operating speeds, and weather conditions.
Inspections and cleanings may be required multiple times throughout
the day particularly in dry, hot, and windy conditions.
IMPORTANT: Avoid re! Regular and thorough cleaning of
machine combined with other routine maintenance
procedures listed in the Operator’s Manual greatly reduce
the risk of re, downtime, and improve machine
performance.
Besides proper maintenance the condition of the material
being handled is the most signicant factor contributing to
res. Dry, light, and uy materials that can create a dust
cloud are the most likely to catch re. Debris can
accumulate in various areas especially on horizontal
surfaces. Conditions such as wind speed and direction can
change where the material accumulates. Be aware of these
changing conditions and adjust your cleaning schedule and
practices to ensure proper machine function and to reduce
the risk of re.
Always follow all safety procedures posted on the machine and in the
Operator’s Manual. Before carrying out any inspection or cleaning,
always park machine safely. (See Parking Safely in the Safety
Section).
The entire machine should be inspected, with extra attention given to
the areas noted below.
OUMX068,0001043-19-20JUL20
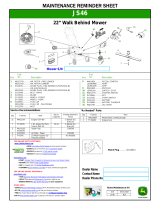
Cleanout Areas
NOTE: Also see machine Service Label.
Primary areas that must be inspected and cleaned on the machine
include:
GXT003036—UN—15JUL16
1.Muer components (A):
- Exhaust Manifold
- Muer Pipes
- Muer
- Muer Shield
2.Engine cooling ns (B) and oil cooler (if equipped.)
3.Engine screen guard (C) (See Cleaning Engine Screen Guard in
the Service Engine section.)
MX101530—UN—24JUN20
4.Top of the mower deck, under shields (D), including spindle and belt
area (E).
MX101531—UN—26JUN20
Machine Cleanout
13

MX101529—UN—24JUN20
5.On or near transaxles (F) and belt drives and ns.
MX101421—UN—22APR20
6.Under the seat and near fuse block (G), including the battery (H)
and wiring harness.
SB31882,00003EB-19-19AUG20
Machine Cleanout
14

Operating Controls
Operator’s Station Controls
Z515E Operator’s Controls
MX101516—UN—26JUN20
A—Park Brake Lever
B—Left Motion Control Lever
C—Right Motion Control Lever
D—Deck Height Pin Tool
E—Mower Deck Lift Lever
F—Mower Deck Lift Pedal
G—Choke Lever
H—Mower Engagement Button
I—Key Switch
J—LED Light Switch (if equipped)
K—Fuel Tank Cap
L—Hourmeter/MowerPlus™ Fuel Display (if equipped)
M—Throttle Control Lever
Z530M and Z530R Operator’s Controls
MX101339—UN—26JUN20
A—Park Brake Lever
B—Left Motion Control Lever
C—Right Motion Control Lever
D—Deck Height Pin Tool
E—Mower Deck Lift Lever
F—Mower Deck Lift Pedal
G—Choke Lever
H—Mower Engagement Button
I—Key Switch
J—LED Light Switch (if equipped)
K—Fuel Tank Cap
L—Throttle Control Lever
M—Operator’s Display Unit or MowerPlus™ Fuel Display
MowerPlus is a trademark of Deere & Company
Operating Controls
15

Z545R Operator’s Controls
MX101443—UN—05JUN20
A—Park Brake Lever
B—Left Motion Control Lever
C—Right Motion Control Lever
D—Deck Height Pin Tool
E—Mower Deck Lift Lever
F—Mower Deck Lift Pedal
G—Electronic Throttle Controller
H—Mower Engagement Button
I—Key Switch
J—LED Light Switch
K—Fuel Tank Cap
L—Operator’s Display Unit
MX101517—UN—26JUN20
Operator's Display Unit
MX101518—UN—05JUN20
Electronic Throttle Controller
SB31882,0000475-19-08JUL20
Operating Controls
16

Operating
Daily Operating Checklist
⃞
Check engine oil.
⃞
Clean muer area, air intake screens, and mower deck.
⃞
Check brake system.
⃞
Check fuel level.
⃞
Check under the machine for leaks.
⃞
Check safety interlock system.
⃞
Check tire pressures.
⃞
Check oil level in both transmissions.
⃞
Check mulch control open/close operation (if equipped).
⃞
Clean mower deck using the washout port after use.
SB31882,00003CD-19-21MAY20
Avoid Damage to Plastic and Painted Surfaces
● Do not wipe plastic parts until they are rinsed rst. Using a dry cloth
causes scratches.
● Insect repellent spray damages plastic and painted surfaces. Do
not spray insect repellent near machine.
● Be careful not to spill fuel on the machine. Fuel damages surfaces.
Wipe up spilled fuel immediately.
● Prolonged exposure to sunlight damages some surfaces.
MP47322,00F4630-19-15APR19
Using Operator Display Unit (If Equipped)
Operator Display Unit
The R-Series machines are equipped with an electronic operator
display unit.
MX101455—UN—04MAY20
Operator Display Unit
A—Engine Diagnostic Indicator
B—Motion Control Levers Neutral Position Indicator
C—Warning Indicator
D—STOP Machine Indicator
E—Mower Engagement Indicator
F—Voltage Indicator
G—Park Brake Indicator
H—Operator Seat Indicator
I—Throttle Indicator
J—Fuel Level Indicator
K—Hourmeter
A Light indicates an engine diagnostic problem. Service is
required. Contact your John Deere Dealer.
B Light alerts operator to return control levers to the neutral
position.
C Light indicates a signicant WARNING. Stop the machine.
D Light indicates to the operator to STOP the machine
immediately.
E Light indicates that the mower blades are engaged.
F Displays the current voltage range.
G Light indicates that the park brake is engaged.
H Light indicates that the operator is seated.
I Displays the current engine throttle range.
J Displays the current fuel level.
K Displays the current operating hours.
Numeric RPM Display
Any R-Series machine with an operator display unit can display the
engine RPM numerically.
MX101508—UN—15MAY20
L—Graphic Display of Engine Speed
M—Numeric Display of RPM
To display the RPM numerically:
● Cycle the control levers out ve times within the rst three seconds
the key switch is ON.
NOTE: Once enabled, the hourmeter will display the engine RPM (M)
numerically. This feature will remain active until the next cycling
of the control levers or cycling of the key switch.
SB31882,00003FD-19-17MAY20
Using the Hour Meter and MowerPlus Fuel Gauge (If
Equipped)
Hour Meter
● The hour meter shows the number of hours the engine has run. The
hour meter does not accumulate hours with the engine o when the
key is in the run position. Use the hour meter to determine when
your machine has reached the recommended service intervals.
● Turn the key to STOP position when not using the machine.
● Hour meter cannot be reset.
Operating
17

MowerPlus™ Fuel Gauge (If Equipped)
MX101410—UN—15APR20
MowerPlus Fuel Gauge
● The hour meter (A) shows the number of hours the engine has run.
The hour meter is always active and cannot be reset.
● The fuel level (B) is indicated by the graph of ve segments in
increasing height. When the fuel tank has emptied to approximately
20%, the last segment ashes indicating approximately 30 minutes
of fuel remaining.
SB31882,00003B5-19-08JUN20
Using Electronic Throttle Control (If Equipped)
Model Z545R is equipped with an electronic throttle control. This three
push-button controller replaces the manual throttle and choke levers.
MX101456—UN—05JUN20
Electronic Throttle Controller
A—MIN - Minimum Throttle
B—ECO - Economy Throttle
C—MAX - Maximum Throttle
A Select MINIMUM throttle when starting the engine and
maneuvering the machine when the mower blades are not
engaged. Do not engage the mower blades in this mode.
B Select ECONOMY throttle for ecient operation in less
demanding mowing conditions.
C Select MAXIMUM throttle for best results in more demanding
mowing conditions.
Custom RPM Mode
The operator can program a custom RPM setting. This setting will be
stored in memory for use later or until the setting is overwritten.
To program a custom engine speed setpoint:
MX101511—UN—22MAY20
● Press and hold MAX or MIN button on keypad.
To Adjust the Engine Speed Up or Down:
MX101511—UN—22MAY20
● Press MAX or MIN button on keypad.
To return to the default display mode:
MX101510—UN—14MAY20
● Press and hold ECO button.
At any time during operation, press and hold ECO to return to the
programmed engine speed.
SB31882,00003FC-19-11JUN20
Mounting and Dismounting Machine
MX101356—UN—24MAR20
● Park machine safely. (See Parking Safely in the Safety section.)
● Mount and dismount the machine from the front. If equipped, deck
grip step is an optional mounting and dismounting path.
● Keep all surfaces used for mounting and dismounting clean and
free of debris.
SB31882,00003BA-19-16JUN20
MowerPlus is a trademark of Deere & Company
Operating
18

Adjusting Seat
E-Series Seat
MX101454—UN—17JUN20
ROPS Not Shown
1. Slide lever (A) sideways to the left.
2. Slide seat forward or rearward to the desired position.
3. Release lever.
M- and R-Series Seat with ComfortGlide
MX101420—UN—17JUN20
ROPS Not Shown
1. Slide lever sideways to the left (A).
2. Slide seat forward or rearward to the desired position.
3. Release lever to center position.
4. Slide lever sideways to the right for ComfortGlide feature.
SB31882,00003BB-19-05JUN20
Adjusting Armrests
NOTE: Each armrest can be raised or lowered in 5 degree increments
from the horizontal position.
MX101419—UN—28APR20
R-Series Shown
1. Raise each armrest (A).
2. Turn adjustment thumbscrew (B) clockwise to lower armrest and
counterclockwise to raise armrest.
SB31882,00003BC-19-12MAY20
Adjusting Motion Control Levers
1. Park machine safely. (See Parking Safely in the Safety section.)
GXT002159—UN—03JUN15
2. To adjust motion control lever height, refer to the operator
instruction label on the machine front panel and the instructions that
follow.
MX101358—UN—23MAR20
3. Remove two bolts and nuts and raise each control lever to the
Operating
19

highest position rst. If uncomfortable, adjust accordingly for the
operator.
● For highest lever position, use holes (A).
● For lowest lever position, use holes (B).
4. You can also adjust each motion control lever slightly forward or
rearward within slotted holes.
SB31882,00003BD-19-23JUN20
Adjusting Cutting Height
Cutting height can be adjusted from approximately 25––100 mm (1––4
in). When mower deck is in transport position cutting height is
approximately 100 mm (4 in).
MX101389—UN—02APR20
1. Raise mower deck:
● Push down on lift pedal (A) and lock in the raised position
(transport). When in the transport position, the lever (B) is raised
over the styling.
2. Insert the deck height pin tool (C) in the proper hole for the desired
height of cut.
3. Lower mower deck:
● Push down on lift pedal (A) and then push down on lever (B),
release lift pedal rearward until the deck achieves the selected
height.
SB31882,00003BE-19-08JUN20
Adjusting Mower Wheels
CAUTION: Avoid injury! Rotating blades are dangerous.
Before adjusting or servicing mower:
• Disconnect spark plug wires or battery negative (-) cable to
prevent engine from starting accidentally.
• Always wear gloves when handling mower blades or
working near blades.
IMPORTANT: Avoid damage! If the mower deck wheels are
adjusted incorrectly, the mower deck can be damaged.
• Wheels must not ride on ground supporting mower weight.
• Check wheel adjustment each time cutting height is
changed.
1. Park machine safely on a level surface. (See Parking Safely in the
Safety section.)
2. Inate tires to correct pressure.
3. Press the mower deck lift pedal, and lock in the transport position.
4. Adjust mower deck wheels to correct height:
.
MX101461—UN—01MAY20
Position 1 (A) 25––38 mm (1––1-1/2 in) Height of Cut
Position 2 (B) 38––50 mm (1-1/2––2 in) Height of Cut
Position 3 (C) 50––76 mm (2––3 in) Height of Cut
Position 4 (D) 76––101 mm (3––4 in) Height of Cut
● Remove nut (E). Pull the carriage bolt (F) out until end of bolt clears
the outer wall of the depth gauge wheel bracket (G). Slide the bolt
and wheel assembly to the desired position. Push the bolt back
through the outer wall of bracket. Install nut (E) and tighten to
specication.
Specication
Mower Wheel Nut—Torque. . . . . . . . . . . . . . . . . . . . . . . . . . . . . . . . . . . 24 N·m (18 lb·ft)
NOTE: The onboard tool with 13 mm wrench is located in the styling
tool box area.
SB31882,00003C7-19-16JUN20
Testing Safety Systems
MXAL42804—UN—09APR13
CAUTION: Avoid injury! Engine exhaust fumes contain
carbon monoxide and can cause serious illness or death.
Do not run an engine in an enclosed area, such as a garage,
even with doors or windows opened.
Move the machine to an outside area before running the
engine.
The safety systems installed on your machine should be checked
before each machine use. Be sure that you have read the machine
operator manual and are familiar with the operation of the machine
before performing these safety system checks.
Operating
20
/