Installation
Safety Information
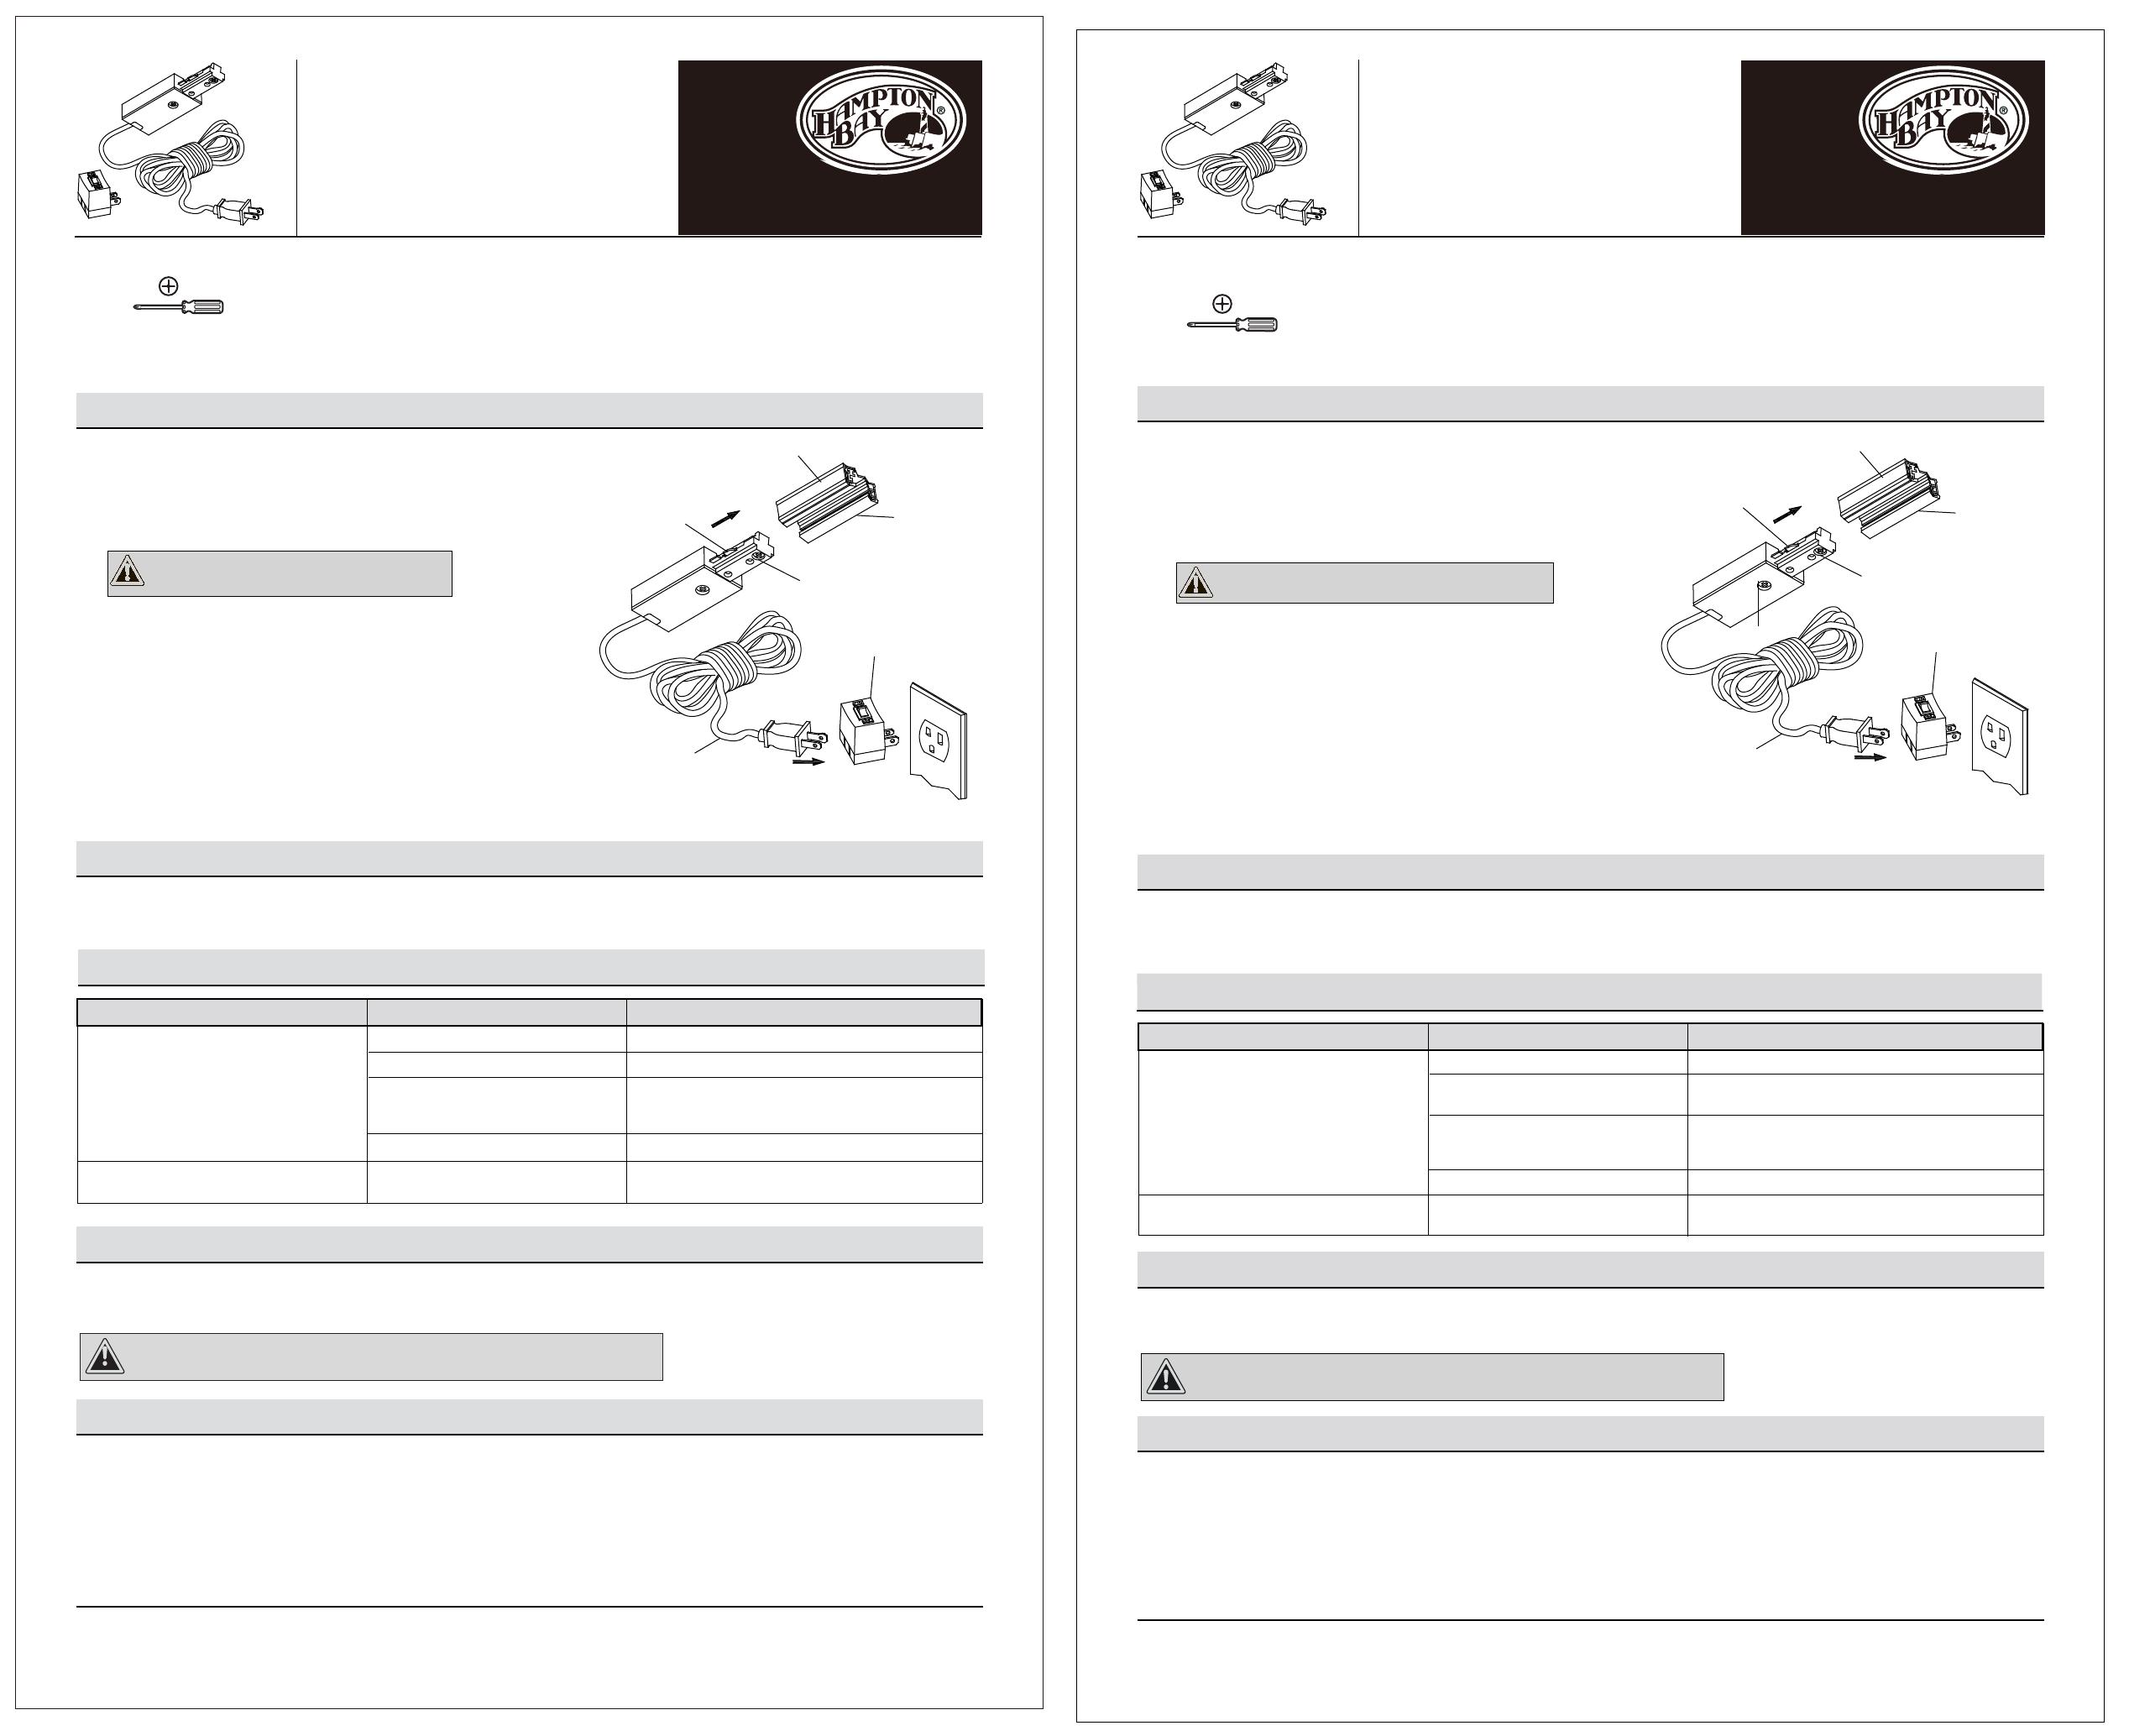
Permits track to be plugged into standard wall outlet where permanent installation is not convenient.
Track Lighting Plug-IN Live End Connector. Energizes track section utilizing a household electrical receptacle.
Determine the ground side of the track (has indented groove on face
and two internal copper bars) and connector (side of connector with
two metal tabs). Can only be assembled if grounds are aligned.
This is not a grounded accessory.
Loosen the set screw on the dead end cap at the appropriate track
end and remove. Loosen the set screw on the connector.
Before installing, disconnect power by turning off the circuit breaker
or removing the fuse from the fuse box.
For use with Hampton Bay EC series track system. 60Hz 120V
TRACK
GROUND GROOVE SIDE
GROUND CONNECTOR
TAB ON THIS SIDE
Troubleshooting
Care and Cleaning
Warranty
Do not use chemical solvents, or harsh abrasives to clean the unit as damage to the unit
or various components may occur rendering the unit inoperable.
CAUTION:
Instalación
Información sobre la seguridad
Permite enchufar el riel a una salida eléctrica estándar cuando no resulta conveniente una instalacin permanente.
Conector enchufable para extremo vivo de sistemas de riel de iluminación Energiza la sección de riel utilizando un tomacorriente doméstico.
Para utilizar con el sistema de riel de la serie Hampton Bay. 60Hz 120V.
CONECTOR DE
EXTREMO CON
CABLE E INTERRUPTOR
Resolución de problemas
Cuidado y limpieza
Garantía
PRECAUCIÓN:
No utilice disolventes químicos o abrasivos fuertes para limpiar el dispositivo,
ya que ésta o sus componentes pueden dañarse, lo cual haría que no funcione.
Artículo #
END CONNECTOR
WITH CORD AND
SWITCH
Item #
1002638640(804239)
Model #EC707WH
Problema
Causa posible Solución
La bombilla no se enciende.
La bombilla se fundió.
Reemplaza la bombilla.
Prueba o reemplaza el interruptor
Revisa las conexiones de los cables.
El fusible se funde o el cortacircuitos se activa
en el momento en que enciendes la bombilla.
La electricidad está apagada.
Hay una conexión defectuosa del cable.
Hay un interruptor defectuoso.
Hay cables cruzados o el cable de
alimentación no está haciendo tierra.
Asegúrate de que el suministro de electricidad está
encendido.
Revisa el cableado. Comunícate con un electricista
certicado y calicado si no estás satisfecho con la
solución de problemas del cableado.
Problem
Possible Cause Solution
The light bulb will not illuminate.
The light bulb is burned out.
Replace the light bulb.
Test or replace the switch.
Check the wire connections.
The fuse blows or the circuit breaker trips when
the light bulb is illuminated.
The power is off.
There is a faulty wire connection.
There is a faulty switch.
There are crossed wires, or the power
wire is not properly grounded.
Make sure the power supply is on.
Check the wiring. Contact a qualied and licensed
electrician if you are not comfortable troubleshooting
wiring problems.
□
□
□
Aligning the ground sides of the track and connector, push the
connector into the open end of the track. Tighten the set screws.
□
Place the track/connector assembly at the desired location on the
ceiling, noting the location of the nearest electrical receptacle.
Mark the track holds and proceed with the installation as described
in the track instructions.
□
Insert the plug into the switch and the switch into the electrical
receptacle.
□
SET SCREW
ELECTRIC CORD & PLUG
ON/OFF SWITCH
RIEL
Antes de intentar limpiarla, desconecte la energía al desenchufar la unidad.
Para limpiar la unidad, utilice un paño seco o ligeramente húmedo.
No use limpiadores que contengan sustancias químicas, disolventes o abrasivos fuertes ya que pueden dañar la unidad.
□
□
□
□
□
□
Antes de instalar, corte el suministro de energia desde el
cortacircuitos o quitando el fusible de la caja.
Determine el lado del riel con conexión a tierra (tiene una ranura
en la parte delantera y dos barras de cobre internas) y el del
conector (lado del conector con dos lengü tas de metal). A pesar
de no ser un accesorio con conexión a tierra, el mismo podrá
ensamblarse únicamente si los lados a tierra están alineados.
Aoje el tornillo jado a la tapa del extremo cerrado del lado del
riel correspondiente y quitela. Aoje el tornillo jado al conector.
Alineando los lados con conexión a tierra del riel y el conector,
empuje el conector por el extremo abierto del riel.
Conecte el riel / ensamblaje de conexión al lugar deseado en
el techo,observando la ubicación del suministro eléctrico más
cercano. Marque los agujeros del riel y proceda con la instalación
según las instrucciones.
Inserte el enchufe en el interruptor y éste en el suministro eléctrico.
RANURA(INDICADOR DE TIERRA)
LEGUETA CONDUCTORA
DE TIERRA EN ESTE LADO
TORNILLO SUJETADOR
CORDÓN ELÉCTRICO
Y ENCHUFE
INTERRUPTOR
The manufacturer warrants this lighting xture against defects in materials and workmanship for a period of one year from the date of purchase. If within
this period the product is found to be defective in material or workmanship, the product must be returned, with a copy of the bill of sale as proof of
purchase, to the original place of purchase. The manufacturer will, at its option, repair, replace, or refund the purchase price to the original purchaser or
consumer. This warranty does not cover light bulbs or the xture becoming damaged due to misuse, accidental damage, improper handling and/or
installation, and specically excludes liability for direct, incidental, or consequential damages. As some states do not allow exclusions or limitations on an
implied warranty, so the above exclusions and limitations may not apply. This warranty gives you specic rights and you may also have other rights that
vary from state to state.
El fabricante garantiza que esta lámpara estará libre de defectos en materiales y mano de obra por un periodo de cincoaño a partir de la fecha de su
compra. Si durante este lapso, el producto resulta defectuoso en cuanto a material omano de obra, deberá devolverlo al lugar de la compra original, junto
con una copia de la factura de venta comocomprobante de la compra. El fabricante, según su criterio, reparará, sustituirá o reembolsará el precio de la
compra alcomprador o consumidor original. Esta garantía no cubre los focos ni que la luminaria resulte dañado debido a un maluso, daño accidental,
manejo o instalación inapropiados y, asimismo, de manera especica excluye la responsabilidad por daños directos, incidentales o emergentes. Puesto
que algunos estados no permiten las exclusiones o limitacionesen una garantía implícita, es posible que las exclusiones y limitaciones anteriores no se
apliquen. Esta garantía le brinda derechos legales especicos y usted podría tener también otros derechos que varían según el estado.
Modelo #EC707WH
TOOLS REQUIRED
Phillips screwdriver
HERRAMIENTAS NECESARIAS
Destornillador Phillips
Before attempting to clean, disconnect the power by unplugging the unit.
To clean the unit use a dry or slightly dampened clean cloth.
Do not use any cleaners with chemicals, solvents or harsh abrasives as damage to unit may occur.
□
□
□
□
□
□
CAUTION: NEVER PLUG INTO ELECTRICAL RECEPTACLE
UNLESS TRACK IS ATTACHED AND ASSEMBLY INSTALLED.
PRECAUCIÓN: NUNCA LO CONECTE A UN SUMINISTRO ELÉCTRICO
A MENOS QUE EL RIEL YA HAYA SIDO COLOCADO E INSTALADO.
Use and Care Guide
1002638640(804239)
Guía de uso y cuidado
HAMPTONBAY.COM
Please contact 1-855-HD-HAMPTON for further assistance.
Contact the Customer Service Team at 1-855-HD-HAMPTON or visit www.hamptonbay.com.
Para más orientación, favor de comunicarse al 1-855-HD-HAMPTON
Comuníquese con el equipo de servicio al cliente al 1-855-HD-HAMPTON o visite www.homedepot.com.
HAMPTONBAY.COM


