Page is loading ...
MA'Y]'AG
®
Gas - Precision Touch
Control 500
Form No, A/09/03
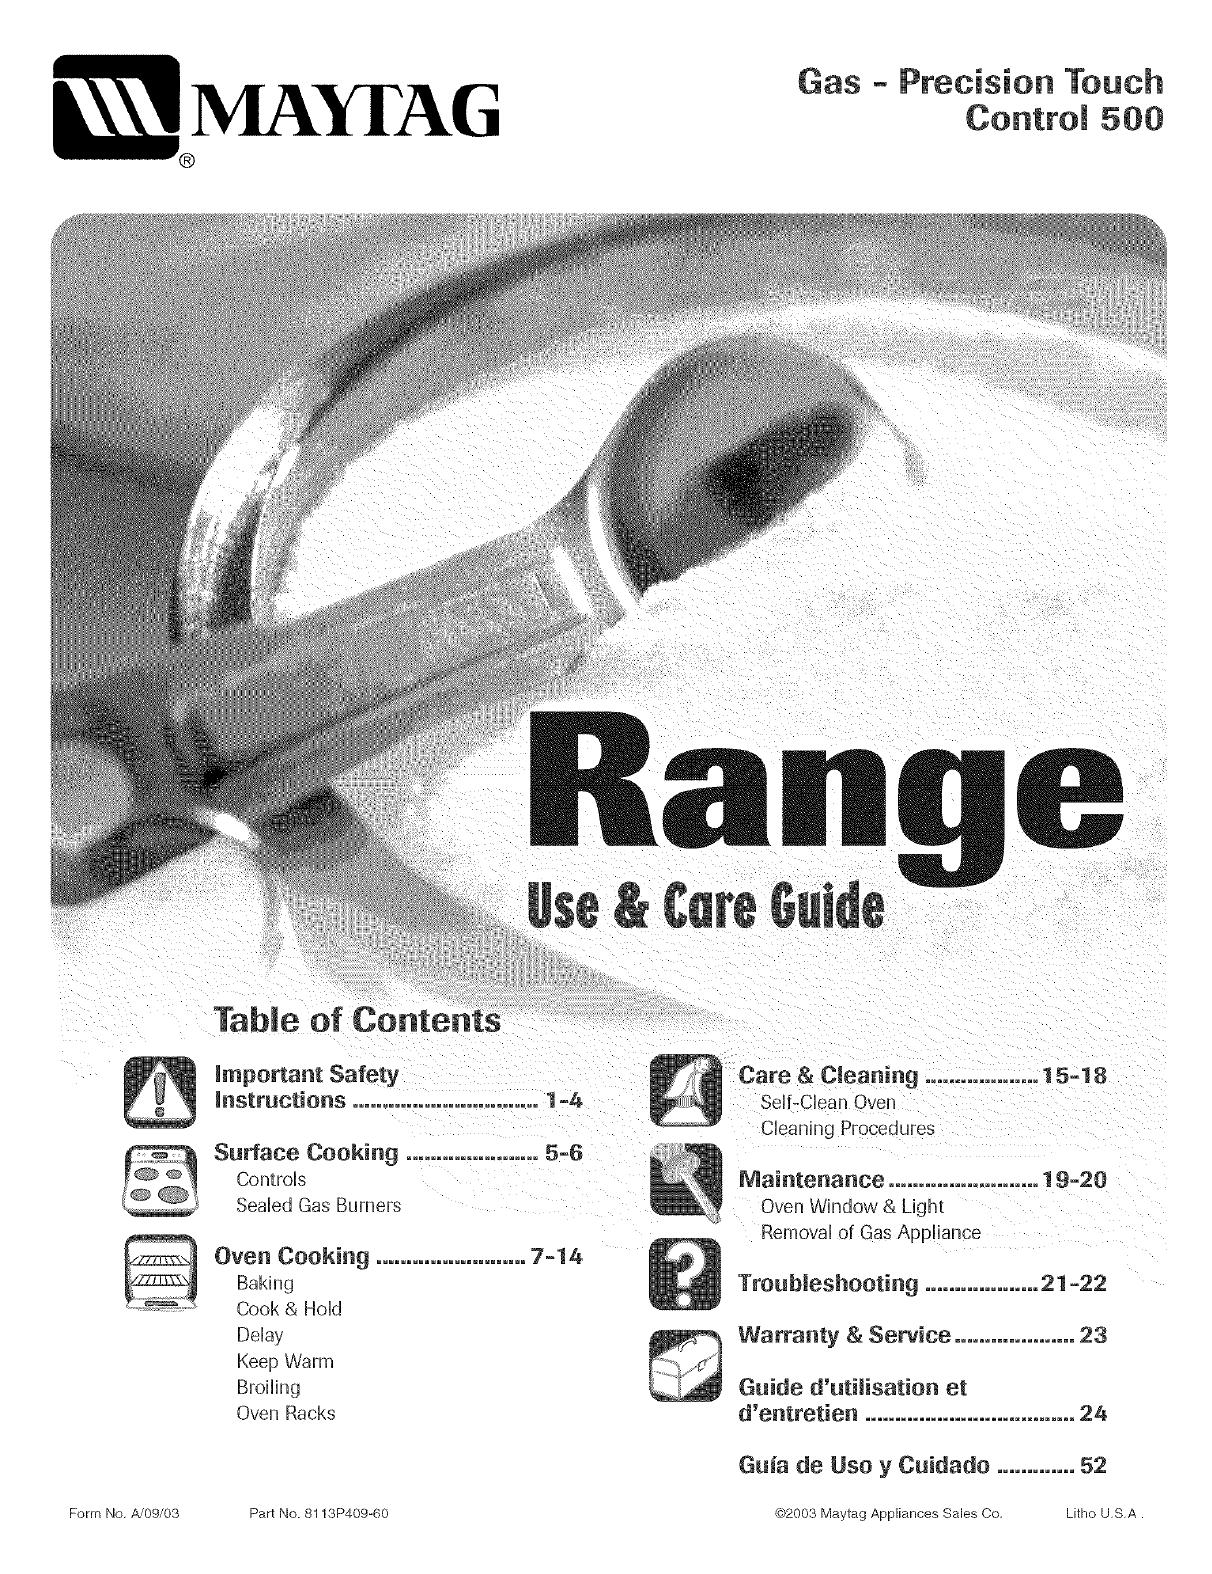
Tabme of Contents
Umportant Safety
instructions ............................... 1-8
Surface Ceoking ...................... 5-G
Controls
Seabd Gas Burners
Oven Cooking ......................... 7=14
Baking
Cook & HoM
Dday
Keep Warm
Broiling
Oven Racks
Part No. 8113P409-60
Care & Cleaning ................... 15-18
Sdf-Ciean Oven
Cleaning Procedures
Maintenance ........................ 19=20
Oven Whldow & Light
Removal ot Gas Appliance
Troubleshooting ................... 21-22
Warranty & Service .................... 23
Guide d'utilisatien et
d'entretien ................................... 24
Guia de Use y Cuidado ............. 52
_)2003 Maytag Appliances Sales Co Litho USA.
Consumer: Please read andkeep this manual for future
cian. Do not attempt to adjust, repair, service, or replace
any par of your appliance unless it is specifically recom-
mended in this guide. All other servicing should be
referred to a qualified servicer. Have the installer show
ou the location of the gas shut off valve and how to
shut it off in an emergency,
Always disconnect power to appliance before servicing.
t-o800-688-2002 Canada
In0ur continuing effortto improve the quality and performance
0four c0oking products, it maybe necessaryto make Changes
For so.vice #ffermaden, see page 23.
Warning and Important Safety Instructions appearing in
this guide are not meant to cover all possible conditions
and situations that may occur. Common sense, caution,
and care must be exercised when installing, maintaining,
or operating the appliance.
Always contact your dealer, distributor, service agent, or
manufacturer about problems or conditions you do not
understand.
Recognize Safety Symbols, Words, Labe(s
WARNING. Hazards or unsafe practices which
COULD resu!t in severe persona! injury or death.
CAUTION _ Hazards or unsafe practices which
COULD result in minor personal injury.
Read and follow a(iinstructions before using this
appmiance to prevent the potential risk of fire, electric
shock, personal injury or damage to the appliance as a
result of improper usage of the appliance. Use appliance
only for its intended purpose as described in this guide.
To ensure proper and safe operation: Appliance must
be properly installed and grounded by a qualified techni-
Ifthe information in this guide is not followed
e×actly, a fire or e×piosioa may resumt causi ng
property daraage, personal injury or d oath.
- Do not store or use gaso|ine or otherfiam-
mable vapors and liquids in the vicinity of this
or any appiianceo
- IF YOU SMELL GAS:
o Do not try to light any appliance°
* Do not touch any electrical switch.
* Do not use any phone inyour buiIdingo
o immediately ca(( your gas suppher from a
neighbor's phone. Follow the gas suppJier's
instructions.
, If you cannot reach yoer gas supplier, call
the fire department.
installation and service must be performed by
a quaJified instaiJer, service agency or the gas
suppliero
and usein accordance with the manufacturer's
instructions.
Genera( instructions
CAUSE INJURIES TO PERSONS
o INSTALL ANTI-TIP DEVICE
PACKED WITH RANGE
FOLLOW ALL INSTALLATION
INSTRUCTIONS
WARNING:To reduce risk of "
abnormal usage or by excessive loading of the
oven door, the appliance must be secured by a
properly installed

To check if device is properly installed, look underneath
range with a flashlight to make sure one of the rear
leveling legs is properly engaged in the bracket slot. The
anti-tip device secures the rear leveling leg to the floor
when properly engaged. You should check this anytime
the range has been moved.
Do not use water on grease fires. Use baking soda, a
dry chemical or foam-type extinguisher to smother fire
or flame.
Chimd Safety
To Prevent Fire or Smoke
Be sure all packing materials are removed from the
appliance before operating it.
Keep area around appliance clear and free from com-
bustible materials, gasoline, and other flammable vapors
and materials.
If appliance is installed near a window, proper precau-
tions should be taken to prevent curtains from blowing
over burners.
NEVER leave any items on the cooktop. The hot air from
the vent may ignite flammable items and may increase
pressure in closed containers which may cause them to
burst.
Many aerosol-type spray cans are EXPLOSIVE when
exposed to heat and may be highly flammable. Avoid
their use or storage near an appliance.
Many plastics are vulnerable to heat. Keep plastics away
from parts of the appliance that may become warm or
hot. Do not leave plastic items on the cooktop as they
may melt or soften if left too close to the vent or a
lighted surface burner.
To eliminate the hazard of reaching over hot surface
burners, cabinet storage should not be provided directly
above a unit. If storage is provided, it should be limited
to items which are used infrequently and which are
safely stored in an area subjected to heat from an
appliance. Temperatures may be unsafe for some items,
such as volatile liquids, cleaners or aerosol sprays.
In Case of Fire
Turn off appliance and ventilating hood to avoid spread-
ing the flame. Extinguish flame then turn on hood to
remove smoke and odor.
, Cooktop: Smother fire or flame in a pan with a lid or
cookie sheet.
NEVER pick up or move a flaming pan.
. Oven: Smother fire or flame by dosing the oven door.
NEVER store items of interest to cNldren in cabinets
above an appliance or on backguard of a range.
items could be seriously injured.
NEVER leave children alone or unsupervised near the
appliance when it is in use or is still hot.
NEVER allow children to sit or stand on any part of the
appliance as they could be injured or burned.
Children must be taught that the appliance and utensils
in it can be hot. Let hot utensils cool in a safe place, out
of reach of small children. Children should be taught
that an appliance is not a toy. Children should not be
allowed to play with controls or other parts of the unit.
About Your Appliance
NEVER use appliance door, or drawer, if equipped, as
tipping of the appliance, damage to the appliance,
2
NEVER use appliance as a space heater to heat or
warm a room to prevent potential hazard to the user and
damage to the appliance. Also, do not use the cooktop
or oven as a storage area for food or cooking utensils.
Do not obstruct the flow of combustion and ventilation
air by blocking the oven vent or air intakes. Restriction
of air flow to the burner prevents proper performance
and increases carbon monoxide emission to unsafe
levels.
The oven vent is located at the base of the control panel.
Avoid touching oven vent area while oven is on and for
several minutes after oven is turned off. Some pars of
the vent and surrounding area become hot enough to
cause burns. After oven is turned off, do not touch the
oven vent or surrounding areas until they have had
sufficient time to cool.
Otherpotentiallyhotsurfacesincludecooktop,areas
facingthecooktop,ovenvent,surfacesnearthevent
opening,ovendoor,areasaroundtheovendoorand
ovenwindow.
Do not touch a hot oven light bulb with a damp cloth as
the bulb could break Should the bulb break, disconnect
power to the appliance before removing bulb to avoid
electrical shock
Cooking Safety
Always place a pan on a surface burner before turning it
on. Be sure you know which knob controls which
surface burner. Make sure the correct burner isturned
on and that the burner has ignited. When cooking is
completed, turn burner off before removing pan to
prevent exposure to burner flame.
Always adjust surface burner flame so that it does not
extend beyond the bottom edge of the pan. An exces-
sive flame is hazardous, wastes energy and may damage
the appliance, pan or cabinets above the appliance.
NEVER leave a surface cooking operation unattended
especially when using a high heat setting or when deep
fat frying. Boilovers cause smoking and greasy spillovers
may ignite. Clean up greasy spills as soon as possible.
Do not use high heat for extended cooking operations.
NEVER heat an unopened container on the surface
burner or in the oven. Pressure build-up may cause
container to burst resulting in serious personal injury or
damage to the appliance.
Use dry, sturdy potholders. Damp potholders may cause
burns from steam. Dish towels or other substitutes
should never be used as potholders because they can
trail across hot surface burners and ignite or get caught
on appliance parts.
Always let quantities of hot fat used for deep fat frying
cool before attempting to move or handle.
Do not let cooking grease or other flammable materials
accumulate in or near the appliance, hood or vent fan.
Clean hood frequently to prevent grease from accumu-
hting on hood or filter. When flaming foods under the
hood turn the fan on.
NEVER wear garments made of flammable material or
loose fitting or long-sleeved apparel while cooking.
Clothing may ignite or catch utensil handles.
Always place oven racks in the desired positions while
oven is cool. Slide oven rack out to add or remove food,
using dry, sturdy potholders. Always avoid reaching into
the oven to add or remove food. If a rack must be
moved while hot, use a dry potholder. Always turn the
oven off at the end of cooking.
Use care when opening the oven door. Let hot air or
steam escape before moving or replacing food.
PREPARED FOOD WARNUNG: Follow food
manufacturer's instructions. If a plastic frozen food
container and/or its cover distorts, warps, or is otherwise
damaged during cooking, immediately discard the food
and its container. The food could be contaminated.
NEVER use aluminum foil to cover oven racks or oven
bottom. This could result in risk of electric shock, fire, or
damage to the appliance. Use foil only as directed in this
guide.
Utensim Safety
Use pans with flat bottoms and handles that are easily
grasped and stay cool. Avoid using unstable, warped,
easily tipped or loose-handled pans. Also avoid using
pans, especially small pans, with heavy handles as they
could be unstable and easily tip. Pans that are heavy to
move when filled with food may also be hazardous.
Be sure utensil is large enough to properly contain food
and avoid boilovers. Pan size is particularly important in
deep fat frying. Be sure pan will accommodate the
volume of food that is to be added as well as the bubble
action of fat.
To minimize burns, ignition of flammable materials and
spillage due to unintentional contact with the utensil, do
not extend handles over adjacent surface burners.
Always turn pan handles toward the side or back of the
appliance, not out into the room where they are easily
hit or reached by small children.
Never let a pan boil dry as this could damage the utensil
and the appliance.
Follow the manufacturer's directions when using oven
cooking bags.
Only certain types of glass, glass!ceramic, ceramic or
glazed utensils are suitable for cooktop or oven usage
without breaking due to the sudden change in tempera-
ture. Follow manufacturer's instructions when using
glass.
3

This appliance has been tested for safe performance
using conventional cookware. Do not use any devices or
accessories that are not specifically recommended in
this guide. Do not use eyelid covers for the surface
units, stovetop grills, or add-on oven convection sys-
tems. The use of devices or accessories that are not
expressly recommended in this manual can create
serious safety hazards, result in performance problems,
and reduce the life of the components of the appliance.
Cmeaning Safety
Turn off all controls and wait for appliance parts to cool
before touching or cleaning them. Do not touch the
burner grates or surrounding areas until they have had
sufficient time to cool,
Clean appliance with caution. Use care to avoid steam
burns if a wet sponge or cloth is used to wipe spills on a
hot surface. Some cleaners can produce noxious fumes
if applied to a hot surface.
Se f-C ean Oven
oven during the self-,clean cycJe.
Clean only parts listed in this guide. Do not clean door
gaskeL The door gasket is essential for a good seal
Care should be taken not to rub, damage, or move the
gaskeL Do not use oven cleaners of any kind in or
around any part of the self-clean oven.
Before self-cleaning the oven, remove broiler pan, oven
racks and other utensils and wipe up excessive
spillovers to prevent excessive smoke, flare-ups or
flaming.
It is normal for the cooktop of the range to become hot
during a self-clean cycle. Therefore, touching the
cooktop during a clean cycle should be avoided.
Important Safety Notice and
The California Safe Drinking Water and Toxic Enforce-
ment Act of 1986 (Proposition 65} requires the Governor
of California to publish a list of substances known to the
State of California to cause cancer or reproductive harm,
and requires businesses to warn customers of potential
exposures to such substances.
Users of this appliance are hereby warned that the
burning of gas can result in low-level exposure to some
of the listed substances, including benzene, formalde-
hyde and soot, due primarily to the incomplete combus-
tion of natural gas or liquid petroleum (LP} fuels. Prop-
erly adjusted burners will minimize incomplete combus-
tion. Exposure to these substances can also be mini-
mized by properly venting the burners to the outdoors.
Users of this appliance are hereby warned that when
the oven is engaged in the self-clean cycle, there may
be some low-level exposure to some of the listed
substances, including carbon monoxide. Exposure to
these substances can be minimized by properly venting
the oven to the outdoors by opening the windows and/
or door in the room where the appliance is located
during the self-clean cycle.
IMPORTANT NOTICE REGARDING PET BIRDS:
Never keep pet birds in the kitchen or in rooms where
the fumes from the kitchen could reach. Birds have a
very sensitive respiratory system. Fumes released during
an oven self-cleaning cycle may be harmful or fatal to
birds. Fumes released due to overheated cooking oil, fat,
margarine and overheated non-stick cookware may be
equally harmful.
Save These instructions for Future Reference
4

LO: Use to simmer foods, keep foods
warm and melt chocolate or butter. Some
cooking may take place on the LO setting
if the pan is covered. It is possible to
reduce the heat by rotating the knob
toward OFF. Be sure flame is stable+
HI: Use to bring liquid to a boil, or reach
pressure in a pressure cooker. Always
reduce setting to a lower heat when liquids
begin to boil or foods begin to cook.
An intermediate flame size is used to
continue cooling. Food will not cook any
faster when a Mgher flame setting is used
than needed to maintain a gentle boil.
Water bolls at the same temperature
whether boiling gently or vigorously.
Surface Controls
o +ffinn_eshould go out during a cooking operation, turn
the burner off. If a strong gas odor is detected, open a
window and wait five minutes before relighting the
burne[
o Be sure all surface controls are set in the OFF position
before supplying gas to the range.
• NEVER touch cooktop until it has cooled. Expect some
parts of the cooktop, especially around the burners, to
become warm or hot during cooking. Use potholders to
protect hands,
Pimot ess ignition
Pilotless ignition eliminates the
need for a constant standing
pilot light. Each surface burner
has a spark ignitor. Use care
when cleaning around the
surface burner.
If the surface burner does
not light, check if ignitor is
broken, soiled or wet.
BURNER CAP
Po_ gnitor
BURNER BASE
Surface Control Knobs
Use to turn on the surface burners. An infinite choice of heat
settings usavailable from LO to HL At the l-Irasetting a detent
or notch may be felt. The knobs can be set on or between any
of the settings.
Graphics next to the knob identify' which burner the O O
knob controls. Forexample, the graphic at right O O
shows the left front burner location.
5
Setting the controls:
The size and type of cookware will affect the heat setting. For
information on cookware and other factors affecting heat
settings, refer to "Cooking Made Simple" booklet.
1=Place a pan on the burner grate=
o The burner flame may lift off or appear separated from
the port if a pan is not placed on the grate=
2=Push in and turn the knob counterclockwise to the MTE
setting+
" A clicking (spark_)sound will be heard and the burner
will light+ (All four ignitors will spark when any surface
burner knob is turned to the MTE position=_)
3=After the burner lights, turn knob to desired flame size+
+ The ignitor will continue to spark until the knob is
turned past the MTE position+
Operating During a
Power Failure
controls are in the OFF position, Strike the match first and
hold it in position before turning the knob to MTE+
1. Hold a lighted match to the desired surface burner head.
2. Push in and turn the control knob slowly to UTE
3. Adjust the flame to the desired level.

Ceektep
To prevent the coektep from discoloring or
staining:
" CHeancooktop after each use.
Wipe acidic or sugary spills as soon as the cooktop has
cooHedas these spills may discoHorthe
Burner Grates
The grates must be propedy positioned before cooking.
When installing the grates, pHacethe tab ends toward the
center, matching the straight bars.
Improper installation of the grates may result in chipping of
the cooktop.
Seamed Burners
The sealed burners of your range are secured to the cooktop
and are not designed to be removed. Since the burners are
sealed into the cooP,top, boilovers or spills will not seep
underneath the cooktop.
However, the burner should be cleaned after each use. The
head portion of the burner is easily removed for cleaning.
(See page 17 for cleaning directions._)
The burner heads must be correctly placed on the burner
base for proper operation of the burner.
Do not operate the burners without a pan on the grate.
The grate's porcelain finish may chip without a pan to
absorb the heat from the burner flame.
Use care when stirring food in a pot/pan sitting on the burner
grate. The grates have a smooth finish for ease of cleaning.
The pot/pan will slide if the handle is not held. This may result
in spilling of hot food items and may be a burn hazard.
Although tile burner grates are durable, they will gradually
lose their shine and/or discolor, due to the high temperatures
of the gas flame.
High Performance Burners*
There isone high speed burner located in the right front position
on your range. Select models also have a second high speed
burner located in the left front position. These burners offer
higher speed cooking that can be used to quickly bring water to
a boil and for large-quantity cooking.
Sim er F}w'ner (select models )
This burner is located in the left rear or right rear position. The
simmer burner offers a lower BTU flame for delicate sauces or
melting chocolate.
* BTUratings will vary when usingLP gas,
" A properly adjusted burner with clean ports will light
within a few seconds. If using natural gas, the flame
will be blue with a deeper blue inner cone.
If the burner flame is yellow or is noisy, the aidgas
mixture may be incorrect. Contact a service technician
to adjust. (Adjustments are not covered by the war-
ranty'.)
With LP gas, slight yellow tips on the flames are
acceptable. This is normal and adjustment is not
necessary.
" With some types of gas, you may hear a "popping"
sound when the surface burner is turned off. This is a
normal operating sound of the burner.
" If the control knob is turned very quickly from Hi to
LO, the flame may go out, particularly if the burner is
cold. If this occurs, turn the knob to the OFF position,
wait several seconds and rdight the burner.
" The flame should be adjusted so it does not extend
beyond the edge of the pan.
Q
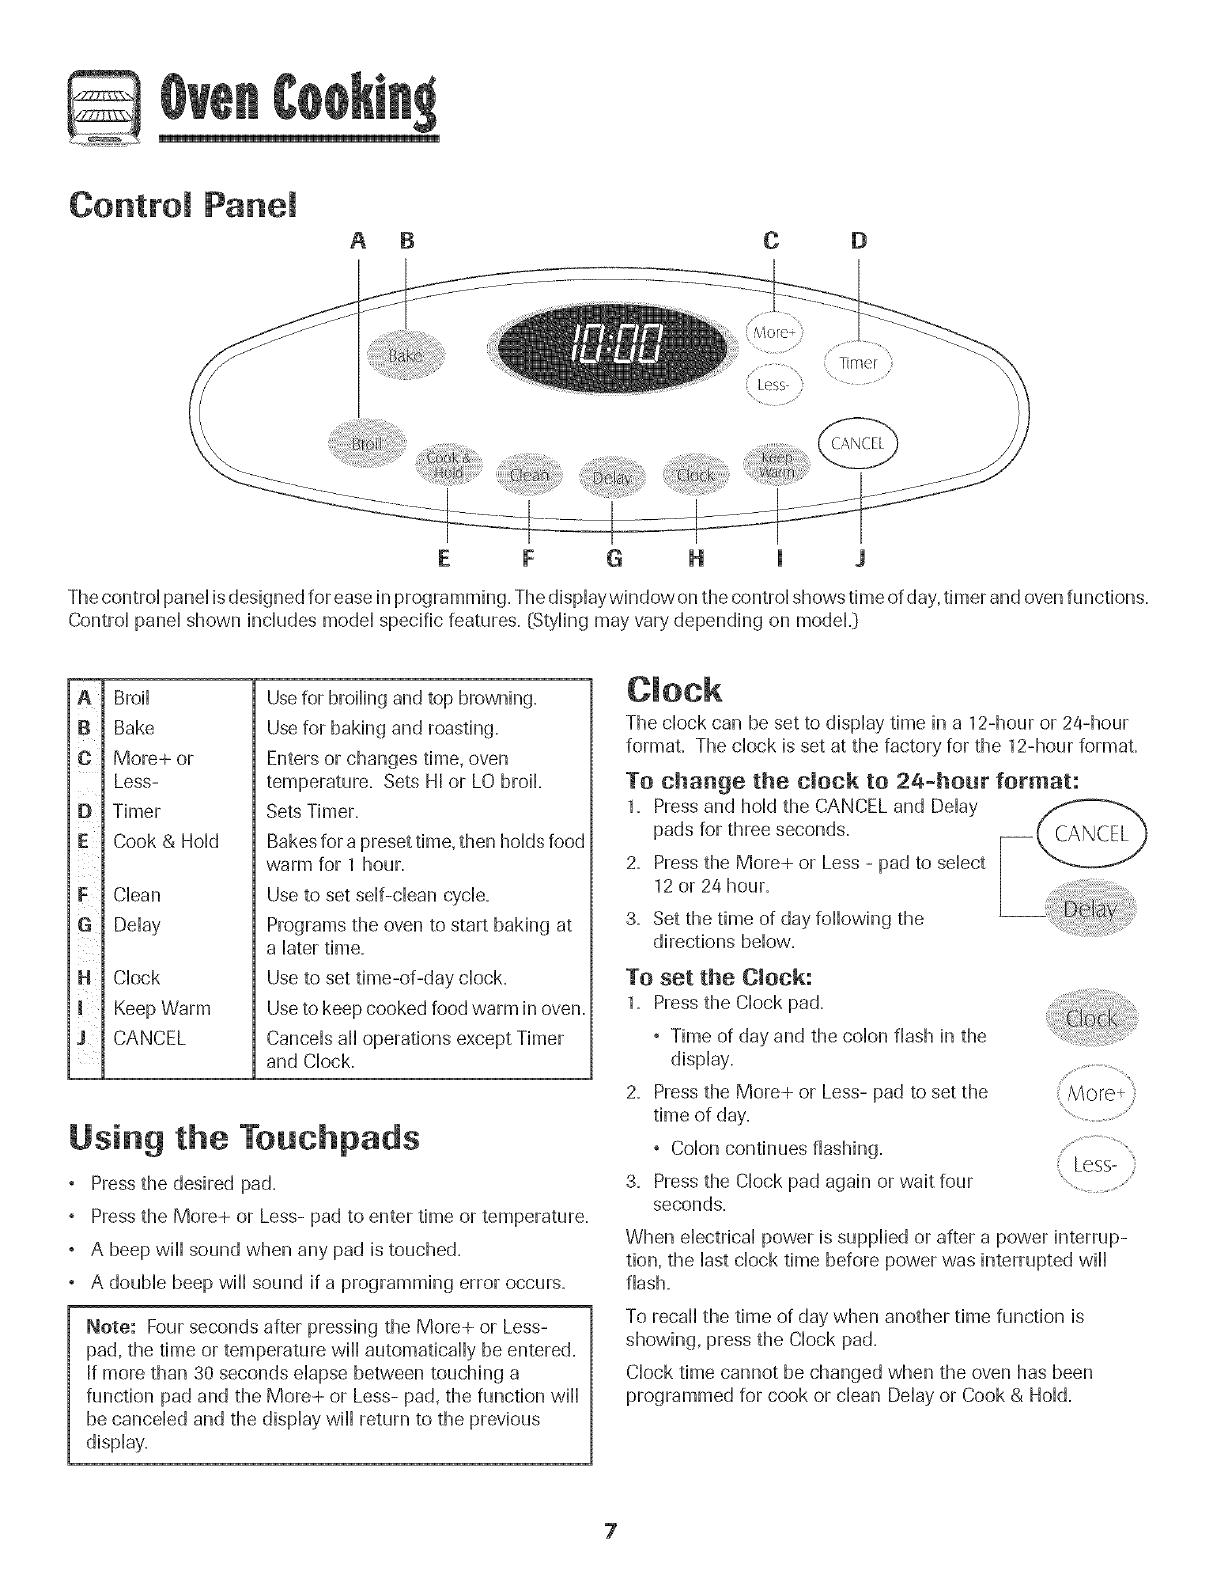
Control Panel
A B C D
Timer
Thecontrol panel isdesigned for easein programming. Thedisplaywindow on the control shows time of day,timer and ovenfunctions.
Control panel shown includes model specific features. (Styling may vary depending on modeL}
iA
l
i
iD
iE
ii
iF
l
iG
i
i"
l
Broii
Bake
More+ or
Less-
Timer
Cook & Hold
Clean
Delay
Clock
Keep Warm
CANCEL
Usefor broiling and top browning.
Use for baking and roasting.
Enters or changes time, oven
temperature. Sets HI or LO broil.
Sets Timer.
Bakes for a preset time, then holds food
warm for 1 hour.
Use to set self-clean cycle.
Programs the oven to start baking at
a later time.
Use to set time-of-day clock.
Use to keep cooked food warm in oven.
Cancels all operations except Timer
and Clock.
Using the Touchpads
Pressthe desired pad.
Pressthe More+ or Less- pad to enter time or temperature.
° A beep will sound when any pad is touched.
° A double beep wiii sound if a programming error occurs.
Note: Fourseconds after pressing the More+ or Less-
pad, the time or temperature will automatically beentered.
If more than 30 seconds elapse between touching a
function pad and the More+ or Less- pad, the function wiii
be canceled and the display wiii return to the previous
display.
The clock can be set to display time in a 12-hour or 24-hour
format. The clock is set at the factory for the 12-hour format.
To change the clock to 24-hour fore, at:
1. Pressand hold the CANCEL and Delay
pads for three seconds.
2. Pressthe More+ or Less - pad to select
12 or 24 hour.
3. Set the time of day following the
directions below.
To set the Clock:
1. Pressthe Clock pad.
, Time of day and the colon flash in the
display.
2. Pressthe More+ or Less- pad to set the
time of day.
, Colon continues flashing.
3. Pressthe Clock pad again or wait four
seconds.
Less- :
When electrical power is supplied or after a power interrup-
tion, the last clock time before power was interrupted will
flash.
To recall the time of day when another time function is
showing, press the Clock pad.
Clock time cannot be changed when the oven has been
programmed for cook or clean Delay or Cook & Hold.

To canceJ the Clock display:
If you do not want the time of day'to dbpHay:
Press and hoid the CANCEL and CHock
pads for three seconds. The time of day
wHi disappear from the dispiay
When the chockdispiay is cancelled, press
the CHockpad to brbfiy dispiay the time
of day.
To restore the C!oek display:
Press and hoid the CANCEL and CHockpads for three sec-
onds. The time of day wHi reappear in the dispiay.
The timer can be set from one minute {00:01} up to 99 hours
and 59 minutes {99:59].
The timer can be used independently of any other oven
activity. It can also be set while another oven function is
operating.
The Timer does not control the oven. It only controls a
beeper.
TO set the Timer:
1. Pressthe Timer pad. ' [imer i
° 00:00 lights in the display.
° The colon flashes in the display.
2. Pressthe More+ or Less- pad until the
correct time appears in the display.
Less-
° The coion wiii continue to flash.
3. PressTimer pad again or wait four seconds.
° The colon continues flashing and the time begins
counting down.
° The last minute of the timer countdown wiii be displayed
as seconds.
4. At the end of the set time, one long beep wiii sound.
To cancel the Timer:
1. Pressand hold the Timer pad for three seconds.
OR
2. Pressthe Timer pad and set the time to 00:00.
Locking the Contro
and Oven Door
The touchpad controls and oven door can be locked for
safety, cleaning, or to prevent unwanted use. They will not
function when locked.
If the oven is currently in use, the controls and door cannot be
locked.
The current time of day wiii remain in the display when the
controls are locked.
To lock:
Press and hold the CANCEL and Cook & CANCEL
Hold pads for three seconds.
LOCKflashes in the display.
To unlock:
Press and hold the CANCEL and Cook & Hoid pads for three
seconds.
LOCKdisappears from the display.
Faumt Codes
BAKE or LOCK may flash rapidiy in the dispiay to aiert you if
there is an error or a problem. If BAKE or LOCKflash in the
display, press CANCEL pad. If BAKE or LOCKcontinue to
flash, disconnect power to the appliance. Wait a few minutes,
and then reconnect power. If the flashing still continues,
disconnect power to the appliance and call an authorized
servicer.
8
Q
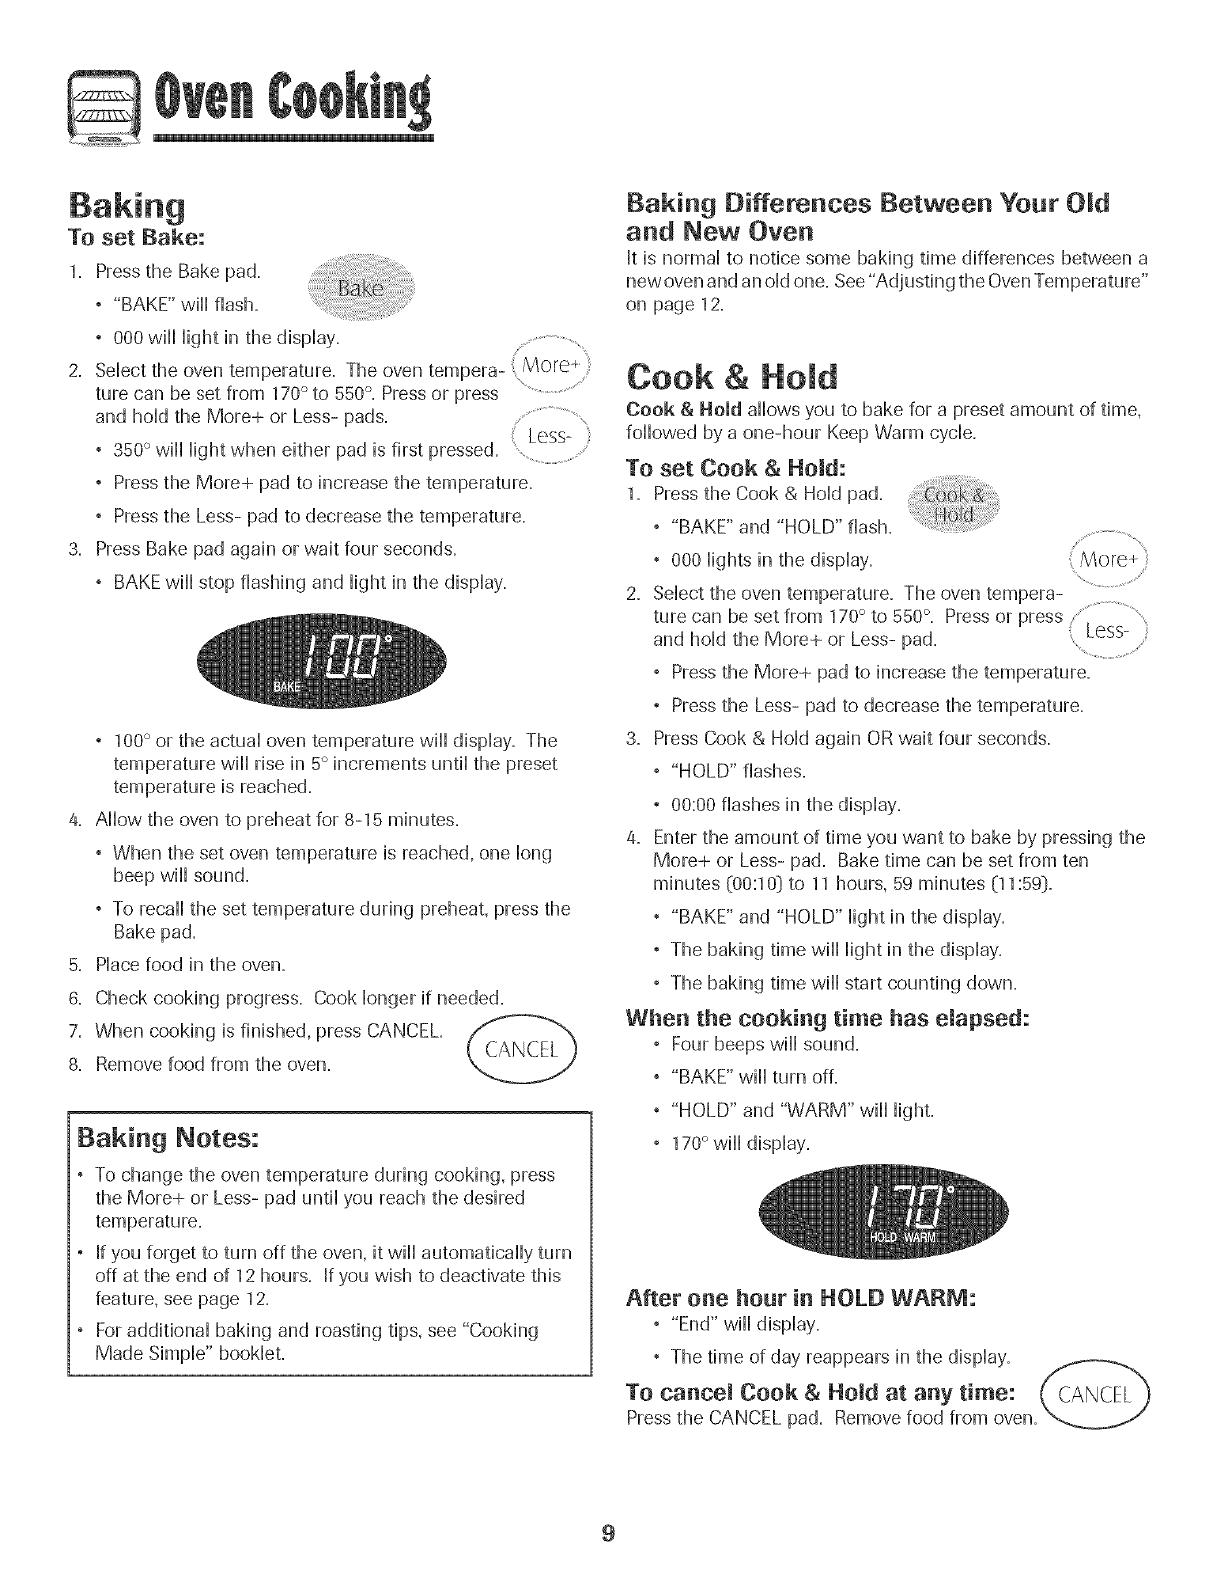
To set Bake:
1. Pressthe Bake pad.
° "BAKE" wii[ flash+
° 000 wii[ light in the display .........................
2. Seiect the oven temperature. The oven tempera- 'More,,
ture can be set from 170° to 550°. Pressor press ...................................
and hoid the More+ or Less- pads.
Less-
° 350°will Hightwhen either pad is first pressed. ..... '
° Pressthe More+ pad to increase the temperature.
, Press the Less- pad to decrease the temperature+
3. Press Bake pad again or wait four seconds.
, BAKEwiil stop flashing and light in the display.
, 100° or the actual oven temperature wiil display. The
temperature will[ rise in 5° increments unti[ the preset
temperature is reached.
4. Aiiow the oven to preheat for 8-15 minutes.
, When the set oven temperature is reached, one [ong
beep will[ sound.
, To recall[ the set temperature during preheat, press the
Bake pad.
5. Piacefood in the oven.
8. Check cooking progress. Cook longer if needed.
7. When cooking is finished, press CANCEL. __
8. Remove food from the oven.
Baking Notes:
° To change the oven temperature during cooking+ press
the More+ or Less- pad until you reach the desired
temperatu re.
if you forget to turn off the oven, it will automatically turn
off at the end of 12 hours, if you wish to deactivate this
feature, see page 12.
Foradditional baking and roasting tips, see "Cooking
Made Simple" booklet+
gak+ng Differences Between Your Old
and New Oven
it is normal to notice some baking time differences between a
new ovenand an old one. See"Adjusting the OvenTemperature"
on page 12.
Cook & Hold
Cook & Hold allows you to bake for a preset amount of time,
followed by a one-hour Keep Warm cycle.
To set Cook & Hemal:
1. Pressthe Cook & Hold pad.
° "BAKE" and "HOLD" flash.
° 000 lights in the display.
2. Select the oven temperature. The oven tempera-
ture can be set from 170° to 550°. Press or press ......................
and hold the More+ or Less- pad. Less-
, Pressthe More+ pad to increase the temperature.
, Pressthe Less- pad to decrease the temperature.
3. Press Cook & Hold again ORwait four seconds.
, "HOLD" flashes.
, 00:00 flashes in the display.
4. Enter the amount of time you want to bake by pressing the
More+ or Less- pad. Bake time can be set from ten
minutes (00:10} to 11 hours, 59 minutes (11:59}.
, "BAKE" and "HOLD" light in the display.
, The baking time wiil light in the display.
, The baking time wiil start counting down.
When the cooking time has elapsed:
° Four beeps will sound.
, "BAKE" will turn off.
° "HOLD" and "WARM" will light+
° 170° will display+
After one hour in HOLD WARM:
° "End" will display+
° The time of day reappears in the display.
To cancel Cook & Hold at any time:
Press the CANCEL pad. Remove food from oven.
9
De ay Bake
Do not use ddayed baking for higMy perishab!e foods such
as dairy products, pork, poultry, Qrseafood,
When using Delay, the oven begins to cook Haterin the day.
Setthe amount of time that you want to dday before the oven
turns on and how Hongyou want to cook. The oven begins to
heat at the seHectedtime and cooks for the specified Hengthof
time, then keeps food warm for up to one hour.
Dday time can be set from 10 minutes (00:10] to 11 hours, 59
minutes (11:59].
To set a DeJayed Baking cycle:
1. Pressthe Dday pad.
, "DELAY" flashes.
, 00:00 flashes in the dispHay.
2. Pressthe More+ or Less- pad to set the
deHaytime.
WMHe"DELAY" is still flashing:
3. Pressthe Cook & Hold pad.
, 000 lights in the display.
, "BAKE" and "HOLD" flash.
4.
Less-
.........................................
Press More+ pad to set the baking temperature.
, 00:00 and "HOLD" flash.
, "BAKE" stays Hit.
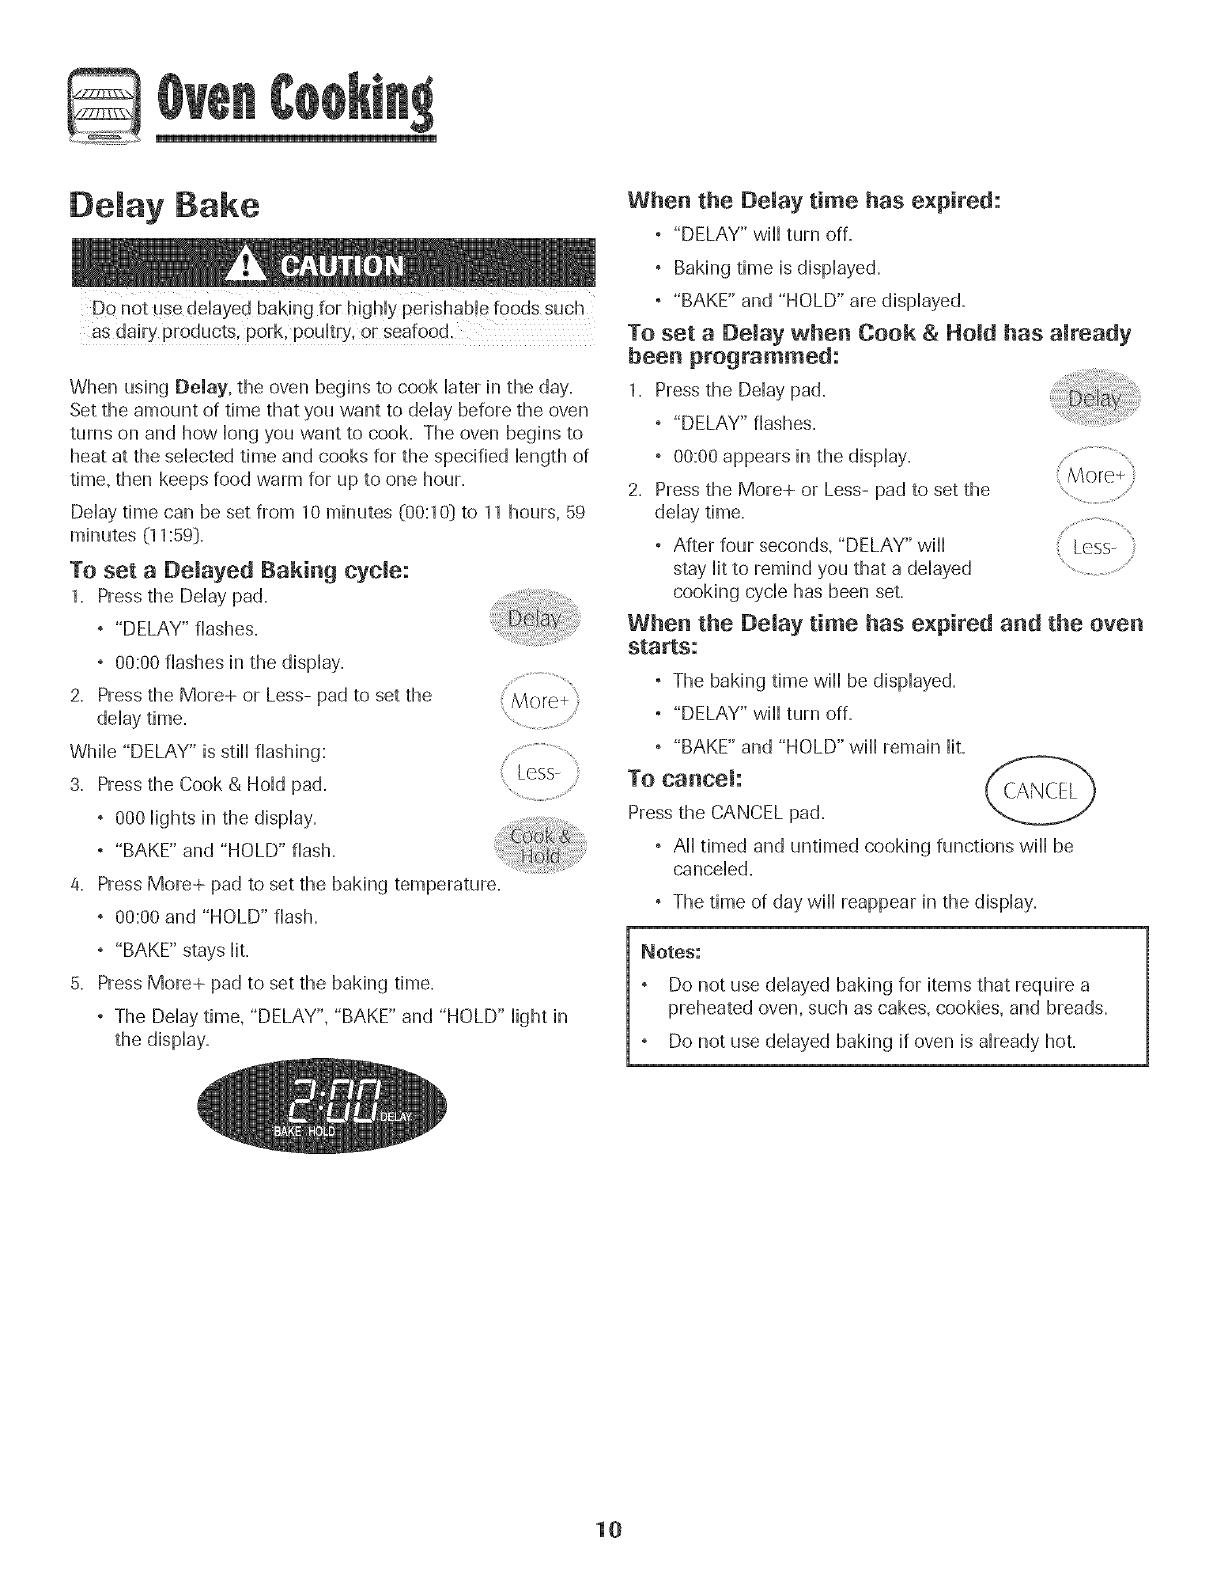
Press More+ pad to set the baking time.
, The Delay time, "DELAY", "BAKE" and "HOLD" light in
the display.
When the Delay time has expired:
, "DELAY" will turn off=
, Baking time is displayed.
, "BAKE" and "HOLD" are displayed.
To set a Demay when Cook & Hold has amready
been programmed:
1. Pressthe Delay pad.
, "DELAY" flashes.
, 00:00 appears in the display. .................................
2. Pressthe More+ or Less- pad to set the .......................................
delay time.
, After four seconds, "DELAY" will Less-
stay lit to remind you that a delayed .........................
cooking cycle has been set.
When the Delay time has expired aad the oven
starts:
, The baking time will be displayed.
, "DELAY" will turn off.
, "BAKE" and "HOLD" will remain Hit.
To eaneeJ:
Press the CANCEL pad.
° All timed and untimed cooking functions will be
canceled.
, The time of day will reappear in the display.
Notes:
Do not use delayed baking for items that require a
preheated oven, such as cakes, cookies, and breads.
Do not use delayed baking if oven is already hot.
10

Keep War
ForsafeHykeephg foods warm or for warmhg breads and
pilate&
To set Keep Warm:
1= Press the Keep Warm pad=
° "WARM" flashes.
° 000 appears in the dispHay........................
2. SeHectthe Keep Warm temperature. The Keep .......................
Warm temperature can be set from 145° to
190°- Pressor press and hoHdthe More+ or ..........................................
Less- pad. less-
,170 °wiHHHightwhen either pad is first pressed.
, Press the More+ pad to increase the temperature.
, Press the Less- pad to decrease the temperature.
WARM and the temperature wiil be displayed while Keep
Warm is active.
Keep Warm Notes:
, ForoptimaHfood quaHity,oven cooked foods shouHdbe kept
warm for no Hongerthan 1 to 2 hours.
, To keep foods from drying, cover HooseHywith foiHor a Hid.
, To warm dinner rolls:
- cover roHHsHooseHywith foiHand pHacein oven.
- press Keep Warm and More+ pads to set 170° F.
- warm for 12-15 minutes.
, To warm pmates:
- pHace2 stacks of up to four pHateseach in the oven.
- press Keep Warm and More+ pads to set 170° F.
- warm for five minutes, turn off the oven and HeavepHates
in the oven for 15 minutes more.
- use onHyoven-safe pHates,check with the manufacturer.
- do not set warm dishes on a coHdsurface as rapid
temperature changes couHdcause crazing or breakage.
To cancel Keep Warm:
1. Pressthe CANCEL pad.
2. Removefood from the oven.
11
Automatic Shut-Off/Sabbath
Mode
The oven will automatically turn off after 12 hours if you
acddentaHy Heaveit on. This safety' feature can be turned off.
TO eaneem the 12-hour shut-off and run the
oven continuously for 72 hours:
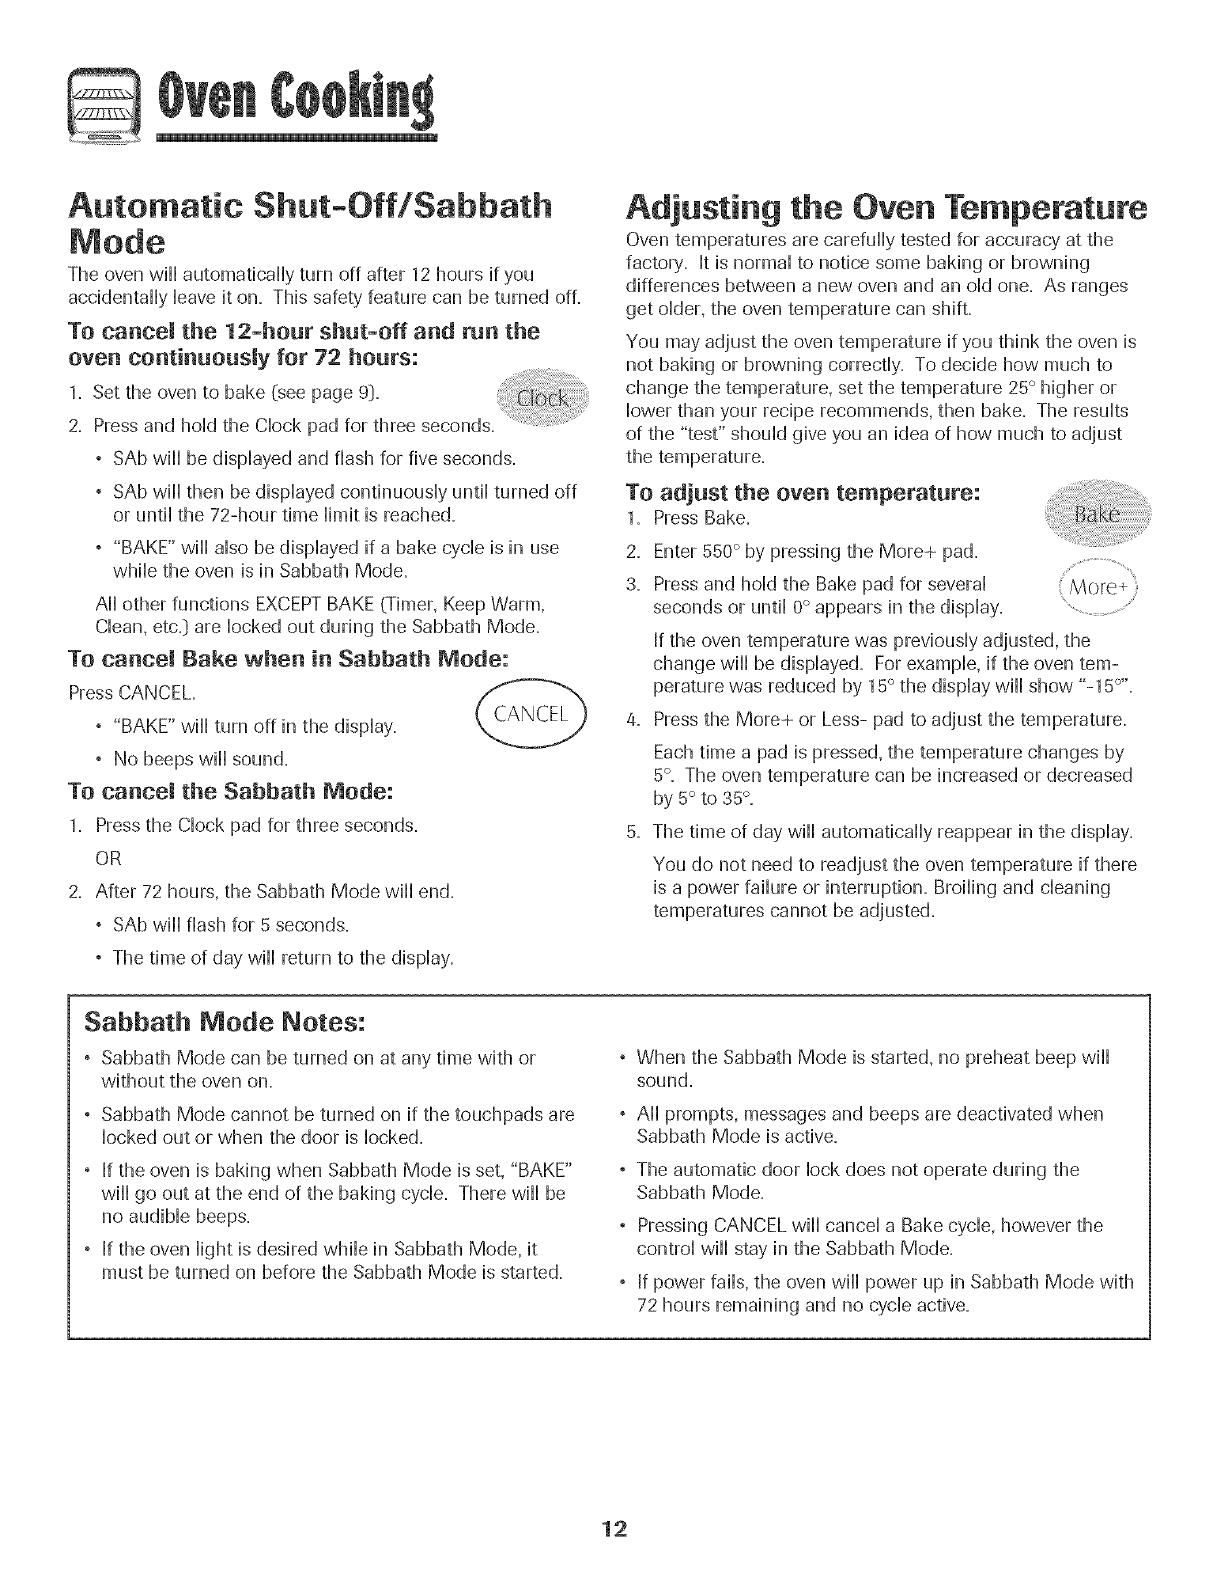
1. Set the over, to bake (see page9:}. :Ci k:::::
2. Press and hoid the CHockpad for three seconds. ......
° SAb will be dispiayed and flash for five seconds.
° SAb will then be dispiayed condnuousiy until turned off
or until the 72-hour time limit is reached.
° "BAKE" will also be displayed if a bake cycle is in use
while the oven is in Sabbath Mode.
All other functions EXCEPTBAKE (Timer, Keep Warm,
Clean, etc.} are locked out during the Sabbath Mode.
To cancel Bake when in Sabbath Mode:
Press CANCEL.
CANCEL
° "BAKE" will turn off in the display.
° No beeps will sound.
To cancel the Sabbath Mode:
1. Pressthe Clock pad for three seconds.
OR
2. After 72 hours, the Sabbath Mode will end.
° SAb will flash for 5 seconds.
° The time of day will return to the display.
Adjusting the Oven Temperature
Oven temperatures are carefully tested for accuracy' at the
factory. It is normal to notice some baking or browning
differences between a new oven and an old one. As ranges
get older, the oven temperature can shift.
You may adjust the oven temperature if you think the oven is
not baking or browning correctly. To decide how much to
change the temperature, set the temperature 25° higher or
lower than your recipe recommends, then bake. The results
of the "test" should give you an idea of how much to adjust
To adjnst the oven temperatnre:
1. Press Bake.
2. Enter 550° by pressing the More+ pad.
3. Pressand hold the Bake pad for several More+
/
seconds or until 0° appears in the display. ............................
If the oven temperature was previously adjusted, the
change wiii be displayed. For example, if the oven tem-
perature was reduced by 15° the display wiii show "-15°''.
4. Pressthe More+ or Less- pad to adjust the temperature.
Eachtime a pad is pressed, the temperature changes by
5°. The oven temperature can be increased or decreased
by 5° to 35°.
5. The time of day wiii automatically reappear in the display.
You do not need to readjust the oven temperature if there
is a power failure or interruption. Broiling and cleaning
temperatures cannot be adjusted.
Sabbath Mode Notes:
° Sabbath Mode can be turned on at any time with or
without the oven on.
° Sabbath Mode cannot be turned on if the touchpads are
locked out or when the door is locked.
° If the oven is baking when Sabbath Mode is set, "BAKE"
will go out at the end of the baking cycle. There will be
no audible beeps.
° If the oven light is desired while in Sabbath Mode, it
must be turned on before the Sabbath Mode is started.
, When the Sabbath Mode is started, no preheat beep wiii
sound.
, All prompts, messages and beeps are deactivated when
Sabbath Mode is active.
° The automatic door lock does not operate during the
Sabbath Mode.
° Pressing CANCELwiii cancel a Bake cycle, however the
controi wiii stay in the Sabbath Mode.
° If power faiis, the oven wiii power up in Sabbath Mode with
72 hours remaining and no cycle active.
12
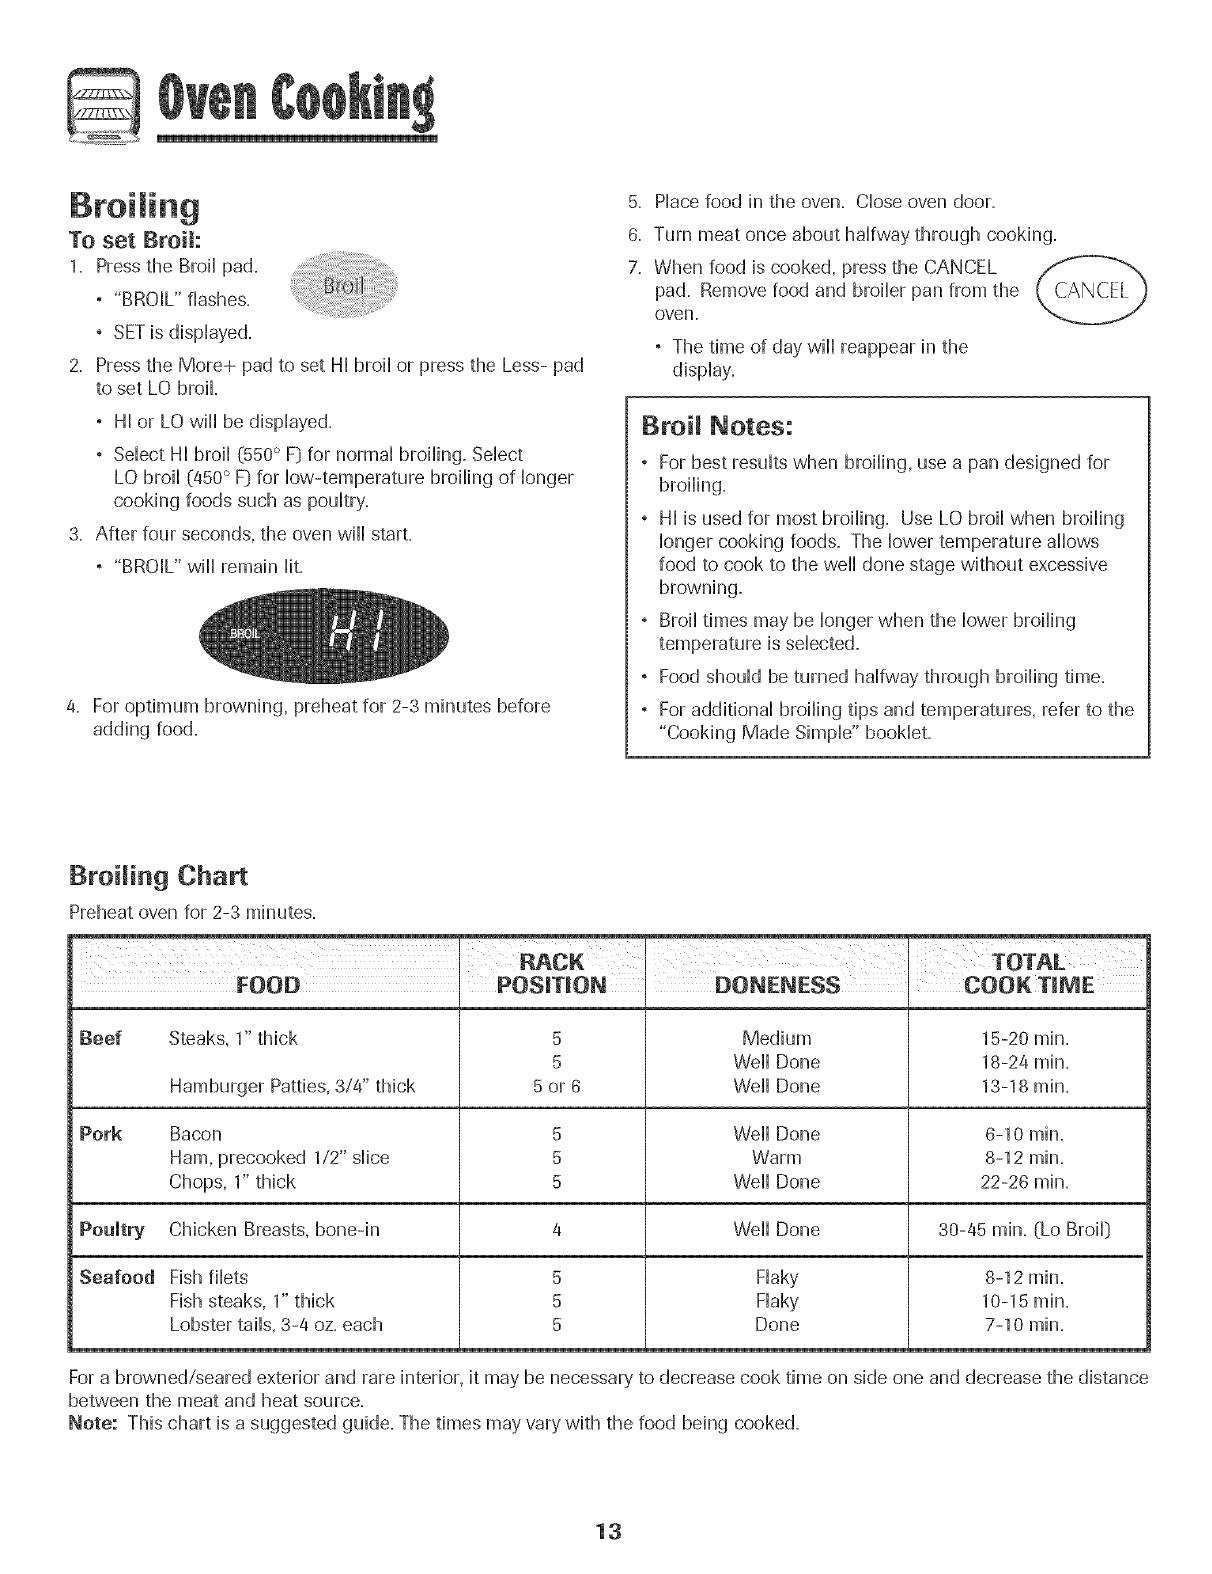
To set Broil:
1. Press the Broii pad.
, "BROIL" flashes.
, SETis dispiayed.
2. Press the More+ pad to set HI broii or press the Less- pad
to set LO broil
, Hi or LO will be dispiayed.
, Sebct HI broii (550° F}for normal broiiing. Sebct
LO broii (450° F}for bw-temperature broihng of bnger
cooking foods such as pouitry.
3. After four seconds, the oven will start.
, "BROIL" will remain Hit.
4. For optimum browning, preheat for 2-3 minutes before
adding food.
5. Piace food in the oven. CHoseoven door.
6. Turn meat once about halfway through cooking.
7. When food is cooked, press the CANCEL
pad. Remove food and broiler pan from the
oven.
° The time of day will reappear in the
display.
Broil Notes:
, Forbest results when broiling, use a pan designed for
broiling.
, HI is used for most broiling. Use LO broil when broiling
longer cooking foods. The lower temperature allows
food to cook to the well done stage without excessive
browning.
, Broil times may be longer when the lower broiling
temperature is selected.
, Food should be turned halfway through broiling time.
, Foradditional broiling tips and temperatures, refer to the
"Cooking Made Simple" booklet.
Broiling Chart
Preheat oven for 2-3 minutes.
RACK TOTAL
FOOD POS_TmON DONENESS I COOK
Beef Steaks, 1"thick
Hamburger Patties, 3/4" thick
Pork Bacon
Ham, precooked 1/2" slice
Chops, 1"thick
Poultry Chicken Breasts, bone-in
Seafood Fish filets
Fish steaks, 1" thick
Lobster tails, 3-4 oz. each
5
5
5or6
5
5
5
Medium
Well Done
Well Done
Well Done
Warm
Well Done
15-20 min.
18-2a rain.
13-18 min.
6-10 min.
8-12 min.
22-26 min.
5
5
5
Weii Done
Flaky
Flaky
Done
30-45 min. (Lo Broil]
8-12 rain.
10-15 min.
7-10 min.
For a browned/seared exterior and rare interior, it may be necessary'to decrease cook time on side one and decrease the distance
between the meat and heat source.
Note: This chart is a suggested guide. The times may vary with the food being cooked.
13
Q
Pilotless ignition
Your range is equipped with pibtbss ignition. With this type of
ignition system, the gas automatically shuts off and the oven
will not operate durittg a power failure.
A lighted match will not light the oven burner. No attempt
should be made to operate the oven daring a power
failure.
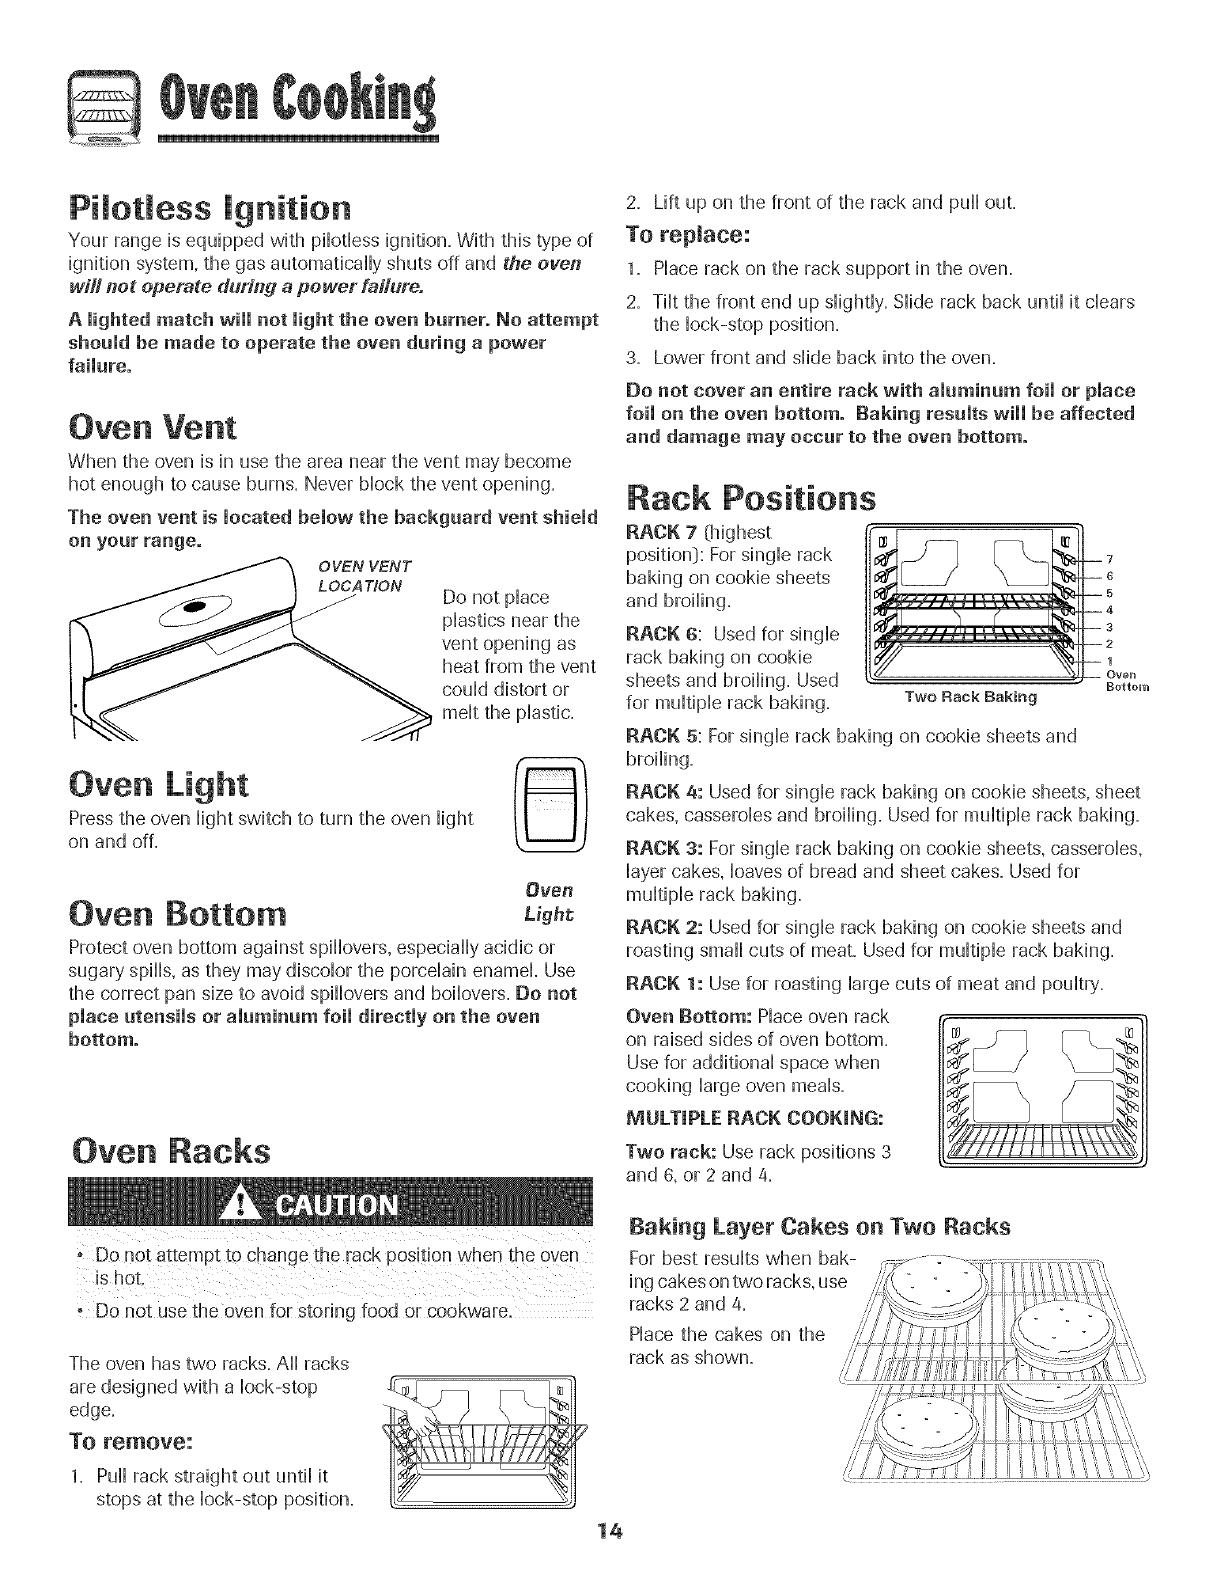
Oven Vent
When the oven is hl use the area near the vent may become
hot enough to cause burns. Never block the vent opening.
The oven vent is located below the backgaard vent shield
OVEN VENT
L OCA TION
on year range.
Do not place
plastics near the
vent opening as
heat from the vent
could distort or
melt the plastic.
Oven Light
Press the oven light switch to turn the oven light
on and off=
Oven
Oven Bottom ug.t
Protect oven bottom against spillovers, especially acidic or
sugary spills, as they may discolor the porcelain enamel. Use
the correct pan size to avoid spillovers and boilovers=Do not
place atensims or amaminam foimdirectmy on the oven
bottom.
Oven Racks
- Do not usethe oven for storing food or cookware.
The oven has two racks. All racks
are designed with a lock-stop
edge.
To remove:
1. Pull rack straight out until it
stops at the lock-stop position.
14
2. Lift up on the front of the rack and pull out.
To replace:
1. Place rack on the rack support in the oven.
2. Tilt the front end up slightly. Slide rack back until it clears
the lock-stop position.
3. Lower front and slide back into the oven.
Do not cover an entire rack with aiaminam foil or place
foil on the oven bottom. Raking resaits will be affected
and damage may occar to the oven bottom.
Rack Positions
RACK 7 (bighest
position): Forsingle rack
baking on cookie sheets
and broiling.
RACK 6: Used for single
rack baking on cookie
sheets and broiling. Used
for multiple rack baking.
7
6
5
4
3
2
1
Oven
Bottom
Two Rack Baking
RACK 5: Forsingle rack baking on cookie sheets and
broiling.
RACK 4: Used for single rack baking on cookie sheets, sheet
cakes, casseroles and broiling. Used for multiple rack baking.
RACK 3: For single rack baking on cookie sheets, casseroles
Dyer cakes, loaves of bread and sheet cakes. Used for
RACK 2: Used for single rack baking on cookie sheets and
roasting small cuts of meat. Used for multiple rack baking.
RACK 1: Use for roasting large cuts of meat and poultry.
Oven Bottom: Place oven rack
on raised sides of oven bottom.
Use for additional space when
cooking large oven meals.
MULTIPLE RACK COOKING:
Two rack: Use rack positions 3
and 6,or 2 and 4.
Baking Layer Cakes on Two Racks
For best results when bak-
ing cakes on two racks, use
racks 2 and 4.
Place the cakes on the
rack as shown.
Seff-C ean Oven
o It is normal for parts of the range to become hot during a
TO set Self-Cmean:
Note: Oven temperature must be below 400° Fto program
a dean cycb.
• To prevent damage to oven door. do not attempt to open
the door when "LOCK" is displayed.
o Avoid touching cooktoD, door. window ol oven vent area
during a clean cycle.
, Do not use commercial oven charters on the oven finish
or around any part of the oven. They will damage the
finish oHparts.
The self-clean cycle uses above-normal cooking temperatures
to automatically clean the oven interior.
It is normal for flare-ups, smoking, or flaming to occur during
cleaning if the oven is heavily soiled. It is better to clean the
oven regularly rather than to wait until there is a heavy build-
up of soil in the oven.
During the cleaning process, the kitchen should be well
ventilated to get rid of normal odors associated with cleaning.
Before Se f-Cmeaning
1. Turn off the oven light before cleaning. The light may burn
out during the clean cycle.
2. Remove broiler pan, all pans, and oven racks from the
oven. The oven racks will discolor and may not slide easily
after a self-clean cycle if they are not removed.
3. Clean oven frame, door frame, area outside of gasket, and
around the opening in the door gasket with a nonabrasive
cleaner such as Bon Ami* or detergent and water. The
self-cleaning process does not clean these areas. They
should be cleaned to prevent soil from baking on during
the clean cycle. (The gasket is the
seal around the oven door and
window.}
4. To prevent damage, do not clean or
rub the gasket around the oven
door. The gasket is designed to
seal in heat during the clean cycle.
5. Wipe up excess grease or spillovers from the oven bottom.
This prevents excessive smoking, flare-ups or flaming
during the clean cycle.
6. Wipe up sugary and acidic spillovers such as sweet
potatoes, tomato, or milk-based sauces. Porcelain enamel
is acid-resistant, not acid-proofi The porcelain finish may
discolor if acidic spills are not wiped up before a self-clean
cycle.
1.
2.
3.
4.
5.
Close the oven door.
Press the Clean pad.
° "CLEAN" flashes in the display.
If the door is not closed, beeps will sound and "DOOR" will
display. If the door is not closed within 45 seconds, the
self-cleaning operation will be canceled and the display
will return to the time of day.
Press the More+ or Less- pad.
° "CL-M" (Medium Soil, 3 hours} is displayed.
Press the More+ or Less- pad to scroll through
the self-cleaning settings. Less-
...............................
CL-HÈ (Heavy'Soil, 4 hours}
CL-M" (Medium soil, 3 hours}
CL-L" (Light Soil, 2 hours}
Choosing the soil level of the oven automatically programs
the self-cleaning time.
After four seconds, the oven wiii start cleaning.
° The cleaning time wiii start counting down in the display.
° "LOCK" wiii appear in the display.
° "CLEAN" wiii appear in the display.
To Delay a Semf-Omean Cycle:
1. Press the Delay pad.
° "DELAY" flashes.
° 00:00 will appear in the display.
2. Press the (\/lore+ or Less- pad to set
the amount of time you want to delay
the cycle. Delay time can be set from
ten minutes (00:10} to 11 hours, 59
minutes (11:59}.
3. Press the Clean pad.
° "CLEAN" will flash.
4. Press the More+ or Less- pad.
° "CL-M" (Medium Soil, 3 hours}
is displayed.
{ More+
oonto
*Brand names for cleaning products are registered trademarks of the respective manufacturers.
15

5. PresstheMore+orLess-padtoscrollthroughthestir-
cleaningsettings.
CL-H"(HeavySoil,4hours}
CL-M"(Mediumsoil,3hours}
CL-L"(LightSoil2hours}
ChoosingthesoiHHeveHoftheovenautomaticallyprograms
theseff-cHeaningtime.
& Afterfourseconds,CLEAN,DELAYandLOCKwillappear
inthedispHaytoshowthattheovenissetforaddayed
deanoperation.TheddaytimeisdispHayed.
During the Serf-Clean Cycle
When LOCK shows in the dispHay,the door cannot be opened.
To prevent damage to the door, do not force the door open
when LOCK is dispHayed.
Smoke and Smells
You may see some smoke and smell an odor the first few
times the oven is cleaned. This is normaHand will lessen in
time.
Smoke may also occur if the oven is heavily soiled or if a
broiler pan was left in the oven.
Sounds
As the oven heats, you may hear sounds of metal parts
expanding and contracting. This is normal and will not
damage the oven.
If the oven has already been set for a clean
cycle and you wish to set a delay:
1. Pressthe Delay pad.
, "DELAY" flashes.
, 00:00will appear in the display ..........................
2. Pressthe More+ or Less- pad to set the More+
amount of time you want to delay the cycle.
After four seconds, CLEAN, DELAY and LOCKwill appear
in the display to show that the oven is set for a delayed
clean operation. The delay time is displayed.
When the Self-Clean cycle starts:
° "DELAY" will turn off.
° The clean time will appear in the display.
To cancel the Serf-Clean cycle:
Press the CANCEL pad.
° Aii words disappear from the display.
° All hmctions are canceled.
° The time of day appears in the display.
After Serf-Cleaning
About one hour after the end of the self-clean cycle, LOCK
will turn off. The door can then be opened.
Some soil may leave a light gray, powdery ash. Remove
it with a damp cloth. If soil remains after wiping, that means
the dean cycle was not long enough. The soil will be re-
moved during the next dean cycle.
if oven racks were left in the oven and de net slide
smoothly after a clean cycle, wipe racks and rack supports
with a small amount of vegetable oil to make them easier to
move.
Fine lines may appear in the porcelain becaase it went
throagh heating and cooling. This is normal and will not
affect performance.
A white discoloration may appear after cleaning if acidic
or sugary foods were not wiped up before the self-clean
cycle. This discoloration is normal and will not affect perfor-
mance.
° If the oven door is left open, "DOOR" will flash in the
display and a signal will beep until the door is closed
and the Clean pad is pressed again.
° If more than five seconds elapse between pressing the
Clean pad and the More+ or Less- pad, the program will
automatically return to the previous display.
° The oven door will be damaged if the oven door is
forced to open when "LOCK" is still displayed.
16
Cleaning Procedures
or cleaning ,This is to aveM damage and possible burns,
TOprevent staining or disc0bratien , dean appHanceafter each use,
!f a part iSrern0ved, be Sureit isC0rrect!y rep!aced_
Brand names are registered trademarks of the
respective manufacturers.
_*To order call 1-877-232-6771 USAor
1-800-688-8408 Canada.
PART PROCEDURE
Broimer Pan Never cover itlsert with ahlminum foil as this prevents the fat from draining to the pan below.
and insert , Placesoapy cloth over insert and pan; let soak to loosen soil.
, Wash in warm soapy water. Use scouring pad to remove stubborn soil
, Broiler pan and insert can be cleaned in dishwasher.
Sealed Gas
Burners
Burner Grates -
Porcemainon
Cast iron
Removabme Burner Heads
° Allow burner to cool Remove burner cap and wash in soapy water with a plastic scouring pad. For
stubborn soils, clean with a soap-filled, nonabrasive pad or Cooktop Cleaning Creme*
{Part #20000001} _*and a sponge.
° Do not clean in the dishwasher or self-cleaning oven.
SeamedGas Burners
° Clean frequently. Allow burner to cool Clean with soap and plastic scouring pad. Forstubborn soils,
clean with a soap-filled, nonabrasive pad. Do not enlarge or distort hobs.
° Be careful not to get water into burner ports.
° Use care when cleaning the ignitor. If the ignitor iswet or damaged the surface burner will not lighL
Wash with warm, soapy water and a nonabrasive, plastic, scrubbing pad. For stubborn soils,
clean with a soap-filled, nonabrasive, plastic pad or Cooktop Cleaning Creme* {Part #20000001}**
and a sponge. [f soil remains, reapply Cooktop Cleaning Creme, cover with a damp paper towel
and soak for 30 minutes. Scrub again, rinse and dry.
Do not clean in the dishwasher or self-cleaning oven.
Clock and ° To activate "Control Lock" for cleaning, see page 8.
Control Pad ° Wipe with a damp cloth. Do not use abrasive cleaning agents as they may scratch the finish.
Area ° Glass cleaners may be used if sprayed on a cloth first. DO NOTspray direedy on eentroipad and
display area.
Control Knobs ° Remove knobs in the OFFposition by pulling forward.
° Wash, rinse and dry. Do not use abrasive cleaning agents as they may scratch the finish.
° Turn on each burner to be sure the knobs have been correctly replaced.
Cooktop and
Control Panel -
Porcelain Enamel
Storage [}rawer
and Door
Handmes -
Painted Enamem
Porcelainenamel isglass fused on metal and maycrack or chip with misuse. Itisacid resistant, not acid proof.
All spillovers, especially acidic or sugary spillovers, should be wiped up immediately with a dry' cloth.
° When cool, wash with soapy water, rinse and dry.
, Never wipe off a warm or hot surface with a damp cloth. This may cause cracking or chipping.
, Never use oven cleaners, abrasive or caustic cleaning agents on exterior finish of range.
° When cool, wash with warm soapy water, rinse and dr},. Never wipe a warm or hot surface with a damp
cloth as this may damage the surface and may cause a steam burn.
° Forstubborn soil, use mildly abrasive cleaning agents such as baking soda paste or Bon Ami*. Do not use
abrasive cleaners such assteel wool pads or oven cleaners. These products will scratch or permanently
damage the surface.
Note: Use a dry towel or cloth to wipe up spills, especially acidic or sugary spitls. Surface may
discolor of dull if seil is not immediately removed. This is especially important for white surfaces.
17
i
Oven Window
and Door - Glass
. Avoid using excessive amounts of water which may seep under or behind gHasscausing staining.
. Wash with soapand water. Rinsewith dear water and dry. GHasscleaner can be used if sprayed on acloth
first.
. Donot useabrasive materiaHssuch asscouring pads. steal wooHor powdered cleaners asthey will scratch
gHass.
Oven interior . Follow instructions on pages 15-16 to set a sdf-c[ean cycle.
Oven Racks
Stainless Steel
(sdect modds)
®
®
®
CHeanwith soapy water.
Removestubborn soiHwith cleansing powder or soap-filled scouring pad. Rinse and dry.
Racks will permanentHydiscoUorand may not sHideout smoothly if left in the oven during a self-clean
operation. If this occurs, wipe the rack and embossed rack supports with a small amount of vegetable oil
to restore ease of movement, then wipe off excess oil.
o DO NOT USEANY CLEANINO PRODUCT CONTAININO CHLORINE BLEACH.
. DO NOTUSEABRASIVE OR ORANGE CLEANERS.
. ALWAYS WIPE WITH THE GRAIN WHEN CL£ANINO.
. Daily Cleaning/Light Soil -- Wipe with one ofthe following - soapy water.white vinegar/water sohtion.
Formula 409 Glass and Surface Cleaner_ or a similar glass cleaner - using a sponge or soft cloth.
Rinse and dry'.To polish and help prevent fingerprints, follow with Stainless Steel Magic Spray*
(Part No. 20000008)**.
, Moderate/Heavy Soil -- Wipe with one of the following - Ben Ami. Smart Cleanser. or Soft Scrub_-
using a damp sponge or soft cloth. Rinse and dry. Stubborn soils may be removed with a damp multi-
purpose Scotch-Brite* pad; rub evenly with the grain. Rinse and dry'.To restore luster and remove streaks.
follow with Stainless Steel Magic Spray_,
, Discoloration -- Using a damp sponge or soft cloth, wipe with Cameo Stainless Steel Cleaner_,Rinse
immediately and dry..To remove streaks and restore luster, follow with Stainless Steel Magic Spray_,
* Brand names for cleaning products are registered trademarks of the respective manufacturers,
** To order direct, call 1-877-232-8771 USAor 1-800-688-8408 Canada.
18
i
Oven Door
Do not p!ace excessiveweight Onor stand on anopen
oven d0or. ThiscouM cause the range to tip over, break
the door, or injure the user.
Note: The oven door on a new range may fed "spongy"
when it is closed. This is normal and will decrease with use.
Oven Window
To protect the oven door window:
1. Do not use abrasive cleaning agents such as steel wool
scouring pads or powdered cleansers as they may scratch
the glass.
2. Do not hit the glass with pots, pans, furniture, toys, or other
objects.
3. Do not close the oven door until the oven racks are in
place.
Scratching, hitting, jarring or stressing the glass may weaken
its structure causing an increased risk of breakage at a later
date.
Leveling Legs
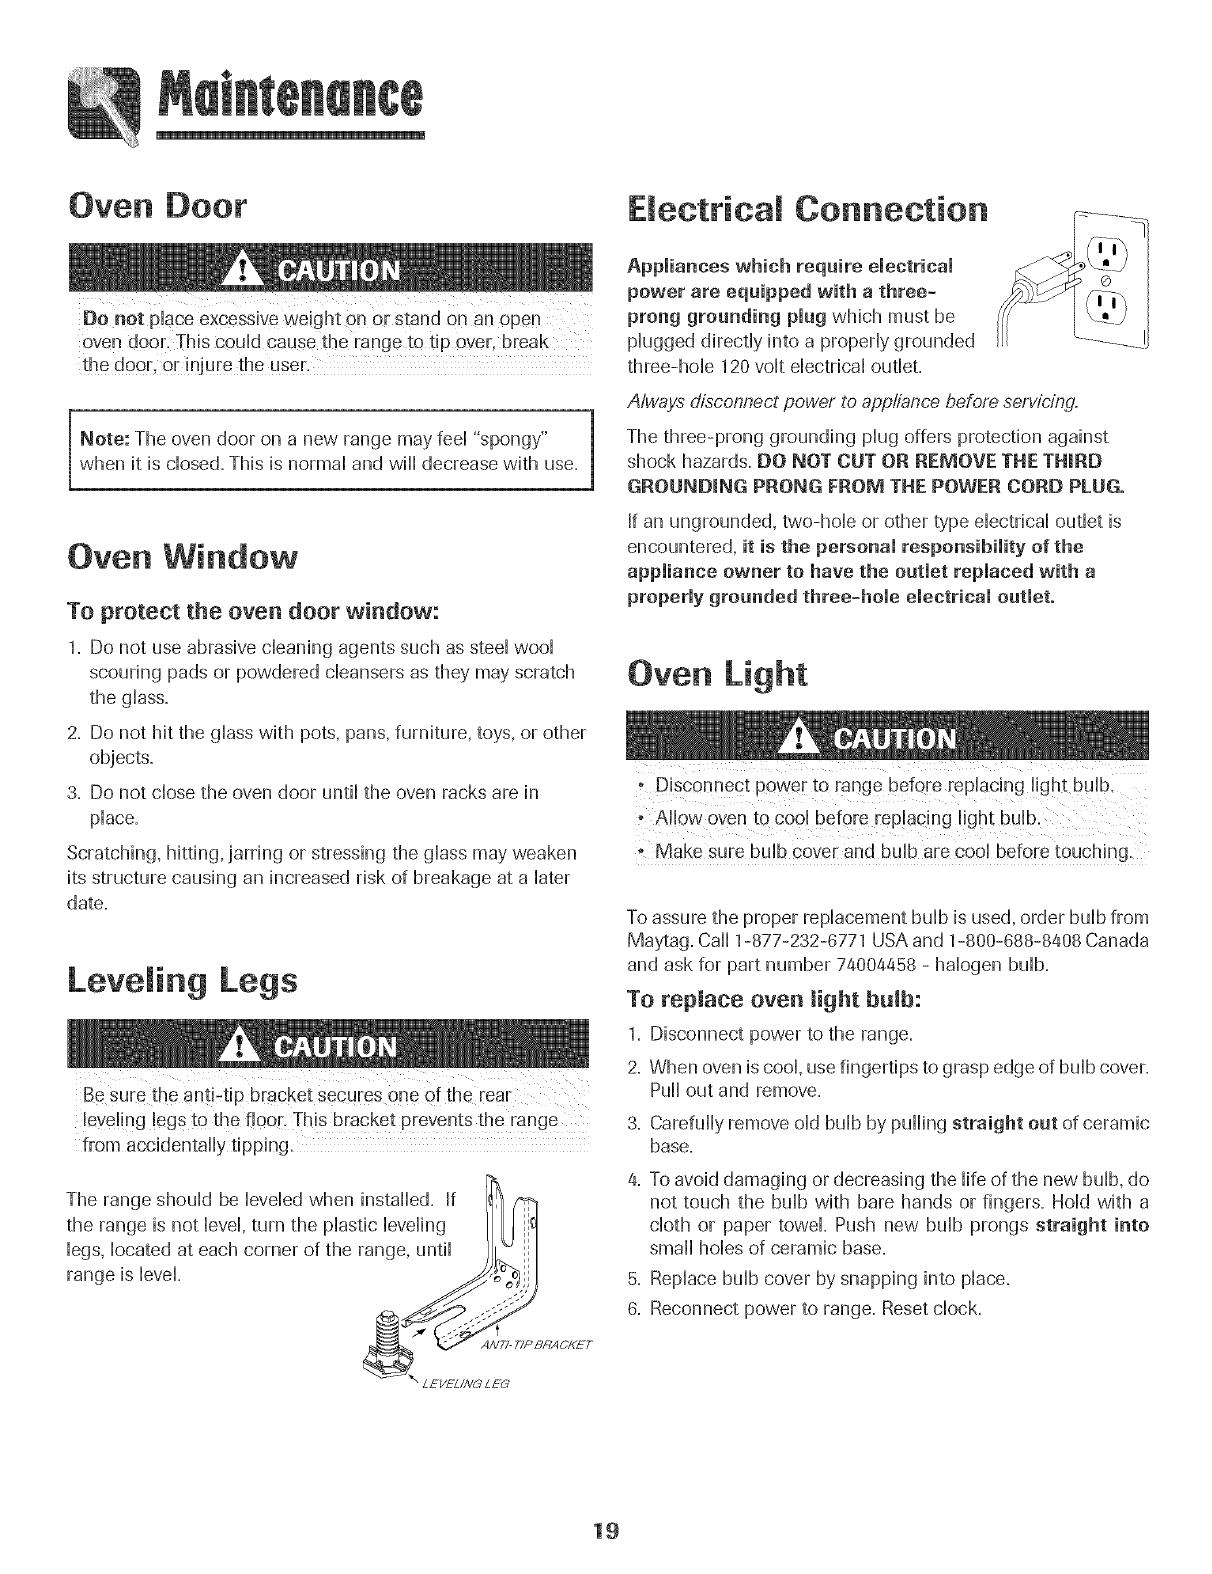
Be sure the antirtip bracket secures one of the rear
from accidentally tipping.
Electrical Connection
Appliances which require electrical
power are equipped with a three=
prong grounding plug which must be
plugged directly into a properly grounded
three-hole 120 volt electrical outlet.
A/ways disconnect power to appiiance before servicing.
The three-prong grounding plug offers protection against
shock hazards. DO NOT CUT OR REMOVE THE THIRD
GROUNDING PRONG FROM THE POWER CORD PLUG.
If an ungrounded, two-hole or other type electrical outlet is
encountered, it is the personal responsibility of the
appliance owner to have the outlet replaced with a
properly grounded three=hole electrical outlet.
Oven Light
. I "
Make su[e bulb cover and bu b are cool before touching.
To assure the proper replacement bulb is used, order bulb from
Maytag. Caii 1-877-232-6771 USAand 1-800-688-8408 Canada
and ask for part number 74004458 - halogen bulb.
To replace oven light bulb:
1. Disconnect power to the range=
2. When oven iscool, usefingertips to grasp edge of bulb cover.
Puii out and remove.
3. Carefully remove old bulb by pulling straight out of ceramic
base.
4. To avoid damaging or decreasing the life of the new bulb, do
not touch the bulb with bare hands or fingers. Hold with a
cloth or paper towel. Push new bulb prongs straight into
small hobs of ceramic base.
5. Replace bulb cover by snapping into place.
6. Reconnect power to range. Resetclock.
19
/