Page is loading ...

H3OCTKTB2BSN
Bellagio By Airworks
1
DIGITAL CERAMIC HEATER
OWNER’S MANUAL
MODEL: H3OCTKTB2BSN
Refer to the warranty. For more information, call 1-800-268-7622 for service or
visit www.super-electric.com.
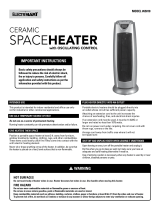
IMPORTANT INSTRUCTIONS
READ & SAVE
FOR HOUSEHOLD USE ONLY
REMEMBER: PORTABLE ELECTRIC HEATERS
ARE DESIGNED FOR SPOT HEATING OR A
SUPPLEMENTARY HEAT SOURCE. THEY ARE
NOT INTENDED TO BE THE MAIN SOURCE OF
HEAT DURING THE NORMAL HEATING SEASON.

H3OCTKTB2BSN
Bellagio By Airworks
2
TABLE OF CONTENTS
Important Instructions ……………………… 2
Parts of the Heater…………………..……… 3
Operating Instructions……………………… 4
Specifications……………………………….. 5
Cleaning and Maintenance………………… 5
Storage………………………………………. 5
Troubleshooting…………………………….. 6
Warranty……………………………………... 7
IMPORTANT INSTRUCTIONS
PLEASE READ ALL INSTRUCTIONS BEFORE USING THIS HEATER
NOTE: There may be a trace of smoke or odour when unit is first operated. Do not be alarmed.
This indicates that a drop of oil fell on the heating coil during the manufacturing process. It
will quickly evaporate and should not re-occur.
Make sure that the room in which the appliance is located is well ventilated during this
operation.
WHEN USING ELECTRICAL APPLIANCES, BASIC PRECAUTIONS SHOULD ALWAYS BE FOLLOWED TO
REDUCE RISK OF FIRE, ELECTRICAL SHOCK AND INJURY TO PERSONS OR PROPERTY, INCLUDING
THE FOLLOWING
1. Read all instructions before using this heater.
2. Check that neither the appliance nor the power cable has been damaged in any way during transportation.
3. Make sure that no pieces of polystyrene or other packaging material have been left between elements of
the appliance. It may be necessary to pass over the appliance with a vacuum cleaner.
4. Be sure that the plug is fully inserted into appropriate receptacle. Please remember that receptacles also
deteriorate due to aging and continuous use: check periodically for signs of overheating or deformations
evidenced by the plug. Do not use the receptacle and CALL your electrician.
5. Connect to properly polarized outlets only.
6. We do not recommend use of an extension cord as it may overheat and cause a risk of fire. However, if you
have to use an extension cord, the cord should be No. 14 AWG minimum size and rated not less than 1875
watts, and has to be used only for supplying power to this heater.
7. Ensure the heater is on a stable, secure surface to eliminate the potential of tipping it over.
8. Extreme caution and supervision is necessary when any heater is used near children or pets. Do not
operate the heater if unattended.
9. Always unplug heater when not in use.
10. Do not run cord under carpeting. Do not cover cord with throw rugs, runners or the like. Place cord away
from traffic area where it will not be tripped over.
11. It is normal for the heater’s plug and cord to feel warm to the touch. A plug or cord which becomes hot to
the touch or becomes distorted in shape may be a result of a worn electrical outlet. Worn outlets or
receptacles should be replaced prior to further use of the heater. Plugging heater into a worn
outlet/receptacle may result in overheating of the power cord or fire.
12. To prevent possible fire, do not block air intakes or exhaust in any manner. Do not use on soft surfaces,
like a bed, where openings may become blocked.
13. Do not insert or allow foreign objects to enter any ventilation or exhaust opening as this may cause electric
shock, fire or damage to the heater.
14. To prevent overload and blown fuses, be sure that no other appliance is plugged into the same outlet
(receptacle) or into another outlet (receptacle) wired into the same circuit.
15. A heater has hot or arcing or sparking pads inside. Do not use it in areas where gasoline, paint or
flammable liquids are used or stored.

H3OCTKTB2BSN
Bellagio By Airworks
3
16. Do not operate any heater with a damaged cord or plug or after the heater malfunctions, has been dropped
or damaged in any manner. Return the heater to an authorized service facility for examination, electrical or
mechanical adjustment or repair.
17. This heater is not intended for use in any area where there is standing water. Never locate heater where it
may fall into a bathtub or other water container.
18. Do not use outdoors.
19. This heater is hot when in use. To avoid burns, do not let bare skin touch hot surfaces. Use handle when
moving the unit. Keep combustible materials, such as furniture, pillows, bedding, papers, clothes and
curtains at least 3 feet (0.9 meters) from the front and top of the radiator and keep them away from the
sides and rear. Keep the rear grille away from walls or drapes so as not to block the air intake.
20. To disconnect the heater, turn controls to OFF, then remove the plug from the outlet.
21. Use this heater only as described in this manual. Any other use not recommended by the manufacturer
may cause fire, electric shock and injury to persons or damage to property.
22. Do not use attachments or filters. They are not recommended.
CAUTION: TO PREVENT ELECTRIC SHOCK, MATCH WIDE BLADE OF PLUG TO WIDE SLOT,
FULLY INSERT.
1. LED display
2. Carry handle (at rear)
3. Control panel
a. Oscillation
b. Mode
c. Power
d. Timer
e. Thermostat
4. Safety grille
5. Oscillating base
6. Remote
PARTS OF THE HEATER
SAVE THESE INSTRUCTIONS

H3OCTKTB2BSN
Bellagio By Airworks
4
Remove the heater from the packaging and place on a firm, level surface.
To operate, connect to properly polarized outlet only. Match wide blade of plug to wide slot and fully insert.
Be sure to plug into a 120V AC, 60Hz outlet. This heater will not operate until the unit is plugged in.
When the heater is plugged in a “beep” will sound once. The room temperature will be displayed until the
unit is unplugged.
For your convenience, the icons on the remote control and the actual heater have the same functions.
YOUR HEATER IS EQUIPPED WITH 4 CONTROL SETTINGS, THERMOSTAT AND TIMER.
POWER
Using button Control Result
1
st
Press Power ON
LO indicator is illuminated and heater output is default on continuous low heat output (900W)
Current room temperature is displayed.
2
nd
Press
Power OFF
Heater will be powered OFF.
Allow 30 seconds for heater to come to a complete stop.
MODE
Using button Control Setting Displayed on LED Use of Thermostat
1
st
Press
HIGH heat output
(1500W)
HI indicator is illuminated and heater output is
continuous and high (1500W)
Current room temperature is displayed.
Heat output is continuous.
Thermostat CANNOT be used at
this setting.
2nd Press
AUTO
heat output
AUTO indicator is illuminated and the
thermostat can be programmed to maintain
the desired temperature.
The current room temperature flashes on the
display.
Thermostat CAN be adjusted by
following instructions below
“THERMOSATAT*”
3rd Press
LOW heat output
(900W)
LO indicator is illuminated and heater output is
on continuous low heat output (900W)
Current room temperature is displayed.
Heat output is continuous.
Thermostat CANNOT be used at
this setting.
Additional presses
Heater cycles between HI/AUTO/LO
THERMOSTAT*
This heater is equipped with a thermostat to sustain the desired temperature. Follow the above directions
to set the heater on AUTO mode. The thermostat can only be used and adjusted while the heater is on
AUTO mode.
To adjust the thermostat using the control panel, set desired temperature by continuously pressing this
button on the unit. The temperature will be adjusted in 1°C(1°F) increments between 5°C(40°F) and
32°C(90°F). The default temperature setting is 24°C (75°F). The temperature will set and stop flashing
within 5 seconds of being adjusted. The current room temperature will reappear on the LED display.
To adjust the thermostat using the remote, press , followed by “” and “” to set the desired
temperature.
The LED can display temperature in ºF or ºC. Press the ( ) and ( ) buttons on the unit together to switch
between ºF or ºC readout.
Once the room warms up to the set temperature, the heater will stop heating. The unit will continue after the
room temperature drops lower than the set temperature.
NOTE: It is normal, when using the thermostat, for your heater to cycle ON and OFF. The heater is
maintaining the set temperature for energy efficiency.
TIMER
This heater is equipped with a timer which can be set to countdown (1-8 hours) to automatic shutoff.
Pressing this button will flash and shuffle through time ranges of 1-8 hours in .5 hr increments. The time will
set and stop flashing after it is adjusted. To program the timer with the remote control, press and adjust
using the “” and “”.
The timer is displayed and the heater will begin countdown to automatic shut off. To deactivate timer, press
this button until 0.0 is displayed.
OPERATING INSTRUCTIONS

H3OCTKTB2BSN
Bellagio By Airworks
5
OSCILLATION
Your heater is equipped with an oscillation feature. If you want to obtain a wider area of heat circulation, use
this oscillating feature.
SAFETY FEATURES OF THIS HEATER
Thermal Cut-off: If the unit overheats, the heater will temporarily be disabled. When this happens, turn the unit
OFF and unplug. Allow it to cool for 30 minutes. Inspect and remove any objects on or adjacent to the heater.
Resume use after unit has cooled sufficiently.
Safety Tip-Over Switch: This unit is equipped with a Safety Tip-Over switch located inside the heater. This
feature cuts the main power to the unit if the heater gets knocked over. If the unit does tip over, simply stand it
up right to resume operation.
Safety Grilles: The heater is equipped with safety grilles at the front to protect the heater element. This part of
the heater can get extremely hot. Do not block this grille as it could cause fire.
Model Number H3OCTKTB2BSN
Power Supply 120V AC, 60Hz
Power Consumption 900Watt (Low), 1500Watt (High)
BTU’s Per Hour Maximum 5200 BTU’s/Hr
Before any cleaning, make sure that:
a) The heater is turned OFF.
b) Disconnect power supply at source by removing plug from power outlet.
c) Your heater is now ready to be cleaned.
Regular Cleaning:
a) Do not use cleaning liquid or other chemicals to spray on the unit.
b) Interior dust can often be removed by using a vacuum cleaner with a crevice tool attachment. DO NOT
ATTEMPT TO OPEN THE UNIT.
c) To clean the exterior, use a clean, soft and lightly damp cloth to gently wipe off the dirt from the surface of
the unit. Be sure not to wet the heating element and the switches. Allow the unit to dry completely before
using it.
CAUTION: DO NOT ALLOW WATER TO RUN INTO THE INTERIOR OF THE HEATER AS THIS COULD
CREATE A FIRE OR ELECTRIC SHOCK HAZARD, DAMAGING THE UNIT.
1. Perform the cleaning procedures described in “Cleaning/Maintenance”.
2. Wipe all parts to dry.
3. Pack heater in a plastic bag.
4. Keep in a cool, dry place.
SPECIFICATIONS
CLEANING AND MAINTENANCE
STORAGE

H3OCTKTB2BSN
Bellagio By Airworks
6
If your heater fails to operate, please follow these procedures prior to contacting Customer Service:
Problem Probable Cause Solution
Heater is not plugged into a
120V polarized
outlet/receptacle.
Ensure unit is in OFF position. Plug in unit and attempt to
turn on again.
The heater fell over and the
Tip-Over Switch temporarily
shutting off the unit.
Turn heater off and unplug. Position heater in an upright
position and ensure the unit is on a flat and even surface.
To resume normal operation, simply plug heater back into a
properly polarized outlet.
Thermal Cut-Off has
temporarily turned off the
heater due to high
temperatures.
Turn heater off and unplug. Allow it to cool for 30 minutes.
Once heater has cooled off, check to make sure there are
not objects on or very close to the unit. To resume
operation, plug unit back in once it has cooled off.
Heater will not
power on.
Breaker/Fuse has been
tripped.
Please check your electrical box to confirm the breaker has
not been blown. This may occur if the unit is sharing a
receptacle with another high power consuming appliance.
Ensure unit is in OFF position. Plug in unit and attempt to
turn on again.
Attempt to plug unit into another independent receptacle in
the house.
Room temperature has
been warmed up to
thermostat setting.
To resume heating, adjust thermostat to a higher setting.
Refer to THERMOSTAT section for more information.
Power light is
on, but no heat
is released
from unit.
The timer was set for the
heater to turn off
automatically.
Turn the timer function OFF by pressing the timer button
until lights at the hour numbers are all off. For more
information, see TIMER section.
A drop of oil fell on the
heating coil during the
manufacturing process. It
will quickly evaporate and
should not occur again.
Ensure room in which heater is situated is well ventilated.
The heater is
creating a
burning smell.
Check & ensure there are
no combustible materials 3
ft (0.9m) surrounding the
heater.
Remove the combustible units preventing air intake into the
heater.
Unit over heats,
temporarily
disabling unit.
Objects placed near the
heater preventing proper air
circulation.
Ensure room in which the heater is situated is well ventilated
and there is at least 3 ft (0.9m) of space between the heater
and any objects.
DO NOT RETURN THE UNIT TO THE STORE OF PURCHASE. If the problem
still persists, refer to the warranty. For more information call 1-800-268-7622 for
service.
PLEASE DO NOT ATTEMPT TO OPEN OR REPAIR THE HEATER YOURSELF. DOING SO COULD VOID
THE WARRANTY AND CAUSE DAMAGE OR PERSONAL INJURY.
TROUBLESHOOTING

1-YEAR WARRANTY
VALID ONLY WITH ORIGINAL PURCHASE RECEIPT
Warranty: Gracious Living Corporation warrants this product against defects in any parts or workmanship for a
period of 1 year from the original purchase date. Parts that prove to be defective during the 1- year period will
be replaced at our option. No charge will be made for such replacement. The right is reserved by the
manufacturer to replace the whole product in lieu thereof. This product warranty covers only the original
consumer purchaser of the product.
Warranty Coverage: This warranty is void if the product has been damaged by accident, neglect, improper
handling or operation, shipping damage, abuse, misuse, unauthorized repairs made or attempted, alterations,
improper assembly/installation or maintenance, commercial use or other causes not arising out of defect in
materials or workmanship. This warranty does not extend to any units which have been altered or modified or
to damage to products or parts thereof which have had the serial number removed, altered, defaced or
rendered illegible. The warranty applies only to products purchased from an authorized Gracious Living
Corporation dealer and used within the boundaries of countries this product is certified for operation in.
Implied Warranties: Any implied warranties which the purchaser may have are limited in duration to
1- year from the date of purchase. This limited warranty is in lieu of all other warranties expressed or implied,
including warranties of merchantability and fitness for a particular purpose and excludes all liability for
incidental or consequential damages for any cause whatsoever.
Warranty Performance: During the above 1- year warranty period, a product with a defect will be replaced
with a comparable model when the product is returned to the store of purchase. The replacement product will
be in warranty for the balance of the 1- year warranty period and an additional one-month period. No charge
will be made for such replacement.
GRACIOUS LIVING CORPORATION
Woodbridge, Ontario
Canada L4L 9J3
www.super-electric.com
1-800-268-7622

H3OCTKTB2BSN
Bellagio By Airworks
8
CHAUFFERETTE CÉRAMIQUE NUMÉRIQUE
MANUEL D’UTILISATION
MODÈLE : H3OCTKTB2BSN
NE PAS RAPPORTER LA CHAUFFERETTE AU POINT D’ACHAT.
Pour plus de
renseignements appelez au 1-800-268-7622 ou visitez le www.super-electric.com pour le service à la clientèle.
CONSIGNES IMPORTANTES À
LIRE ET À CONSERVER
POUR USAGE DOMESTIQUE SEULEMENT
À NOTER : LES CHAUFFERETTES ÉLECTRIQUES PORTATIVES
SONT CONÇUES COMME SOURCE DE CHAUFFAGE PONCTUEL OU
SUPPLÉMENTAIRE, ET NON COMME SOURCE PRINCIPALE DE
CHAUFFAGE DURANT LA SAISON DE CHAUFFAGE NORMALE.
/