Page is loading ...

LTF 11H132
EN
English
Operating instructions
DISHWASHER - Contents
Operating instructions,1
Precautions and advice, 2-3
Assistance, 4
Product Data, 5
Installation, 6-7
Description of the appliance, 8
Rened salt and rinse aid, 9
Loading the racks, 10-11
Detergent and dishwasher use, 12
Wash cycles, 13
Special wash cycles and options, 14
Care and maintenance, 15
Troubleshooting, 16
PL
Polski
Instrukcja obsługi
ZMYWARKA - Spis treści
Instrukcja obsługi,1
Zalecenia i środki ostrożności, 3-4
Serwis Techniczny, 4
Karta produktu, 5
Instalacja, 17-18
Opis urządzenia, 19
Sól regeneracyjna i środek nabłyszczający, 20
Ładowanie koszy, 21-22
Środek myjący i obsługa zmywarki, 23
Programy, 24
Programy specjalne i opcje, 25
Konserwacja i obsługa, 26
Nieprawidłowe działanie i możliwe środki zaradcze, 27

2
pull the plug from the mains socket. Do
not pull on the cable.
•The water supply tap must be shut off
and the plug should be removed from
theelectricalsocketattheend ofevery
cycleandbeforecleaningtheappliance
orcarryingoutanymaintenancework.
•Themaximumnumberofplacesettingsis
shownintheproductsheet.
• Iftheappliancebreaksdown,donotunder
anycircumstancestouchtheinternalparts
inanattempttoperformtherepairwork
yourself.
•Donotleanorsitontheopendoor:this
maycausetheappliancetooverturn.
•Thedoorshouldnotbeleftopenasitmay
create a dangerous obstacle.
•Keepdetergentandrinseaidoutofreach
of children.
•The packaging material should not be
usedasatoy.
• Knives and other utensils with sharp
edges must be placed either with the
points/blades facing downwards in the
cutlerybasketorhorizontallyonthetip-up
compartmentsorinthetray/thirdbasket,
if available.
Disposal
•Todispose of any packaging materials,
follow local legislation so that the
packagingsmaybereused.
•The European Directive 2012/19/EU
relatingtoWasteElectricalandElectronic
Equipment(WEEE)statesthathousehold
appliances should not be disposed of
usingthenormalsolidurbanwastecycle.
Exhaustedappliancesshouldbecollected
separatelyinordertooptimisethecostof
reusingandrecyclingthematerialsinside
the machine, while preventing potential
damage to the atmosphere and public
health. The crossed-out dustbin symbol
shownonallproductsremindstheowners
of their obligations regarding separated
wastecollection.
For further information relating to the correct
disposalofhouseholdappliances,owners
maycontacttherelevantpublicauthority
or the local appliance dealer.
Saving energy and respecting the
environment
Saving water and energy
•Only begin a wash cycle when the
dishwasher is full. While waiting for the
EN
Precautions and advice
This appliance was designedand
manufacturedincompliancewithinternational
safetystandards.Thefollowinginformation
hasbeenprovidedforsafetyreasonsand
shouldbereadcarefully.
Keepthisinstructionmanualinasafeplace
forfuturereference.Iftheapplianceissold,
givenawayormoved,makesurethemanual
iskeptwiththemachine.
Read the instructions carefully, asthey
include important information on safe
installation,useandmaintenance.
Thisappliancewasdesignedfordomestic
useorsimilarapplications,forexample:
-farmhouses;
-usebyguestsinhotels,motelsandother
residentialsettings;
-bed&breakfasts.
Remove the appliance from all packaging
andmakesureitwasnotdamagedduring
transportation. Ifit was damaged, contact
theretaileranddonotproceedanyfurther
withtheinstallationprocess.
General safety
• This appliance should not be operated
bychildrenyoungerthan8years,people
withreducedphysical,sensoryormental
capacities, or inexperienced people
who are not familiar with the product,
unless they are given close supervision
orinstructionsonhowtouseitsafelyand
aremadeawarebyaresponsibleperson
of the dangers its use might entail.
•Childrenmustnotplaywiththeappliance.
•Itistheuser'sresponsibilitytocleanand
maintain the appliance. Children should
nevercleanormaintainitunlesstheyare
given supervision.
• Theappliancewasdesignedfordomestic
use inside the home and is not intended
for commercial or industrial use.
•The appliance must be used to wash
domesticcrockeryinaccordancewiththe
instructions in this manual.
•The appliance must not be installed
outdoors, even in covered areas. It is
extremelydangeroustoleavethemachine
exposedtorainandstorms.
• Donottouchtheappliancewhenbarefoot.
•When unplugging the appliance always
5
Product Fiche
Brand
HOTPOINT ARISTON
Model
LTF 11H132
Rated capacity in standard place settings (1)
14
Energy efciency class on a scale from A+++ (low consumption) to D (high consumption)
A+++
Energy consumption per year in kWh (2)
237
Energy consumption of the standard cleaning cycle in kWh
0.83
Power consumption of the off-mode in W
0.5
Power consumption of the left-on mode in W
5.0
Water consumption per year in litres (3)
2520
Drying efcacy class on a scale from G (low efcacy) to A (high efcacy)
A
Programme time for standard cleaning cycle in minutes
190
The duration of the left-on mode in minutes
12
Noise in dB(A) Re 1pW
42
Built-in model
Yes
NOTES
1) The information on the label and che relates to the standard cleaning cycle, this programme is suitable to clean normally soiled
tableware and it is the most efcient programme in terms of combined energy and water consumption. The standard cleaning cycle
corresponds to the Eco cycle.
2) Based on 280 standard cleaning cycles using cold water ll and the consumption of the low power modes. Actual energy consumption
depends on how the appliance is used.
3) Based on 280 standard cleaning cycles. Actual water consumption depends on how the appliance is used.
EN
Product Data (product fiche)
Karta produktu
Marka
HOTPOINT ARISTON
Nazwa modelu
LTF 11H132
Pojemność znamionowa, wyrażona liczbą standardowych kompletów naczyń (1)
14
Klasa efektywności energetycznej, skla od A+++ (niskie zużycie) do D (wysokie zużycie)
A+++
Zużycie energii w kWh rocznie (2)
237
Zużycie energii w standardowym cyklu zmywania w kWh
0.83
Zużycie energii w trybie wyłączenia i trybie czuwania w W
0.5
Zużycie energii w trybie włączenia i trybie czuwania w W
5.0
Roczne zużycie wody w litrach rocznie (3)
2520
Klasa efektywności suszenia, skala od G (minimalna efektywność) do A (maksymalna efektywność)
A
Czas programu dla standardowego cyklu zmywania w minutach
190
Czas trwania trybu czuwania w minutach
12
Poziom emitowanego hałasu w dB(A) re1 pW
42
Model do zabudowy
Tak
Uwagi
1) Informacja, że cykl jest odpowiedni do zmywania normalnie zabrudzonych zastaw stołowych oraz że jest najbardziej efektywnym
programem pod względem łącznego zużycia energii i wody dla tego rodzaju zastawy stołowej; Standardowy cykl zmywania odpowiada
cyklowi Eco.
2) Na podstawie 280 standardowych cykli zmywania, przy użyciu zimnej wody, oraz w trybie niskiego zużycia energii. Rzeczywiste
zużycie energii zależy od sposobu użycia urządzenia.
3) Na podstawie 280 standardowych cykli zmywania. Rzeczywiste zużycie energii zależy od sposobu użycia urządzenia.
PL
Karta produktu
EN
6
Installation
* Onlyavailableinselectedmodels.
Iftheappliancemustbemovedatanytime,keepitin
anuprightposition;ifabsolutelynecessary,itmaybetilted
onto its back.
Connecting the water supply
Adaptationofthewatersupplyforinstallationshouldonly
beperformedbyaqualifiedtechnician.
Thewaterinletandoutlethosesmaybepositionedtowards
the right or the left in order to achieve the best possible
installation.
Make sure the dishwasher does not bend or squash the
hoses.
Connecting the water inlet hose
• Toa3/4”gascoldorhotwaterconnectionpoint(max.
60°C).
• Runthewateruntilitisperfectlyclear.
• Screwtheinlethosetightlyintopositionandturnoffthe
tap.
Iftheinlethoseisnotlongenough,contactaspecialist
store or an authorised technician
(seeAssistance)
.
Thewaterpressuremustbewithinthevaluesindicated
intheTechnicalDatatable-otherwisethedishwashermay
befunctionproperly.
Makesurethehoseisnotbentorcompressed.
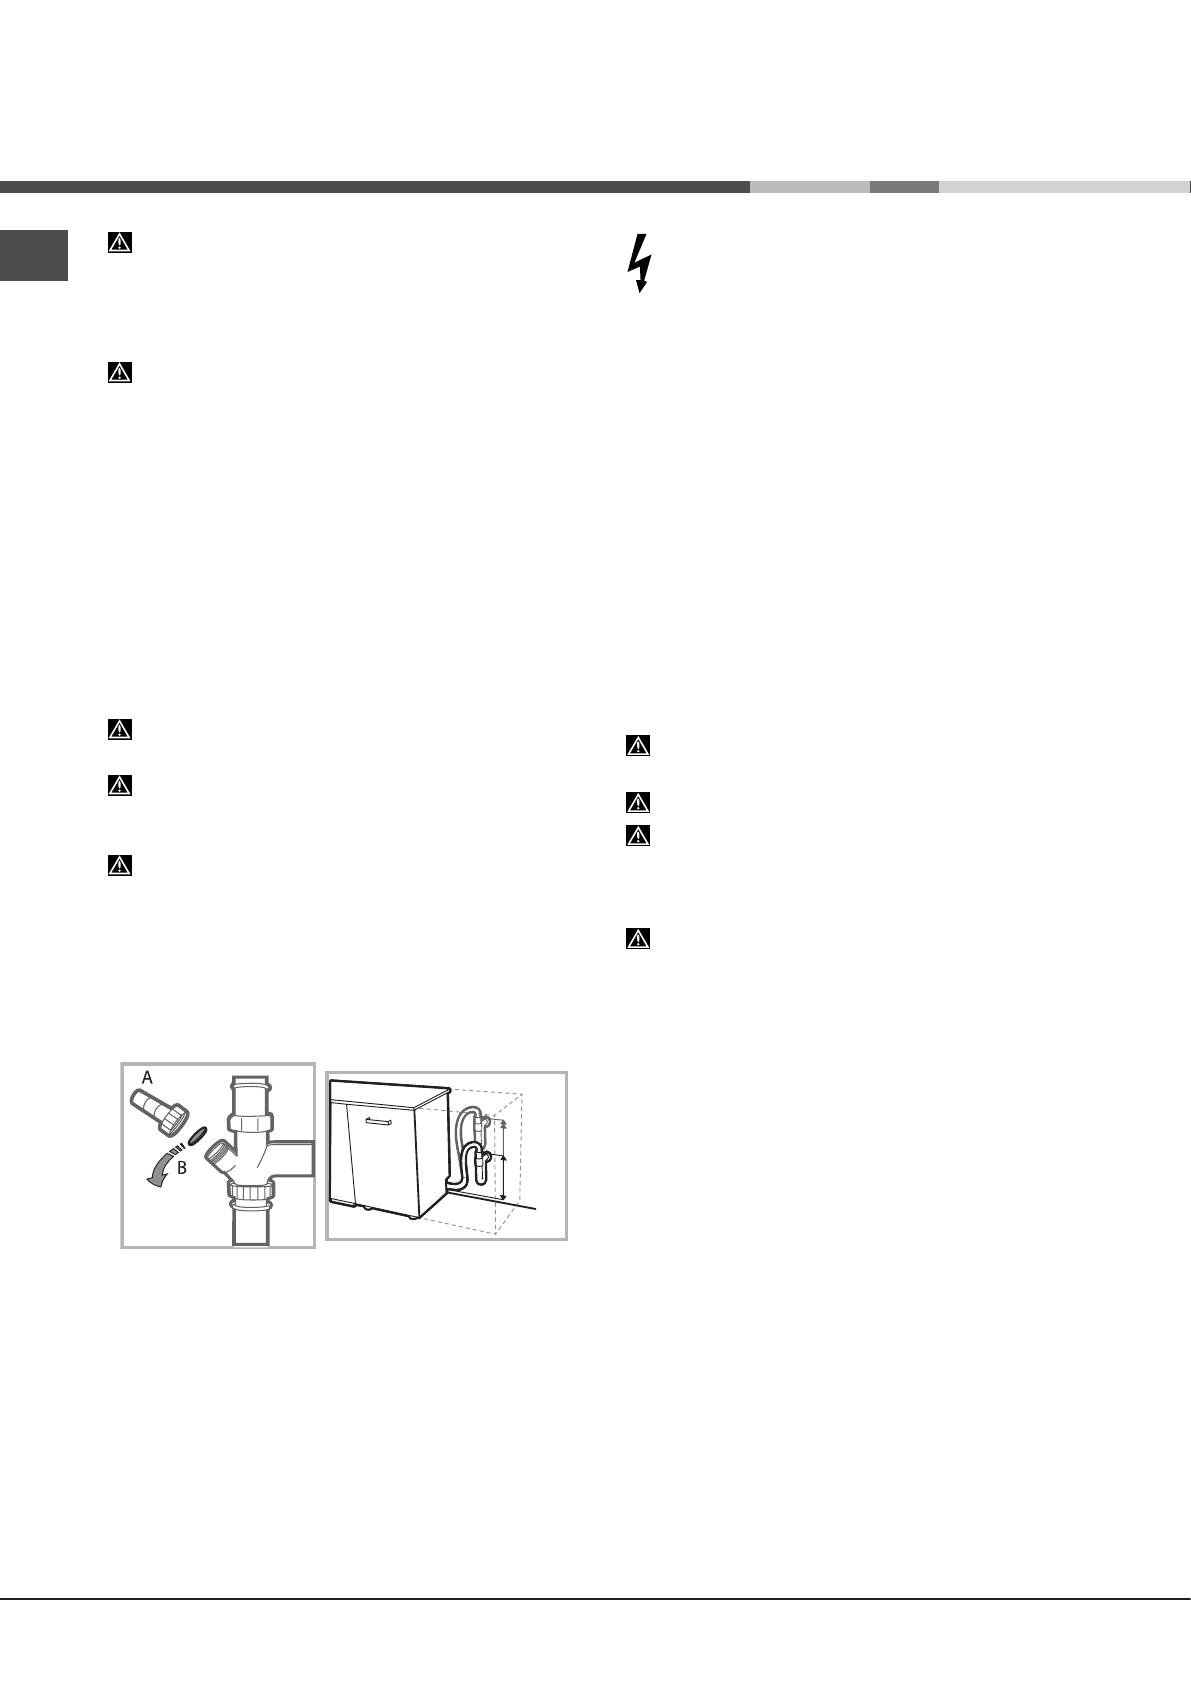
Connecting the water outlet hose
Connect the outlet hose to a drain duct with a minimum
diameterof2cm.(A)
Theoutlethoseconnectionmustbeataheightrangingfrom
40to80cmfromthefloororsurfacewherethedishwasher
rests.
Beforeconnectingthewateroutlethosetothesinkdrain,
removetheplasticplug(B).
Anti-flooding protection
Toensurefloodsdonotoccur,thedishwasher:
-isprovidedwithaspecialsystemwhichblocksthewater
supplyin theevent ofanomalies or leaks from inside the
appliance.
Some models are also equipped with the supplementary
safety device New Acqua Stop*, which guarantees anti-
floodingprotectionevenintheeventofasupplyhoserupture.
WARNING: HAZARDOUS VOLTAGE!
Undernocircumstancesshouldthewaterinlethosebecut
as it contains live electrical parts.
Electrical connection
Before inserting the plug into the electrical socket, make
surethat:
• The socket is earthed and complies with current
regulations;
• the socket can withstand the maximum load of the
applianceasshownonthedataplatelocatedontheinside
of the door
(seechapterDescriptionoftheappliance);
• Thepowersupplyvoltagefallswithinthevaluesindicated
on the data plate on the inside of the door.
• Thesocketiscompatiblewiththeplugoftheappliance.
If this is not the case, ask an authorised technician to
replacetheplug(
seeAssistance
).Donotuseextension
cables or multiple sockets.
Oncetheappliancehasbeeninstalled,thepowersupply
cableandtheelectricalsocketshouldbeeasilyaccessible.
Thecableshouldnotbebentorcompressed.
Ifthepowersupplycableisdamaged,haveitreplaced
bythemanufactureroritsauthorisedTechnicalAssistance
Service in order to prevent all potential hazards.
(See
Assistance)
The Company shall not be held responsible for any
incidents,iftheseregulationsarenotobserved.
Positioning and levelling
1.Positionthedishwasheronalevelsturdyfloor.Iftheflooris
uneven,thefrontfeetoftheappliancemaybeadjusteduntil
itreachesahorizontalposition.Iftheapplianceislevelled
correctly,itwillbemorestableandmuchlesslikelytomove
orcausevibrationsandnoisewhileitisoperating.
2. Before recessing the dishwasher, stick the adhesive
transparent strip*underthewoodenshelfinordertoprotect
itfromanycondensationwhichmayform.
3.Placethedishwashersothatitssidesorbackpanelarein
contactwiththeadjacentcabinetsorthewall.Thisappliance
can also be recessed under a single worktop*
(see the
Assemblyinstructionsheet)
.
4*. To adjust the height of the rear foot, turn the red
hexagonalbushingonthelowercentralpartatthefrontofthe
dishwasherusingahexagonalspannerwithanopeningof8
mm.Turnthespannerinaclockwisedirectiontoincreasethe
heightandinananticlockwisedirectiontodecreaseit.
(see
Building-ininstructionsheetattachedtothedocumentation)
MIN 40 cm
MAX 80 cm

EN
7
Technical data
Dimensions
width 59.5 cm
height 82 cm
depth 57 cm
Capacity 14 standard place-settings
Water supply
pressure
0,05 ÷ 1MPa (0.5 ÷ 10 bar)
7,25 – 145 psi
Power supply voltage See appliance data plate
Total absorbed power See appliance data plate
Fuse See appliance data plate
This dishwasher conforms to the
following European Community
Directives:
-2006/95/EC (Low Voltage)
-2004/108/EC (Electromagnetic
Compatibility)
-2009/125/EC (Comm. Reg.
1016/2010) (Ecodesign)
-97/17/EC (Labelling)
-2012/19/EC (WEEE)
The machine has a buzzer/set of tones
(dependingonthe
dishwashermodel
) to inform the user that a command has
been implemented: power on, cycle end etc.
The symbols/indicator lights/LEDs on the control panel/
display may vary in colour and may have a flashing or fixed
light
(dependingonthedishwashermodel)
.
The display provides useful information concerning the type
of wash cycle, drying/wash-cycle phase, remaining time,
temperature etc etc.
*Onlyavailableinselectedmodels.
Advice regarding the first wash cycle
Aftertheinstallation,removethestoppersfromtheracksand
the retaining elastic elements from the upper rack
(ifany).
Water softener settings
Beforestartingthefirstwashcycle,setthehardnesslev-
el of
thewaterfromthemainssupply.
(seechapterRinse
aidandrefinedsalt).
Firstloadthesoftenertankwithwater,thenintroduceabout
1kgofsalt.Itisperfectlynormalforwatertoflowout.
Assoonasthisprocedureiscomplete,runawashcycle.
Onlyusesaltthathasbeenspecificallydesignedfordish-
washers.
Afterthesalthasbeenpouredintothemachine,theLOW
SALTindicatorlight*switchesoff.
Ifthesaltcontainerisnotfilled,thewatersoftenerand
theheatingelementmaybedamagedasaresult.
START 2END LIGHT *
Somedishwashermodelsareequippedwithagreen
indicatorlightinthegapbetweenthedoorandkitchen
top providing information on the phase of the current
washcycle.Oneofthefollowingoperatingmodescanbe
selected:
a)Disabledfunction
b)Whenthecyclestartsthelightgoesonforfewseconds,
staysoffduringthecycleandflashesattheendofthecycle
(defaultmode)
c)Thelightstaysonduringthecycleandflashesattheend
ofthecycle.Ifthedelayedstartwasset,thelightgoeson
eitherforthefirstfewsecondsortheentiredurationofthe
countdown,basedonwhethermodeb)orc)wasset.
Thelightgoesoffeverytimethedoorisopened.
Toselectthemodeyouprefer,switchonthemachine,hold
downbuttonP until one of the three letters appears on the
display,pressbuttonPuntilyoureachthedesiredletter(or
mode),holddownbuttonP to confirm the selection.
EN
8
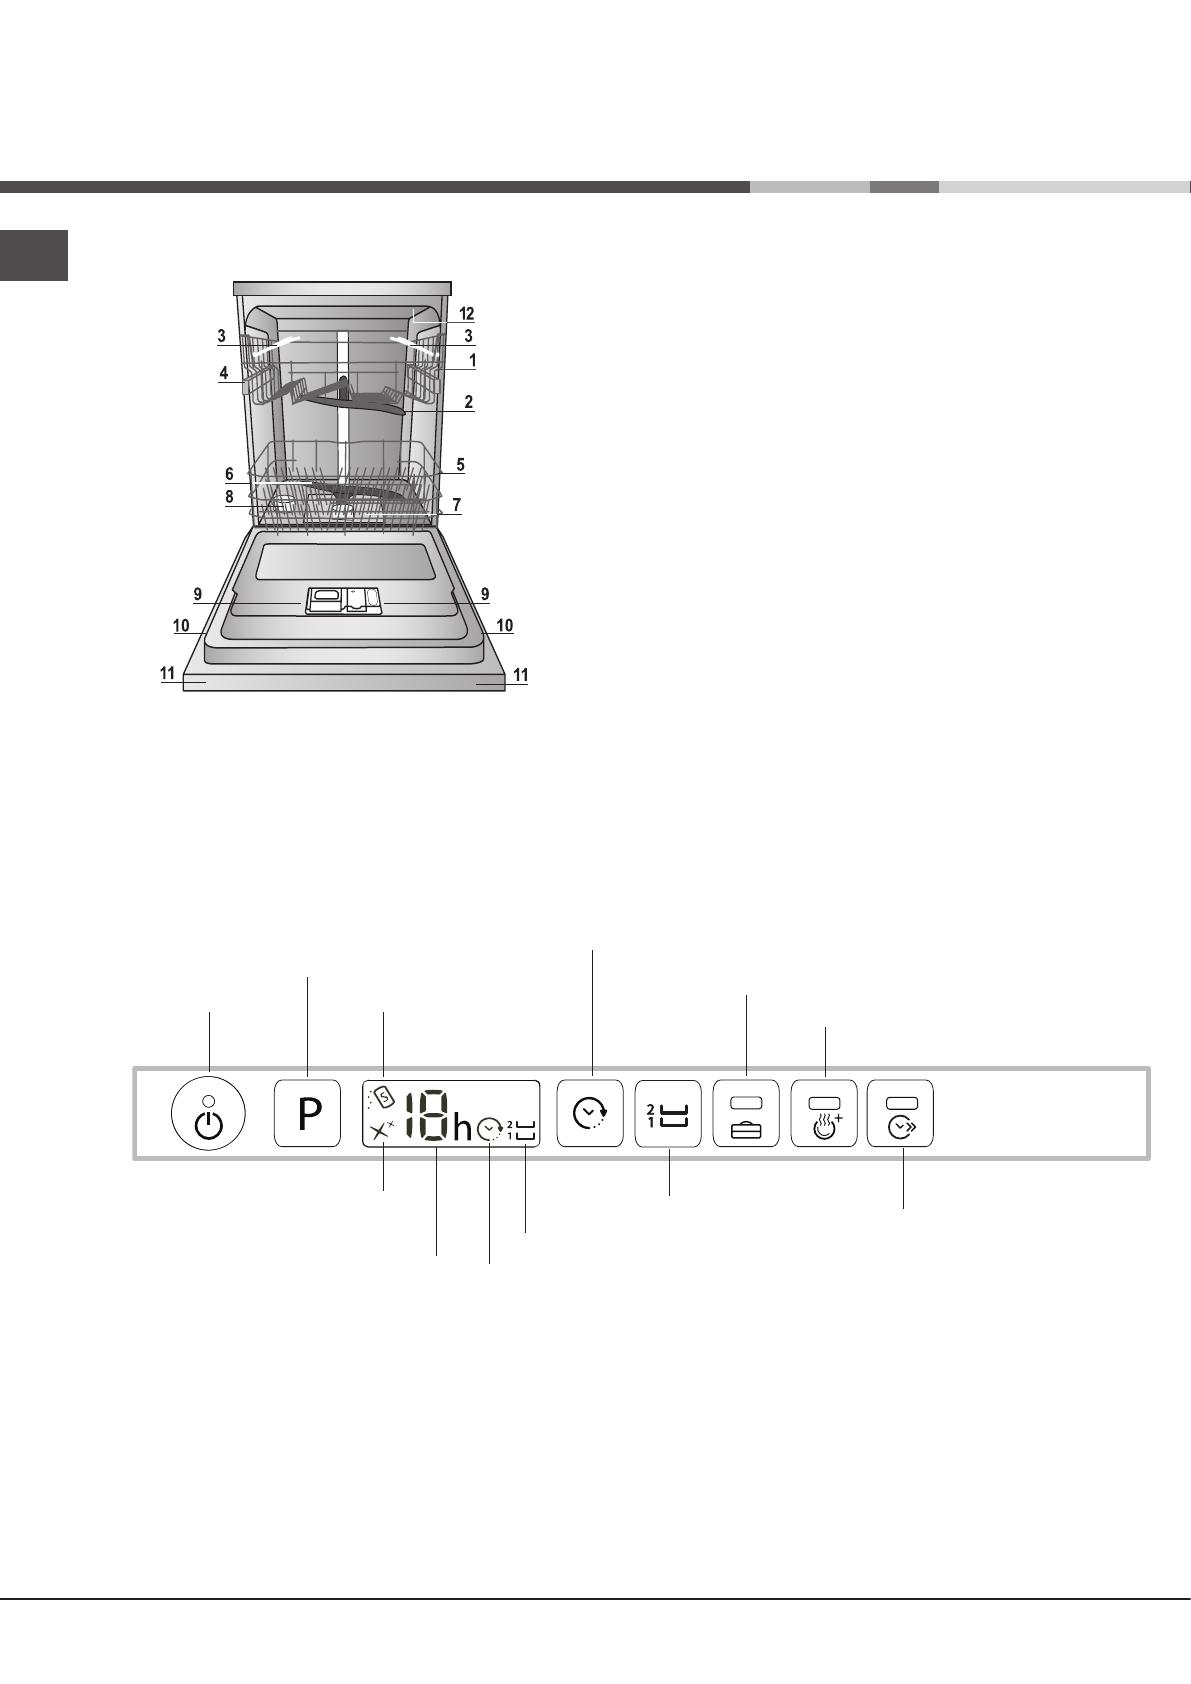
Overall view
Description of the
appliance
***Onlyincompletelybuilt-inmodels.
* Onlyavailableinselectedmodels.
The number and type of wash cycles and options may vary depending on the dishwasher model.
Control panel
Select wash cycle button
Short Time button and
indicator light
Extra dry button and indicator light
Salt indicator light
Rinse aid indicator light
Multi-functional tablets button and indicator light
Wash cycle number and
remaining time indicator light
Delayed start button
Zone Wash button
ON-OFF/Reset button
and indicator light
Zone Wash indicator lights
Delayed start indicator light
1. Upperrack
2. Uppersprayerarm
3. Tip-updispensers
4. Rackheightadjuster
5. Lowerrack
6. Lowersprayerarm
7. Washing filter
8. Saltdispenser
9. Detergentandrinse-aiddispensers
10. Data plate
11. Controlpanel****
12. TurboDry*
EN
9
M
A
X
Only use products which have been specifically designed
for dishwashers. Do not use table salt or industrial salt.
Follow the instructions given on the packaging.
If you are using a multi-function product, we recommend
that you add salt in any case, especially if the water is hard
or very hard.
(Followtheinstructionsgivenonthepackaging.)
If you do not add salt or rinse aid, the LOW SALT* and
LOW RINSE AID* indicator lights will remain lit.
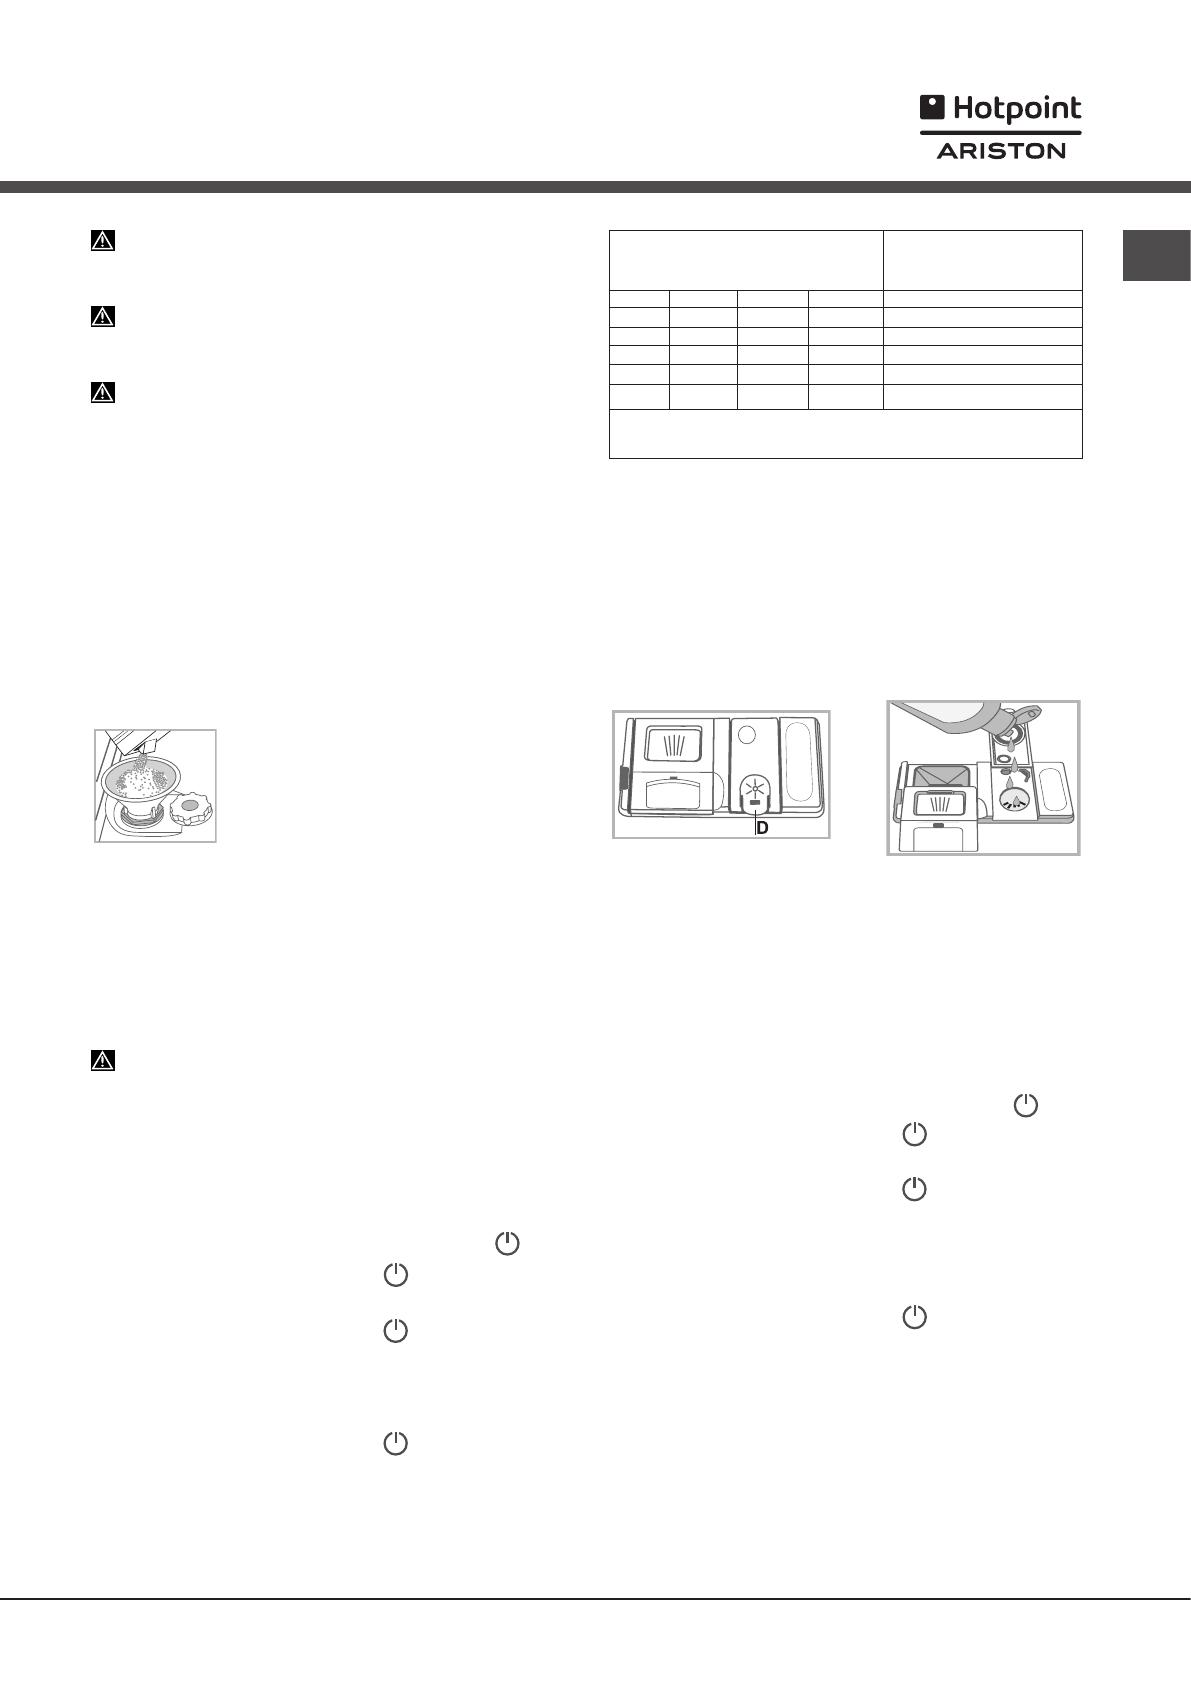
Measuring out the refined salt
Theuseof salt prevents the formation of LIMESCALEonthe
dishesandonthemachine'sfunctionalcomponents.
•Itisimportantthatthesaltdispenserbeneverempty.
•Itisimportanttosetthewaterhardness.
Thesaltdispenserislocatedinthelowerpartofthedishwasher
(seeDescription)
andshouldbefilled:
• WhentheLOWRINSEAIDindicatorlightinthecontrolpanel
is lit *;
• Whenthegreenfloat* on the cap of the salt dispenser is no
longer visible.
• Seeautonomyinthewaterhardnesstable.
1.Removethelowerrackandunscrewthe
containercap(anticlockwise).
2.Onlythefirsttimeyoudothis:fillthewater
dispenser up to the edge.
3. Position the funnel
(see figure)
and
fill the salt container right up to its edge
(approximately1kg);itisnotunusualfora
littlewatertoleakout.
4.Removethefunnelandwipeanysaltresidueawayfromthe
opening;rinsethecapunderrunningwaterandthenscrewiton.
Itisadvisable to perform this procedure every timeyouadd
salt to the container.
Makesurethecapisscrewedontightly,sothatnodetergent
can get into the container during the wash cycle (this could
damagethewatersoftenerbeyondrepair).
Wheneveryouneedtoaddsalt,werecommendcarrying
outtheprocedurebeforethewashingcycleisstarted.
Setting the water hardness
For perfect water softener operation, it is essential that the
adjustmentbebasedonthewaterhardnessinyourhouse.Ask
yourlocalwatersupplierforthisinformation.Thefactorysetting
isformediumwaterhardness.
•SwitchthedishwasheronusingtheOn/Offbutton.
•SwitchitoffusingtheOn/Offbutton
•HolddownbuttonPfor5secondsuntilyouhearabeep.
•SwitchitonusingtheOn/Offbutton
•Thecurrentselectionlevelnumberandsaltindicatorlightflash.
• Press button P to select the desired hardness level
(see
hardnesstable).
•SwitchitoffusingtheOn/Offbutton
•Settingiscomplete!
Refined salt and
rinse aid,
(°dH=hardnessmeasuredinGermandegrees-°f=hardness
measuredinFrenchdegrees–mmol/l=millimolesperlitre)
Measuring out the rinse aid
RinseaidmakesdishDRYINGeasier.Therinseaiddispenser
shouldbefilled:
• WhentheLOWRINSEAIDindicatorlightonthepanel/display
is lit *;
• Whenthedarkopticalindicator* on the dispenser door “D”
becomes transparent.
1.Openthedispenser“D”bypressingandpullingupthetab
onthelid;
2. Carefully introduce the rinse aid as far as the maximum
reference notch in the filling space - avoid spilling it. If this
happens,cleanthespillimmediatelywithadrycloth.
3.Presstheliddownuntilyouhearaclicktocloseit.
NEVER pour the rinse aid directly into the tub.
Adjusting the amount of rinse aid
Ifyouarenotcompletelysatisfiedwiththedryingresults,you
maywanttoadjustthequantityofrinseaidused.
•SwitchthedishwasheronusingtheOn/Offbutton.
•SwitchitoffusingtheOn/Offbutton
•PressbuttonPthreetimes-abeepwillbeheard.
•SwitchitonusingtheOn/Offbutton
• The current selection level number and rinse aid indicator
light flash.
•PressbuttonPtoselectthelevelofrinseaidquantitytobe
supplied.
•SwitchitoffusingtheOn/Offbutton
•Settingiscomplete!
Ifthe rinse aid level is settoZERO, the rinse aid willnotbe
suppliedandthelowrinseaidindicatorlightwillnotbelitifyou
run out of it.
Amaximumof4levelscanbesetaccordingtothedishwasher
model.Thefactorysettingisforamediumlevel.
•Ifyouseebluishstreaksonthedishes,setalownumber(1-2).
•Iftherearedropsofwaterorlimescalemarksonthedishes,
setahighnumber(3-4).
Water Hardness Table
Average autonomy
salt dispenser with 1
wash cycle per day
level °dH °fH mmol/l months
1 0 - 6 0 - 10 0 - 1 7 months
2 6 - 11 11 - 20 1.1 - 2 5 months
3 12 - 17 21 - 30 2.1 - 3 3 months
4 17 - 34 31 - 60 3.1 - 6 2 months
5*
34 - 50 61 - 90 6.1 - 9 2/3 weeks
For values between 0°f and 10°f, we do not recommend the use of salt.
A setting of 5 may increase cycle duration.
*Onlyavailableinselectedmodels.
EN
10
Loading the racks
Tips
Before loading the racks, remove all food residues from the
crockeryandempty liquids fromglassesandcontainers.No
preventive rinsing is needed under running water.
Arrangethecrockerysothatitisheldinplacefirmlyanddoes
nottipover;andarrangethecontainerswiththeopeningsfacing
downwards and the concave/convex parts placed obliquely,
thusallowingthewatertoreacheverysurfaceandflowfreely.
Makesurethatthelids,handles,traysandfryingpansdonot
preventthesprayerarmsfromrotating.Placeanysmallitems
inthecutlerybasket.
Sinceplasticdishesandnon-stickfryingpansusuallyretainmore
waterdrops,theirdryingwillbenotsogoodasthatofceramic
orstainless-steeldishes.
Lightweightitemssuchasplasticcontainersshouldbeplaced
intheupperrackandarrangedsothattheycannotmove.
Afterloadingtheappliance,makesurethatthesprayerarms
canrotatefreely.
Lower rack
Thelowerrackcanholdpans,lids,dishes,saladbowls,cutlery
etc.Largeplatesandlidsshouldideallybeplacedatthesides.
Verysoileddishesandpansshouldbeplacedinthelowerrack
becauseinthissectorthewaterspraysarestrongerandallow
ahigherwashingperformance.
Somemodelsareequipped
withVerticalZone,special
pull-out supports*in the
rear of the rack that can
beusedtosupportfrying
pans and baking pans in a
moreverticalposition,thus
taking up less space.
Inordertouseit,justget
hold of the coloured grip
and pull it upwards while
rotating it forward. The
supports can slide right
andlefttofitthesizeofthecrockery.
*Onlyavailableinselectedmodelswithdifferentnumbersand
positions.
Severaldishwashermodelsarefittedwithtip-upsectors*.
Theycanbeusedinaverticalpositionwhenarrangingdishes
orinahorizontalposition(lower)toloadpansandsaladbowls
easily.
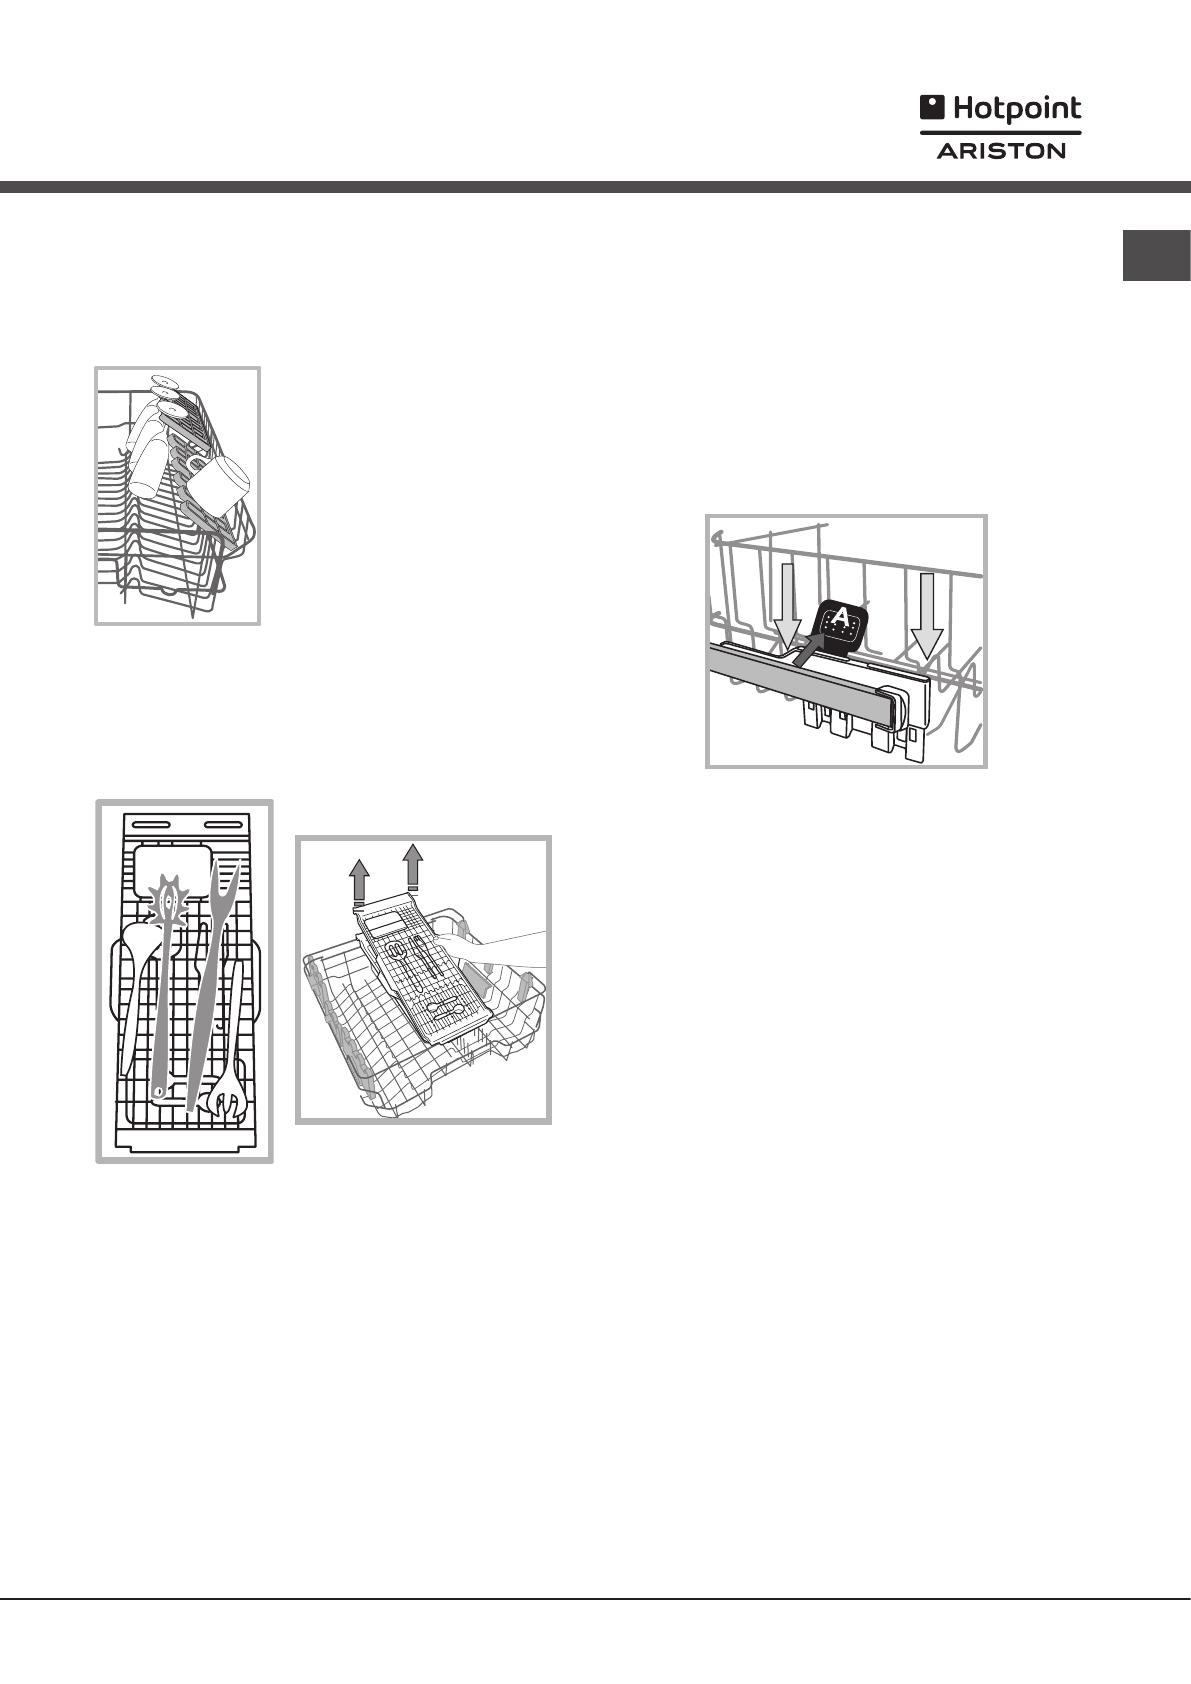
Cutlery basket
Themodularbasketcanslidetooptimisethespaceinsidethe
lowerrack.Itisequippedwithtopgrillesforimprovedcutlery
arrangement.
Knivesandotherutensilswithsharpedgesmustbeplaced
inthecutlerybasketwiththepointsfacingdownwardsorthey
mustbepositionedhorizontallyinthetip-upcompartmentson
the upper rack
Upper rack
Loadthisrackwithdelicateandlightweightcrockerysuchas
glasses,cups,saucersandshallowsaladbowls.
Severaldishwashermodelsarefittedwithtip-upsectors*.
They can be used in a vertical position when arranging tea/
dessertsaucersorinalowerpositiontoloadbowlsandfood
containers.
EN
11
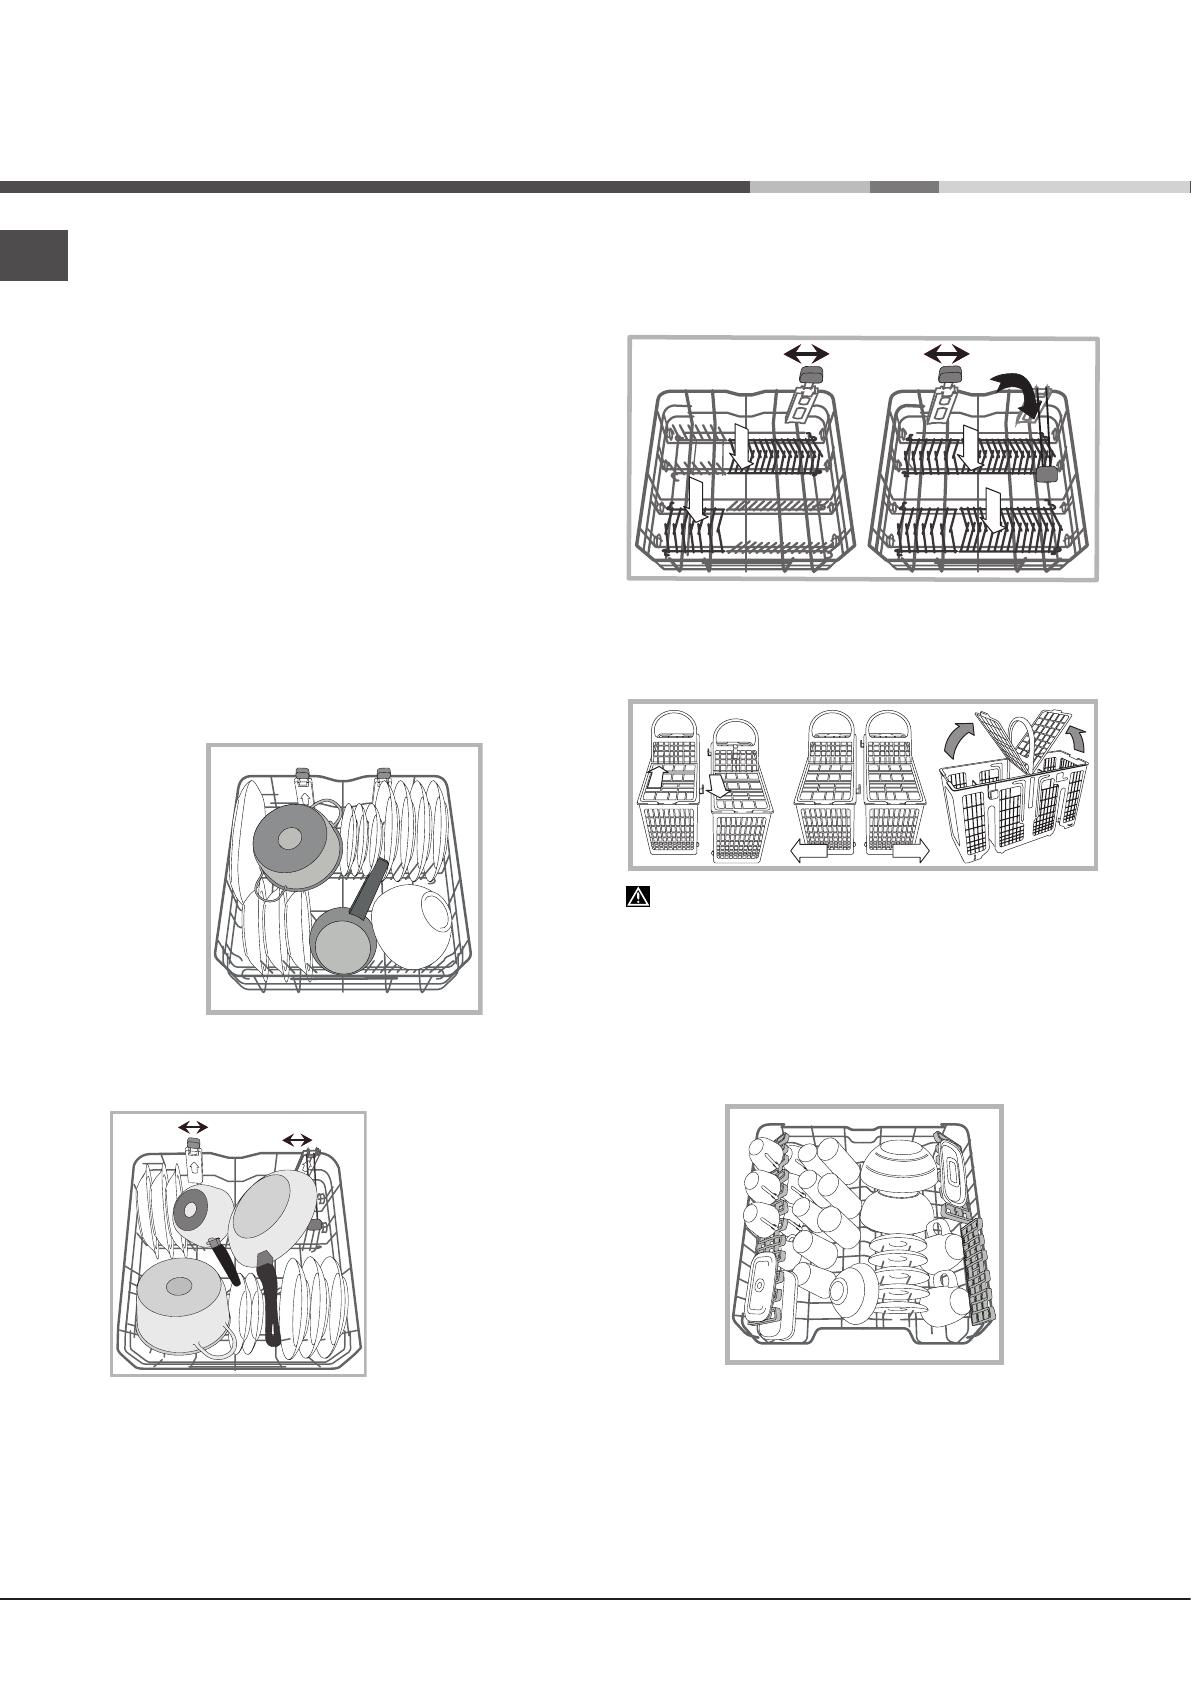
Adjusting the height of the upper rack
Inordertomakeiteasiertoarrangethecrockery,theupperrack
maybemovedtoahigherorlowerposition.
The height of the upper rack should be adjusted WHEN THE
RACK IS EMPTY.
NEVER raise or lower the rack on one side only.
IftherackisequippedwithaLift-Up device*
(seefigure)
,lift
itupbyholdingitssides.Torestorethelowerposition,press
thelevers(A)atthesidesoftherackandfollowtherackdown.
Unsuitable crockery
• Woodencrockeryandcutlery.
• Delicatedecoratedglasses,artistichandicraftandantique
crockery.Theirdecorationsarenotresistant.
• Parts in synthetic material which do not withstand high
temperatures.
• Copperandtincrockery.
• Crockerysoiledwithash,wax,lubricatinggreaseorink.
Thecoloursofglassdecorationsandaluminium/silverpiecescan
changeandfadeduringthewashingprocess.Sometypesof
glass(e.g.crystalobjects)canbecomeopaqueafteranumber
ofwashcyclestoo.
Damage to glass and crockery
Causedby:
• Typeofglassandglassproductionprocess.
• Chemicalcompositionofdetergent.
• Watertemperatureofrinsecycle.
Tips:
• Onlyuse glasses and porcelain guaranteed by the
manufacturerasdishwashersafe.
• Useadelicatedetergentsuitableforcrockery.
• Collectglassesandcutleryfromthedishwasherassoonas
thewashcycleisover.
Theupperrackcanbeadjustedforheightbasedonrequirements:
highpositiontoplacebulkycrockeryinthelowerrackandlow
positiontomakethemostofthetip-upcompartments/sectors
bycreatingmorespaceupwards.
*Onlyavailableinselectedmodels.
Tip-up compartments with adjustable position
Thesidetip-upcompartmentscanbepositionedatthreedifferent
heightstooptimizethearrangementofcrockeryinsidetherack.
Wineglassescanbeplacedsafelyinthetip-upcompartments
byinsertingthestemofeachglassintothecorrespondingslots.
For optimum drying results incline
the tip-up compartments more. To
change the inclination, pull up the
tip-up compartment, slide it slightly
andpositionitasyouwish.
Cutlery tray*
Somedishwashermodelsarefittedwithaslidingtray which
can be used to hold serving utensils or small cups. For optimum
washingperformanceavoidpositioningbulkycrockerydirectly
belowthetray.Thecutlerytraycanberemoved
(seeFigure).
EN
12
*Onlyavailableinselectedmodels.
Measuring out the detergent
A good wash result also depends on the correct
amount of detergent being used. Exceeding the stated
amount does not result in a more effective wash and
increases environmental pollution.
Based on how soiled the items are, the amount can be
adjusted to individual cases using powder or liquid
detergent.
In the case of normally soiled items, use approximately
either 35 gr (powder detergent) or 35 ml (liquid detergent).
If tablets are used, one tablet will be enough.
If the crockery is only lightly soiled or if it has been rinsed
with water before being placed in the dishwasher, reduce
the amount of detergent used accordingly.
For good washing results also follow the instructions shown
on the detergent box.
For further questions please ask the detergent producers.
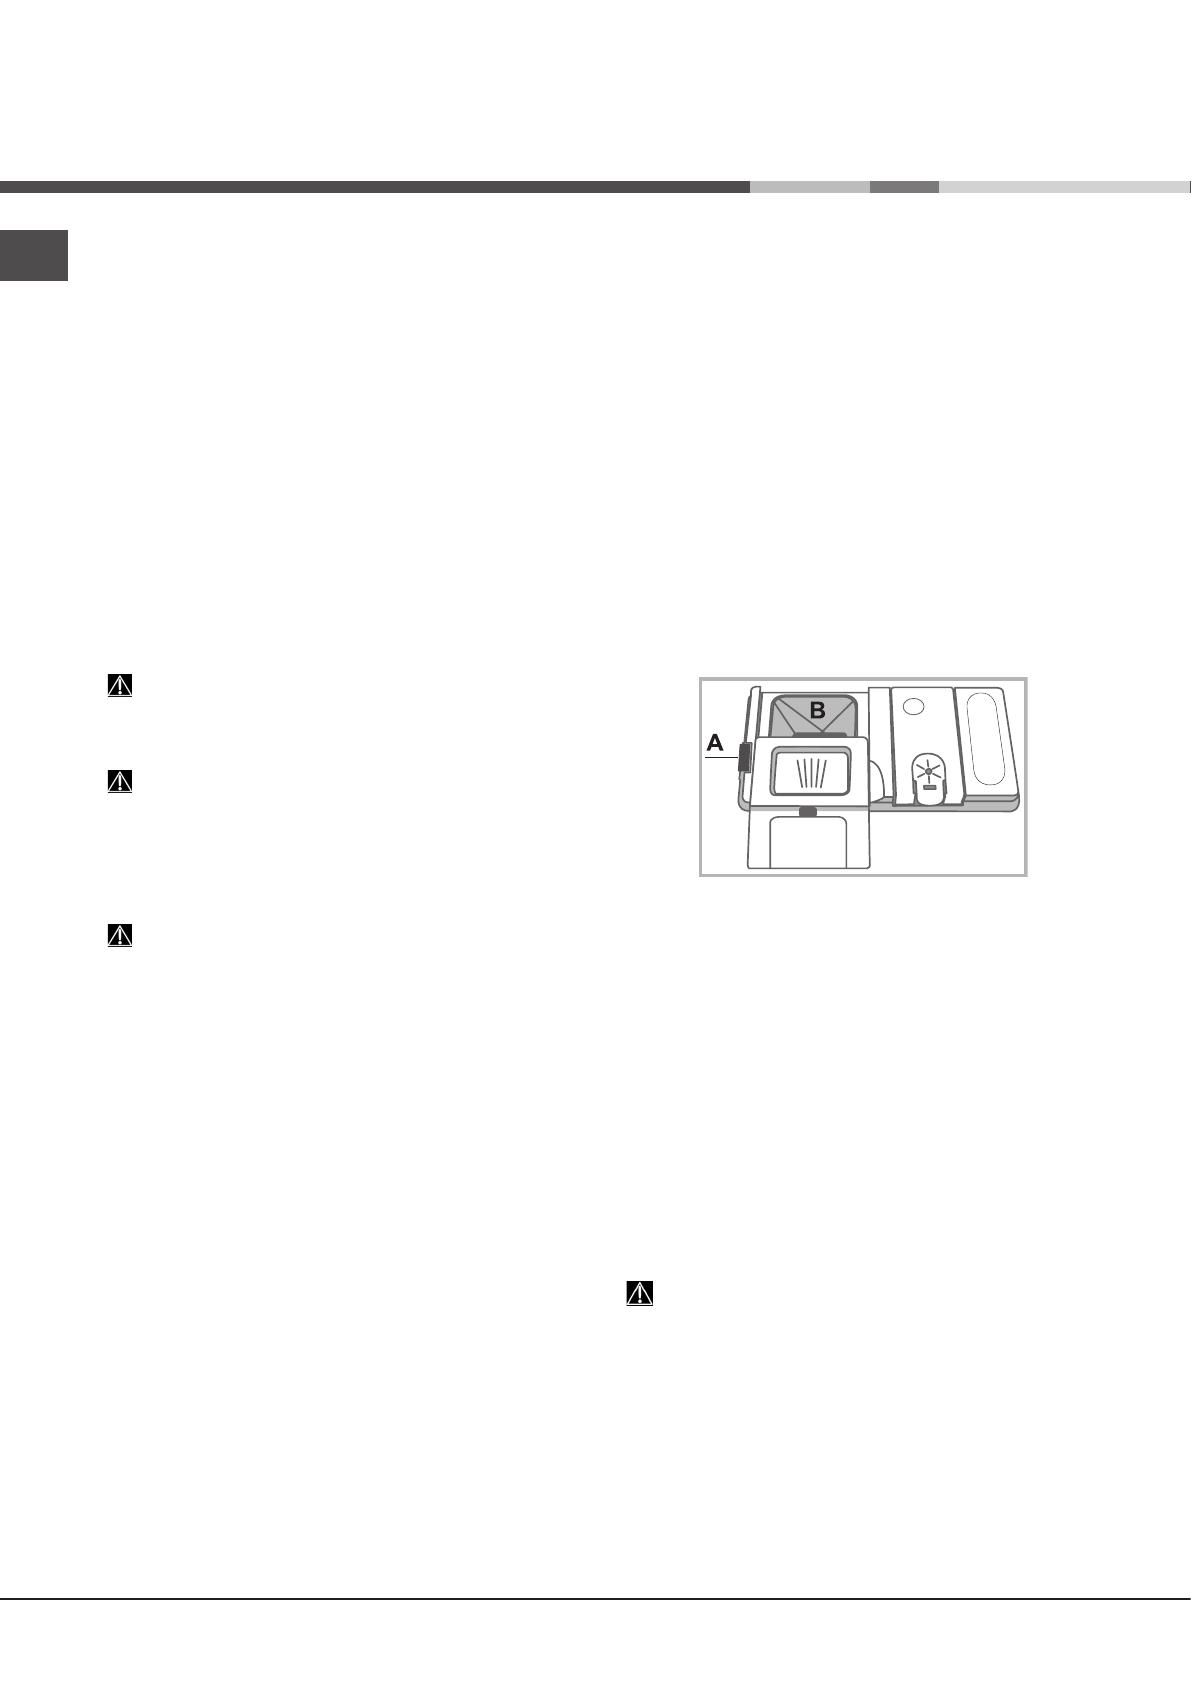
To open the detergent dispenser use the opening device “A”.
Introduce the detergent into the dry dispenser “B” only.
Place the amount of detergent for pre-washing directly
inside the tub.
1.WhenmeasuringoutthedetergentrefertotheTableofwash
cyclestoaddtheproperquantity.CompartmentB comprises
a level showing the maximum quantity of liquid or powder
detergentthatcanbeaddedtoeachcycle.
2. Remove detergent residues from the edges of the dispenser
and close the cover until it clicks.
3.Closethelidofthedetergentdispenserbypullingitupuntil
the closing device is secured in place.
Thedetergentdispenserautomaticallyopensupattherighttime
accordingtothewashcycle.
Ifall-in-onedetergentsareused,werecommendusingtheTABS
option,becauseitadjuststhecyclesothatthebestwashing
anddryingresultsarealwaysachieved.
Only use detergent which has been specifically designed
for dishwashers.
DO NOT USE washing up liquid.
Using excessive detergent may result in foam residues
remaining in the machine after the cycle has ended.
To achieve the best washing and drying results, the
combined use of detergent, rinse aid liquid and refined salt
is required.
We recommend using detergents that do not contain
phosphates or chlorine, as these products are harmful to
the environment.
Starting the dishwasher
1.Turnthewatertapon.
2. Open the door and press ON-OFF button: the ON/OFF
indicatorlights,optionsandthedisplaycomeon.
3.Measureoutthedetergent.
(seeadjacentinformation).
4.Loadtheracks
(seeLoadingtheracks)
.
5.Selectthewashcycleinaccordancewiththetypeofcrockery
and its soil level
(seetableofwashcycles)
bypressingtheP
button.
6. Select the wash options*.
(see Special wash cycles and
options)
.
7.Startthewashcyclebyshuttingthedoor.
8.Theendofthewashcycleisindicatedbybeepsandbythe
flashingofthewashcyclenumberonthedisplay.Openthedoor,
switchofftheappliancebypressingtheON/OFFbutton,shut
offthewatertapandunplugtheappliancefromtheelectricity
socket.
9.Waitforafewminutesbeforeremovingthecrockery,inorder
toavoidburns.Unloadtheracks,beginningwiththelowerlevel.
- The machine will switch off automatically during
certain extended periods of inactivity, in order to
minimise electricity consumption.
AUTO WASH CYCLES*:somemodelsofdishwashersare
equippedwithaspecialsensorwhichcanbeusedtoassess
thelevelofsoilingandautomaticallysettingthemostefficient
andeconomicwashcycleaccordingly.
ThedurationoftheAutowashcyclesmayvaryduetothe
operation of the sensor.
Ifthecrockeryisonlylightlysoiledorifithasbeenrinsed
withwaterbeforebeingplacedinthedishwasher,reducethe
amountofdetergentusedaccordingly.
Modifying a wash cycle in progress
Ifamistakewasmadeduringthewashcycleselectionprocess,
itispossibletochangethecycle,providedthatithasonlyjust
begun:openthedoortakingcaretoavoidtheescapingsteam,
bypressingandholdingtheON/OFFbutton,themachinewill
switchoff.SwitchthemachinebackonusingtheON/OFFbutton
andselectthenewwashcycleandanyoptionsdesired;start
thecyclebyclosingthedoor.
Adding extra crockery
Withoutswitchingoffthemachine,openthedoor,takingcare
toavoidtheescapingsteam,andplacethecrockeryinsidethe
dishwasher.Shutthedoorandthecyclewillbeginfromthepoint
atwhichitwasinterrupted.
Accidental interruptions
Ifthedoorisopenedduringthewashcycle,orifthereisapower
cut,thecyclestops. Itstartsagainfromthepoint at whichit
wasinterruptedoncethedoorhasbeenshutortheelectricity
supplyisrestored.
Detergent and
dishwasher use
EN
13
Wash cycles
Wash cycle
Wash cycle
which
include
drying
Options
Approximate
duration of wash
cycles
Water
consumption
(l/cycle)
Energy
consumption
(KWh/cycle)
1. Eco Yes
Delayed start – Tabs –
Extra Dry
03:10’ 9 0,89
2. Auto Intensive Yes
Delayed start – Tabs –
Extra Dry – Short Time -
Zone wash
02:00’ - 03:10’ 14,0 - 15,5 1,50 - 1,80
3. Auto Normal Yes
Delayed start – Tabs –
Extra Dry – Short Time -
Zone wash
01:30’ - 02:30’ 14,5 – 16,0 1,20 - 1,35
4. Auto Fast No
Delayed start – Tabs
00:40’ - 01:20’ 13,0 - 14,5 1,15 - 1,25
5. Duo Wash Yes
Delayed start – Tabs –
Extra Dry – Short Time
02:00’ 18,0 1,30
6. Delicate Yes
Delayed start – Tabs –
Extra Dry
01:40’ 11,0 1,10
7. Express 30’ No
Delayed start – Tabs
00:30’ 9,0 0,50
8. Goodnight Yes
Delayed start – Tabs –
Extra Dry
03:30’ 15,0 1,2
9. Soak No
Delayed start
00:12’ 4,5 0,01
10. Sanitazing Yes
Delayed start
01:20’ 10,0 1,25
11. Self Clean No
Delayed start
00:50’ 8,0 0,80
Wash-cycledataismeasuredunderlaboratoryconditionsaccordingtoEuropeanStandardEN50242.
Based on the different conditions of use, the wash-cycle duration and data can change.
The number and type of wash cycles and options may vary depending on the dishwasher model.
Instructions on wash-cycle selection and detergent dosage
1.TheECOwashcycleisthestandardcycletowhichtheenergylabeldatarefers.Itcanbeusedtowashcrockerywithanormal
soillevelandisthemostefficientcycleintermsofenergyandwaterconsumptionforthistypeofcrockery.29gr/ml+6gr/ml**–1
Tab(**Quantityofpre-washingdetergent)
2.Heavilysoileddishesandpans(nottobeusedfordelicateitems).35gr/ml–1Tab
3.Normallysoiledpansanddishes.29gr/ml+6gr/ml**–1Tab
4.Limitedquantityofdailysoiling(idealfor4placesettings)25gr/ml–1Tab
5.Washspreadoverthethreeracks:normalintheupperrackandthirdrackforcutleryandglasses,heavy-dutyinsaucepansin
thelowerrack.35gr/ml–1Tab
6.Cyclefordelicateitems,whicharemoresensitivetohightemperatures35gr/ml–1Tab
7.Fastcycletobeusedforslightlydirtydishes(idealfor2placesettings)25gr/ml–1Tab
8.Optimumperformanceensured.Idealfornight-timeoperation.35gr/ml–1Tab
9.Pre-washwhileawaitingcompletionoftheloadwiththedishesfromthenextmeal.Nodetergent.
10.High-temperaturedisinfectingcycle.Idealtocleancrockeryandfeedingbottles.30gr/ml–1Tab
11.DishwashercleaningcycletobeusedwhenthedishwasherisEMPTYwithspecialdetergents.
Standbyconsumption:Left-onmodeconsumption:5W-Offmodeconsumption:0.5W.

EN
14
Extra drying
Toimprovethedrynesslevelofthecrockery,press
theEXTRADRYINGbuttonandtheindicatorlight/symbolwill
lightup.Ifitispressedagain,theoptionwillbedeselected.
Ahighertemperatureduringthefinalrinsingandalonger
dryingphaseimprovethedrynesslevel.
The EXTRA DRYING option increases the duration of
the wash cycle.
Multi-functional tablets* (Tabs)
Thisoptionoptimiseswashinganddryingresults.
When using multi-functional tablets, press the MULTI-
FUNCTIONALTABLETSbutton;thecorrespondingindicator
light/symbolwilllightup.Ifthebuttonispressedagain,the
optionwillbedeselected.
The “Multi-functional tablets” option results in a
longer wash cycle.
The use of tablets is only recommended for models
having this option and it is not recommended with wash
cycles which do not specify the use of multi-functional
tablets.
Special wash cycles
and Options
Wash options
If an option is not compatible with the selected wash cycle
(see table of wash cycles), the corresponding LED flashes
rapidly 3 times and beeps will sound.
Delayed start
Thestart ofthe washcycle may be delayed for a
periodoftimebetween1 and 12 hours.
1. Press the DELAYED START button: the corresponding
symbol appears on the display; each time you press the
button,thetime(1h,2h,etc.uptomax.12h)fromthestart
oftheselectedwashcyclewillbeincreased.
2.Selectthecycleandclosethedoor:thetimerwillbegin
countingdown;
3.Oncethistimehaselapsed,theindicatorlightswitches
offandthewashcyclebegins.
Toadjustthedelaytimeandselectasmallerperiodoftime,
presstheDELAYEDSTARTbutton.Tocancelit,pressthe
buttonrepeatedlyuntiltheselecteddelayedstartindicator
lightswitchesoff.Thewashcyclewillstartautomaticallyas
soon as the door is shut.
Short Time option
Thisoptioncanbeusedtoreducethedurationofthe
mainwashcycleswhilemaintainingthesamewashing
anddryingperformancelevels.
Having selected the option, press the Short Time button. To
deselecttheoption,pressthesamebuttonagain.
Zone Wash
Thisoptionmakesitpossibletocarryoutthewash
cycle in the selected rack only. Select the wash
cycleandthenpresstheZONEWASHbutton:theselected
racklightsupandthewashcyclestartsintheselectedrack
only.Pressthebuttonagaintodeselecttheoption.
The option is available with the following wash cycles:
Intensive and Normal.
Select the option and the Intensive cycle to start the
ULTRAINTENSIVEZONEwashing.Thiswashcycleisideal
for very soiled mixed loads, e.g. pans and saucepans,
disheswithheavyencrustationordifficult-to-cleancrockery
(grater,vegetablemill,dirtycutlery).Thesprayingpressureis
strongerandthewashingtemperaturehigher,thusensuring
optimum handling of stubborn stains.
SelecttheoptionandtheNormal cycletostarttheSAVING
ZONEwashing.Thisfunctionmakesitpossibletoreduce
energyconsumption.Cycledurationmightchange.
Remember to load the crockery in the selected rack only
Notes:
Optimumperformancelevelswhenusingthe“Fast"and"Express
30’”cyclescanbeachievedbyrespectingthespecifiednumber
of place settings.
Toreduceconsumptionevenfurther,onlyrunthedishwasher
whenitisfull.
Note for Test Laboratories: forinformationoncomparativeEN
testingconditions,pleasesendanemailtothefollowingaddress:
*Onlyavailableinselectedmodels.
EN
15
Care and maintenance
Shutting off the water and electricity
supplies
• Turnoffthewatertapaftereverywashcycletoavoidleaks.
• Alwaysunplug the appliance when cleaning it and when
performingmaintenancework.
Cleaning the dishwasher
• Theexternalsurfacesofthemachineandthecontrolpanel
canbecleanedusinganon-abrasiveclothwhichhasbeen
dampened with water. Do not use solvents or abrasive
products.
• Anymarksontheinsideoftheappliancemayberemoved
usingaclothdampenedwithwaterandalittlevinegar.
Preventing unpleasant odours
• Alwayskeepthedooroftheapplianceajarinordertoavoid
moisture from forming and being trapped inside the machine.
• Cleanthesealsaroundthedooranddetergentdispensers
regularlyusingadampsponge.Thiswillavoidfoodbecoming
trappedin the seals, which isthemain cause behind the
formation of unpleasant odours.
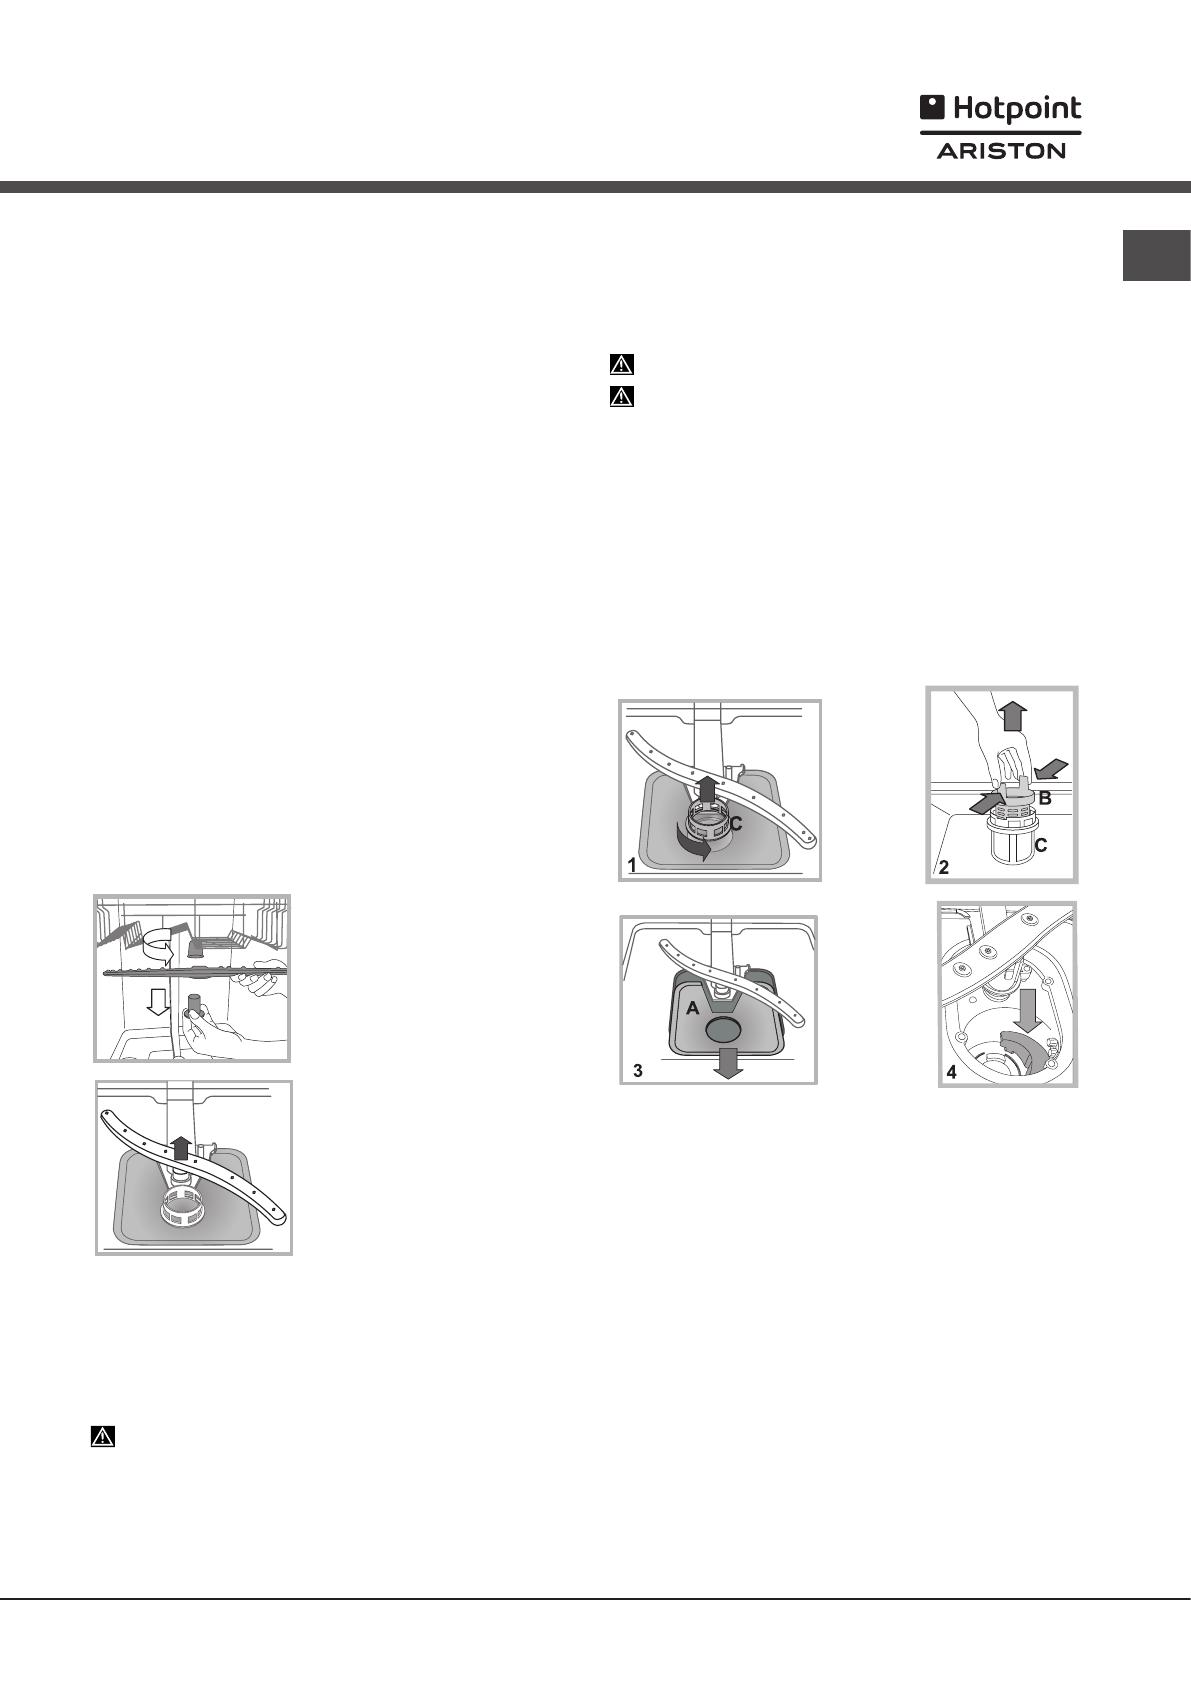
Cleaning the sprayer arms
Foodresiduemaybecomeencrustedontothe sprayer arms
and block the holes used to spray the water. It is therefore
recommendedthatyoucheckthearmsfromtimetotimeand
cleanthemwithasmallnon-metallicbrush.
Thetwosprayerarmsmaybothberemoved.
Toremovetheuppersprayerarm,
turn the plastic locking ring in an
anti-clockwisedirection.Theupper
sprayer arm should be replaced
so that the side with the greater
numberofholesisfacingupwards.
The lower sprayer arm can be
removedbypressingontheside
tabsandpullingitupwards.
Cleaning the water inlet filter*
Ifthewaterhosesareneworhavenotbeenusedforanextended
periodoftime,letthewaterruntomakesureitisclearandfree
ofimpuritiesbeforeperformingthenecessaryconnections.Ifthis
precautionisnottaken,thewaterinletcouldbecomeblocked
anddamagethedishwasher.
Cleanthewaterinletfilteratthetapoutletregularly.
-Turnoffthewatertap.
-Unscrewtheendofthewaterinlethose,removethefilterand
cleanitcarefullyunderrunningwater.
-Re-placethefilterandscrewthewaterhosebackintoposition.
Cleaning the filters
Thefilterassemblyconsistsofthreefilterswhichremovefood
residuesfromthewashingwaterandthenrecirculatethewater.
Theyshouldbecleanedifyouwishtoachievethebestresults
ineverywash.
Cleanthefiltersregularly.
Thedishwashershouldnotbeusedwithoutfiltersorifthe
filter is loose.
•Afterseveralwashes,checkthefilterassemblyandifnecessary
cleanit thoroughlyunderrunning water,usinga non-metallic
brushandfollowingtheinstructionsbelow:
1.TurnthecylindricalfilterCinananti-clockwisedirectionand
pull it out
(fig.1).
2. Remove the cup filter Bbyexertingaslightpressureonthe
side flaps
(fig.2);
3.Slideoutthestainless-steelplatefilterA.
(fig.3).
4. Inspect the trap and remove any food residues. NEVER
REMOVEthewash-cyclepumpprotection
(blackdetail)(fig.4).
Aftercleaningthefilters,re-placethefilterassemblyandfixitin
positioncorrectly;thisisessentialformaintainingtheefficient
operationofthedishwasher.
Leaving the machine unused for extended
periods
• Disconnecttheappliancefromtheelectricitysupplyandshut
offthewatertap.
• Leavethedooroftheapplianceajar.
• Whenyoureturn,runawashcyclewhenthedishwasheris
empty.
*Onlyavailableinselectedmodels.

EN
16
Troubleshooting
Whenevertheappliancefailstowork,checkforasolutionfromthefollowinglistbeforecallingforAssistance.
*Onlyavailableinselectedmodels.
Problem: Possible causes / Solutions:
The dishwasher does not start or
cannot be controlled.
• Switch off the appliance by pressing the ON/OFF button, switch it back on after approximately
one minute and reset the program.
• The appliance has not been plugged in properly.
• The dishwasher door has not been shut properly.
The door won’t close. • The lock was released. Strongly push the door until a “clacking” noise is heard.
No water drains out from the
dishwasher.
• The dishwasher cycle has not yet nished.
• The water inlet hose is bent (see Installation).
• The drain duct is blocked.
• The lter is clogged up with food residues.
The dishwasher makes excessive
noise.
• The dishes are rattling against each other or against the sprayer arms.
• Excessive foam presence: the detergent has not been measured out correctly or it is not
suitable for use in dishwashers. (see Start-up and use).
The dishes and glasses are covered
in a white lm or limescale deposits.
• The level of the rened salt is low or the dosage setting is not suited to the hardness of the
water (see Rinse aid and salt).
• The lid on the salt dispenser is not closed properly.
• The rinse aid has been used up or the dosage is too low.
The dishes and glasses are streaked
or have a bluish tinge.
• The rinse aid dosage is too high.
The crockery has not been dried
properly.
• A wash cycle without a drying programme has been selected.
• The rinse aid has been used up or the dosage is too low (see Rinse aid and salt).
• The rinse aid dispenser setting is not high enough.
• The crockery is made from non-stick material or plastic.
The dishes are not clean.
• The racks are overloaded (see Loading the racks).
• The crockery has not been arranged well.
• The sprayer arms cannot move freely.
• The wash cycle is too gentle (see Wash cycles).
• Excessive foam presence: the detergent has not been measured out correctly or it is not
suitable for use in dishwashers. (see Start-up and use).
• The lid on the rinse aid compartment has not been shut correctly.
• The lter is dirty or blocked (see Care and maintenance).
• The rened salt level is low (see Rinse aid and salt).
The dishwasher does not take any
water in - Tap shut-off alarm
(beeps are heard and H appears for
some minutes on the display)
(the ON/OFF indicator light ashes and
number 6 appears on the display).
• There is no water in the mains supply.
• The water inlet hose is bent (see Installation).
• Turn on the tap and the appliance will start after a few minutes.
• The appliance lock has been activated because no action was taken when the beeps sounded.
Switch off the machine using the ON/OFF button, turn on the tap and switch the machine back
on after a few seconds by pressing the same button. Re-program the appliance and restart the
wash cycle.

PL
28
www.hotpoint-ariston.com
Indesit Company Spa
Viale Aristide Merloni 47
60044 Fabriano (AN)
Italy
195126000.00 - NC
06/2014 jk - Xerox Fabriano
/