Page is loading ...

2M21VIB / 2M22VIB
Product Features
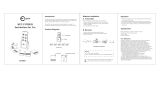
Parent’s Unit (PD193479)
Model 2M21 - 1 unit
Model 2M22 - 2 units
Power
Volume:
Up/Down
Clip
Green = batteries ok
Red = batteries low
DC Adapter Jack
Vibe
ON/OFF
Vibe setting
Green
when
charging
Replacement Parts
s7ARRANTY)NFORMATION53!
WWWGRACOBABYCOM
OR
1-800-345-4109
To register your Graco product from within
the U.S.A. visit us online at
www.gracobaby.com/productregistration.
We currently do not accept product registrations
from those living outside the
United States of America.
0RODUCT2EGISTRATION53!
4OPURCHASEPARTSORACCESSORIESORFORWARRANTYINFORMATION
INTHE5NITED3TATES please contact us at the following:
1
©2011 Graco PD193484A 9/11
Rechargeable
Battery Pack
Model 2M21 - qty.1
Model 2M22- qty.2
.URSERY5NIT0$
Model 2M21/2M22
!#!DAPTER
Model 2M21 - 2 units
Model 2M22 - 3 units
DC Adapter
Jack
Battery Compartment
NightLight
Power
LED
Power
Parent
Finder
Channel
Selector

Failure to follow these warnings and the assembly
instructions could result in serious injury or death.
This device is designed only to monitor the sounds of your child. )TWILLNOTALERTYOUTOYOURCHILDSSILENTACTIVITIES
When using the monitor, you must still provide the supervision necessary for the continued safety of your child. This product
is not designed or intended for use as a medical monitor. Always be sure that both the transmitter and receiver are working
properly and are within range of each other.
s342!.'5,!4)/.(!:!2$ Keep the adapter cords out of the reach of children. Do not use with extension cords.
sDO NOT place the Nursery Unit or its cord within your child’s reach. Do not put the Nursery Unit inside a crib or play yard.
s5SE/.,9WITHVOLT!#ELECTRICALOUTLETS
s0ROTECTTHE!#ADAPTERCORDS Place them so they are not walked on or pinched by furniture or other items.
s!LLOWFORPROPERVENTILATIONWHENUNITSAREINUSEDo not cover the Nursery Unit or Parent Units with any object such
as a blanket. Do not place it in a drawer or in any location which would muffle the sound or interfere with the normal flow of air.
sDO NOT immerse any part of the Nursery Unit or Parent Units in water. Clean only with a dry cloth.
sDO NOT place unit near water and moisture. Do not use the Nursery Unit outdoors. Do not use the Nursery Unit near possible
wet areas, such as a bathtub, shower, wash basin, sink, laundry tub, swimming pool, wet basement, etc.
s+EEP.URSERY5NITAWAYFROMHEATSOURCES such as fireplaces, radiators, stoves, and TVs or other appliances. Heat can
damage the case or electrical parts.
sDO NOT use the Nursery Unit if:
s4HEADAPTERCORDSORPLUGSHAVEBEENDAMAGED
s4HEUNITHASBEENEXPOSEDTOLIQUIDS
s5NITHASBEENDROPPEDORISDAMAGED
s$/./4/0%.4(%.523%295.)40!2%.45.)43/2!$!04%23 No user-serviceable parts inside. Risk of electrical
shock, fire or death.
s4HEANTENNAUSEDFORTHISTRANSMITTERMUSTBEINSTALLEDTOPROVIDEASEPARATIONDISTANCEOFATLEASTCMvFROMALLPERSONS
and must not be co-located or operating in conjunction with any other antenna or transmitter.
2
&##3TATEMENT
7!2.).'Modifications not authorized by the manufacturer may void users authority to operate this device.
./4%4HISEQUIPMENTHASBEENTESTEDANDFOUNDTOCOMPLYWITHTHELIMITSFORA#LASS"DIGITALDEVICEPURSUANTTO0ART
of the FCC Rules. These limits are designed to provide reasonable protection against harmful interference in a residential
INSTALLATION4HISEQUIPMENTGENERATESUSESANDCANRADIATERADIOFREQUENCYENERGYANDIFNOTINSTALLEDANDUSEDIN
accordance with the instructions, may cause harmful interference to radio communications.
(OWEVERTHEREISNOGUARANTEETHATINTERFERENCEWILLNOTOCCURINAPARTICULARINSTALLATION)FTHISEQUIPMENTDOESCAUSE
HARMFULINTERFERENCETORADIOORTELEVISIONRECEPTIONWHICHCANBEDETERMINEDBYTURNINGTHEEQUIPMENTOFFANDONTHE
user is encouraged to try to correct the interference by one or more of the following measures:
s2EORIENTORRELOCATETHERECEIVINGANTENNA
s)NCREASETHESEPARATIONBETWEENTHEEQUIPMENTANDRECEIVER
s#ONNECTTHEEQUIPMENTINTOANOUTLETONACIRCUITDIFFERENTFROMTHATTOWHICHTHERECEIVERISCONNECTED
s#ONSULTTHEDEALERORANEXPERIENCEDRADIO46TECHNICIANFORHELP
4HISDEVICECOMPLIESWITHPARTOFTHE&##2ULES/PERATIONISSUBJECTTOTHEFOLLOWINGTWOCONDITIONS4HISDEVICEMAY
NOTCAUSEHARMFULINTERFERENCEANDTHISDEVICEMUSTACCEPTANYINTERFERENCERECEIVEDINCLUDINGINTERFERENCETHATMAY
cause undesired operation.
2M21VIB/2M22VIB
Graco Children’s Products
3 Glenlake Parkway
Atlanta, GA 30328

Parent Unit
s4HEBATTERYMUSTBEPLUGGEDINTOTHE0ARENT5NITBEFORETHE
unit will be ready for use. Remove the battery door cover on the
Parent Unit with a key or flat blade screw driver. Remove the battery
pack from the packaging and plug into the back of the unit. Place
the battery pack into the recess and press the wire into the slot on
the side. Replace the battery door.
.URSERY5NIT
s4URNTHEUNITOVERANDUSESCREWDRIVERTOREMOVETHEBATTERYDOOR
s0LACE!!!6,2BATTERIESINTOTHEBATTERYCOMPARTMENT.OTE
the proper orientation of the batteries.
s$ONOTMIXOLDANDNEWBATTERIES
s$ONOTMIXALKALINESTANDARDCARBONZINCORRECHARGEABLE
NICADMIUMETCBATTERIES
s0LACETHEBATTERYDOORBACKONTHEUNIT
s0LEASEREMOVEADEADBATTERYPROMPTLY!DEADBATTERYLEFTINTHEUNIT
may leak, damaging your unit.
s$ONOTATTEMPTTORECHARGEANONRECHARGEABLEBATTERY
s!RECHARGEABLEBATTERY#!../4BERECHARGEDBYPLUGGINGTHE!#
adapter into the Nursery Unit.
s2EMOVETHEBATTERIESFROMTHEUNITIFITISNOLONGERBEINGUSEDORWILL
be stored for an extended period of time.
s4HE0ARENT5NITSCANUSEEITHERTHERECHARGEABLEBATTERYTHATCOMESWITHTHEUNITORSTANDARDVOLT!#HOUSEHOLD
CURRENT4HE.URSERY5NITUSES!!!6,2BATTERIESORSTANDARDVOLT!#HOUSEHOLDCURRENT
s4OUSE!#ADAPTERSPLUGTHECONNECTORONTHECORDINTOTHE!#ADAPTERJACKONTHESIDEOFTHE0ARENT5NITANDTHEBACKOFTHE
Nursery Unit, then plug adapter into a standard wall outlet.
s5SE/.,9THE'RACOADAPTERSINCLUDEDWITHTHEUNIT$ONOTUSETHESEADAPTERSWITHOTHEREQUIPMENTUNDERANY
circumstances.
s)FUNITSDONOTWORKCHECKTHAT!#ADAPTERSAREPLUGGEDINTOWORKINGOUTLETS
s7HENELECTRICITYISOFFFROMAPOWERFAILUREETCTHE.URSERY5NITWILLOPERATEON!!!6,2BATTERIES)FTHE0OWER
,%$ISNOTLITTURNTHEPOWEROFFANDTHENBACKONTOTHE.URSERY5NIT!GREEN,%$INDICATESTHATTHEBATTERIESAREFINE!RED
,%$INDICATESTHATTHEBATTERIESARELOW)FTHE,%$DOESNOTLIGHTATALLTHENREPLACETHEBATTERIES4HE0ARENT5NITWILLOPERATE
if the rechargeable battery is charged.
s)NCASEYOUAREEXPERIENCINGSOMEINTERFERENCETHECHANNELONTHE.URSERY5NITCANBECHANGEDBY
PRESSINGTHEhCHvBUTTONONTHESIDEOFTHEUNIT4HE0ARENT5NITWILLAUTOMATICALLYSCANALLOFTHEAVAILABLECHANNELSUNTILIT
locks on to the Nursery Unit. If you are still experiencing interference, press the channel button on the side of the Nursery
Unit up to 6 times until a good channel is found.
"ATTERY)NSTALLATION
5SING!#!DAPTERS
3ELECTING#HANNELS
3
Plug in cord
"ATTERIESSHOULDBEDISPOSEDOFPROPERLY
by recycling.

,OW"ATTERY)NDICATION
Parent Unit
s7HENTHEBATTERYISLOWINTHEPARENTUNITTHE,%$BARONTHESIDEOFTHEUNITWILLCHANGEFROMGREENTOREDANDYOUWILL
HEARASERIESOFAUDIBLEBEEPSEVERYTOSECONDS)FOPERATEDTOOLONGONALOWBATTERYYOUMAYALSOEXPERIENCEA
POORSIGNALANDTHECONNECTION,%$ONTHEFRONTOFTHEPARENTUNITMAYCHANGEFROMGREENTOREDANDYOUWILLHEARASERIES
OFAUDIBLEBEEPSEVERYTOSECONDS
s9OUMAYEITHERTURNOFFTHEUNITORPLUGINTHE!#ADAPTERTORECHARGETHEBATTERIES
.URSERY5NIT
s7HENTHEBATTERIESARELOWINTHE.URSERY5NITTHEPOWER,%$WILLCHANGEFROMGREENTORED9OUMAYALSOEXPERIENCEA
POORSIGNALANDTHECONNECTION,%$ONTHEFRONTOFTHE0ARENT5NITMAYCHANGEFROMGREENTOREDANDYOUWILLBEGINTO
hear the Parent Unit beep.
s9OUMAYEITHERTURNOFFTHEUNITPLUGINTHE!#ADAPTERORREPLACETHEBATTERIES
/UTOF2ANGE)NDICATION
s)FTHE0ARENT5NITBEGINSTOLOSETHESIGNALFROMTHE.URSERY5NITTHECONNECTION,%$BOTTOM3OUND,IGHT,%$WILLCHANGE
FROMGREENTORED!DDITIONALLYYOUWILLHEARASERIESOFAUDIBLEBEEPSEVERYTOSECONDSTOWARNTHEUSERTHATTHE
connection to the Nursery unit has been lost.
s)MMEDIATELYMOVETHE0ARENT5NITCLOSERTOTHE.URSERY5NITTOREGAINCONNECTION
s/NCECONNECTIONHASBEENREGAINEDTHECONNECTION,%$WILLCHANGEFROMREDTOGREENANDTHEAUDIBLEBEEPWILLSTOP
.OTE)TISNOTUNCOMMONFORTHE0ARENT5NITTOOCCASIONALLYLOSEANDREGAINCONNECTIONWITHTHE.URSERY
5NITINENVIRONMENTSTHATHAVEASIGNIFICANTAMOUNTOFOBSTRUCTIONS
3ETTING5PTHE"ABY-ONITOR
4
./4%)TISVERYIMPORTANTTHATTHESTEPSBELOWBEFOLLOWEDFORFIRSTTIMEPOWERUP
1. For optimum operation, it is best to charge the batteries in the Parent Units for at least 16 hours prior to use. The rechargeable
BATTERIESNEEDTOBEINSTALLEDINTOTHE0ARENT5NITBEFORECHARGINGREFERTOTHEh"ATTERY)NSTALLATIONvSECTION
0LACETHE.URSERY5NITWITHINFEETMETERSOFYOURBABY0LUGAN!#ADAPTERINTOTHEJACKONTHEBACKOFTHE.URSERY
Unit. Plug it into a working 120 volt AC outlet.
3. Aim the Nursery Unit toward your baby. Check that there are no walls or large objects that could block sound transmission.
0LACETHE0ARENT5NITWITHINFIVEFEETMETERSOFTHE.URSERY5NITANDTURNONTHE0ARENT5NITUSINGTHE/N/FFSWITCH
ONTHESIDEOFTHEUNIT!LLOFTHE3OUND,IGHT,%$SWILLILLUMINATEANDTHEBOTTOM,%$WILLBERED9OUWILLALSOHEARASINGLE
audible beep.
4URNONTHE.URSERY5NITUSINGTHE/N/FFSWITCHONTHEFRONT4HEGREENPOWERLIGHTSHOULDCOMEON
7ITHINAFEWSECONDSTHE0ARENT5NITWILLLOCKONTOTHE.URSERY5NITANDTHETOPFOURGREEN,%$SWILLSHUTOFF
!SECONDLATERYOUWILLHEARASERIESOFBEEPSANDTHECONNECTION,%$SHOULDCHANGEFROMREDTOGREEN9OURMONITORISNOW
ready for use.
)TIS6%29)-0/24!.4TOTESTTHESYSTEMWHENFIRSTSETUPANDATREGULARTIMESTHEREAFTER Test the units if you
suspect they may have been damaged or have not been used for a long time.
1. If two adults are present, have one take the Parent Units to different locations, trying various volume settings, while the
other speaks into the Nursery Unit.
2. If only one adult is available, place a ticking clock, radio, or other sound-producing device near the Nursery Unit to test it.
3. When testing, keep the level of your child’s sounds in mind, and adjust the volume accordingly.
4. If there is sound interference, switch the Nursery Unit and the Parent Units to the other channel setting.
4ESTINGTHE3YSTEM

Operation
4O,ISTEN4O"ABY
s4URNON.URSERY5NITUSINGTHE/./&&SWITCH
s4URNONONEORBOTH0ARENT5NITSUSINGTHE/./&&SWITCH
s!DJUSTTHEVOLUMEONTHE0ARENT5NITBYPRESSINGTHE6OLUME5P$OWNBUTTONS.OTETHATTHE3OUND,IGHTS,%$S
illuminate as the volume button is pressed up or down to provide a visual feedback for the volume level. The unit will beep
louder or softer depending on the volume level.
s4HE3OUND,IGHTSONTHE0ARENT5NITWILLILLUMINATEASYOURCHILDOROTHEROBJECTSMAKENOISENEARTHE.URSERY5NIT0LEASE
NOTETHATTHE3OUND,IGHTSANDVOLUMECONTROLONTHE0ARENT5NITAREINDEPENDENTOFEACHOTHER7ITHTHEVOLUMETURNEDALL
THEWAYDOWNTHE3OUND,IGHTSWILLSTILLILLUMINATEASYOURCHILDOROTHEROBJECTSMAKENOISENEARTHE.URSERY5NIT
5
6IBRATION!LERT&EATURE
1.To turn on the Vibration Alert Feature, set the switch on the side of the parent unit to on.
4OADJUSTTHELEVELATWHICHTHEVIBRATIONALERTISACTIVATEDPRESSANDHOLDTHEh6IBEvBUTTONONTHESIDEOFTHEPARENT
UNIT4HE3OUND,IGHTSWILLILLUMINATETOSHOWTHEVIBRATIONALERTADJUSTMENTSETTING0RESSTHEVOLUME50$/7.SWITCH
TOCHANGETHESETTING!LOWERSOUNDLIGHTSETTINGWILLMAKETHEVIBRATIONACTIVATEFORQUIETERSOUNDS!HIGHERSOUNDLIGHT
setting will make the vibration activate for louder sounds. When the sound in the nursery goes above the sound light level
you choose, the vibration alert will be activated.
2ELEASETHEh6IBEv"UTTON
.IGHT,IGHT&EATURE
0RESSTHE.IGHT,IGHT"UTTONONTHETOPOFTHE.URSERY5NITONCEFORLOWSETTINGTWICEFORHIGHSETTING
and a third time to turn it off.
s4HISFEATUREWILLALLOWYOUTOLOCATEAMISPLACED0ARENT5NITASLONGASTHE0ARENT5NITISPOWEREDONAND
within range of the Nursery Unit.
s4OACTIVATEPRESSTHEh0&vBUTTONONTHEFRONTOFTHE.URSERY5NITTHE.URSERY5NITNEEDSTOBE/.
s4HE0ARENT5NITWILLGENERATEANAUDIBLEBEEPEVERYSECONDANDTHE3OUND,IGHTSWILLFLASHONANDOFF
s/NCETHE0ARENT5NITISLOCATEDTHEAUDIBLEBEEPCANBESHUTOFFBYPRESSINGANYBUTTONONTHE0ARENT5NIT
Parent Finder Feature

-OSTPROBLEMSHAVEASIMPLESOLUTION&IRSTCHECK
THAT
s0OWERISTURNED/.FORBOTHUNITS
s"OTHUNITSAREPLUGGEDINORBATTERIESAREFRESHIN.URSERY
5NITANDFULLYCHARGEDIN0ARENT5NIT
s%LECTRICALOUTLETWORKS
s6OLUMEISTURNEDUPON0ARENT5NIT
s0ARENT5NITISINRANGEOFTHE.URSERY5NIT
.O3OUND
s"ATTERYDEADORWEAKREPLACEORUSE!#ADAPTER
s!#ADAPTERNOTPROPERLYCONNECTEDCHECKTHECONNECTIONS
s.URSERY5NITCOVEREDORBLOCKEDREMOVETHEOBSTRUCTION
7EAK3OUND
s.URSERY5NITTOOFARFROMBABYMOVECLOSER
s,ARGEOBJECTSBLOCKINGTHESIGNALTRYREPOSITIONING.URSERY
Unit.
s6OLUMESETTINGTOOLOWTURNITUP
3TATIC
s)NTERFERENCEFROMOTHERELECTRICALEQUIPMENT
ELIMINATECAUSEOFSTATIC46SMIXERSCOMPUTERSFANS
FLUORESCENTLIGHTSLIGHTDIMMERSETC
s0ARENT5NITTOOFARFROM.URSERY5NITMOVETHEM
closer.
s3IGNIFICANTAMOUNTOFOBSTRUCTIONSBETWEEN0ARENT5NIT
and Nursery Unit such as walls, ceilings & buildings.
Try moving the Nursery Unit to another part of the
room.
s#HANGECHANNELON.URSERY5NIT
3HRILL3OUND&EEDBACK
s.URSERY5NITAND0ARENT5NITTOOCLOSETOGETHER
move them farther apart.
s6OLUMESETTOOHIGHLOWERTHEVOLUME
0ARENT5NIT7ILL.OT,OCKON#HILD5NIT
s
!LLOFTHE3OUND,IGHTSAREILLUMINATEDANDTHEUNITBEEPS
Go to Pairing Parent and Child Unit section.
4ROUBLE3HOOTING
$/./4!44%-04TOMODIFYTHEUNIT!NYMODIFICATIONSTOTHETRANSMITTERANDORRECEIVERCANVOIDTHE
OPERATORSAUTHORITYTOOPERATETHEEQUIPMENT
0AIRING0ARENT5NITAND#HILD5NIT
To ensure privacy, your Parent Unit is paired with your
.URSERY5NITATTHEFACTORY9OUR0ARENT5NITWILLNOTWORK
with any other Nursery Unit.
If Parent Unit won’t lock onto the Nursery Unit, or you
purchased a new Nursery Unit, follow the procedure below
to pair the Parent Unit and Nursery Unit. If you purchased a
new Parent Unit, skip Step 1. The new Parent Unit is ready
to pair with your Nursery Unit.
1. Erase the Pairing from the Parent Unit.
s4URNTHE0ARENT5NITOFF
s(OLDTHE6OLUME$OWN"UTTONONTHE0ARENT5NITWHILE
PRESSINGTHE/N/FF"UTTON#ONTINUETOHOLDTHE6OLUME
$OWN"UTTONUNTILYOUHEARASINGLEBEEPANDALLOFTHE
3OUND,IGHTSILLUMINATEBRIEFLY
s2ELEASETHE6OLUME$OWN"UTTON
s0RESSANDHOLDTHE6OLUME$OWN"UTTONAGAIN
s7ITHINSECONDSYOUWILLHEARABEEP2ELEASETHE6OLUME
$OWN"UTTON!LLOFTHE3OUND,IGHTSANDTHERED,OSS
#ONNECTION,%$WILLBELIT4HE0ARENT5NITISREADYTOPAIR
with Nursery Unit.
2. Pair the Parent Unit with Nursery.
s0LACE.URSERY5NITINTHESAMEROOMFIVEFEET
METERSAWAYFROMTHE0ARENT5NIT
s4URNON.URSERY5NITUSINGTHE/N/FF"UTTONONTHESIDE
The green power light should come on.
s7ITHINAFEWSECONDSTHE0ARENT5NITWILLFINDTHE.URSERY
5NIT4HE3OUND,IGHTSWILLSHUTOFFANDTHE0ARENT5NITWILL
beep. The Parent Unit is now paired with Nursery Unit.
3. Repeat this procedure if you need to pair another
Parent Unit with the Nursery Unit.
Nothing happened when I turned on the Nursery Unit.
What do I do?
s&IRSTTRYTURNINGTHE.URSERY5NITOFFANDTHENONAGAIN
s)FTHE0ARENT5NITSTILLDOESNOTPAIRWITHTHE.URSERY5NIT
PRESSTHE#HANNEL"UTTONONTHE.URSERY5NITTHENTURNTHE
Nursery Unit off, and then on again.
6

%S-59)-0/24!.4%PROBARALSISTEMACUANDOLOINSTALAPORPRIMERAVEZYPERIØDICAMENTEENADELANTE
0RUEBELASUNIDADESSISOSPECHAQUEPODRÓANHABERRESULTADODA×ADASONOHANSIDOUSADASDURANTEUNTIEMPOLARGO
3IHAYDOSADULTOSPRESENTESHAGAQUEUNOLLEVELAS5NIDADESPARAPADRESALUGARESDIFERENTESPROBANDOVARIOSNIVELESDEL
volumen mientras el otro habla en la Unidad del dormitorio.
3ISOLAMENTEHAYUNADULTODISPONIBLEPONGAUNRELOJQUESUENERADIOUOTRODISPOSITIVOQUEPRODUZCASONIDOSCERCADELA
Unidad del dormitorio para probarla.
3. Mientras hace la prueba, mantenga el nivel del sonido de su niño en mente y ajuste el volumen lo necesario.
4. Si hay interferencia con el sonido, pase la Unidad del dormitorio y las Unidades para padres a otro canal.
Prueba del sistema
Funcionamiento
0ARAESCUCHARALBEBÏ
s%NCIENDALA5NIDADDELDORMITORIOUSANDOELINTERRUPTORDE%.#%.$)$/!0!'!$/
s%NCIENDAUNAOAMBASDELAS5NIDADESPARAPADRESUSANDOELINTERRUPTORDE%.#%.$)$/!0!'!$/
s!JUSTEELVOLUMENENLA5NIDADPARAPADRESOPRIMIENDOLOSBOTONESPARASUBIRYBAJARELVOLUMEN.OTEQUELOSDIODOS
ELECTROLUMINISCENTESINDICADORESDESONIDOSEILUMINANAMEDIDAQUESEOPRIMEELBOTØNPARASUBIROBAJARELVOLUMENPARA
PROPORCIONARUNAINDICACIØNVISUALDELNIVELDELVOLUMEN,AUNIDADSONARÉMÉSALTAOMÉSBAJASEGÞNELNIVELDELVOLUMEN
s,ASLUCESINDICADORASDESONIDODELA5NIDADPARAPADRESSEILUMINARÉNCUANDOSUNI×OUOTROSOBJETOSHACENRUIDOCERCA
DELA5NIDADDELDORMITORIO0ORFAVORNOTEQUELASLUCESINDICADORASDESONIDOYELCONTROLDELVOLUMENDELA5NIDADPARA
PADRESSONINDEPENDIENTES#ONELVOLUMENTOTALMENTEBAJOLASLUCESINDICADORASDESONIDOSEILUMINARÉNCUANDOSUNI×O
UOTROSOBJETOSHAGANRUIDOCERCADELA5NIDADDELDORMITORIO
5
&UNCIØNDEALERTACONVIBRACIØN
1. Para activar la función de alerta con vibración, ponga el interruptor del costado de la unidad para padres en la posición
encendido.
0ARAAJUSTARELNIVELALQUESEACTIVALAALERTADEVIBRACIØNPRESIONEYMANTENGAPRESIONADOELBOTØNDE6IBRACIØNh6IBEv
ALCOSTADODELAUNIDADPARAPADRES,ASLUCESDESONIDOSEILUMINARÉNPARAMOSTRARLACONFIGURACIØNDEAJUSTEDELAALERTA
DEVIBRACIØN0RESIONEELINTERRUPTORDEVOLUMEN35")2"!*!2PARACAMBIARLACONFIGURACIØN5NACONFIGURACIØNDELUZDE
SONIDOSBAJOSACTIVARÉLAVIBRACIØNPARASONIDOSMÉSSUAVES5NACONFIGURACIØNDELUZDESONIDOSALTOSACTIVARÉLAVIBRACIØN
PARASONIDOSMÉSFUERTES#UANDOELSONIDOENELDORMITORIOSUPEREELNIVELDELUZDESONIDOQUEELIGIØSEACTIVARÉLAALERTA
de vibración.
,IBEREELBOTØNhVIBRACIØNv
1. Oprima el botón luz nocturna de la unidad del dormitorio una vez para el nivel bajo, dos veces para el
valor alto y una tercera vez para apagarla.
&UNCIØNDELALUZNOCTURNA
s!LGUNASUNIDADESVIENENEQUIPADASCONUNAFUNCIØNDE"ÞSQUEDADEPADRES%STAFUNCIØNLEPERMITE
UBICARALA5NIDADPARAPADRESSIEMPREQUELA5NIDADESTÏENCENDIDAYDENTRODELADISTANCIADELA5NIDAD
del dormitorio.
s0ARAACTIVARLAOPRIMAELBOTØNh0&vENELFRENTEDELAUNIDADDELDORMITORIOLAUNIDADDELDORMITORIODEBEESTAR
%.#%.$)$!
s,A5NIDADPARAPADRESGENERARÉUNSONIDOCADASEGUNDOYLASLUCESINDICADORASDESONIDODESTELLARÉN
s5NAVEZQUEHAENCONTRADOLA5NIDADPARAPADRESELSONIDOSEAPAGARÉSIOPRIMECUALQUIERBOTØNENLAUNIDAD
&UNCIØNDEBÞSQUEDADEPADRES
/