4. OPERATION
Operating Instructions (see figure #4)
Dry operation onlyThis toaster is for (no oil). Do not put buttered bread products in the toaster.
Ensure Release Sheets are properly installed. (See page 7.)
Turn Main Power Switch on. Set Temperature Control to desired temperature. (Temperature is factory
set at 600°F.)
Allow Pilot Light to cycle at least two times (on/off). When the light is on, the grill is heating. Heat up time
!
!
!
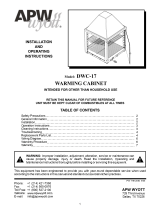
FIGURE 2:
BUN THICKNESS DIALS
Bun ThicknessAdjustment
The VSX is designed to accommodate a variety of different
products. Adjust for product thickness by setting the Bun
Thickness Dials on the side of the toaster to the appropriate
setting. Settings for different thicknesses are indicated on
the label adjacent to the Bun Thickness Dials. See figure 2.
is about 15 minutes.
Place bun halves on feeder cut side down (facing grill
surface). Toast time is approximately 8, 20 or 30
seconds depending on bun height, diameter and model
purchased. Increase or decrease temperature setting
and/or Bun Thickness Dials to achieve desired
brownness and temperature.
!
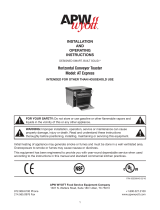
VSX-20 Temperature Control (See Figure 3)
UP: While pressed, displays the set-point. Press and hold for at
least 3 seconds to increase set point.
DOWN: While pressed, displays the set-point. Press and hold for at
least 3 seconds to decrease set point.
TEMP: Press to momentarily display the actual platen temperature.
PILOT: Illuminated when power is being applied to heater.
POWER: Main power supply to the toaster.
1. Make sure that all the doors are closed and the lid is on. (It should
look like the photograph on the cover.)
2. Make sure toaster is plugged in to the correct voltage. The voltage
of the toaster is written on the data plate. The data plate is located
Operation of Controller (See Figure 3)
on the back of the toaster near the cord.
3. Turn the toaster on (POWER). “|” is on and “O” is off.
4. When main power is applied, the digital display will boot up (displays “888” and then the software
version information). Then it will display “Lo.” (If the toaster is already warm, it might display “Hi.”)
5. The toaster remembers the last set point that was entered, even if you turn the toaster off. APW
recommends a set point of 600°F or below. If you wish to change the set point, press (and hold)
either the UP or DOWN key. Display will change set point by 1 degree for the first 5 degrees, and
then it will jump by 5's. When you reach the set point that you want, let go of the button. You may
then press the UP or DOWN key to make further changes. If you don't press any buttons for 5
seconds, then the new set point will take effect.
6. When the set point is changed, the display will say “Lo” or “Hi” until the set point is reached. After
that time it will say “rdY.” While it says “rdY” the platen will cycle on and off to maintain the set point.
Whenever heat is applied to the platen, the PILOT LED will be illuminated.
7. It takes the toaster 10-15 minutes to warm up.
FIGURE: 3
VSX-20
TEMP. CONTROL