Page is loading ...

1
Model No., No. de Modelo, N° de modèle
Serial No., No. de Serie, N° de série
Date of Purchase, Fecha de Compra, Date d’achat
For Future Reference
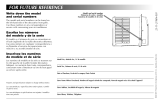
Write down the model and serial numbers
The model and serial numbers can be found on
the side of the cabinet near the control panel. Use
these numbers in any correspondence or service
calls concerning your air conditioner.
Para referencia futura
Escriba el número de modelo y de serie
El número de modelo y de serie se encuentran en
el costado del gabinete cerca del panel de control.
Use estos números en toda la correspondencia o
llamadas de servicio relacionadas con su
acondicionador de aire.
Pour consultation ultérieure
Inscrivez les numéros de modèle et de série
Noter ci-contre les numéros de modèle et de série
(on les trouve sur le côté de la grille décorative
avant, près du tableau de commande).
Communiquer ces numéros lors de toute
correspondance ou appel au service après-vente
ayant trait au climatiseur.
ENGLISH
Important Safety Instructions .............................. 1
Installation.............................................................. 2
Operation .............................................................. 4
Maintenance .......................................................... 5
Warranty.................................................................. 7
ESPAÑOL
Instrucciones importantes de seguridad .............. 8
Instalación .............................................................. 9
Funcionamiento .................................................. 11
Mantenimiento .................................................... 12
Garantía................................................................ 14
FRANÇAIS
Directives de sécurité importantes .................... 15
Installation............................................................ 16
Utilisation ............................................................ 18
Maintneance ........................................................ 19
Garantie................................................................ 21
Room Air Conditioners for
Double-Hung Windows
Acondicionadores de aire
ambientales para ventanas
de guillotina
Climatiseur d’air individuel
pour fenêtres à guillotine
For additional questions please call
1-217-347-6459
or e-mail: [email protected]
Para mayor información por favor llame al
1-217-347-6459
o envíe correo electrónico a:
Pour d'autr
es questions :
1.217.347.6459
ou courriel : [email protected]
23-23-0371N-003

Room Air Conditioner
1
WARNING
• Do not remove or modify this plug
•
Do not use as an on/off switch
•
Do not use outdoors
•
Do not push furniture against or place furniture on the
electrical cord. This can trip the test switch and/or damage
the cord and become a potential condition for arcing
•
Do not attempt to repair the cord. If the cord requires
replacement, call an authorized servicer
.
• The Arc Detection Device is not a Ground Fault
Interrupter and should not be used as such
• The Arc Detection Device contains an electronic circuit
board and should not be submerged or exposed to water
spray
Resetting
If the Arc Detection Device has tripped, the reset button
will pop up.
Follow these steps to reset the Arc Detection Device:
1. Unplug unit from electrical outlet
2. Press the reset button
3. Plug the unit back into electrical outlet
4. Check to see if power has returned to the unit
Testing
You should test the Arc Detection Device equipped power
cord monthly, after every major electrical storm, or if power
to your Room Air Conditioner has been interrupted.
Follow these steps to test the Arc Detection Device:
1. Unplug unit from electrical outlet
2.
Press the reset button
3.
Plug the unit back into electrical outlet
4. Press test button.
Unit should trip and reset button will pop up.
5. Press reset button again for use
If above test fails, stop using the air conditioner and
contact customer service by calling the following toll-
free number:
1-800-332-6658
or email: [email protected]
WARNING
W
ARNING
Power Cord with Arc Detection Device
The power cord supplied with this air conditioner is
equipped with an Arc Detection Device designed to shut
off power to the unit when it senses an arc fault condition.
An arc fault is an unintentional electrical discharge that
occurs when electrical products or wires are damaged,
aged, or improperly used. An arc fault can be potentially
h
azardous if left undetected.
Electrical Shock Hazard
• Plug unit only into a grounded electrical
outlet.
• Do not use an extension cord or plug adapter with this
unit.
• Do not operate unit with decorative front or filter
removed.
• Failure to follow these precautions could result in
electrical shock, fire or personal injury.
• If the air conditioner has a serial plate rating of 115 volts
and greater than 7.5 amps, it must have its own fuse or
circuit breaker, and no other device or unit should be
operated on that fuse or circuit breaker.
• If the air conditioner has a serial plate rating of 230
volts, it must have its own fuse or circuit breaker, and no
other device or unit should be operated on that fuse or
circuit breaker.
• We recommend that a qualified electrician install unit in
accordance with the National Electrical Code and local
codes and ordinances.
• Use copper conductors of correct wire gauge and
protector size only.
• Do not alter cord or plug end. Do not remove warning
label on cord.
Important Grounding Requirements
•
Air conditioner has a three-prong grounding plug on the
power supply cord, which must be plugged into a
properly grounded three-prong wall receptacle for your
protection against possible shock hazard. For models up
to and including 7.5 amperes, use a grounding type wall
receptacle to match the cord plug.
• For models above 7.5 amperes use a single outlet
grounding type wall receptacle to match the cord plug.
Do not operate this air conditioner without proper time
d
elay circuit protection (circuit breaker or fuse). Refer to
s
erial plate for proper power supply requirements.
Recommended Wire Sizes
(As installed per building code) :
PROTECTOR SIZEWIRE
GAUGE
1
5 AMP #14 MINIMUM
20 AMP #12 MINIMUM
30 AMP #10 MINIMUM
2
50V
3
0A
2
50V
1
5A
1
25V
15A
2
50V
20A

Room Air Conditioner
2
T
ools Needed
Screwdrivers
Tape
Measure
Carpenter’s Level
5/8” wood screws..............9
Brackets ............................2
A
B
A
B
Installation Parts Kit
Window Requirements
Air conditioner is factory prepared for installation in
standard double hung windows (air conditioner cannot be
installed in other types of windows). The air conditioner
can be installed in windows 23” to 34” wide when filler
panels are used. In windows 19” to 22” wide the air
conditioner can be installed without the filler panels. All
windows must open at least 12 3/4” vertically.
Install the air conditioner in a window where there will be
enough clearance around the cabinet to allow ample
circulation of air through unit. All supporting parts should
be secured to firm wood, masonry, or metal.
Installation in window 23” to 34” wide
1.
Open and mark center line of window
. Measure and mark
6” to the right of the center line and 6” to the left of the
center line (Fig. 2).
2. Place bracket so that the inside edge rests on the
appropriate 6” mark. Secure brackets with two (2) 1” long
wood screws (Fig. 2).
F
iller Panel Installation
1. Place tabbed side of curtain in track on side of air
c
onditioner cabinet, and slide down the track until the
curtain is even top and bottom (Fig.1).
2. Slide the filler panel frame onto the air conditioner
cabinet using the tracks on the top and bottom of the
unit. Slide the frame as close to the air conditioner as
possible so that the curtain locks into place. Gently pull
the frame out until it is the correct length for your
application.
1
Tabbed side
of curtain
Curtain
track
Filler panel frame
Curtain
Filler panel
frame track (top bar)
Filler panel
frame track
(bottom bar)
6"
6"
Center
of
window
opening
5/8” Screws
Bracket
Bracket
Window Sill
5/8” Screws
2
A
dditional Safety Precautions
• D
o not
c
ut, alter or remove any of the expanded
polystyrene (styrofoam) inside this air conditioner.
•
D
o not
s
tore or use gasoline or other flammable vapors
a
nd liquids in the vicinity of this or any other appliance.
T
he fumes can create a fire hazard or explosion.
•
Do not introduce objects in the air discharge area. This
could cause permanent damage.
•
Do not pour liquids on the air conditioner as this could
cause a malfunction. With the unit unplugged, use a
damp cloth for cleaning the unit.
•
Do not use strong solvents to clean the air conditioner.
• Clean the air conditioner filter every two weeks to avoid
overheating caused by air obstruction. Do not operate
without filter.
•
Do not obstruct the air intake area of your air
conditioner, as this could cause overheating, thus
activating the unit’s security switch and shutting off the
unit.
•
Do not block air circulation to outside louvers of cabinet.
•
Do not block air flow inside with blinds, curtains, or
furniture, or outside with shrubs, enclosures, or other
buildings.
•
Do not run the air conditioner with an outside
protective cover in place. This could result in fire or
mechanical damage within the air conditioner.

Room Air Conditioner
3
Foam Seal
Lower
Window Sash
5/8” Wood Screws
Wood Sill
Filler Panel Tab
4
Nails / Screws
L-Bracket
5
8. Cut foam seal to width of window and install between
upper and lower window sash (Fig. 4).
Caution: Do not drill a hole in bottom pan. Unit is designed
to operate with approximately 1/2” of water in bottom pan.
Installation in window 19” to 22” wide
(Do not attach filler panels for this application)
1
. Refer to steps 1 and 2 of preceding instructions.
2. Close window until it touches behind top bar (Fig. 4).
3. Fasten lower window sash to window frame using
finishing nails, wood screws, or “L” brackets (Fig. 5).
4. If filler is required on sides of air conditioner, cut foam
seal to size and fill both sides.
5. Cut foam seal to width of window and install between
upper and lower window sash (Fig. 4).
3. To overcome storm window interference, securely attach
2” wide wood strips to the window stool and sill, with
s
crews. Strips should be as long as window opening and
flush with back side of stool. Thickness of strips should be
controlled by amount of interference (Fig. 3).
4. Keeping a firm grip on air conditioner, carefully center air
conditioner in window opening with the bottom bar
b
etween the window stool and the angle bracket. Air
conditioner should slant slightly downward on the
outside as shown by half a bubble off on a carpenters
l
evel. This outward pitch prevents water from entering
the room (Fig. 3).
5. Close the window until it touches behind air conditioner
top bar. Slide filler panels outward until they touch
window sash tracks. (Do not release grip on air
conditioner until lower window sash is in final position)
(Fig. 3).
Bracket
Upper
Window Sash
Wood Strips
(optional)
Lower
Window Sash
Top bar
Bottom
bar
Level
3
6. Secure top of filler panels by driving 5/8” long wood
screws into window sash through mounting holes in top
slides.
7.
Secure bottom of filler panels by driving 5/8” long screws
into window sill through fi
ller panel tabs.

Room Air Conditioner
4
Control Functions
1. Master Control: Turns unit on and off. Selects desired function
of unit, cooling with continuous air circulation or air circulation
without cooling.
2. Thermostat: Controls unit thermostat, which regulates room
temperature by automatically turning compressor on and off.
Cooling Operation
1. Turn thermostat to the coolest setting.
2. Turn master control to HI COOL.
3. If room becomes too cool for comfort, turn thermostat counter-
clockwise until compressor turns off (air circulating fan
will remain in operation).
4. When desired comfort level is reached, Master Control may be
turned to a lower setting.
5. To turn the unit off, or in the event of a power interruption,
turn Master Control to OFF.
Air Circulation Without Cooling
To circulate and filter air:
1. Turn Master Control to HIGH FAN.
Caution: If air conditioner is shut off, wait a minimum of three
minutes before restarting.
Master Control
Thermostat
6

Room Air Conditioner
5
Remove screw
from both
sides of
cabinet
Air Filter
Decorative Front
8
10
D
ecorative Front Removal
1. Turn the unit off and remove the plug from the outlet.
2. Remove the screws on either side of the cabinet (Fig. 8).
3. Gently pull forward while grasping both sides of the
decorative front.
4. To replace the decorative front, line up the top and
b
ottom and sides, and gently press into position.
5. Reattach the screws on both sides of the decorative front.
Make sure the decorative front is secure before
reconnecting the plug and operating the unit.
7
Note: Failure to keep air filter clean will result in poor air
circulation.
DO NOT operate without filter. This can render the unit
inoperable.
C
leaning the Air Filter
Every two weeks: Clean the Filter
1. Turn power to OFF.
2. Remove the air filter by grasping the top corners and
pulling it up and out of the unit (Fig. 7).
3. Wash in hot soapy water, rinse and shake dry.
4. Replace the filter, with the front of the filter toward you.
5. To dry the filter thoroughly, run your unit for a few
minutes. Remember, only a clean filter works properly
and delivers top efficiency at every setting.
P
roper use and care of your air conditioner will help ensure
longer life of the unit. It is recommended to have the unit
inspected annually, as well as having the coils and
condensate water passages cleaned. Expense of the annual
inspection is the consumers’ responsibility.

Room Air Conditioner
6
O
ccurrence Possible Cause Solutions
A
ir conditioner will not operate
•
Wall plug disconnected. • Push plug firmly into wall outlet.
• House fuse blown or circuit breaker tripped. • Replace fuse with time delay type
or reset circuit breaker.
•
Unit turned off and then on too quickly. • If air conditioner is turned off,
w
ait 3 minutes before restarting.
•
Thermostat set too low for cooling. • Adjust thermostat to higher setting for cooling.
A
ir from unit does not
•
Thermostat set too warm. • Set thermostat to colder temperature.
f
eel cold enough
•
Room temperature below 70°F. • Cooling may not occur until room
temperature rises above 70°F.
Air conditioner cooling, • Outdoor temperature below 70
°F. • To defrost the coil set thermostat to warmer
but room is too warm — position.
i
ce forming on cooling coil
•
Dirty air filter — air restricted. • C
lean filter.
See “Cleaning the Air Filter” section.
b
ehind decorative front
Air conditioner cooling,
• Dirty air filter — air restricted. • Clean air filter.
but room too warm — Refer to “Cleaning Air Filter” section.
NO ice forming on cooling coil • Thermostat set too warm. • Set thermostat to colder setting.
behind decorative front
Noise when unit is cooling
• Air movement sound. • The sound of rushing air is normal. If too loud,
turn selector to lower fan setting.
• Sound of fan hitting water-moisture • This is normal when humidity is high.
removal system. Close doors, windows and registers.
• Window vibration — poor installation. • Refer to installation instructions —
check with installer.
Water dripping inside • Improper installation. • Tilt air conditioner slightly to the outside to
when unit is cooling allow water drainage. Refer to installation
instructions — check with installer.
Water dripping outside • Unit removing large quantity of moisture • This is normal during excessively humid days.
when unit is cooling from humid room.
Troubleshooting Guide
To save time and expense, check the following before calling an authorized service station.

Room Air Conditioner
7
Room Air Conditioner Warranty
(Within the 48 contiguous United States, state of Hawaii, the District of
Columbia, Puerto Rico and Canada)
Limited One Year Warranty
During the first year after the date of original purchase, if the unit fails
t
o function during normal use due to defective material or
workmanship, the unit can be returned to the place of purchase for an
exchange.
E
xceptions
T
he above warranty does not cover failure to function caused by
damage to the unit while in your possession (other than damage
caused by defect or malfunction), or by its improper installation, or by
unreasonable use of the unit, including without limitation, failure to
provide reasonable and necessary maintenance or to follow the
written Installation and Operating Instructions.
If the unit is put to commercial, business, rental, or other use or
application other than for consumer use, the manufacturer makes no
warranties, express or implied, including but not limited to, any
implied warranty of merchantability or fitness for particular use or
purpose.
THE REMEDIES PROVIDED FOR IN THE ABOVE EXPRESS WARRANTY
ARE THE SOLE AND EXCLUSIVE REMEDIES THEREFOR, NO OTHER
EXPRESS WARRANTIES ARE MADE. ALL IMPLIED WARRANTIES,
INCLUDING BUT NOT LIMITED TO ANY IMPLIED WARRANTY OF
MERCHANTABILITY OR FITNESS FOR A PARTICULAR USE OR PURPOSE,
ARE LIMITED IN DURATION TO ONE YEAR FROM THE DATE OF
ORIGINAL PURCHASE. IN NO EVENT SHALL FEDDERS BE LIABLE FOR
INDIRECT, INCIDENTAL, OR CONSEQUENTIAL DAMAGES, EVEN IF
ADVISED IN ADVANCE OF THE POSSIBILITY OF SUCH DAMAGES. NO
WARRANTIES, EXPRESS OR IMPLIED, ARE MADE TO ANY BUYER UPON
RESALE.
Some states do not allow limitations on how long an implied warranty
lasts or do not allow the exclusion or limitation of incidental or
consequential damages, so the above limitations or exclusions may not
apply to you. This warranty gives you specific legal rights, and you may
also have other rights which may vary from state to state.
No warranties are made for units sold outside of the above stated
areas. Your distributor or final seller may provide a warranty on units
sold outside of these areas.
Pr
oof of Purchase Date
It is the responsibility of the consumer to establish the original
purchase date for warranty purposes. We recommend that the original
store receipt be kept for that purpose.
For Additional Assistance:
You may contact CareCo by email:
by calling the following number:
217-347-6459
or you may write:
CareCo, Service Department
415 W. Wabash Ave., P.O. Box 200
Ef
fi
ngham, IL 62401
Before contacting CareCo, carefully read the
Installation and Operating Instructions booklet.
/