Page is loading ...

x 2 drill
Narrow Log Store
Assembly Instructions
English SS442A
Information
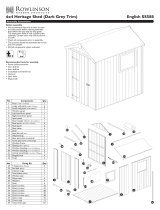
No. Components Qty.
1 Floor 1
2 Left side panel 1
3 Right side panel 1
4 Back slat 10
5 Shelf 1
6 Roof panel 1
7 Roof top board 1
8 Roof fascia 1
No. Fixing Kit Qty.
9 63mm screws 4
10 50mm screws 4
11 32mm screws 4
12 40mm nails 46
13 30mm nails 6
Before assembly
•We recommend that time is taken to
read the instructions before starting
assembly, then follow the easy step by
step guide. The instruction sheet is only
a guide to the assembly. Certain items may
not be shown to scale.
• Check all components prior to assembly
• This product should be assembled
by no less than two people
• Drill all components where indicated
Recommended tools for assembly
• Power drill/screwdriver
• 2mm drill bit
• Cross head screwdriver bit
• Hammer
• Spirit level
2022 © Rowlinson Garden Products Ltd
We constantly improve the quality of our products, occasionally
the components may differ from the components shown and are
only correct at time of printing. We reserve the right to change the
specification of our products without prior notice.
If in doubt of any aspect regarding the assembly, use or safety of your log store, please contact us:
Help Line (Normal Office Hours) 01829 261 121
Email: support@rowgar.co.uk
ROWLINSON GARDEN PRODUCTS LIMITED
Green Lane
Wardle Nr. Nantwich
Cheshire
CW5 6BN
www.rowgar.co.uk
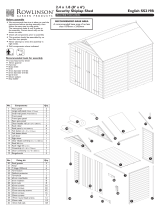
6. Roof
Place the roof over the top of the back and sides. Secure in place using 4 x 63mm screws. Screw through the side of the
roof into the side panels.
5. Roof Fascia
Position the front fascia board underneath the top board and secure to the roof framing. At each end use 2 x 40mm
nails. In the middle use only 1 x 40mm nail.
It may be necessary to drill
pilot holes for all screws in
this section.
Drill
1
2
3
4
5
6
7
8
63mm
63mm
40mm

3. Back Slats
Secure the ten back slats to the back of the log store. Align each slat with the slats on the side panels and secure in place
using 2 x 40mm nails at each end of each slat. Nail the bottom back slat to the floor using an additional 1 x 40mm nail.
1. Wall Panels
Position the left side panel on the floor so that the frame sit on the floor and the cladding overhang the floor edge. Secure
through the bottom frame of the side panel into the floor using 2 x 50mm screws. Position and attached the right side
panel in the same way.
2. Shelf
Position the shelf at the desired height between the two side panels. Secure in place using 4 x 32mm screws. Screw
through the side panel into the shelf frames as show below.
Drill
Drill
It may be necessary to
drill pilot holes for the
screws in this section.
It may be necessary to
drill pilot holes for the
screws in this section.
Important note:
The side panels slope down
to the back of the log store.
Note:
On the bottom slat, add an
additional nail to the centre.
Nail through the board in
to the edge of the floor
4. Roof Top Board
To the roof panel, position the roof top board so that it overhangs the front edge by 50mm. Secure in place using
6 x 30mm nails.
50mm
50mm
50mm
32mm
40mm
40mm
30mm
/