Page is loading ...

CHARACTERISTICS
• AF Illuminator for low light focusing
• Automatic shutter speed setting
• Flash readiness indication
• Red-eye reduction (Type N, OP and P)
• Front and rear curtain synchronization
• Power saving function
INSERTING THE BATTERIES
• Turn the ON/OFF switch to the OFF position.
• Slide open the battery compartment cover.
• Insert 4 AA batteries observing the correct polarity.
• Close the battery compartment cover.
Caution: When inserting the batteries, make sure to observe the
correct polarity. Improperly inserted batteries may cause damage to
the flash unit. When replacing batteries, be sure to replace all four
cells with the same battery brand and capacity.
MOUNTING FLASH TO THE CAMERA
• For Type C, N & P flashes: Loosen the lock ring. Slide the flash
into camera accessory shoe. Tighten the flash with the lock ring.
• For Type OP flash: Insert the mounting foot of the flashgun into
camera accessory shoe and press "LOCK" to lock the flashgun in
place.
• For Type SA flash: Insert the mounting foot of the flashgun into
camera accessory shoe. Then the flashgun is locked in place.
REMOVING THE FLASH
• For Type C, N & P flashes: Loosen the lock ring and remove the
flash off backwards.
• For Type OP flash: Press both sides of the Lock/Release button
towards the directions as indicated then pull the flashgun off
backward.
• For Type SA flash: Push the Shoe Release button and pull the
flashgun off backward.
OPERATING THE FLASH AND TESTING
Slide the ON/OFF switch to the "ON" position. After a few seconds
the Ready/Test lamp should glow, indicating that the flash is ready to
shoot. Press the Ready/Test button to make sure that your flash
works properly. When the flash discharges, wait until the ready lamp
glows again.
Adjust your camera to the appropriate setting. Most cameras can be
set to the program position (see your camera's manual for details on
flash synchronization). When the flash is ready to fire, it will
automatically set the camera's shutter speed. The flash readiness
indicator will appear in the display on the camera. Different camera models indicate flash readiness
in different ways (see your camera's instruction manual).
Point your camera at the subject and gently press the shutter button to take the photo. The OK lamp
on the flash will light to indicate that the picture is exposed correctly.
AF / TTL OPERATION
AF - AUTO FOCUS
The AF illuminator helps the camera focus properly when the subject is in low light. If the camera is
compatible with an external AF mode, slightly press the shutter button and the red AF illuminator will
be automatically activated.
TTL
The flash performs pre-flashes for cameras to calculate the intensity of flash light output. The flash
light output is controlled automatically by the camera.
RED-EYE REDUCTION (Type N, OP and P)
The red-eye reduction function reduces the red-eye phenomenon by emitting pre-flashes before the
main flash. To setup this function, please refer to your camera's instruction manual.
FRONT AND REAR CURTAIN SYNCHRONIZATION
Some cameras offer the option of rear curtain synchronization (Rear mode) triggering the flash unit
at the end of the exposure time. Rear curtain synchronization is particularly advantageous when
using slow shutter speeds (slower than 1/30 sec.) or when shooting moving objects that have their
own source of light. Rear curtain synchronization gives a more realistic impression of movement
because the light streaks behind the light source instead of building up in front of it, as is the case
when the flash is synchronized with the front shutter curtain. Depending on its operation mode, the
camera uses shutter speeds slower than its sync speed.
Thank-you for purchasing a ProMaster Electronic flash. Please take a few
minutes to review these instructions so that you will get the most from your
purchase.
Specifications
Specifications and design are subject to change without notice.
Guide No. (ISO 100) 36(m) / 120 (ft) at 85mm position
Flash Head 28-35-50-85mm
Bounce Angle 0
O
, 30
O
, 45
O
, 60
O
, 90
O
Power source Four 1.5V AA size batteries (R6, LR6)
Flash duration 1/500-1/30000 sec.
Recycling time 0.3-7 sec.
Dimensions Approx. 75 x 85 x 112mm
Weight w/o battery Approx. 250g
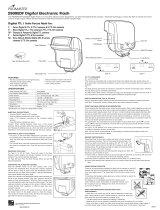
Bounce Angle
Indication
Test Button
Battery
Compartment
Cover
0
30
45
60
OFF
ON
READY
AUTO OK
Update Socket
TTL Bounce Flash
Zoom Head
AF Illuminator
For Type P flash: You can select the synchronization mode as either front curtain ( ) or rear
curtain ( ) at the back of the flash. The flash will fire according to the mode selected to match with
the camera’s shutter.
For Type C, N, OP, SA flash: The camera controls front or rear curtain synchronization, therefore no
setting is required on the flash.
Note: Rear curtain synchronization is only possible on cameras with this feature. See your camera’s
instruction manual for details.
POWER SAVING FUNCTION
If there is no communication between the flash and the camera for
approximately three minutes, the flash will automatically switch to the power
saving mode in order to save battery power. The Ready Light will be off
while in power saving mode.
To reactivate the flashgun, simply press your camera’s shutter or turn the
main switch off and on again. The flashgun does not completely power off in
power saving mode, however, power consumption is drastically reduced. If
you are not going to use your flashgun for an extended period of time, we recommend you to turn the
flash off.
BOUNCE PHOTOGRAPHY
Using direct flash to illuminate a subject results in a more harsh light, sometimes yielding
unattractive shadows. A softer light with more pleasing effects can be obtained by using bounce
flash. The head of this flash can be set to an angle of 30°, 45°, 60°, or 90° so
that the light from the flash can be reflected off the ceiling or walls. When
shooting indoors, this technique can help to create more natural-looking
pictures of people with softer shadows.
In order to have your pictures correctly exposed using bounce flash, the
following is recommended:
(1) Select white or reflective surfaces to bounce the light off. Otherwise your
pictures will have an unnatural color cast similar to that of the reflecting
surface.
(2) Set the camera’s exposure mode to Aperture Priority Auto (“A”) or Manual (“M”).
(3) Use a wider aperture than for a direct exposure, as 2 or 3 stops of light will be lost when using a
bounce flash.
ZOOM HEAD
The zoom flash head covers the focal length of 28-35-50-85mm in four stops. To choose these
positions, simply move the flash head as shown.
Note: Make sure the flash is set to a focal length equal to or wider than the camera lens focal length
to assure proper coverage.
UPDATE SOCKET
The advanced features of this ProMaster flash allow it to be reprogrammed as necessary. For more
details on the upgrade of the firmware, please contact your ProMaster dealer.
HINTS FOR MAINTENANCE AND BETTER FLASH PHOTOGRAPHY
• The flash unit does not function on camcorders.
• Misfiring sometimes occurs when the power switch is turned on and off continuously. If it happens,
power off the flash unit for a few seconds before switching it on again. The flash unit will then work
as normal.
• Do not leave or store the flash unit in temperatures exceeding 40ºC. This might adversely affect
the internal structure or performance of the flash unit. Particularly, do not leave the flash unit in the
automobiles during summer.
• Remove the batteries if you don’t intend to use the flash for a long period of time.
• The flash unit is not water-resistant. Rain and humid weather may cause irreparable damage to
the flash.
• The flash unit is composed of very delicate electronic parts. It should be protected against shock,
impact or other improper handling.
• The flash unit contains a high voltage condenser. Do not try to open the housing or repair the
flash.
• Do not clean the surface of the flash unit with any petroleum solvent, detergent solution or other
strong solvents. These solvents may cause damage to the flash.
WARNING
This flash unit may not function when the battery power is not sufficient or when user operates this
unit in an inappropriate way. To reset, switch the flash unit OFF using its main power switch. If
batteries are low, replace with fresh batteries. After a few seconds switch the flash to the ON position
and it should resume normal operation.
ONE YEAR UNCONDITIONAL GUARANTEE
If for any reason, this ProMaster product fails within ONE YEAR of the date of purchase, return this
product to your ProMaster dealer and it will be exchanged for you at no charge. ProMaster products
are guaranteed for ONE FULL YEAR against defects in workmanship and materials. If at any time
after one year, your ProMaster product fails under normal use, we invite you to return it to ProMaster
for evaluation.
www.promaster.com | Fairfield, CT 06825
28355085
mm
0°
90°
60°
45°
30°
OFF
ON
READY
AUTO OK
1
2
Wide Angle Diffuser
Focal lengths of 18 mm or more
can be illuminated (35 mm format)
using this diffuser.
ACCESSORIES
Type OP
Mounting Foot
Type C/N/P
Mounting Foot
Type SA
Mounting Foot
Type C, N, OP, SA
Type P
Mounting Foot
Back Panel
/


