Page is loading ...

Ref. AD3012
Termolink WiFi
Instructions Manual
Termolink WiFi
(Ref. AD3012)

Ref. AD3012
1
Termolink WiFi
DESCRIPTION
Digital screen indicatingroom
temperature and clock
Anti-freeze setting
4 customisable programs for each day
of the week
Ergonomic wall mount
Relay output NA 5A to 250 Vac
Power 230 Vac 50 Hz
Size 120 x 100 x 80 mm
BACK PLATE
TERMOLINK

C NA
F N
230 Vca
Ref. AD3012
2
Once the back plate is installed, snap on the thermostat
cover as shown in the drawing. Make sure that the
connection terminals are attached correctly to the back
plate and that the cover is correctly positioned. You will
see that the thermostat is sloped for correct viewing of
the screen at a height of 1.40 metres, recommended
for the installation.
Termolink WiFi
CONNECTION
INSTALATION SEQUENCE
WALL MOUNT
Connect the wires as indicated in the phase terminal
serigraph
CONNECT WIRES
CONNECT
CON
NECTION
TO
230 Vca
CON
NECTION
TO
THERMOSTAT
Attach the back plate to the wall passing the boiler wires
and the two 230 V mains wires through the openings.
Mark and drill the openings on the wall to receive the
plastic wall anchors.
Screw on and mount the back plate with the screws
while leaving the vertical screw loose to be able to level
the device.
Once levelled tighten up the screw.

Ref. AD3012
3
REMOTE
REMOTE
WPS
Termolink WiFi
CONNECT TO INTERNET
While the router is searching for WiFi devices press the
Termolink button and hold for 5 seconds.
The Termolink pilot light will start to flicker more rapidly,
which indicates that Termolink is now communicating
with the router.
SETTING
Locate the WPS button of the router. To connect the
router to Termolink press said button, and the router will
start a search for WiFi devices for at least one minute
(depending on brands and models). This is the time in
which the next step is to be carried out.
THE ROUTER
As of this moment, the two devices will communicate
and interchange programming information. This process
takes about 2 minutes, at the end of which the word
REMOTE is displayed on the screen. This means that
the device is ready to communicate with the exterior
COMMUNICATION ESTABLISHED
Once Termolink is connected to the mains and the heating system, connect it up to the WiFi network in your home. To
do this proceed as follows:

Ref. AD3012
4
Termolink WiFi
There are 3 functioning modes:
OFF (off)
The heating is switched off.
MAN (manual)
Use the button to lower the temperature and the button
to raise it.
AUTO (automatic)
The thermostat will control the heating according to the time
periods programmed.
By pressing the
button, the functioning mode of the heating
changes successively.
This displays the functioning mode, the average room
temperature and the current time and day of the week.
ON
OFF
CYCLE
OFF
MAN
AUTO
PM
AM
ON
OFF
CYCLE
OFF
MAN
AUTO
PM
AM
ON
OFF
CYCLE
OFF
MAN
AUTO
PM
AM
ON
OFF
CYCLE
OFF
MAN
AUTO
PM
AM
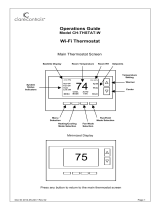
INSTRUCTIONS FOR USE
MAIN SCREEN
OFF
MAN
AUTO
Heating switched
Manual mode
Programmed mode
MODO DE FUNCIONAMIENTO
MAIN SCREEN
INST
RUCTIONS ON HOW THE THERMOSTAT FUNCTIONS IN LOCAL MODE
Anti-freeze
temperature
Program
button
Functioning
mode
Program
cycle
Heating on
Temperature
Room
temperature
Clock
Lower set point
temperature
Raise set point
temperature
OK
Day/date and
time display
Left Right
Connectivity
to the internet
ON
OFF
CYCLE
OFF
MAN
AUTO
REMOTE

Ref. AD3012
5
Termolink WiFi
In MAN mode, the device works like a normal thermostat. Use
the button to lower the temperature and the button to
raise it.
When either of these buttons is pressed,the desired setpoint
temperature will be displayed on the screen. Holding the
button down will raise or lower the set point temperature
quickly
ON
OFF
CYCLE
OFF
MAN
AUTO
PM
AM
ON
OFF
CYCLE
OFF
MAN
AUTO
PM
AM
ON
OFF
CYCLE
OFF
MAN
AUTO
PM
AM
In automatic mode, the thermostat will function according to
the program set over the week.
When the clock is adjusted to the right time, confirm by
pressing .
ON
OFF
CYCLE
OFF
MAN
AUTO
PM
AM
ON
OFF
CYCLE
OFF
MAN
AUTO
PM
AM
ON
OFF
CYCLE
OFF
MAN
AUTO
PM
AM
ON
OFF
CYCLE
OFF
MAN
AUTO
PM
AM
Press the button until the clock is displayed.
Then press the button to confirm the selection and the next
screen will be displayed, on which the day of the week will
be flashing. Now adjust the day of the week using the
buttons. The days of the week will flash as said buttons are
pressed. Stop pressing when the current day of the week is
displayed. To continue adjusting the hours, the minutes, and
so on, press the button. The time will flash and using the
buttons, navigate to the desired time.
FUNCTIONING ACCORDING TO PROGRAM
RAISING AND LOWERING THE TEMPERATURE
ADJUSTING THE TIME

Ref. AD3012
6
Termolink WiFi
The next time you press the button, it will be to adjust the
hour and minutes for the heating to switch off during that time
period of that day.
When you then press the button, the next programming
cycle for that day will be displayed.Proceed as above to adjust
the complete cycle. If you leave the cycle at zero, the device
will not take this into account and will proceed to apply the
next cycle.
Continue to program each of the time period cycles with each
set point temperature in the same way.If at any time you press
the button, you will exit the programming screen while
confirming all the adjustments.
Press the button when the letter
P
is displayed in the upper
right-hand corner.
Then press the
to confirm the selection and the programming
screen will be displayed.
The first option displayed for change is the day of the week. If you
start programming from the first day, press the button again
to set the first hour the heating is to be connected, in other words,
the first time period of functioning. With the or buttons you
can set the connection time. Press the button to adjust the
minutes.
Once these options have been set, press the button again to
adjust the set point temperature of the first time period of the first
day using the or buttons.
ON
OFF
CYCLE
OFF
MAN
AUTO
PM
AM
ON
OFF
CYCLE
OFF
MAN
AUTO
PM
AM
ON
OFF
CYCLE
OFF
MAN
AUTO
PM
AM
ON
OFF
CYCLE
OFF
MAN
AUTO
PM
AM
ON
OFF
CYCLE
OFF
MAN
AUTO
PM
AM
ON
OFF
CYCLE
OFF
MAN
AUTO
PM
AM
ON
OFF
CYCLE
OFF
MAN
AUTO
PM
AM
ON
OFF
CYCLE
OFF
MAN
AUTO
PM
AM
From the main screen, press the button until the icon
is displayed.
Then press the OK button to confirm. The screen will display
the minimum set point temperature. This is the temperature
at which the thermostat in automatic mode would start up
the heating even though this is not planned. This is activated
so that the room temperature will not drop too low in the
event of frost.
ADJUSTING THE ANTI-FREEZE TEMPERATURE
PROGRAMMING THE HEAT

Ref. AD3012
7
Termolink WiFi
ALDEA DOMOTICA, S.L.
SPAIN
UNITED KINGDOM
FRANCE
/