Santec 1120FL55 Installation guide

Category
Faucets
Type
Installation guide
WIDESPREAD
KEEP THIS INSTRUCTION BOOKLET FOR FUTURE REFERENCE
Parts Breakdown
3
7
9
8
10
14
11
12
5
4
6
1
2
13
#
PART
DESCRIPTION PART #
1 Complete Spout Assembly *
PS - 2 _ _00-U**
2 Complete Handle Assembly * YY - _ _**
rdering the part.
** Please specify option code when ordering the part.
14 Complete Pop-Up *
VP0202-1 VP0202-2 VP0202-3 VP0202-X
Hexagonal Nut PM-60712
Screws for Hexagonal Nut PM-617
13 Lift Rod* P0264
PM-332Fiber Washer11
7 Flexible Hoses P0441
8 Washer for Tee Connector PM-074
9 Tee Connector P0427
3 Hot Cartridge Only
P0418
4 Cold Cartridge Only
P0419
5 Complete Hot Valve P0466
6 Complete Cold Valve P0467
10 Spout Mounting Hardware P0431
0 1
*Illustration may not depict actual products
Spout
Counter surface
Remove tee connector and spout mounting hardware from the spout.
Apply a ring of silicone caulking around hole designated for the spout.
Do
supply lines.
Hole size for the spout and handle trim is 1-1/4
From the top of the sink or counter, insert the spouts threaded shank
the sink top.
wipe away excess silicone with a wet nger or damp cloth.
Spout Installation (1)
0 2
*Illustration may not depict actual products
Spout
From below, slip notched washer and gasket over spout shank. Align
notched washer and gasket to allow pop-up rod to pass through.
Attach wing nut and brass lock nut. Secure spout by tightening the two
screws on the wing nut. Thread tee connector and washer to the spout
shank
Spout Installation (2)
Notched rubber washer
Wing nut
Brass lock nut
Tee connector washer
Notched metal washer
Tee connector
Spout
Mounting
Hardware
and tighten to seal.
0 3
Remove the valve body mounting hardware from the valve body. Slip
through the appropriate hole next to the spout (HOT-left & COLD-right).
For proper handle turning direction, install the handle with the COLD
( blue label ) at the right side of sink and the handle with the HOT
( red label ) at the left side of the sink.
Handle trim is ready for drop-in installation.
DO NOT DISSASSEMBLE HANDLE TRIM FROM VALVE BODY.
Handle Trim Installation (1)
Valve Body
Mounting Hardware
Washer
Brass Lock Nut
Flexible hoses
*Illustration may not depict actual products
Handle Trim
0 4
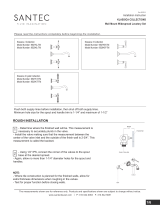
From underneath the sink or counter, screw the valve body mounting
hardware pieces back onto the valve body. First the washer, then the
brass lock nut.
Align the levers or cross handles properly against the spout. Tighten the
brass lock nut with a plumbers wrench until it secures the valve body
screwdriver.
Connect and tighten the inlet hoses to the supply lines.
avoid leakage.
After the connections have been made, remove the aerator housing by
unscrewing it counter-clockwise. Turn on the water supply at the valves
beneath the sink or counter and check for leakages at all joints. If water
leaks from any of the connections, tighten the connection until the
leakage stops.
If no leakage is present, slowly turn the handles to the full open position
and let the water ush for approximately 45 seconds.This can prevent
damages to the ceramic cartridges caused by debris in the supply lines.
Handle Trim Installation (2)
Inlet Hoses
Aerator
Housing
Handle Trim
0 5
Ball Rod Hole
Insert threaded end of the assembly up from beneath the sink.
the
facing toward the back of the sink. Then, tighten the lock nut from below.
Clean excess silicone with a wet nger or damp cloth.
Pop Up Drain Installation (1)
Drain Plug
Drain Flange
Gasket
Washer
Lock nut
Pop Up Drain
the
0 6
eye-screw of the drain plug is facing the wall so that the ball rod
will properly t into it.
Insert the ball rod washer into drain body followed by the ball rod, 2nd
washer, and ball rod nut. Tighten the ball rod nut until snug.
Gently push the horizontal ball rod down to place the plunger in the
up position.
Insert the lift knob into the back of the spout and (from underneath)
screw the lift rod onto the lift knob securely ( if applicable ).
Test pop-up for smooth operation and adjust if necessar y.
Pop Up Drain Installation (2)
Pop Up Drain
the
the
Slide the lift rod and knob through the lift rod strap and tighten thumb screw.
Gently push the horizontal ball rod down to place the drain plug in the up position.
Slip one leg of ball rod clip off horizontal rod and insert lift rod strap, reattach leg of ball rod clip.
Drain plug with
adjustable eye-screw
Drain tube
Ball rod
assembly
(ball rod, ball rod
nut, & 2 washers)
Lift rod
Lift knob
0 7
L IFET I ME L IMITE D WARRANTY
L ENGTH O F W A RRAN TY & WHO IS C OVE RED BY O U R WARRANTY
WHA T IS C OVERED BY OUR WA RRANTY
E X C LUSIO NS AND L I MITATIONS OF W ARRANTY
1.
2.
3.
1.
2.
3.
4.
5.
6.
7.
9.
8.
Finishes:
Cartridges:
Parts:
Drains
Crystals and/or glass
This warranty does not cover:
changes in the nish or in the product due to normal wear or again and does not
cover any product or parts which have been altered or used in a manner not typical
for the product.
SANTEC
Living nishes are unique, are intended to change over time and are exluded from the
nish warranty. Any product outdoors or in a marine environment are excluded from the
nish warranty.
  • Page 1 1
  • Page 2 2
  • Page 3 3
  • Page 4 4
  • Page 5 5
  • Page 6 6
  • Page 7 7
  • Page 8 8
  • Page 9 9
  • Page 10 10

Santec 1120FL55 Installation guide

Category
Faucets
Type
Installation guide

Ask a question and I''ll find the answer in the document

Finding information in a document is now easier with AI