
Friteuse
Handleiding
Friteuse
Mode d'emploi
Fritteuse
Bedienungsanleitung
Friggitrice
Manuale di istruzioni
Freidora
Manual de instrucciones
Fritadeira
Manual de instruções
Fritös
Bruksanvisning
Frituresteger
Instruktionsvejledning
Stekegryte
Brukerhåndbok
Rasvakeitin
Ohjekirja
NL
FR
DE
IT
ES
PT
S
DK
N
FIN
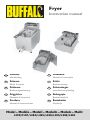
Fryer
Instruction manual
Model • Modèle • Modell • Modello • Modelo • Malli:
L370/P107/L484/L485/L490/L495/L300/L301

Table of Contents
Safety Tips . . . . . . . . . . . . . . . . . . . . . . . . . . . . . . . . . . . . . . . . . . . . . . . . . . . . . . . . . . . . . . . . . 1
Product Description . . . . . . . . . . . . . . . . . . . . . . . . . . . . . . . . . . . . . . . . . . . . . . . . . . . . . . . . . 1
Introduction . . . . . . . . . . . . . . . . . . . . . . . . . . . . . . . . . . . . . . . . . . . . . . . . . . . . . . . . . . . . . . . . 1
Pack Contents . . . . . . . . . . . . . . . . . . . . . . . . . . . . . . . . . . . . . . . . . . . . . . . . . . . . . . . . . . . . . . 1
Operation . . . . . . . . . . . . . . . . . . . . . . . . . . . . . . . . . . . . . . . . . . . . . . . . . . . . . . . . . . . . . . . . . 2
Connecting the Element/Control Panel (L370/P107/L484/L485) . . . . . . . . . . . . . . . . 2
Connecting the Element/Control Panel (L490/L495/L300/L301). . . . . . . . . . . . . . . . . 2
Connecting the Basket Handle (L370/P107/L484/L485) . . . . . . . . . . . . . . . . . . . . . . . 3
Cooking . . . . . . . . . . . . . . . . . . . . . . . . . . . . . . . . . . . . . . . . . . . . . . . . . . . . . . . . . . . . . 3
Thermal Cut-Out Reset . . . . . . . . . . . . . . . . . . . . . . . . . . . . . . . . . . . . . . . . . . . . . . . . 4
Cleaning, Care & Maintenance . . . . . . . . . . . . . . . . . . . . . . . . . . . . . . . . . . . . . . . . . . . . . . . . . 4
Troubleshooting . . . . . . . . . . . . . . . . . . . . . . . . . . . . . . . . . . . . . . . . . . . . . . . . . . . . . . . . . . . . 5
Technical Specifications . . . . . . . . . . . . . . . . . . . . . . . . . . . . . . . . . . . . . . . . . . . . . . . . . . . . . . . 5
Electrical Wiring . . . . . . . . . . . . . . . . . . . . . . . . . . . . . . . . . . . . . . . . . . . . . . . . . . . . . . . . . . . . 6
Compliance . . . . . . . . . . . . . . . . . . . . . . . . . . . . . . . . . . . . . . . . . . . . . . . . . . . . . . . . . . . . . . . . 6
Inhoudsopgave
Veiligheidstips . . . . . . . . . . . . . . . . . . . . . . . . . . . . . . . . . . . . . . . . . . . . . . . . . . . . . . . . . . . . . . 7
Productbeschrijving . . . . . . . . . . . . . . . . . . . . . . . . . . . . . . . . . . . . . . . . . . . . . . . . . . . . . . . . . . 7
Inleiding . . . . . . . . . . . . . . . . . . . . . . . . . . . . . . . . . . . . . . . . . . . . . . . . . . . . . . . . . . . . . . . . . . . 7
Verpakkingsinhoud . . . . . . . . . . . . . . . . . . . . . . . . . . . . . . . . . . . . . . . . . . . . . . . . . . . . . . . . . . 7
Werking . . . . . . . . . . . . . . . . . . . . . . . . . . . . . . . . . . . . . . . . . . . . . . . . . . . . . . . . . . . . . . . . . . . 8
Element/bedieningspaneel aansluiten (L370/P107/L484/L485) . . . . . . . . . . . . . . . . . . 8
Element/bedieningspaneel aansluiten (L490/L495/L300/L301) . . . . . . . . . . . . . . . . . . . 9
Friteusehandvat bevestigen (L370/P107/L484/L485)) . . . . . . . . . . . . . . . . . . . . . . . . . 9
Koken . . . . . . . . . . . . . . . . . . . . . . . . . . . . . . . . . . . . . . . . . . . . . . . . . . . . . . . . . . . . . . 9
Thermische uitschakelingsschakelaar . . . . . . . . . . . . . . . . . . . . . . . . . . . . . . . . . . . . . . 10
Reiniging, zorg & onderhoud . . . . . . . . . . . . . . . . . . . . . . . . . . . . . . . . . . . . . . . . . . . . . . . . . . . 10
Oplossen van problemen . . . . . . . . . . . . . . . . . . . . . . . . . . . . . . . . . . . . . . . . . . . . . . . . . . . . . 11
Technische specificaties . . . . . . . . . . . . . . . . . . . . . . . . . . . . . . . . . . . . . . . . . . . . . . . . . . . . . . . 11
Elektrische bedrading . . . . . . . . . . . . . . . . . . . . . . . . . . . . . . . . . . . . . . . . . . . . . . . . . . . . . . . . 12
Productconformiteit. . . . . . . . . . . . . . . . . . . . . . . . . . . . . . . . . . . . . . . . . . . . . . . . . . . . . . . . . . 12
Sommaire
Conseils de sécurité . . . . . . . . . . . . . . . . . . . . . . . . . . . . . . . . . . . . . . . . . . . . . . . . . . . . . . . . . 13
Description du produit . . . . . . . . . . . . . . . . . . . . . . . . . . . . . . . . . . . . . . . . . . . . . . . . . . . . . . . 13
iNTRODUCTION . . . . . . . . . . . . . . . . . . . . . . . . . . . . . . . . . . . . . . . . . . . . . . . . . . . . . . . . . . . 13
Contenu de l'emballage . . . . . . . . . . . . . . . . . . . . . . . . . . . . . . . . . . . . . . . . . . . . . . . . . . . . . . . 14
Operation . . . . . . . . . . . . . . . . . . . . . . . . . . . . . . . . . . . . . . . . . . . . . . . . . . . . . . . . . . . . . . . . . 14
Montage de l'ensemble Élément chauffant & Panneau de commande
(L370/P107/L484/L485) . . . . . . . . . . . . . . . . . . . . . . . . . . . . . . . . . . . . . . . . . . . . . . . . 14
Montage de l'ensemble Élément chauffant & Panneau de commande
(L490/L495/L300/L301) . . . . . . . . . . . . . . . . . . . . . . . . . . . . . . . . . . . . . . . . . . . . . . . . . 15
Montage de la poignée du panier (L370/P107/L484/L485) . . . . . . . . . . . . . . . . . . . . . 15
Cuisson . . . . . . . . . . . . . . . . . . . . . . . . . . . . . . . . . . . . . . . . . . . . . . . . . . . . . . . . . . . . . 15
Coupe-circuit thermique . . . . . . . . . . . . . . . . . . . . . . . . . . . . . . . . . . . . . . . . . . . . . . . 16
Nettoyage, entretien et maintenance . . . . . . . . . . . . . . . . . . . . . . . . . . . . . . . . . . . . . . . . . . . . 16
Dépannage . . . . . . . . . . . . . . . . . . . . . . . . . . . . . . . . . . . . . . . . . . . . . . . . . . . . . . . . . . . . . . . . . 17
Spécifications techniques . . . . . . . . . . . . . . . . . . . . . . . . . . . . . . . . . . . . . . . . . . . . . . . . . . . . . . 17
Raccordement électrique . . . . . . . . . . . . . . . . . . . . . . . . . . . . . . . . . . . . . . . . . . . . . . . . . . . . . 18
Conformité . . . . . . . . . . . . . . . . . . . . . . . . . . . . . . . . . . . . . . . . . . . . . . . . . . . . . . . . . . . . . . . . . 18
UK
NL
FR
Page is loading ...
Page is loading ...
Page is loading ...

1
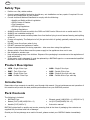
UK
Safety Tips
• Position on a flat, stable surface.
• A service agent/qualified technician should carry out installation and any repairs if required. Do not
remove any components on this product.
• Consult Local and National Standards to comply with the following:
• Health and Safety at Work Legislation
• BS EN Codes of Practice
• Fire Precautions
• IEE Wiring Regulations
• Building Regulations
• ALWAYS ensure oil levels are within the ‘MIN’ and ‘MAX’ levels. Failure to do so could result in fire.
• ALWAYS use a suitable cooking oil.
• ALWAYS remove excess moisture/water from food before frying to avoid excess foaming and spitting
of the oil.
• Change oil regularly. The flashpoint of oil (the point at which it ignites) gradually reduces the more it
is used.
• DO NOT cover the oil pan when frying.
• DO NOT immerse the appliance in water.
• Some surfaces become hot during operation - take care when using the appliance.
• Always switch off and disconnect the power supply to the appliance when not in use.
• Not suitable for outdoor use.
• Keep all packaging away from children. Dispose of the packaging in accordance to the regulations of
local authorities.
• If the power cord is damaged, it must be replaced by a BUFFALO agent or a recommended qualified
technician in order to avoid a hazard.
Product Description
Introduction
Please take a few moments to carefully read through this manual. Correct maintenance and operation of
this machine will provide the best possible performance from your BUFFALO product.
Pack Contents
The following is included:
BUFFALO prides itself on quality and service, ensuring that at the time of packaging the contents are
supplied fully functional and free of damage.
Should you find any damage as a result of transit, please contact your BUFFALO dealer immediately.
• L370 - Single 3 litre fryer
• P107 - Twin 3 litre fryer
• L484 - Single 5 litre fryer
• L485 - Double 5 litre fryer
• L490 - Single 5 litre fryer
• L495 - Double 5 litre fryer
• L300 - Single 8 litre fryer with tap
• L301 - Double 8 litre fryer with tap
•BUFFALO Fryer
• Basket (P107/L485/L495/L301 x 2)
• Handle (P107/L485 x 2)
• Element guard (L490/L300 x 1, L495/L301 x 2)
• Lid (P107/L485/L495/L301 x 2)
• Instruction manual

2
UK
Telephone Helpline: 0845 146 2887 (United Kingdom)
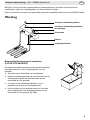
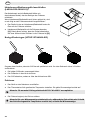
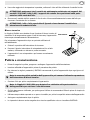
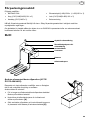
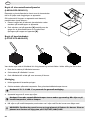
Operation
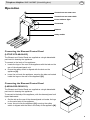
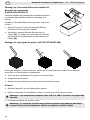
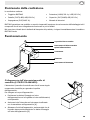
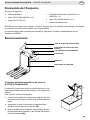
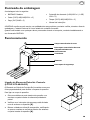
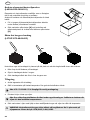
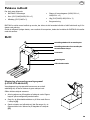
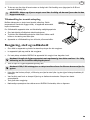
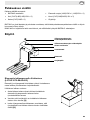
Connecting the Element/Control Panel
(L370/P107/L484/L485)
The Element and Control Panel are supplied as a single detachable
part to aid in cleaning the appliance.
To connect to the body of the appliance:
1. Locate the lugs on the rear of the appliance with the tabs on the
rear of the element/panel unit.
2. Ensure the safety switch is aligned with the slots on the
appliance [A].
3. Lower the unit onto the appliance, ensuring the tabs are located
inside the lugs on the rear of the appliance [B].
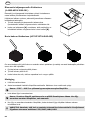
Connecting the Element/Control Panel
(L490/L495/L300/L301)
The Element and Control Panel are supplied as a single detachable
part to aid in cleaning the appliance.
To connect to the body of the appliance; with the element/panel unit
tipped backwards:
1. Slot the tab on the rear of the element/panel unit under the lugs
on the main body of the appliance.
2. Lower the unit onto the appliance [A], ensuring the safety
switch is aligned with the slots in the body of the appliance [B].
Thermal Cut-out reset cover
Thermal Cut-out reset switch
Power indicator light
Thermostat
Element
Safety switch
[B]
[A]
[B]
[A]

3
UK
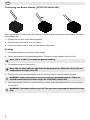
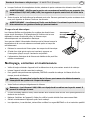
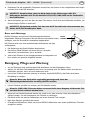
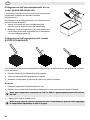
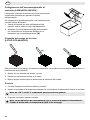
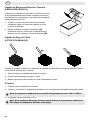
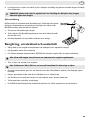
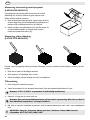
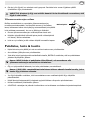
Connecting the Basket Handle (L370/P107/L484/L485)
Care must be taken to ensure that the handle is correctly located, and securely pulled back in to position
before being used.
1. Squeeze the two ends of the handle together.
2. Slot the ends of the handle in to the basket.
3. Lower the handle so that it slots over the frame of the basket.
Cooking
1. Connect the appliance to the mains power supply.
2. Set the thermostat to the desired temperature. The amber power indicator light turns On.
3. The appliance begins to heat the oil.
4. Once the oil is at the set temperature lower the food into the oil using the basket supplied.
5. Remove the basket from the oil once the food is cooked. Shake gently above the oil pan to remove
any excess oil.
Note: 170°C to 180°C is suitable for general cooking.
Note: The red Heat indicator light turns On during heat-up. When the oil is at the set
temperatures the light turns Off.
WARNING: Ensure the basket is securely located on the basket mounts. These are
located towards the front of the oil pan on L370/P107/L484/L485.
WARNING: The food and oil are very hot! Take care when removing the basket as oil may
drip.

4
UK
Telephone Helpline: 0845 146 2887 (United Kingdom)
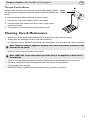
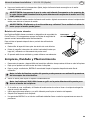
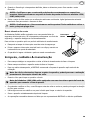
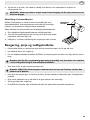
Thermal Cut-Out Reset
Buffalo Fryers are fitted with a Thermal Cut-Out safety feature. Should
the temperature exceed safe levels the appliance will automatically cut
power.
To reset the appliance aftera sufficient cool-down period:
1. Unscrew the cover of the Safety Cut-Out reset switch.
2. Press the small reset switch down until it clicks, using a blunt
pointed instrument.
3. The appliance is now reset and can be used as normal.
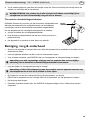
Cleaning, Care & Maintenance
• Always turn Off the appliance and disconnect from the power supply before cleaning.
• Always allow the appliance and oil to cool before cleaning.
• For best performance, BUFFALO recommend that the appliance is cleaned after each day of operation.
• Empty the oil to clean the appliance thoroughly.
• If the oil is to be reused then filtering it before refilling the pan will extend the oils cooking life.
• Use warm, soapy water and a damp cloth to clean the exterior of the appliance.
•Dry thoroughly after cleaning.
• A BUFFALO dealer or qualified technician should carry out repairs if required.
Note: Failure to clean the appliance regularly may result in premature activation of the
thermal cut-out switch.
Note: L300/L301 Fryers come with a tap at the front of the appliance to drain the oil
from the pan.
Reset
Switch

5
UK
Telephone Helpline: 0845 146 2887 (United Kingdom)
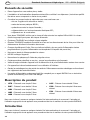
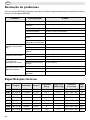
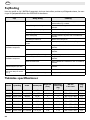
Tro ubl esh oo tin g
If your BUFFALO appliance develops a fault, please check the following table before making a call to the
Helpline.
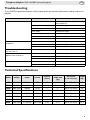
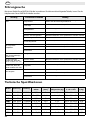
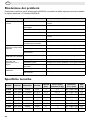
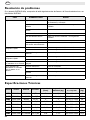
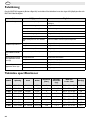
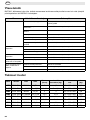
Technical Specifications
Fault Probable Cause Action
The appliance is not working The appliance is not switched on Check the appliance is plugged in correctly
and switched on
Plug and lead are damaged Call BUFFALO agent or qualified technician
Fuse in the plug has blown Replace the plug fuse
Power supply Check power supply
Internal wiring fault Call BUFFALO agent or qualified technician
Thermal cut-out activated Reset thermal cut-out
Safety switch not located properly Refit control/element unit
Appliance does not reach set
temperature
Faulty thermostat Call BUFFALO agent or qualified technician
Faulty element Call BUFFALO agent or qualified technician
Build-up of fat on the element Clean the appliance
Appliance heats up but indicator light
does not come on
Indicator light has expired Call BUFFALO agent or qualified technician
Power indicator light comes on but
appliance does not heat up
Faulty element Call BUFFALO agent or qualified technician
Faulty thermostat Call BUFFALO agent or qualified technician
Thermostat set incorrectly Check thermostat
Appliance slow to heat up Faulty element Call BUFFALO agent or qualified technician
Build-up of fat on the element Clean the appliance
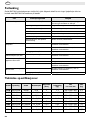
Model Voltage Power Current
Capacity
(litres)
Maximum
single load
(kg)
Dimensions
h x w x d (mm)
Weight
(kg)
L370 230V 50Hz 2000W 8.7A 3 1.2 300 x 180 x 400 4.2
P107 230V 50Hz 2 x 2000W 2 x 8.7A 2 x 3 2 x 1.2 300 x 360 x 400 8.2
L484 230V 50Hz 2800W 12.2A 5 2 300 x 270 x 400 5.8
L485 230V 50Hz 2 x 2800W 2 x 12.2A 2 x 5 2 x 2 300 x 540 x 400 10.8
L490 230V 50Hz 2800W 12.2A 5 2 300 x 283 x 450 7.7
L495 230V 50Hz 2 x 2800W 2 x 12.2A 2 x 5 2 x 2 352 x 550 x 454 14
L300 230V 50Hz 2900W 12.6A 8 3 402 x 283 x 520 8.5
L301 230V 50Hz 2 x 2900W 2 x 12.6A 2 x8 2 x 3 400 x 550 x 500 15.2

6
UK
Telephone Helpline: 0845 146 2887 (United Kingdom)
Electrical Wiring
This appliance is supplied with a 3 pin, moulded, BS1363 plug and lead, with a 13 amp fuse as standard.
The plug is to be connected to a suitable mains socket.
This appliance is wired as follows:
• Live wire (coloured brown) to terminal marked L
• Neutral wire (coloured blue) to terminal marked N
• Earth wire (coloured green/yellow) to terminal marked E
This appliance must be earthed, using a dedicated earthing circuit.
If in doubt consult a qualified electrician.
Electrical isolation points must be kept clear of any obstructions. In the event of any emergency
disconnection being required they must be readily accessible.
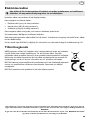
Compliance
The WEEE logo on this product or its documentation indicates that the product must
not be disposed of as household waste. To help prevent possible harm to human
health and/or the environment, the product must be disposed of in an approved and
environmentally safe recycling process. For further information on how to dispose of
this product correctly, contact the product supplier, or the local authority responsible
for waste disposal in your area.
BUFFALO parts have undergone strict product testing in order to comply with
regulatory standards and specifications set by international, independent, and federal
authorities.
BUFFALO products have been approved to carry the following symbol:
All rights reserved. No part of these instructions may be produced or transmitted in any form or by any means,
electronic, mechanical, photocopying, recording or otherwise, without the prior written permission of BUFFALO.
Every effort is made to ensure all details are correct at the time of going to press, however, BUFFALO reserve the
right to change specifications without notice.
Page is loading ...
Page is loading ...
Page is loading ...
Page is loading ...
Page is loading ...
Page is loading ...
Page is loading ...
Page is loading ...
Page is loading ...
Page is loading ...
Page is loading ...
Page is loading ...
Page is loading ...
Page is loading ...
Page is loading ...
Page is loading ...
Page is loading ...
Page is loading ...
Page is loading ...
Page is loading ...
Page is loading ...
Page is loading ...
Page is loading ...
Page is loading ...
Page is loading ...
Page is loading ...
Page is loading ...
Page is loading ...
Page is loading ...
Page is loading ...
Page is loading ...
Page is loading ...
Page is loading ...
Page is loading ...
Page is loading ...
Page is loading ...
Page is loading ...
Page is loading ...
Page is loading ...
Page is loading ...
Page is loading ...
Page is loading ...
Page is loading ...
Page is loading ...
Page is loading ...
Page is loading ...
Page is loading ...
Page is loading ...
Page is loading ...
Page is loading ...
Page is loading ...
Page is loading ...
Page is loading ...
Page is loading ...
Page is loading ...
Page is loading ...
Page is loading ...
Page is loading ...
Page is loading ...
Page is loading ...
Page is loading ...
Page is loading ...
Page is loading ...
Page is loading ...
Page is loading ...
-
 1
1
-
 2
2
-
 3
3
-
 4
4
-
 5
5
-
 6
6
-
 7
7
-
 8
8
-
 9
9
-
 10
10
-
 11
11
-
 12
12
-
 13
13
-
 14
14
-
 15
15
-
 16
16
-
 17
17
-
 18
18
-
 19
19
-
 20
20
-
 21
21
-
 22
22
-
 23
23
-
 24
24
-
 25
25
-
 26
26
-
 27
27
-
 28
28
-
 29
29
-
 30
30
-
 31
31
-
 32
32
-
 33
33
-
 34
34
-
 35
35
-
 36
36
-
 37
37
-
 38
38
-
 39
39
-
 40
40
-
 41
41
-
 42
42
-
 43
43
-
 44
44
-
 45
45
-
 46
46
-
 47
47
-
 48
48
-
 49
49
-
 50
50
-
 51
51
-
 52
52
-
 53
53
-
 54
54
-
 55
55
-
 56
56
-
 57
57
-
 58
58
-
 59
59
-
 60
60
-
 61
61
-
 62
62
-
 63
63
-
 64
64
-
 65
65
-
 66
66
-
 67
67
-
 68
68
-
 69
69
-
 70
70
-
 71
71
-
 72
72
-
 73
73
-
 74
74
-
 75
75
-
 76
76


Ask a question and I''ll find the answer in the document
Finding information in a document is now easier with AI
in other languages
- italiano: Buffalo Tools f/1.0L USM Manuale utente
- français: Buffalo Tools f/1.0L USM Manuel utilisateur
- español: Buffalo Tools f/1.0L USM Manual de usuario
- Deutsch: Buffalo Tools f/1.0L USM Benutzerhandbuch
- Nederlands: Buffalo Tools f/1.0L USM Handleiding
- português: Buffalo Tools f/1.0L USM Manual do usuário
- dansk: Buffalo Tools f/1.0L USM Brugermanual
- svenska: Buffalo Tools f/1.0L USM Användarmanual
- suomi: Buffalo Tools f/1.0L USM Ohjekirja