Hisense KF-1802GWE User guide
- Category
- Split-system air conditioners
- Type
- User guide
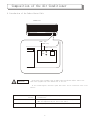
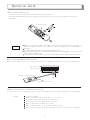
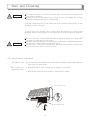
Hisense KF-1802GWE air conditioner provides cooling, drying, and fan functions. Its compact size offers the same capabilities as its predecessors. The microprocessor-controlled operation and simple one-touch wireless remote control facilitate automatic operation. It features a 12-hour ON or OFF timer, 1-hour OFF timer, and automatic or 3-step fan speed. The air sweep control distributes air evenly around the room for optimal comfort.
Hisense KF-1802GWE air conditioner provides cooling, drying, and fan functions. Its compact size offers the same capabilities as its predecessors. The microprocessor-controlled operation and simple one-touch wireless remote control facilitate automatic operation. It features a 12-hour ON or OFF timer, 1-hour OFF timer, and automatic or 3-step fan speed. The air sweep control distributes air evenly around the room for optimal comfort.


-
 1
1
-
 2
2
-
 3
3
-
 4
4
-
 5
5
-
 6
6
-
 7
7
-
 8
8
-
 9
9
-
 10
10
-
 11
11
-
 12
12
-
 13
13
-
 14
14
-
 15
15
-
 16
16
-
 17
17
-
 18
18
-
 19
19
-
 20
20
-
 21
21
-
 22
22
-
 23
23
-
 24
24
-
 25
25
-
 26
26
-
 27
27
-
 28
28


Hisense KF-1802GWE User guide
- Category
- Split-system air conditioners
- Type
- User guide
Hisense KF-1802GWE air conditioner provides cooling, drying, and fan functions. Its compact size offers the same capabilities as its predecessors. The microprocessor-controlled operation and simple one-touch wireless remote control facilitate automatic operation. It features a 12-hour ON or OFF timer, 1-hour OFF timer, and automatic or 3-step fan speed. The air sweep control distributes air evenly around the room for optimal comfort.
Ask a question and I''ll find the answer in the document
Finding information in a document is now easier with AI
Related papers

Other documents
-
 Hisense Group KFR 2601GW/BPE User manual
-
 Hisense Group KFR 28GWE User manual
-
 Hisense Group KFR-3208GW User manual
-
 Tadiran Telecom TGI-12H User manual
-
Sanyo SAP-KRV126EH Owner's manual
-
Airwell GCXV26RCA Technical & Service Manual
-
-
-
-
Panasonic CS-KS18NB4UW & CZ-18BT1U + CU-KS18NKU User manual


