Page is loading ...

This product is Listed by
Underwriters Laboratories Inc.
Representative samples of this
product have been evaluated
by UL and meet applicable
safety standards.
This product is Listed by
Underwriters Laboratories Inc.
Representative samples of this
product have been evaluated
by UL and meet applicable
safety standards.
This product is Listed by
Underwriters Laboratories Inc.
Representative samples of this
product have been evaluated
by UL and meet applicable
safety standards.
This product is Listed by
Underwriters Laboratories Inc.
Representative samples of this
product have been evaluated
by UL and meet applicable
safety standards.
DO NOT REMOVE. REPLACE IF DAMAGED OR REMOVED.
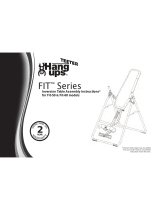
IMPORTANT SAFETY INSTRUCTIONS
READ ALL INSTRUCTIONS BEFORE USING THE INVERSION TABLE
Owner's Manual
900ia Inversion Table
To download and print Teeter's 900ia instructions,
visit the product support page at teeter.com or scan with your smartphone
EN
Specifications subject to change without notice. Teeter and Teeter logo are registered trademarks of Teeter. © 2016 Teeter. International law prohibits any copying. LI9000 0516-0
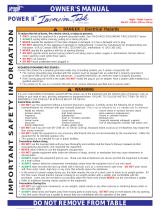
FAILURE TO FOLLOW INSTRUCTIONS AND WARNINGS COULD RESULT IN SERIOUS INJURY OR DEATH.
To reduce the risk of injury:
• Read and understand all the instructions, review all other accompanying documents, and inspect the equipment before using the
inversion table. It is your responsibility to familiarize yourself with the proper use of this equipment and the inherent risks of inversion if
these instructions are not followed, such as falling on your head or neck, pinching, entrapment, equipment failure, or aggravating a pre-
existing medical condition. It is the responsibility of the owner to ensure that all users of the product are fully informed about the proper
use of the equipment and all safety precautions.
• DO NOT use the equipment without a licensed physician’s approval. Carefully review the following list of medical contraindications for
inversion with your licensed physician (this is not an exhaustive list, it is intended only for reference):
• ALWAYS be certain the Ankle Lock System is properly adjusted and fully engaged, and that your ankles are secure before using the
equipment. HEAR, FEEL, SEE and TEST that the Ankle Lock System is snug, close-fitting and secure EVERY TIME you use the equipment.
• ALWAYS wear securely tied lace-up shoes with a flat sole, such as a normal tennis-style shoe.
• DO NOT wear any footwear that could interfere with securing the Ankle Lock System, such as shoes with thick soles, boots, high-tops or
any shoe that extends above the anklebone.
• DO NOT use the inversion table until it is adjusted properly for your height and body weight. Improper settings can cause rapid inversion
or make returning upright difficult. New users, and users who are physically or mentally compromised, will require the assistance of a
spotter. Make sure the equipment is set to your unique user settings prior to each use.
• DO NOT sit up or raise head to return upright. Instead, bend knees and slide your body to the foot-end of the inversion table to change
weight distribution. If locked out in full inversion, follow the instructions for releasing from the locked position before returning upright.
• DO NOT continue using the equipment if you feel pain or become light-headed or dizzy while inverting. Immediately return to the upright
position for recovery and eventual dismount.
• DO NOT use if you are over 6 ft 6 in (198 cm) or over 300 lbs. (136 kg). Structural failure could occur or head/neck may impact the floor
during inversion.
• DO NOT allow children to use this machine. Keep children, bystanders, and pets away from machine while in use. The inversion table
is not intended for use by persons with reduced physical, sensory or mental capabilities, unless they are given supervision and instruction
concerning use of the machine by a person responsible for their safety.
• DO NOT store the inversion table upright if children are present. Fold and lay the table on the floor. DO NOT store outdoors.
• DO NOT use aggressive movements, or use weights, elastic bands, any other exercise or stretching device or non-Teeter® attachments
while on the inversion table. Use the inversion table only for its intended use as described in this manual.
• DO NOT drop or insert any object into any opening. Keep body parts, hair, loose clothing and jewelry clear of all moving parts.
• DO NOT use in any commercial, rental or institutional setting. This product is intended for indoor, home-use only.
• DO NOT operate equipment while under the influence of drugs, alcohol, or medication that may cause drowsiness or disorientation.
• ALWAYS inspect the equipment prior to use. Make sure all fasteners are secure.
• ALWAYS replace defective components immediately and/or keep the equipment out of use until repair.
• ALWAYS position equipment on a level surface and away from water or ledges that could lead to accidental immersion or falls.
• Refer to additional warning notices posted on the equipment. If a product label or Owner’s Manual should become lost, damaged or
illegible, contact Customer Service for replacement.
WARNING
!
• Middle ear infection
• Extreme obesity
• Pregnancy
• Hiatal or ventral hernia
• Eye conditions like glaucoma,
retinal detachment or
conjunctivitis
• Chronic sinusitis
• High blood pressure or
hypertension
• Heart or circulatory disorders
• Use of anticoagulants
(including high doses of
aspirin)
• Weakness, frailty, or mobility
issues
• Dizziness, trouble with
coordination or head-down
disorientation
• Vertigo, motion sickness or
inner ear disorders
• Brain injury or recent head
trauma
• Recent stroke or transient
ischemic attack
• Spinal injury or conditions
impacting the spinal cord
• Cerebral sclerosis
• Medical conditions associated
with the weight-bearing joints
• Acutely swollen joints
• Bone weakness (osteoporosis)
• Recent or unhealed fractures
• Medullary pins or surgically
implanted orthopedic supports
• Any other medical condition
that may be made more
severe by an elevation of blood
pressure, intracranial pressure
or the mechanical stress of the
inverted position

The Ankle Comfort Dial rotates into a High (1) or Low (2) setting (Figure 9), with a one inch height variance.
Set the Ankle Comfort Dial so the Front & Rear Ankle Cups secure around the smallest part of your ankles
(with minimal distance between the Ankle Lock System and the top of your foot). This will reduce body slide
on the Table Bed while inverted, which can cause a shift in weight distribution and interfere with the ease of
which you can control your rotation.
Attach the Angle Tether to the U-Bar under the Table Bed (Figure 8) to limit the degree of rotation. Slide
the buckle to lengthen or shorten the tether to pre-set your desired maximum inversion angle, or unclip the
tether altogether when you are ready to rotate into full inversion.
Main Shaft: Determine a Height Setting
The Roller Hinges control the responsiveness or rate of rotation of
the inversion table. There are three holes; the hole selection
depends both on your body weight and the rotational
responsiveness you desire (diagram right). For users just learning to
use the inversion table, use the 'Beginner / Partial Inversion' setting.
Changing the Roller Hinge Setting
1. Pull out the Height-Selector Locking Pin and slide the Main Shaft
in all the way to the very last hole (the storage setting near the Rear Ankle Cups). Release and engage the Pin (Figure 1).
2. Stand in front of the Table Bed and rotate it opposite from use (Figure 2) to rest against the Crossbar of the A-Frame.
3. Grasp each Roller Hinge under the Pivot Pins, using your thumbs to open the Self-Locking Hooks over the Pivot Pins (Figure 3).
Lift both sides of the Table Bed out of the A-Frame and rest the head of the Table Bed on the floor.
4. Open each Cam Lock completely. Disengage the Roller Hinge from the Bracket Pin and slide it to the desired setting (Figure 4).
Engage the Bracket Pin in the same Roller Hinge hole setting on each side. Secure the Cam Lock.
5. Re-attach the Table Bed into the A-Frame Hinge Plates (Figure 5). Ensure the Self-Locking Hooks snap closed over each Roller Hinge
Pivot Pin. Rotate the Table Bed to the use position and adjust the Main Shaft for use (Figure 6).
Labeled
right on the equipment!
Figure 1 Figure 2 Figure 3 Figure 4 Figure 5 Figure 6
Figure 7
Figure 8
Figure 9
900ia Owner’s Manual - 2
A
80-120 lbs
120-220 lbs
36-54 kg
220-300 lbs
54-100 kg
100-136 kg
Beginner / Partial Inversion Suggested for Full Inversion
opposite Pivot Pin
Bottom Hole
near Pivot Pin
Top Hole Middle Hole
B C
Most
Responsive Least
Responsive
User Settings
1. Stand on the left side of the A-Frame. Pull out the Height-Selector Locking Pin with your right hand
while sliding the Main Shaft out with your left (Figure 7). For ease of adjustment, lower the Main Shaft
below horizontal to lengthen and raise the Main Shaft above horizontal to shorten.
2. Start by sliding the Main Shaft until the last setting you can read is one inch greater than your height
(e.g. if you’re 5’10”/178 cm, the last numbers visible will be 5’11”/180 cm). This helps to ensure that the rotation
of the table is not too fast. You will test to see if this setting is right for you later. Your ideal height setting will
depend on your weight distribution and could vary several inches on either side of your actual height.
3. Release the spring-loaded Height-Selector Locking Pin to fully engage a hole
setting. Use caution to prevent pinching fingers. Ensure the Pin passes
completely through the Main Shaft.
Roller Hinges: Select a Hole Setting
There are four (4) User Settings on your Teeter® that must be properly adjusted for your unique needs and body type. Take time to find
your ideal settings. Every time prior to using the inversion table, make sure the User Settings are adjusted to your personal settings.
Angle Tether: Pre-Set the Angle
Ankle Comfort Dial™: Find Your Setting
1Set Height
Product images throughout this document may vary from your model.
Failure to set these adjustments correctly may result in too rapid inversion or difficulty returning upright.
WARNING
!

Prior to inverting, properly secure your ankles by following these steps:
1. With your back to the Table Bed, and using the handles to steady yourself, carefully step inside the
A-Frame to stand next to one side of the Main Shaft (the A-Frame Crossbar will be behind your
legs) (Figure 10). Lift the foot closest to the Main Shaft over the Ankle Lock System and place it on
the floor on the other side, to straddle the Main Shaft.
2. If the Ankle Lock System is closed, push down on the EZ-Reach Handle, then push outward to
open it all the way. Release the handle in the open position.
3. To balance yourself, rest only your lower body against the lower portion of the Table Bed as you
slide one ankle at a time from the side (Figure 11) between the Front & Rear Ankle Cups, placing
your feet on the Ankle Comfort Dial.
Do not insert your foot into the Ankle Lock System as you would slide your foot into a shoe (Figure
11A). Your feet should always be either on the floor or on the Ankle Comfort Dial; never use any
other part of the inversion table as a step.
4. Press your ankles back firmly against the Rear Ankle Cups, then slightly rotate the tops of the Cups
so they are angled toward the back of your leg/Achilles tendon (Figure 12). This will allow the Cups
to rotate somewhat as you invert so the cushioned part comfortably supports your ankles.
5. Push down on the EZ-Reach Handle (Figure 13), pull toward your legs and release when the Front
& Rear Ankle Cups fit snug, with a close fit against the smallest part of your ankles (Figure 14). If
there is too much distance between the Cups and the top of your feet, refer to Ankle Comfort
Dial: Find Your Setting. Jiggle the EZ-Reach Handle from front to back to make sure it has fully
engaged and is locked securely. Verify that no part of your footwear or garments touch or interfere
with the EZ-Reach Ankle Lock System in any way during inversion.
Secure Your Ankles
Employ the method of “HEAR, FEEL, SEE, TEST” every time you secure your ankles in the inversion table:
HEAR the locking EZ-Reach Handle click into place;
FEEL the EZ-Reach Handle to make sure it is fully engaged and locked in its setting, and FEEL that the
Front & Rear Ankle Cups are close-fitting around the smallest part of your ankles;
SEE that the EZ-Reach Handle is secure, and does not move out of position, and SEE that there is NO
space between your ankles and the Ankle Cups.
TEST the EZ-Reach Ankle Lock System enclosure to ensure that it is snug, close-fitting and secure by
wiggling and attempting to pull your feet through the Ankle Cups. Ensure that you CANNOT disengage
from the Ankle Cups each time before attempting to invert.
Figure 10
Figure 11
Figure 11A
Figure 12
Figure 13 Figure 14
Labeled
right on the equipment!
2Lock Ankles
BEFORE USING THE INVERSION TABLE
Make sure the inversion table rotates smoothly to the fully inverted position and back, and that all fasteners are secure. Ensure that there
is adequate clearance to rotate in front, above and behind you.
Prepare to Invert 900ia Owner’s Manual - 3
WARNING
!
FAILURE TO PROPERLY SECURE THE ANKLES COULD RESULT IN SERIOUS INJURY OR DEATH!
ALWAYS
check that the Ankle Lock
System is fully engaged in a hole setting that brings the Cups to a snug, close fit against the smallest part of the ankles.
ALWAYS
wear
securely tied, lace-up shoes with a flat sole, such as a tennis shoe. DO NOT wear shoes with thick soles, boots, high-tops or any shoe that
extends above the anklebone, as this type of footwear could interfere with properly securing your ankles. NEVER use the inversion table
face down. DO NOT attempt to invert or lean your upper body against the Table Bed before securing your ankles.

Testing Your Balance and Rotation Control
When adjusted properly, you will control the rotation of the inversion table by simply shifting your body weight by moving your arms or
bending your knees. Your ideal balance settings are determined by your body type and weight distribution - this is why your Main Shaft
setting may differ from your actual height.
It’s important to take time, test your settings, and ensure a relaxing, enjoyable experience! Failure to properly adjust your height setting
may result in too rapid inversion or difficulty returning upright.
Set the Angle Tether and for your first few inversion sessions, ask a spotter to assist you until you are able to find your correct balance
setting and are comfortable with the operation of the inversion table.
1. Lean back and rest your head on the Table Bed with your arms at your sides.
• If balanced correctly, the inversion table should begin to rotate slightly, with
the Main Shaft lifting a few inches off the bumper of the Crossbar (Figure 15).
• The Main Shaft may be TOO SHORT if the inversion table rotates so that the
Main Shaft lifts more than a few inches off the Crossbar, to horizontal (0°) or
beyond. Carefully dismount, lengthen the height setting by one hole,
secure your ankles again and re-test.
• The Main Shaft may be TOO LONG if the inversion table does not rotate at all,
and the Main Shaft remains seated firmly on the Crossbar. Carefully dismount,
shorten the height setting by one hole, secure your ankles again and re-test.
Your Main Shaft setting should remain the same as long as you continue to use the
same Roller Hinge setting and your weight does not fluctuate substantially. If you
change your Roller Hinge setting, you should test your balance and control again.
Figure 15
Balanced Correctly: Main
Shaft lifts slightly off Crossbar
0° horizontal
60°
90°
Rotating Into Inversion
To ensure the inversion table does not rotate too far, too quickly, be sure that you have attached the
Angle Tether and completed the balance testing.
1. With your head resting against the Table Bed, raise one arm at a time to begin rotation
(Figure 16). For maximum control and comfort, every movement should be slow and
deliberate (the faster you move, the faster the inversion table will rotate).
2. Practice controlling the speed and angle of rotation by slowly moving your arms back
and forth.
3. Once you’ve reached the maximum angle allowed by the Angle Tether, rest both arms over
your head. Relax and breathe deeply to help your muscles relax (Figure 17).
Returning Upright
1. To begin rotating back to starting position, slowly bring your arms to your sides.
2. Since your body may have lengthened or shifted on the Table Bed while inverted, arm
movements may not be enough to return you completely upright. Simply bend your knees
slightly while shifting your body weight toward the foot-end of the Table Bed (Figure 18). DO
NOT lift your head, rely solely on the handles or try to sit up (Figure 19).
3. Stop and rest for a few minutes just past horizontal (0°) to help prevent dizziness and allow
your back to re-compress without discomfort before returning completely upright.
If you still have trouble returning upright after following these suggestions, adjust your User Settings
and test your balance and rotation control again.
Figure 16
Figure 18
Figure 19
Prepare to Invert (continued)
Inverting
900ia Owner’s Manual - 4
Figure 17
To release from full inversion lock-out (see pg 5), reach one hand behind your head and pull the
table bed toward your back. To return upright, place arms at your sides. If this does not work, DO
NOT SIT UP. Use handles and BEND YOUR KNEES to shift body weight to the foot-side of the table
bed. If you have difficulty returning upright, consult the 'Testing Your Balance' section.
WARNING
!

Full Inversion
Full inversion is defined as hanging completely upside down (90°) with your back free from the Table
Bed. Many Teeter® users enjoy this option because of the added freedom of movement for stretches and
exercises. However, DO NOT attempt this step until you are completely comfortable controlling the rotation
of the inversion table and and are able to fully relax at an angle of 60°. To fully invert:
1. Disconnect the Angle Tether.
2. Adjust the Roller Hinges to Setting A to enable the inversion table to “lock” firmly in full inversion.
If you are 220 lbs (100 kg) or more, set the Roller Hinges to Setting B (see User Settings, pg 2).
3. Slowly raise both hands over your head to begin rotation. You may need to assist the last
few degrees of rotation by pushing on the floor or A-Frame until the Table Bed stops
against the Crossbar (Figure 20).
4. Relax and allow your body to pull away from the Table Bed so you are hanging freely. If you
tense up or press your back against the Table Bed, you will likely come “unlocked.”
5. In your correct balance setting, your weight will keep the Table Bed “locked” in this position
until you are ready to return upright. If unable to maintain an adequate “lock” while fully
inverted, contact Teeter® Customer Service for options.
To Release from the Inverted “Locked” Position:
1. With one hand, reach behind your head and grasp the Table Bed and Bed Frame Extension
(Figure 21). With the other hand, grasp the base of the A-Frame in front.
2. Pull both hands together (Figure 22). This will rotate the Table Bed out of the “locked”
position. Keep elbows in to avoid pinching between the A-Frame and Table Bed
(Figure 23). Follow the instructions for Returning Upright on the previous page.
Dismounting
1. Push down on the EZ-Reach Handle to disengage the lock, then push out to open
the Ankle Lock System all the way (Figure 24).
2. Release the handle in the open position.
3. Keep your lower body supported against the Table Bed as you step onto the floor.
Carefully stand up and ensure you have your balance before stepping over the Main Shaft
and finishing your dismount.
Figure 14
60°
90°
Figure 20
Figure 21
Figure 22
Figure 23
Figure 24
Inverting (continued) 900ia Owner’s Manual - 5
Folding For Storage
1. Disconnect the Angle Tether.
2. Pull out the Height-Selector Locking Pin and slide the Main Shaft in all the way to the last
hole (the storage setting near the Rear Ankle Cups). Release and engage the Pin.
3. Stand in front of the Table Bed and rotate it opposite from use until it rests against the
Crossbar of the A-Frame (Figure 25).
4. Pull up on the Spreader Arms to fold the A-Frame (Figure 26), leaving the A-Frame legs open
to a width of 16-20” for stability. Use caution to prevent pinching fingers.
16-20”
Figure 25
Figure 26
Tipping Hazard: Leave A-Frame open wide enough to remain stable, or secure to a wall to prevent
tipping. If children are present, store flat on the floor, not upright.
Figure 27
WARNING
!
Storage & Maintenance
If you opt to leave the inversion table open and ready for use, be sure to SECURE the equipment to deter
unintentional rotation. You can either A. loop the Angle Tether around the Main Shaft and Crossbar, then
attach it to itself with the clip (Figure 27), or B. secure with a Key Lock (available to order at teeter.com).
Test to ensure the inversion table cannot rotate.
Maintenance
Wipe with a damp cloth to clean. Prior to every use, check for wear and tear. Replace damaged or worn
parts immediately. Keep out of service until repaired. Contact Teeter for service recommendations.

Get Started
Control Your Rotation:
The angle and speed of rotation will greatly impact your inversion
experience. To limit the angle of rotation, pre-set the Angle Tether (pg 2). To control speed or
responsiveness of rotation, optimize the Roller Hinges and Main Shaft settings for your body type
(pg 2). Take time to test and adjust your settings (pg 4) with the help of a spotter until you are able
to fully control the rotation of the Teeter by simply shifting the weight of your arms.
Determine the Angle:
Start at a modest angle (20°-30°) for the first few weeks or until you
become comfortable with the sensation and operation of the equipment. Once you are able to
fully relax, advance to greater angles of inversion to increase decompression benefits. Work up to
60° (parallel with the A-frame rear legs) or beyond for best results, but be sure to advance slowly
and listen to your body – relaxation is key. Many users never do more than 60°, and that's just
fine! That said, some advanced users enjoy the added freedom of movement for stretches and
exercises at full inversion (90°).
Determine the Duration:
Begin with short 1-2 minute sessions to allow your body to adapt
to inversion. Over time, as you feel comfortable, gradually work up to a duration that allows your muscles to
fully relax and release so your back can decompress. This should typically take about 3-5 minutes.
Make it a Habit:
Most users will find better results with shorter, more frequent sessions than longer sessions done
infrequently. Ideally, work it into your routine so that you are able to invert with your Teeter several times a day.
Realize Benets
Relax & Release:
Close your eyes, take deep breaths and elongate your body. Focus on un-tensing your muscles to allow
your spine and joints to decompress. The better you are able to relax, the more benefits you will feel.
Add Stretching & Movement:
Intermittent Traction (alternating inversion with rest periods) or oscillation (rhythmic
rocking) can help you get used to the feeling of inversion and encourage muscle relaxation. Add movement and stretching
to help maximize the benefits for your joints and ligaments: gently stretch and twist while partially or fully inverted, or use the
A-Frame, or Grip-and-Stretch Handles to add decompression.
Give it Time:
Like starting any new exercise program, it can take some time to see the results. Some people feel the benefits
immediately and some take longer. Be patient, stick with it and invert often.
Maximize Comfort
Increase Ankle Comfort:
Wear socks with lace-up shoes – the material will provide added cushion and support for the
ankles. Adjust the Ankle Comfort Dial for minimal space between the foot and platform. Slightly rotate the top of the Rear Cups
toward your ankles so they will rotate to support your heels as you invert. Secure the Ankle Lock System for a snug, close fit.
Reduce Muscle Soreness:
As with any exercise program, you may experience mild soreness when you first get started.
While you're relaxed, your body is making huge changes as your skeleton and muscles adapt. Don't do too much, too soon -
begin with a modest angle and shorter duration to reduce the likelihood of soreness.
Listen to Your Body:
Respond to any signs of discomfort by making changes: reduce the angle and/or duration, try
different times of day, take deep breaths, and add gentle movement and stretching. When you feel like you've had enough,
return upright! Inversion is all about relaxation and enjoyment.
Return Upright Slowly:
Be sure to rest at just past horizontal (0°) for 15-30 seconds or more to allow your body to readjust
and your back to gradually re-compress before dismounting the equipment.
Understand the Equipment:
Watch the Getting Started DVD for more inverted stretching and exercise tips. Read and
always follow the Owner’s Manual. Always check that your personalized User Settings are correct before inverting, and always
lock in your ankles.
Get the Most Out of Your Teeter 900ia Owner’s Manual - 6
0°
60°
90°
/