LG F4ZN500S1 Owner's manual

Category
Washing machines
Type
Owner's manual
www.lg.com
Copyright © 2019 - 2020 LG Electronics Inc. All Rights Reserved
OWNER'S MANUAL
WASHING MACHINE
Before beginning installation, read these instructions carefully. This will simplify
installation and ensure that the product is installed correctly and safely. Leave
these instructions near the product after installation for future reference.
EN ENGLISH
F*WN*, F*ZN*
MFL71445708
Rev.03_042820
CZ ČEŠTINA
SK SLOVENČINA
TABLE OF CONTENTS
This manual may contain images or content
different from the model you purchased.
This manual is subject to revision by the
manufacturer.
IMPORTANT SAFETY INSTRUCTIONS ........................................3
READ ALL INSTRUCTIONS BEFORE USE ..................................................... 3
WARNING
.........................................................................................................3
CARING FOR THE ENVIRONMENT
................................................................8
Disposal of Your Old Appliance
.........................................................................8
INSTALLATION ...............................................................................9
Parts and Specifications....................................................................................9
Installation Place Requirements......................................................................10
Unpacking the Appliance.................................................................................12
Levelling the Appliance
...................................................................................12
Connecting the Water Inlet Hose
....................................................................13
Installing the Drain Hose
.................................................................................14
OPERATION .................................................................................15
Operation Overview ........................................................................................15
Preparing the Laundry.....................................................................................15
Adding Detergents and Softeners
...................................................................16
Control Panel
..................................................................................................18
Programme Table
............................................................................................ 19
Consumption Data
..........................................................................................22
Extra Options and Functions
........................................................................... 23
SMART FUNCTIONS ....................................................................25
Using LG SmartThinQ Application ..................................................................25
Using Smart Diagnosis....................................................................................28
MAINTENANCE ............................................................................ 29
Cleaning After Every Wash .............................................................................29
Cleaning the Appliance Periodically
................................................................30
TROUBLESHOOTING .................................................................. 32
Before Calling for Service ...............................................................................32
OPERATING DATA .......................................................................39
Product Fiche ..................................................................................................39
3
EN
IMPORTANT SAFETY INSTRUCTIONS
READ ALL INSTRUCTIONS BEFORE USE
The following safety guidelines are intended to prevent unforeseen
risks or damage from unsafe or incorrect operation of the
appliance.
The guidelines are separated into ‘WARNING’ and ‘CAUTION’ as
described below.
Safety Messages
This symbol is displayed to indicate matters and operations
that can cause risk. Read the part with this symbol carefully
and follow the instructions in order to avoid risk.
WARNING
This indicates that the failure to follow the instructions can cause
serious injury or death.
CAUTION
This indicates that the failure to follow the instructions can cause the
minor injury or damage to the product.
WARNING
WARNING
To reduce the risk of explosion, fire, death, electric shock,
injury or scalding to persons when using this product, follow
basic precautions, including the following:
4
EN
Technical Safety
This appliance can be used by children aged from 8 years and above
and persons with reduced physical, sensory or mental capabilities
or lack of experience and knowledge if they have been given
supervision or instruction concerning use of the appliance in a safe
way and understand the hazards involved. Children shall not play
with the appliance. Cleaning and user maintenance shall not be made
by children without supervision.
Children of less than 3 years should be kept away unless
continuously supervised.
If the power cord is damaged, it must be replaced by the
manufacturer, its service agent or similarly qualified persons in order
to avoid a hazard.
Ventilation openings must not be obstructed by a carpet.
This appliance is intended to be used in household only and not in
applications such as;
Staff kitchen areas in shops, offices and other working
environments;
Farm houses;
By clients in hotels, motels and other residential type environments;
Bed and breakfast type environments;
Areas for communal use in blocks of flats or in launderettes
Use a new hose or hose-set supplied with the appliance. Reusing old
hoses can cause a water leak and subsequent property damage.
The water pressure must be between 100 and 1000 kPa.
The maximum capacity in some cycles for dry clothes to be washed
is 8 kg.
Installation
Never attempt to operate the appliance if it is damaged,
malfunctioning, partially disassembled, or has missing or broken
parts, including a damaged cord or plug.
This appliance should only be transported by two or more people
holding the appliance securely.
5
EN
Do not install the appliance in a damp and dusty place. Do not install
or store the appliance in any outdoor area, or any area that is subject
to weathering conditions such as direct sunlight, wind, or rain or
temperatures below freezing.
Tighten the drain hose to avoid separation.
If the power cord is damaged or the hole of the socket outlet is loose,
do not use the power cord and contact an authorized service centre.
Do not plug the appliance into multiple outlet sockets, power boards,
or an extension power cable.
This appliance must not be installed behind a lockable door, a
sliding door or a door with a hinge on the opposite side to that of the
appliance, in such a way that a full opening of the appliance door is
restricted.
This appliance must be grounded. In the event of malfunction or
breakdown, grounding will reduce the risk of electric shock by
providing a path of least resistance for electric current.
This appliance is equipped with a power cord having an equipment
grounding conductor and a grounding power plug. The power plug
must be plugged into an appropriate socket outlet that is installed and
grounded in accordance with all local codes and ordinances.
Improper connection of the equipment-grounding conductor can
result in risk of electric shock. Check with a qualified electrician or
service personnel if you are in doubt as to whether the appliance is
properly grounded.
Do not modify the power plug provided with the appliance. If it
does not fit the outlet, have a proper outlet installed by a qualified
electrician.
Operation
Do not attempt to separate any panels or disassemble the appliance.
Do not apply any sharp objects to the control panel in order to
operate the appliance.
6
EN
Do not repair or replace any part of the appliance. All repairs
and servicing must be performed by qualified service personnel
unless specifically recommended in this Owner’s Manual. Use only
authorized factory parts.
Do not put animals, such as pets into the appliance.
Keep the area underneath and around the appliance free of
combustible materials such as lint, paper, rags, chemicals, etc.
Do not leave the appliance door open. Children may hang on the
door or crawl inside the appliance, causing damage or injury.
Use new hose or hose-set supplied with the appliance. Reusing old
hoses can cause a water leak and subsequent property damage.
Do not put in, wash or dry articles that have been cleaned in, washed
in, soaked in, or spotted with combustible or explosive substances
(such as waxes, wax removers, oil, paint, gasoline, degreasers,
drycleaning solvents, kerosene, petrol, spot removers, turpentine,
vegetable oil, cooking oil, acetone, alcohol, etc.). Improper use can
cause fire or explosion.
Never reach into the appliance while it is operating. Wait until the
drum has completely stopped.
In case of flood, disconnect the power plug and contact the LG
Electronics customer information centre.
Do not push down the door excessively, when the appliance door is
open.
Do not touch the door during a high temperature programme.
Do not use flammable gas and combustible substances (benzene,
gasoline, thinner, petroleum, alcohol, etc.) near the appliance.
If the drain hose or inlet hose is frozen during winter, use it only after
thawing.
Keep all washing detergents, softener and bleach away from children.
Do not touch the power plug or the appliance controls with wet hands.
Do not bend the power cable excessively or place a heavy object on
it.
Do not wash rugs, mats, shoes or pet blankets, or any other items
other than clothes or sheets, in this machine.
7
EN
This appliance must only be used for domestic household purposes
and should not be used in mobile applications.
If there is a gas leakage (isobutane, propane, natural gas, etc.),
do not touch the appliance or power plug and ventilate the area
immediately.
Maintenance
Securely plug the power plug in the socket outlet after completely
removing any moisture and dust.
Disconnect the appliance from the power supply before cleaning the
appliance. Setting the controls to the OFF or stand by position does
not disconnect this appliance from the power supply.
Do not spray water inside or outside the appliance to clean it.
Never unplug the appliance by pulling on the power cable. Always
grip the power plug firmly and pull straight out from the socket outlet.
Disposal
Before discarding an old appliance, unplug it. Cut off the cable
directly behind the appliance to prevent misuse.
Dispose of all packaging materials (such as plastic bags and
styrofoam) away from children. The packaging materials can cause
suffocation.
Remove the door before disposing of or discarding this appliance to
avoid the danger of children or small animals getting trapped inside.
8
EN
CARING FOR THE ENVIRONMENT
Disposal of Your Old Appliance
This crossed-out wheeled bin symbol indicates that waste electrical and electronic
products (WEEE) should be disposed of separately from the municipal waste
stream.
Old electrical products can contain hazardous substances so correct disposal
of your old appliance will help prevent potential negative consequences for the
environment and human health. Your old appliance may contain reusable parts that
could be used to repair other products, and other valuable materials that can be
recycled to conserve limited resources.
You can take your appliance either to the shop where you purchased the product,
or contact your local government waste office for details of your nearest authorised
WEEE collection point. For the most up to date information for your country, please
see www.lg.com/global/recycling.
9
EN
INSTALLATION
Front View
a Control panel
b Detergent dispenser drawer
c Drum
d Door
e Cover cap
f Drain pump filter
g Drain plug
h Adjustable feet
Rear View
a Power plug
b Transit bolts
c Drain hose
Parts and Specifications
NOTE
Appearance and specifications may change without notice to improve the quality of the appliance.
Accessories
* This feature is only available on some models.
a Cold water inlet hose*
b Spanner
c Caps for covering transit bolt holes*
d Elbow bracket for securing drain hose*
10
EN
Specifications
Model F*WN*, F*ZN*
Power Supply 220 - 240 V~, 50 Hz
Dimension
(Width x Depth x Height)
600 mm X 560 mm X 850 mm
Product Weight 63 kg
No further backflow protection required for connection to the water inlet.
Installation Place
Requirements
Before installing the appliance, check the following
information to make sure that the appliance should
be installed in a correct place.
Installation Location
Install the appliance on a flat floor. (Allowable
slope under the appliance: 1°)
Never try to level any uneven floor by putting
pieces of wood, cardboard or similar materials
under the appliance.
If it is impossible to avoid positioning the
appliance next to a gas cooker or coal burning
stove, an insulation (850 X 600 mm) covered
with aluminium foil on the side facing the cooker
or stove must be inserted between the two
appliances.
Ensure that when the appliance is installed, it is
easily accessible for an engineer in the event of
a breakdown.
When installing the appliance, adjust all four feet
using the transit bolt spanner which makes the
appliance stable, and leave approximate 5 mm
for a clearance between the top of the appliance
and the underside of any worktop.
Additional clearance should have 100 mm for
the wall and 20 mm for rear, right and left side.
100 mm
20 mm
5 mm
20 mm
WARNING
This appliance must only be used for domestic
household purposes and should not be used in
mobile applications.
NOTE
If the appliance is installed on a raised platform,
it must be securely fastened in order to eliminate
the risk of falling off.
11
EN
Wooden Floors (Suspended
Floors)
When installing the appliance on wooden floors,
use rubber cups to prevent the appliance from
excessive vibration and unbalance.
To prevent vibration, we recommend you to
place rubber cups a at least 15 mm thick of the
each foot of the appliance, secured to at least
two floor beams with screws.
If possible, install the appliance in one of the
corners of the room, where the floor is more
stable.
Fit the rubber cups to reduce vibration.
CAUTION
This appliance must only be used for domestic
household purposes and should not be used in
mobile applications.
If the appliance is installed on the unstable
floor (e.g. wooden floor), the warranty does not
cover any damages and cost occured due to the
installation on the unstable floor.
NOTE
You can purchase rubber cups (Part No.
4620ER4002B) from the LG Electronics service
centre.
Ventilation
Make sure that air circulation around the
appliance should not be impeded by carpets,
rugs, etc.
Ambient Temperature
Do not install the appliance in rooms where
freezing temperatures may occur. Frozen hoses
may burst under pressure. The reliability of
the electronic control unit may be impaired at
temperatures below freezing point.
If the appliance is delivered in winter and
temperatures are below freezing, place the
appliance at room temperature for a few hours
before putting it into operation.
Electrical Connection
Do not use an extension cord or double adapter.
Always unplug the appliance and turn off the
water inlet after use.
Connect the appliance to an earthed socket in
accordance with current wiring regulations.
The appliance must be positioned so that the
plug is easily accessible.
Power outlet must be at least 1 meter of either
side of the appliance.
WARNING
Repairs to the appliance must only be carried
out by the qualified personnel. Repairs carried
out by inexperienced persons may cause injury
or serious malfunctioning. Contact your LG
Electronics service centre.
The power plug must be plugged into an
appropriate socket outlet that is installed and
grounded in accordance with all local codes and
ordinances.
12
EN
Unpacking the Appliance
Lifting the Appliance Off the Foam
Base
* This feature is only available on some models.
After removing the carton and shipping material, lift
the appliance off the foam base.
Make sure the tub support a* comes off with
the base and is not stuck to the bottom of the
appliance.
If you must lay the appliance down to remove
the carton base b, always protect the side of
the appliance and lay it carefully on its side. Do
not lay the appliance on its front or back.
*
Removing the Bolt Assemblies
1
Starting with the bottom transit bolts a, use
the spanner (included) to fully loosen all transit
bolts by turning them counterclockwise.
2
Remove the bolt assemblies by wiggling them
slightly while pulling them out.
3
Install the hole caps.
Locate the hole caps b included in the
accessory pack or attached on the back.
Levelling the Appliance
Checking the Level
Levelling the appliance prevents unnecessary
noise and vibration. Check whether the appliance is
perfectly level after installation.
If the appliance rocks when pushing the top
plate of the appliance diagonally, adjust the feet
again.
Adjusting and Levelling the Feet
When installing the appliance, the appliance should
be aligned and perfectly level.
If the appliance is not aligned and level properly,
the appliance may be damaged or may not
operate properly.
13
EN
1
Turn the adjustable feet as required if the floor
is uneven.
Do not insert pieces of wood etc. under the
feet.
Make sure that all four feet should be stable
and resting on the floor.
2
Check if the appliance is perfectly level using a
spirit level a.
3
Secure the adjusting feet with the lock nuts b
by turning counterclockwise against the bottom
of the appliance.
4
Check if all lock nuts at the bottom of the
appliance are secured properly.
NOTE
Proper placement and levelling of the appliance
will ensure long, regular, and reliable operation.
The appliance must be level and stand firmly in
position.
It must not ‘Seesaw’ across corners under the
load.
Do not let the feet of the appliance get wet.
Failure to do so may cause vibration or noise.
Connecting the Water Inlet
Hose
Note for Connection
Water pressure must be between 100 kPa
and 1000 kPa (1.0 - 10.0 kgf/cm²). If the
water pressure is more than 1000 kPa, a
decompression device should be installed.
Do not overtighten the water inlet hose to all
valves.
Periodically check the condition of the hose and
replace the hose if necessary.
Checking the Rubber Seal on the
Water Inlet Hose
Two rubber seals a are supplied with the water
inlet hoses. They are used to prevent water leaks.
Make sure that the connection to taps should be
sufficiently tight.
14
EN
Connecting Hose to Water Tap
Screw - Type Hose to Tap with Thread
Screw the hose connector to the water supply,
which has ¾” threaded union.
NOTE
Before connecting the inlet hose to the water
tap, turn on the water tap to flush out foreign
substances (dirt, sand, sawdust, and etc.) in the
water lines. Let the water drain into a bucket,
and check the water temperature.
Connecting Hose to the Appliance
Screw the water line to the water supply on the
back of the appliance.
NOTE
After completing connection, if water leaks from
the hose, repeat the same steps. Use the most
conventional type of tap for the water supply. If
the tap is square or too big, remove the guide
plate before inserting the tap into the adaptor.
Make sure that the hose should not be kinked or
trapped.
Installing the Drain Hose
For Model with Drain Pump
The drain hose should not be placed higher than
100 cm above the floor. Water in the appliance may
not drain or may drain slowly.
Securing the drain hose correctly will protect the
floor from damage due to water leakage.
_DN
If the drain hose is too long, do not force it back
into the appliance. This will cause abnormal
noise.
When installing the drain hose to a sink, secure
it tightly with string.
15
EN
OPERATION
Operation Overview
Using the Appliance
Before the first wash, select the Cotton wash
programme and add a half amount of the detergent.
Start the appliance without laundry. This will remove
possible residues and water from the drum that may
have been left during manufacturing.
1
Sort laundry and load items.
Sort laundry by fabric type, soil level, colour
and load size as needed. Open the door and
load items into the appliance.
2
Add detergent or softener.
Add the proper amount of detergent to the
detergent dispenser drawer. If desired, add
bleach or fabric softener to the appropriate
areas of the dispenser.
3
Turn on the appliance.
Press the Power button to turn on the
appliance.
4
Choose the desired cycle.
Press the cycle button repeatedly or turn the
cycle selector knob until the desired cycle is
selected.
Now select a wash temperature and spin
speed. Pay attention to a fabric care label of
your clothes.
5
Begin cycle.
Press the Start/Pause button to begin the
cycle. The appliance will agitate briefly
without water to measure the weight of the
load. If the Start/Pause button is not pressed
within 15 minutes, the appliance will shut off
and all settings will be lost.
6
End of cycle.
When the cycle is finished, a melody will
sound. Immediately remove your clothing
from the appliance to reduce wrinkling.
Check around the door seal when removing
the load for small items that may be caught
in the seal.
Preparing the Laundry
Sort laundry for best washing results, and then
prepare laundry according to the symbols on the
care labels.
Sorting the Clothes
For best washing results, sort your clothes
according to a care label stating fabric type and
washing temperature. Adjust the spin speed to
wash them.
Soil level (Heavy, Normal, Light): Separate
clothes according to soil level. If possible, do
not wash heavily soiled items with lightly soiled
ones.
Colour (White, Lights, Darks): Wash separately
dark or dyed clothes from whites or light colours.
Mixing dyed clothes with light clothes can
result in dye transfer or discolouration of lighter
clothes.
Lint (Lint producers, Collectors): Wash
separately lint producing fabrics from lint
collecting fabrics. Lint producers can result in
pilling and linting on the lint collectors.
Checking the Fabric Care Label
Symbols on the care labels
The symbols tell you about the fabric content of
your clothes and how it should be washed.
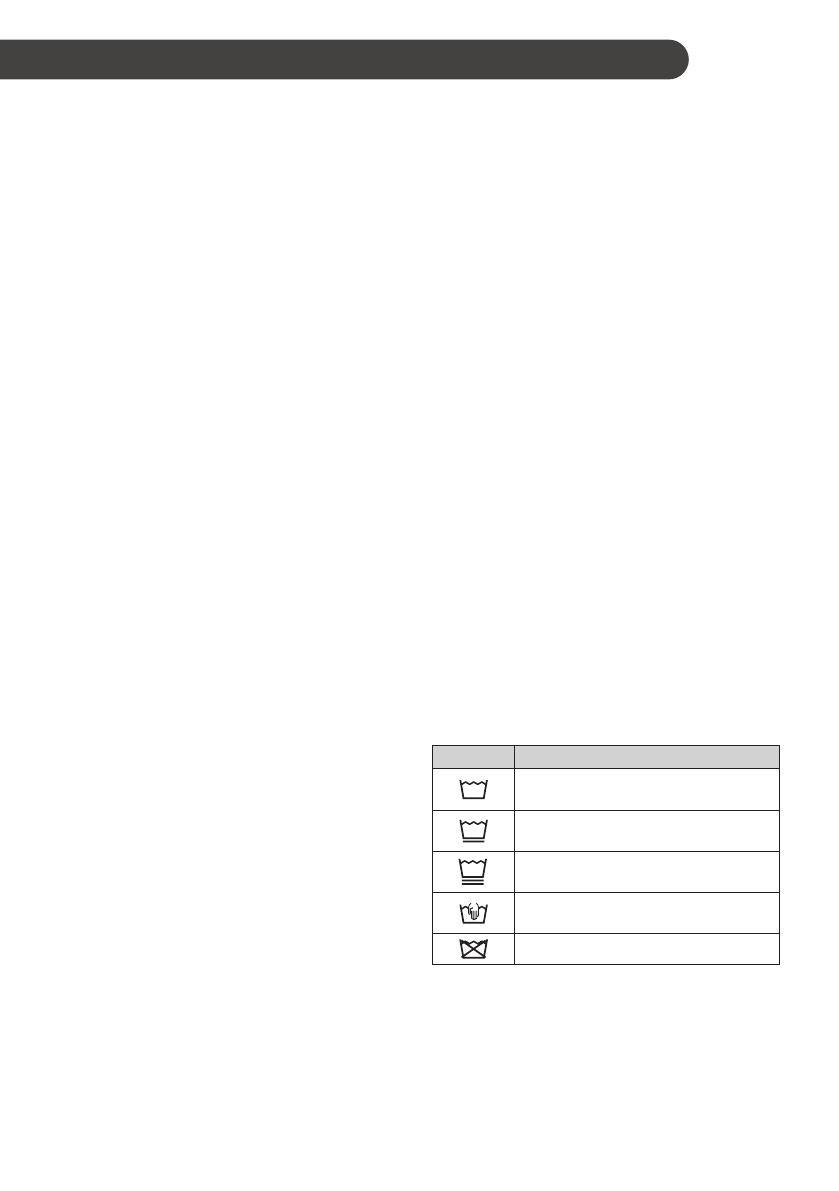
Symbol Wash / Fabric type
Normal Wash
Cotton, Mixed Fabrics
Easy Care
Synthetic, Mixed Fabrics
Special Delicate Wash
Delicates
Hand Wash Only
Wool, Silk
Do not wash
NOTE
The dashes under the symbol give you
information about the type of fabric and the
maximum allowance of mechanical stress.
16
EN
Checking the Clothes before
Loading
Combine large and small items in a load. Load
large items first. Large items should not be more
than half of total load.
Do not wash single small items. Add 1-2 similar
items to the load to prevent an out-of-balance
load.
Make sure to empty all pockets. Items such as
nails, hair clips, matches, pens, coins and keys
can damage both your appliance and clothes.
Wash delicates (stockings, underwired bras) in
a wash net.
Close zippers, hooks and strings to make sure
that these items do not snag other clothes.
Pre-treat dirt and stains by saturating the
dirt and stains with dissolved detergent and
brushing them in order to remove dirt.
Check the folds of the flexible gasket (gray) and
remove any small items.
CAUTION
Check if the laundry gets stuck between the
door and the seal, otherwise the laundry may
get damaged while washing.
Remove items from the flexible gasket to prevent
clothing and door seal damage.
Adding Detergents and
Softeners
Detergent Dosage
Detergent should be used according to the
instruction of the detergent manufacturer and
selected according to type, colour, soiling of the
fabric and the washing temperature.
Reduce the amount of detergent if too many
suds are formed.
Too much detergent results in excessive suds
which cause poor washing.
When you use liquid detergent, follow
the guidelines provided by the detergent
manufacturer.
You can pour liquid detergent directly into the
main detergent drawer if you are starting the
wash cycle immediately.
Do not use liquid detergent if you are using
Delay End function, or if you have selected
Pre Wash option, as the liquid may harden.
Detergent usage may need to be adjusted for
water temperature, water hardness, size and
soil level of the laundry. For best results, avoid
oversudsing.
Refer to the label of the clothes, before choosing
the detergent and water temperature.
Use only suitable detergents for the respective
type of clothing:
Liquid detergent is often designed for special
applications, e.g. for coloured fabric, wool,
delicate or dark laundry.
Powdered detergent is suitable for all types
of fabric.
For better washing results of white and pale
clothes, use powdered detergent with bleach.
Detergent is dispensed from the dispenser at
the beginning of the wash cycle.
17
EN
NOTE
Do not let the detergent harden. Doing so may
lead to blockages, poor rinse performance or
odour.
Full load: According to manufacturer’s
recommendation
Part load: ¾ of the normal amount
Minimum load: ½ of full load
Adding Detergent
Detergent for main wash a only ~ J
Detergent for pre wash b and main wash a ~
d # J
NOTE
Use the appropriate amount of detergent. Too
much detergent, bleach or softener may cause
an overflow.
When selecting Pre Wash, divide the dosage
into ⅓ for pre wash and ⅔ for main wash.
Adding Detergent Tablet
Detergent tablet is also available when washing
laundry.
1
Open the door and put detergent tablets into
the drum.
2
Load the laundry into the drum and close the
door.
NOTE
Do not put tablets into the drawer.
Adding Fabric Softener
Add a fabric softener to the maximum fill line.
Close the dispenser drawer gently.
Do not leave the fabric softener in the detergent
drawer for more than 2 days. Fabric softener
may harden.
Softener will automatically be added during the
last rinse cycle.
Do not open the drawer when water is being
supplied.
Solvents (e.g. benzene, etc.) must not be used.
NOTE
Pouring excessive fabric softener over the
maximum fill line can cause it to dispense too
early, which may stain clothes.
Do not pour fabric softener directly onto the
laundry, which may stain the laundry.
Adding Water Softener
A water softener, such as anti-limescale can be
used to cut down on the use of detergent in areas
with high water hardness level.
First add detergent, and then the water softener.
Dispense according to the amount specified on
the packaging.
18
EN
Control Panel
Control Panel Features
a Power Button
Press the Power button to turn on or off the appliance.
b Programme Knob
Programmes are available according to the laundry type.
The lamp will light up to indicate the selected programme.
c Start/Pause Button
Press the Start/Pause button to start or pause a wash cycle.
Press the Start/Pause button to stop a wash cycle temporarily.
d Extra Options and Functions
You can use the extra options and functions to customize the programmes.
To use the extra functions, press and hold the corresponding button for 3 seconds. The
corresponding symbol lights up in the display.
In order to use the Dálkový štart (Remote Start) function, refer to SMART FUNCTIONS.
This allows you to select an additional programmes and will light when selected.
f : This icon turns on when the appliance is connected to Wi-Fi network at home.
e Display
The display shows the settings, remaining estimated time, options, and status messages. When the
appliance is turned on, the default settings in the display will light up.
18:88: When a programme is selected, the default time for that programme is displayed. The default
time can be changed according to the selected option.
k : When the laundry is being washed, this icon is illuminated.
l : When the laundry is being rinsed after completion of washing programme, this icon is
illuminated.
p : When the laundry is spun to remove the water in the laundry, this icon is illuminated.
H : When this icon is illuminated, the door cannot be opened.
19
EN
a AI DD
AI DD M provides the desired washing and spinning.
M is activated when Bavlna (Cotton), Smíšené prádlo (Mixed Fabric) and Syntetika (Easy Care)
programmes are selected and operated.
Programme Table
Washing Programme
Programme Bavlna (Cotton) Max. Load Rating
Description Provides better performance by combining various drum motions.
Use for coloured fast items (shirts, nightdresses, pajamas, etc.) and normally
soiled cotton load (underwear).
Proper Temperature 40 °C (Cold to 95 °C)
Max. Spin Speed 1400 rpm
Programme Bavlna+ (Cotton+) Max. Load Rating
Description Provides optimised washing performance for large amount of laundry with less
energy consumption.
Use for coloured fast items (shirts, nightdresses, pajamas, etc.) and normally
soiled cotton items (underwear).
Proper Temperature 60 °C (Cold to 60 °C)
Max. Spin Speed 1400 rpm
Programme Smíšené prádlo (Mixed Fabric) Max. Load 3 kg
Description Enables various fabrics to be washed simultaneously.
Use for various kind of fabrics except special items (silk/delicate, sports wear,
dark clothes, wool, duvet/curtains).
Proper Temperature 40 °C (Cold to 60 °C)
Max. Spin Speed 1400 rpm
Programme Syntetika (Easy Care) Max. Load 3 kg
Description Suitable for casual shirts that do not need ironing after washing.
Use for Polyamide, acrylic, polyester.
Proper Temperature 40 °C (cold to 60 °C)
Max. Spin Speed 1400 rpm
20
EN
Programme Tiché praní (Silent Wash) Max. Load 4.5 kg
Description Provides less noise and vibration and saves money by using overnight electricity.
Use for coloured fast garments (shirts, nightdresses, pajamas, etc.) and lightly
soiled white cotton (underwear).
Proper Temperature 40 °C (Cold to 60 °C)
Max. Spin Speed 1000 rpm
Programme Pro alergiky (Allergy Care) Max. Load 3.0 kg
Description Helps to remove allergens such as house mites, pollen and fur.
Proper Temperature 60 °C
Max. Spin Speed 1400 rpm
Programme
Dětská parní péče (Baby Steam Care)
Max. Load 4.5 kg
Description Provides clothes care with gentle motion and better performance by steam.
Proper Temperature 60 °C
Max. Spin Speed 1000 rpm
Programme Jemné prádlo (Delicates) Max. Load 2 kg
Description Suitable for delicate clothes such as underwear, blouse, etc
Proper Temperature 20 °C (Cold to 40 °C)
Max. Spin Speed 800 rpm
Programme Ruční praní/Vlna (Hand/Wool) Max. Load 1.5 kg
Description For hand and machine washable delicate clothes such as washable wool,
lingerie, dresses etc. (Use detergent for machine washable woolens).Use for
Wool, Silk, hand washable clothes, delicate, easily damaged laundry.
Proper Temperature 30 °C (Cold to 40 °C)
Max. Spin Speed 800 rpm
Programme Sportovní oblečení (Sportswear) Max. Load 2 kg
Description Suitable for special items like sports and outdoor wear.
Use for Coolmax, gore-tex, fleece and sympatex.
Proper Temperature 40 °C (Cold to 40 °C)
Max. Spin Speed 800 rpm
  • Page 1 1
  • Page 2 2
  • Page 3 3
  • Page 4 4
  • Page 5 5
  • Page 6 6
  • Page 7 7
  • Page 8 8
  • Page 9 9
  • Page 10 10
  • Page 11 11
  • Page 12 12
  • Page 13 13
  • Page 14 14
  • Page 15 15
  • Page 16 16
  • Page 17 17
  • Page 18 18
  • Page 19 19
  • Page 20 20
  • Page 21 21
  • Page 22 22
  • Page 23 23
  • Page 24 24
  • Page 25 25
  • Page 26 26
  • Page 27 27
  • Page 28 28
  • Page 29 29
  • Page 30 30
  • Page 31 31
  • Page 32 32
  • Page 33 33
  • Page 34 34
  • Page 35 35
  • Page 36 36
  • Page 37 37
  • Page 38 38
  • Page 39 39
  • Page 40 40
  • Page 41 41
  • Page 42 42
  • Page 43 43
  • Page 44 44
  • Page 45 45
  • Page 46 46
  • Page 47 47
  • Page 48 48
  • Page 49 49
  • Page 50 50
  • Page 51 51
  • Page 52 52
  • Page 53 53
  • Page 54 54
  • Page 55 55
  • Page 56 56
  • Page 57 57
  • Page 58 58
  • Page 59 59
  • Page 60 60
  • Page 61 61
  • Page 62 62
  • Page 63 63
  • Page 64 64
  • Page 65 65
  • Page 66 66
  • Page 67 67
  • Page 68 68
  • Page 69 69
  • Page 70 70
  • Page 71 71
  • Page 72 72
  • Page 73 73
  • Page 74 74
  • Page 75 75
  • Page 76 76
  • Page 77 77
  • Page 78 78
  • Page 79 79
  • Page 80 80
  • Page 81 81
  • Page 82 82
  • Page 83 83
  • Page 84 84
  • Page 85 85
  • Page 86 86
  • Page 87 87
  • Page 88 88
  • Page 89 89
  • Page 90 90
  • Page 91 91
  • Page 92 92
  • Page 93 93
  • Page 94 94
  • Page 95 95
  • Page 96 96
  • Page 97 97
  • Page 98 98
  • Page 99 99
  • Page 100 100
  • Page 101 101
  • Page 102 102
  • Page 103 103
  • Page 104 104
  • Page 105 105
  • Page 106 106
  • Page 107 107
  • Page 108 108
  • Page 109 109
  • Page 110 110
  • Page 111 111
  • Page 112 112
  • Page 113 113
  • Page 114 114
  • Page 115 115
  • Page 116 116
  • Page 117 117
  • Page 118 118
  • Page 119 119
  • Page 120 120
  • Page 121 121
  • Page 122 122
  • Page 123 123
  • Page 124 124

LG F4ZN500S1 Owner's manual

Category
Washing machines
Type
Owner's manual

Ask a question and I''ll find the answer in the document

Finding information in a document is now easier with AI

in other languages