
Cordless Circular Saw
Akku-Kreissäge
Scie circulaire à batterie
Sega circolare a batteria
Snoerloze cirkelzaagmachine
Sierra circular a batería
Serra circular a bateria
¢ÈÛÎÔÚ›ÔÓÔ Ì·Ù·Ú›·˜
C 18DMR
Read through carefully and understand these instructions before use.
Diese Anleitung vor Benutzung des Werkzeugs sorgfältig durchlesen und verstehen.
Lire soigneusement et bien assimiler ces instructions avant usage.
Prima dell’uso leggere attentamente e comprendere queste instruzioni.
Deze gebruiksaanwijzing s.v.p. voor gebruik zorgvuldig doorlezen.
Leer cuidadosamente y comprender estas instrucciones antes del uso.
Antes de usar, leia com cuidado para assimilar estas instruções.
∆ιαάστε πρσεκτικά και κατανήσετε αυτές τις δηγίες πριν τη ρήση.
Handling instructions
Bedienungsanleitung
Mode d’emploi
Istruzioni per l’uso
Gebruiksaanwijzing
Instrucciones de manejo
Instruções de uso
δηγίες ειρισµύ

1
21
43
65
7 98
10 1211
1
3
4
6
7
5
5>
9
8
6
5
A
B
5
5
C
D
5
B
2

2
15
16
13 14
19(A)
19(B)
17 18
20 21
F
E
H
G
>
I
F
J
F
H
L
K
M
N
O
P
Q
M
K
LK
T
R
W
S
V
U
H

3
24
25
22 23
26 27
R
X
Y
H
W
Z
\
]
[
a
\
c
b
\
d
F
f
e

4
English Deutsch Français
To avoid kickback, do support
Unterstützen Sie das Brett bzw. die Tafel in der Pour éviter tout retour de lame, soutenir la
board or panel near the cut.
Nähe des Schnittes, um Rückschlag zu verhüten. planche ou le panneau près de la ligne de coupe.
Don’t support board or panel
Unterstützen Sie das Brett bzw. die
Ne pas soutenir la planche ou le
away from the cut.
Tafel nicht entfernt von der Schnittstelle.
panneau loin de la ligne de coupe.
A TYPICAL ILLUSTRATION OF TYPISCHE ABBILDUNG FÜR
EXEMPLE TYPE DE SOUTIEN MANUEL DE LA SCIE, DE
PROPER HAND SUPPORT HANDUNTERSTÜTZUNG
SOUTIEN LA PIÈCE ET D’ACHEMINEMENT DU CORDON
Vise Schraubstock Etau
Rechargeable battery Akkumulator Batterie rechargeable
Latch Schnapper Loquet
Nameplate Bezeichnungsschild Plaque signalétique
Pull out Herausziehen Tirer
Insert Einsatz Insérer
Handle Griff Poignée
Push Drücken Pousser
Pilot lamp Kontrollampe Lampe pilote
Charge time lamp Ladezeitlampe Témoin de durée de charge
Charge status lamp Ladestatuslampe Témoin d’état de charge
Lumber Schnittholz Bois
Base Grundplatte Base
Workbench Werkbank Etabli
Saw blade Sägeblatt Lame de la scie
Wing-nut Flügelschraube Ecrou à ailettes
Wing-bolt Flügelschraube Boulon-papillon
Premarked line Versetzt-Markierung Ligne de repère
Front scale when not inclined Frontskala wenn nicht geneigt Echelle avant quand non incliné
Front scale at 45˚ incline Frontskala bei 45˚ -Neigung Echelle avant quand incliné à 45°
Knob-bolt Rändelschraube Tête de boulon
Guide Führung Guide
Switch lock Schalterverriegelung Verrou d’interrupteur
Switch trigger Abzugschalter Gâchette
Left-hand bolt Linke Schraube Boulon gauche
Lock lever Sperrhebel Levier de blocage
Box wrench Steckschlüssel Clef à béquille
Lower guard lever Unterer Schutzabdeckungshebel Levier du protecteur inférieur
Saw cover Sägeabdeckung Couvercle de la scie
Washer (B) Unterlegscheibe (B) Rondelle (B)
Washer (A) Unterlegscheibe (A) Rondelle (A)
Spindle Achse Arbre
Light cover Lampenabdeckung Couvercle d’éclairage
Convex Konvex Convexe
Housing Gehäuse Boîtier
Concave Konkav Concave
Arrow-marked Pfeilmarkierung Marqué d’une flèche
Back of the socket Rückseite des Sockels Dos de la douille
Socket Sockel Douille
Light bulb Birne Ampoule
Square Winkel Equerre
Slotted set screw Schaftschraube Vis sans fin
Dust collector Staubsauger Collecteur á poussière
1
2
3
4
5
6
7
8
9
0
A
B
C
D
E
F
G
H
I
J
K
L
M
N
O
P
Q
R
S
T
U
V
W
X
Y
Z
[
\
]
_
a
b
c
d
e
f

5
Italiano Nederlands Español
Per evitare rinculo, appoggiare l’asse
Om terugslag te voorkomen, dient u plank
of paneel in
Para evitar el contragolpe, apoye la
o il pannello vicino al taglio.
de buurt van de zaagsnede te ondersteunen.
tabla o el panel cerca del lugar de corte.
Non appoggiare la tavola o il
Ondersteuning op te grote afstand
No apoye la tabla o el panel lejos
pannello lontano dal taglio.
van de zaagsnede is onvoldoende.
del lugar de corte.
ILLUSTRAZIONE TIPO DI UN
TYPISCH VOORBEELD HOE DE MACHINE
UNA ILUSTRACIÓN TÍPICA DE LA SUJECIÓN DE LA SIERRA, APOYO DE LA PIEZA
SUPPORTO MANO CORRETTO
VASTGEHOUDEN DIENT TE WORDEN.
DE TRABAJO Y COLOCACIÓN DEL CABLE DE ALIMENTACIÓN
Morsa Bankschroef Tornillo de banco
Batteria ricaricabile Oplaadbare batterij Batería recargable
Fermo Vergrendeling Enganche
Piastrina Naamplaatje Placa de características
Estrarre Uittrekken Sacar
Inserire Insteken Insertar
Impugnatura Handgreep Mango
Spingere Drukken Presionar
Spia Kontrolelampje Lámpara piloto
Spia di tempo di carica Oplaadtijdlampje Lámpara del tiempo de carge
Spia di stato di carica Oplaadstatuslampje Lámpara del estado de carge
Legno Zaaghout Madera útil
Base Basisplaat Base
Banco di lavoro Werkbank Banco de trabajo
Lame della sega Zaagblad Cuchilla de sierra
Manopola Knop Perilla
Bullone a farfalla Vleugelmoer Perno de mariposa
Traccia del taglio Markeerlijn Línea de trazado
Scala frontale non inclinata
Voorste schaal bij niet hellend zaagblad
Escala frontal sin inclinación
Scala frontale inclinata a 45˚
Voorste schaal bij hellend Escala frontal con 45° de
zaagblad (45°) inclinación
Manopola bullone Knopbout Perno de bola
Guida Aanslagplaat Guía
Blocco interruttore Vergrendeling Bloqueo del interruptor
Interruttore a grilletto Trekkerschakelaar Interruptor de gatillo
Bullone sinistro Linker bout Perno de apriete a la izquierda
Leva di bloccaggio Palhefboom Palanca de cierre
Chiave fissa a collare Steeksleutel Llave anular
Leva griglia inferiore
Hendel van onderste
Palanca de protección inferior
afscherming
Carter della sega Zaagdek Cubierta de la sierra
Rondella (B) Onderlegschijf (B) Arandela (B)
Rondella (A) Onderlegschijf (A) Arandela (A)
Asse As Husilio
Coprilampada Lichtkap Cubierta de la luz
Convesso Bol Parte convexa
Carcassa Behuizing Alojamiento
Concavo Hol Parte cóncava
Freccia Pijlmarkering Marca de flecha
Retro dello zoccolo Achterkant fitting Parte trasera del portalámparas
Zoccolo Fitting Portalámparas
Lampadina Lampje Bombilla de luz
Squadra Windelhaak Escuadra
Vite senza fine Koploze schroef Vástago
Raccoglipolvere Stof-verzamelaar Colector de polvo
1
2
3
4
5
6
7
8
9
0
A
B
C
D
E
F
G
H
I
J
K
L
M
N
O
P
Q
R
S
T
U
V
W
X
Y
Z
[
\
]
`
a
b
c
d
e
f

6
Português
Ελληνικά
Para evitar um coice, suporte a
Για να απύγετε την ανάκρυση, στηρίετε τη
placa ou o painel perto do corte.
σανίδα ή τ κµµάτι κντά στην τµή.
Não suporte a placa ou o painel Μη στηρίετε τη σανίδα ή τ
longe do corte. κµµάτι µακριά απ την κπή.
UMA IMAGEM TÍPICA DO
ΤΥΠΙΚΗ ΑΠΕΙΚΝΙΣΗ ΤΗΣ ΚΑΤΑΛΛΗΛΗΣ
SUPORTE ADEQUADO DA MÃO
ΣΤΗΡΙΗΣ ΜΕ Τ ΕΡΙ
Torno Μέγκενη
Bateria recarregável Επαναρτιµενη µπαταρία
Trinco Κλείστρ
Placa do nome Πινακίδα
Puxar Τραήτε
Introduzir Βάλτε
Pega Λαή
Empurrar Ωθήστε
Lâmpada piloto Ενδεικτική λυνία
Lâmpada de tempo de recarga Λαµπτήρας ρνυ ρτισης
Lâmpada de estatus de recarga
Λαµπτήρας κατάστασης ρτισης
Madeira υλεία
Base Βάση
Bancada de trabalho Πάγκς εργασίας
Lâmina de Serra Πρινωτή λεπίδα
Porca de orelhas Πεταλύδα
Parafuso de orelhas ειριδα
Linha pré-marcada Πρ-σηµαδεµένη γραµµή
Escala dianteira quando não inclinado
Μπρστινή κλίµακα ταν δεν ρίσκεται σε κλίση
Escala dianteira a uma inclinação de 45°
Μπρστινή κλίµακα µε κλίση 45
°
Parafuso manípulo Κυµπί-µπυλνι
Guia δηγς
Bloqueio do interruptor Ασάλεια διακπτη
Gatilho do interruptor Σκανδάλη διακπτη
Parafuso lado esquerdo Αριστερ µπυλνι
Alavanca de bloqueio Μλς ασάλισης
Chave de tubos Μπυλνκλειδ
Alavanca da protecção inferior Μλς κάτω πρυλακτήρα
Cobertura da serra Κάλυµµα πρινιύ
Arruela (B) Ρδέλα (B)
Arruela (A) Ρδέλα (Α)
Fuso Άνας
Cobertura da luz Κάλυµµα για τ ως
Convexo Κυρτ τµήµα
Alojamento Περίληµα
Côncavo Κίλ τµήµα
Marcado pela seta Σηµάδι µε έλς
Parte posterior do casquilho Πίσω µέρς υπδής
Tomada Υπδή
Lâmpada Λάµπα
Quadrado ρθγωνιµετρ
Parafuso fendido Βίδες µε σισµή
Colector de pó Συλλγέας σκνης
1
2
3
4
5
6
7
8
9
0
A
B
C
D
E
F
G
H
I
J
K
L
M
N
O
P
Q
R
S
T
U
V
W
X
Y
Z
[
\
]
_
a
b
c
d
e
f

7
Symbols
The following show
symbols used for the
machine. Be sure that you
understand their meaning
before use.
Symbole
Die folgenden Symbole
werden für diese Maschine
verwendet. Achten Sie
darauf, diese vor der
Verwendung zu verstehen.
Symboles
Les symboles suivants
sont utilisés pour l’outil.
Bien se familiariser avec
leur signification avant
d’utiliser l’outil.
Simboli
Di seguito mostriamo i
simboli usati per la
macchina. Assicurarsi di
comprenderne il
significato prima dell’uso.
Read instruction
manual.
Bedienungsanleitung
lesen.
Lire le mode d’emploi.
Leggere il manuale di
istruzioni.
Wear safety glasses.
Eine Schutzbrille tragen.
Porter des lunettes de
sécurité.
Indossare occhialoni di
sicurezza.
Wear hearing protection.
Gehörschutz tragen.
Porter des protections
anti-bruit.
Indossare i dispositivi di
protezione acustica.
Lees de handleiding.
Draag een
veiligheidsbril.
Lea el manual de
instrucciones.
Use gafas de seguridad.
Leia o manual de
instruções.
Utilize óculos de
segurança.
∆ιαάστε τ εγειρίδι
δηγιών.
Φράτε γυαλιά
ασαλείας.
Draag
gehoorbescherming.
Utilice protecciones
auriculares.
Use proteção auditiva.
Symbolen
Hieronder staan symbolen
afgebeeld die van toepassing
zijn op deze machine. U moet
de betekenis hiervan begrijpen
voor gebruik.
Símbolos
A continuación se muestran
los símbolos usados para la
máquina. Asegúrese de
comprender su significado
antes del uso.
Símbolos
A seguir aparecem os
símbolos utilizados pela
máquina. Assimile bem seus
significados antes do uso.
™‡Ì‚ÔÏ·
Τα παρακάτω δείνυν τα
σύµλα πυ ρησιµπιύνται
στ µηάνηµα. Βεαιωθείτε τι
κατανείτε τη σηµασίας τυς
πριν τη ρήση.
Φράτε πρστατευτικά
ακής.
Only for EU countries
Do not dispose of electric
tools together with household
waste material!
In observance of European
Directive 2002/96/EC on waste
electrical and electronic
equipment and its
implementation in accordance
with national law, electric
tools that have reached the
end of their life must be
collected separately and
returned to an
environmentally compatible
recycling facility.
Nur für EU-Länder
Werfen Sie Elektrowerkzeuge
nicht in den Hausmüll!
Gemäss Europäischer
Richtlinie 2002/96/EG über
Elektro- und Elektronik-
Altgeräte und Umsetzung in
nationales Recht müssen
verbrauchte Elektrowerkzeuge
getrennt gesammelt und einer
umweltgerechten
Wiederververtung zugeführt
werden.
Pour les pays européens
uniquement
Ne pas jeter les appareils
électriques dans les ordures
ménagères!
Conformément à la directive
européenne 2002/96/EG relative
aux déchets d’équipements
électriques ou électroniques
(DEEE), et à sa transposition
dans la législation nationale, les
appareils électriques doivent
être collectés à part et être
soumis à un recyclage
respectueux de
l’environnement.
Solo per Paesi UE
Non gettare le
apparecchiature elettriche tra i
rifiuti domestici.
Secondo la Direttiva Europea
2002/96/CE sui rifiuti di
apparecchiature elettriche ed
elettroniche e la sua
attuazione in conformità alle
norme nazionali, le
apparecchiature elettriche
esauste devono essere
raccolte separatamente, al fine
di essere reimpiegate in modo
eco-compatibile.
Alleen voor EU-landen
Geef elektrisch gereedschap
niet met het huisvuil mee!
Volgens de Europese richtlijn
2002/96/EG inzake oude
elektrische en elektronische
apparaten en de toepassing
daarvan binnen de nationale
wetgeving, dient gebruikt
elektrisch gereedschap
gescheiden te worden
ingezameld en te worden
afgevoerd naar een recycle
bedrijf dat voldoet aan de
geldende milieu-eisen.
Sólo para países de la Unión
Europea
¡No deseche los aparatos
eléctricos junto con los
residuos domésticos!
De conformidad con la
Directiva Europea 2002/96/CE
sobre residuos de aparatos
eléctricos y electrónicos y su
aplicación de acuerdo con la
legislación nacional, las
herramientas eléctricas cuya
vida útil haya llegado a su fin
se deberán recoger por
separado y trasladar a una
planta de reciclaje que cumpla
con las exigencias ecológicas.
Apenas para países da UE
Não deite ferramentas
eléctricas no lixo doméstico!
De acordo com a directiva
europeia 2002/96/CE sobre
ferramentas eléctricas e
electrónicas usadas e a
transposição para as leis
nacionais, as ferramentas
eléctricas usadas devem ser
recolhidas em separado e
encaminhadas a uma
instalação de reciclagem dos
materiais ecológica.
Mvo για τις ώρες της EE
Mηv πετάτε τα ηλεκτρικά
εργαλεία στov κάδo oικιακώv
απoρριµµάτωv!
Σύµωvα µε τηv εuρωπαϊκή
oδηγία 2002/96/EK περί
ηλεκτρικώv και ηλεκτρovικώv
σuσκεuώv και τηv
εvσωµάτωσή της στo εθvικ
δίκαιo, τα ηλεκτρικά
εργαλεία πρέπει vα
σuλλέγovται εωριστά και
vα επιστρέovται για
αvακύκλωση µε τρπo ιλικ
πρoς τo περιάλλov.

8
English
GENERAL OPERATIONAL PRECAUTIONS
WARNING! When using battery operated tools, basic
safety precautions should always be followed to reduce
the risk of fire, leaking batteries and personal injury,
including the following.
Read all these instructions before operating this product
and save these instructions.
For safe operations:
1. Keep work area clean. Cluttered areas and benches
invite injuries.
2. Consider work area environment. Do not expose
tools to rain. Do not use tools in damp or wet
locations. Keep work area well lit.
Do not use tools where there is risk to cause fire
or explosion.
3. Keep children away. Do not let visitors touch the
tool. All visitors should be kept away from work
area.
4. Store batteries or idle tools. When not in use,
tools and batteries should be stored separately in
a dry, high or locked up place, out of reach of
children.
Ensure that battery terminals cannot be shorted
by other metal parts such as screws nails etc.
5. Do not force the tool. It will do the job better and
safer at the rate for which it was intended.
6. Use the right tool. Do not force small tools or
attachments to do the job of a heavy duty tool.
Do not use tools for purposes not intended.
7. Dress properly. Do not wear loose clothing or
jewellery, they can be caught in moving parts.
Rubber gloves and non-skid footwear are
recommended when working outdoors. Wear
protecting hair covering to contain long hair.
8. Use safety glasses. Also use face or dust mask
if the cutting operation is dusty.
9. Connect dust extraction equipment.
If devices are provided for the connection of dust
extraction and collection facilities, ensure these
are connected and properly used.
10. Do not abuse the cord (if fitted). Never carry the
tool by the cord or yank it to disconnect it from
the socket. Keep the cord away from heat, oil and
sharp edges.
11. Secure work. Use clamps or a vice to hold the
work. It is safer than using your hand and it frees
both hands to operate the tool.
12. Do not overreach. Keep proper footing and balance
at all times.
13. Maintain tools with care. Keep cutting tools sharp
and clean for better and safer performance. Follow
instructions for lubrication and changing
accessories. Inspect tool cords periodically and if
damaged, have it repaired by authorized service
facility. Keep handles dry, clean, and free from oil
and grease.
14. Disconnect tools. Where the designs permits,
disconnect the tool from its battery pack, when
not in use, before servicing, and when changing
accessories such as blades, bits and cutters.
15. Remove adjusting keys and wrenches. Form the
habit of checking to see that keys and adjusting
wrenches are removed from the tool before turning
it on.
16. Avoid unintentional starting. Do not carry the tool
with a finger on the switch.
17. Stay alert. Watch what you are doing. Use common
sense. Do not operate the tool when you are tired.
18. Check damaged parts. Before further use of the
tool, a guard or other part that is damaged should
be carefully checked to determine that it will
operate properly and perform its intended function.
Check for alignment of moving parts, free running
of moving parts, breakage of parts, mounting and
any other conditions that may affect its operation.
A guard or other part that is damaged should be
properly repaired or replaced by an authorized
service center unless otherwise indicated in this
handling instructions. Have defective switches
replaced by an authorized service facility. Do not
use the tool if the switch does not turn it on and
off.
19. Warning
䡬 The use of any accessory or attachment, other
than those recommended in this handling instruc-
tions, may present a risk of personal injury.
䡬 Ensure that the battery pack is correct for the tool.
䡬 Ensure that the outside surface of battery pack or
tool is clean and dry before plugging into charger.
䡬 Ensure that batteries are charged using the correct
charger recommended by the manufacturer. In-
correct use may result in a risk of electric shock,
overheating or leakage of corrosive liquid from
the battery.
20. Have your tool repaired by a qualified person.
This tool is in accordance with the relevant safety
requirements. Repairs should only be carried out
by qualified persons using original spare parts,
otherwise this may result in considerable danger
to the user.
21. Disposal of battery
Ensure battery is disposed of safely as instructed
by the manufacturer.
22. If under abusive conditions, liquid is ejected from
the battery, avoid contact
If this accidentally occurs, frush with water. If
liquid contacts eyes additionally, seek medical
help.
SAFETY INSTRUCTIONS FOR ALL SAWS
DANGER!
a) Keep hands away from cutting area and the blade.
Keep your second hand on auxiliary handle, or
motor housing.
If both hands are holding the saw, they cannot
be cut by the blade.
b) Do not reach underneath the workpiece.
The guard cannot protect you from the blade
below the workpiece.
c) Adjust the cutting depth to the thickness of the
workpiece.
Less than a full tooth of the blade teeth should
be visible below the workpiece.
d) Never hold piece being cut in your hands or across
your leg. Secure the workpiece to a stable
platform.
It is important to support the work properly to
minimize body exposure, blade binding, or loss
of control.
e) Hold power tool by insulated gripping surfaces when
performing an operation where the cutting tool
may contact hidden wiring or its own cord.
Contact with a “live” wire will also make exposed
metal parts of the power tool “live” and shock
the operator.
f) When ripping always use a rip fence or straight
edge guide.
This improves the accuracy of cut and reduces
the chance of blade binding.
g) Always use blades with correct size and shape
(diamond versus round) of arbour holes.
Blades that do not match the mounting hardware
of the saw will run eccentrically, causing loss
of control.

9
English
h) Never use damaged or incorrect blade washers
or bolt.
The blade washers and bolt were specially
designed for your saw, for optimum performance
and safety of operation.
䡬 Never use any abrasive wheels
Burst of abrasive wheel cause serious injury of
operator or persons around the working area.
FURTHER SAFETY INSTRUCTIONS FOR ALL
SAWS
Causes and operator prevention of kickback:
– kickback is a sudden reaction to a pinched, bound
or misaligned saw blade, causing an uncontrolled
saw to lift up and out of the workpiece toward
the operator;
– when the blade is pinched or bound tightly by
the kerf closing down, the blade stalls and the
motor reaction drives the unit rapidly back toward
the operator;
– if the blade becomes twisted or misaligned in
the cut, the teeth at the back edge of the blade
can dig into the top surface of the wood causing
the blade to climb out of the kerf and jump back
toward the operator.
Kickback is the result of saw misuse and/or incorrect
operating procedures or conditions and can be
avoided by taking proper precautions as given below.
a) Maintain a firm grip with both hands on the saw
and position your arms to resist kickback forces.
Position your body either side of the blade, but
not in line with the blade.
Kickback could cause the saw to jump backwards,
but kickback forces can be controlled by the
operator, if proper precautions are taken.
b) When blade is binding, or when interrupting a cut
for any reason, release the trigger and hold the
saw motionless in the material until the blade
comes to a complete stop.
Never attempt to remove the saw from the work
or pull the saw backward while the blade is in
motion or kickback may occur.
Investigate and take corrective actions to
eliminate the cause of blade binding.
c) When restarting a saw in the workpiece, centre
the saw blade in the kerf and check that saw teeth
are not engaged into the material.
If saw blade is binding, it may walk up or
kickback from the workpiece as the saw is
restarted.
d) Support large panels to minimize the risk of blade
pinching and kickback.
Large panels tend to sag under their own weight.
Supports must be placed under the panel on
both sides, near the line of cut and near the
edge of the panel.
e) Do not use dull or damaged blades.
Unsharpened or improperly set blades produce
narrow kerf causing excessive friction, blade
binding and kickback.
f) Blade depth and bevel adjusting locking levers
must be tight and secure before making cut.
If blade adjustment shifts while cutting, it may
cause binding and kickback.
g) Use extra caution when making a “plunge cut”
into existing walls or other blind areas.
The protruding blade may cut objects that can
cause kickback.
SAFETY INSTRUCTIONS FOR SAWS WITH
INNER PENDULUM GUARD
a) Check lower guard for proper closing before each
use. Do not operate the saw if lower guard does
not move freely and closeinstantly. Never clamp
or tie the lower guard into the open position.
If saw is accidentally dropped, lower guard may
be bent.
Raise the lower guard with the retracting handle
and make sure it moves freely and does not
touch the blade or any other part, in all angles
and depth of cut.
b) Check the operation of the lower guard spring. If
the guard and the spring are not operating
properly, they must be serviced before use.
Lower guard may operate sluggishly due to
damaged parts, gummy deposits, or build-up of
debris.
c) Lower guard should be retracted manually only
for special cuts such as “plunge cuts” and
“compound cuts”. Raise lower guard by retracting
handle and as soon as blade enters the material,
the lower guard must be released.
For all other sawing, the lower guard should
operate automatically.
d) Always observe that the lower guard is covering
the blade before placing saw down on bench or floor.
An unprotected, coasting blade will cause the saw
to walk backwards, cutting whatever is in its path.
Be aware of the time it takes for the blade to
stop after switch is released.
PRECAUTIONS ON USING CORDLESS
CIRCULAR SAW
1. Always charge the battery at a temperature of 10
– 40°C. A temperature of less than 10°C will result
in over charging which is dangerous. The battery
cannot be charged at a temperature higher than
40°C.
The most suitable temperature for charging is that
of 20 – 25°C.
2. When one charging is completed, leave the charger
for about 15 minutes before the next charging of
battery.
Do not charge more than two batteries
consecutively.
3. Do not allow foreign matter to enter the hole for
connecting the rechargeable battery.
4. Never disassemble the rechargeable battery and
charger.
5. Never short-circuit the rechargeable battery. Short-
circuiting the battery will cause a great electric
current and overheat. It results in burn or damage
to the battery.
6. Do not dispose of the battery in fire.
If the battery is burnt, it may explode.
7. When using this unit continuously, the unit may
overheat, leading to damage in the motor and
switch. Please leave it without using it for
approximately 15 minutes.
8. Do not insert object into the air ventilation slots
of the charger.
Inserting metal objects or inflammables into the
charger air ventilation slots will result in electrical
shock hazard or damaged charger.
9. Using an exhausted battery will damage the
charger.
10. Bring the battery to the shop from which it was
purchased as soon as the post-charging battery
life becomes too short for practical use. Do not
dispose of the exhausted battery.

10
English
11. Wear earplugs to protect your ears during
operation.
12. Always hold the handle of the power tool firmly.
Otherwise the counterforce produced may result
in inaccurate and even dangerous operation.
13. Do not use saw blades which are deformed or
cracked.
14. Do not use saw blades made of high speed steel.
15. Do not use saw blades which do not comply with
the characteristics specified in these instructions.
16. Do not stop the saw blades by lateral pressure
on the disc.
17. Always keep the saw blades sharp.
18. Ensure that the safety cover moves smoothly and
freely.
19. Never use the circular saw with its safety cover
fixed in the open position.
20. Ensure that the retraction mechanism of the guard
system operates correctly.
21. The saw blades body must be thinner than the
riving knife and the width of cut, or kerf (with
teeth set) must be greater than the thickness of
the riving knife.
22. Never operate the circular saw with the saw blade
turned upward or the side.
23. Ensure that the material is free of foreign matters
such as nails.
24. The riving knife should always be used except
when plunging in the middle of the workpiece.
25. The saw blades range should be from 165 mm
to 150 mm.
26. Be careful of brake kickback.
This circular saw features an electric brake that
functions when the switch is released. As there
is some kickback when the brake functions, be
sure to hold the main body securely.
27. Avoid cutting in the state where the base has
floated up from the material.
When blade is binding, or when interrupting a cut
for any reason, release the trigger and hold the
saw motionless in the material until the blade
comes to a complete stop. Never attempt to
remove the saw from the work or pull the saw
backward while the blade is in motion or KICKBACK
may occur. Investigate and take corrective actions
to eliminate the cause of blade binding.
28. Support large panels to minimize the risk of blade
pinching and KICKBACK. Large panels tend to sag
under their own weight. Supports must be placed
under the panel on both sides, near the line of
cut and near the edge of the panel as shown in
Fig. 1.
To minimize the risk of blade pinching and kickback.
When cutting operation requires the resting of the
saw on the work piece, the saw shall be rested
on the larger portion and the smaller piece cut
off.
29. Use extra caution when making a “Pocket Cut”
into existing walls or other blind areas. The
protruding blade may cut objects that can cause
KICKBACK.
NEVER place your hand or fingers behind the saw
(Fig. 3). If kickback occurs, the saw could easily
jump backwards over your hand, possibly causing
severe injury.
30. WARNING: It is important to support the work
piece properly and to hold the saw firmly to
prevent loss of control which could cause personal
injury. Fig. 4 illustrates typical hand support of the
saw.
31. Place the wider portion of the saw base on that
part of the work piece which is solidly supported,
not on the section that will fall off when the cut
is made. As examples, Fig. 5 illustrates the RIGHT
way to cut off the end of board, and Fig. 6 the
WRONG way. If the work piece is short or small,
clamp is down.
DON’T TRY TO HOLD SHORT PLACES BY HAND!
32. Never attempt to saw with the circular saw held
upside down in a vise. This is extremely dangerous
and can lead to serious accidents (Fig. 7).
33. When the brake becomes ineffective, replace the
carbon brushes with new ones.
SPECIFICATIONS
POWER TOOL
Model C18DMR
No-load speed 3400 min
–1
Capacity Cutting depth
90° 57 mm
45° 40 mm
EB1820L: Ni-Cd 18 V (2.0 Ah 15 cells)
Rechargeable battery EB1826HL: Ni-MH 18 V (2.6 Ah 15 cells)
EB1830HL: Ni-MH 18 V (3.0 Ah 15 cells)
Light bulb 12 V, 5 W
Weight 3.6 kg
CHARGER
Model UC24YFA UC24YJ UC18YG
Charging voltage 7.2 – 24 V 7.2 – 18 V
Weight 0.6 kg 1.0 kg 0.3 kg

11
English
STANDARD ACCESSORIES
Standard accessories are subject to change without notice.
OPTIONAL ACCESSORIES (sold separately)
1. Battery (EB1820L, EB1826HL, EB1830HL)
2. Saw Blade
Use......Cutting various types of wood.
External Diam Hole Diam. No. of Teeth
165 mm 16 mm 24 pieces
165 mm 20 mm 24 pieces
165 mm 30 mm 24 pieces
3. Washer (A) .... for 16 mm (Hole dia. of saw blade)
.... for 20 mm (Hole dia. of saw blade)
.... for 30 mm (Hole dia. of saw blade)
4. Dust Collector Set
Connect the suction hose to collect saw dust with
the vacuum cleaner (see Fig. 27).
Optional accessories are subject to charge without notice.
APPLICATION
Cutting various types of wood.
BATTERY REMOVAL/INSTALLATION
1. Battery removal
Hold the handle tightly and push the battery latches
to remove the battery (see Fig. 8, 9).
CAUTION
Never short-circuit the battery.
2. Battery installation
Insert the battery while observing its polarities (see
Fig. 9).
CHARGING
〈UC24YFA〉
Before using the power tool, charge the battery as follows.
1. Connect the charger’s power cord to a receptacle
When the power cord is connected, the charger’s
pilot lamp will blink in red (At 1-second intervals).
2. Insert the battery into the charger
Firmly insert the battery into the charger till it
contacts the bottom of the charger and checking
the polarities as shown in Fig. 10.
CAUTION
䡬 If the batteries are inserted in the reverse direction,
not only recharging will become impossible, but it
may also cause problems in the charger such as
a deformed recharging terminal.
3. Charging
When inserting a battery in the charger, charging
will commence and the pilot lamp will light
continuously in red.
When the battery becomes fully recharged, the pilot
lamp will blink in red (At 1-second intervals) (See
Table 1).
(1) Pilot lamp indication
The indications of the pilot lamp will be as shown
in Table 1, according to the condition of the charger
or the rechargeable battery.
C18DMR
1 Saw Blade (mounted on tool) ................................................................................ 1
2 Box Wrench ................................................................................................................ 1
3 Guide ............................................................................................................................ 1
4 Charger (UC24YFA) .................................................................................................... 1
5 Plastic case.................................................................................................................. 1
1
5
2
3
4

12
English
〈UC24YJ〉
Before using the power tool, charge the battery as follows.
1. Connect the charger’s power cord to the receptacle
When connecting the plug of the charger to a
receptacle, the charge status lamp will blink in red
(At 1-second intervals).
2. Insert the battery into the charger
Insert the battery into the charger as shown in Fig.
11. When the battery is pushed all the way to the
(a) Charging time
After charging commences, the charge time lamp
lights red indicating 30 minutes, orange indicating
20 minutes, and green indicating 5 minutes until
completion. When the battery is fully charged,
the charge status lamp lights green, and the
buzzer sounds continuously for 6 seconds.
(b) Overheat standby
When the battery is overheated, it cannot be
charged, and the charge time lamp flashes red
(in 0.6 second intervals). Leave the battery
inserted in the charger, and charging will
commence when the battery cools down.
bottom, charging starts, and the charge time lamp
lights red, orange, or green according to the
remaining charging time.
3. Charging
(1) Lamp indications
This charger is equipped with a charge time lamp
that indicates remaining charging time, and a charge
status lamp that indicates battery status as shown
in Table 2.
Lights for 0.5 seconds. Does not light for 0.5
seconds. (off for 0.5 seconds)
Lights continuously
Lights for 0.5 seconds. Does not light for 0.5
seconds. (off for 0.5 seconds)
Lights for 0.1 seconds. Does not light for 0.1
seconds. (off for 0.1 seconds)
Lights continuously
Before
charging
While
charging
Charging
complete
Charging
impossible
Blinks
(RED)
Lights
(RED)
Blinks
(RED)
Flickers
(RED)
Lights
(GREEN)
Malfunction in the
battery or the charger.
The battery temperature
is high, making recharg-
ing impossible.
Table 1
Indications of the pilot lamp
Charging
impossible
(c) Charging impossible
When there is a malfunction with the battery or
charger, the charge status lamp flashes orange
rapidly (in 0.2 second intervals), and the buzzer
sounds intermittently for 5 seconds.
(2) Regarding the temperatures of the rechargeable
battery
The temperatures for rechargeable batteries are as
shown in the table below, and batteries that have
become hot should be cooled for a while before
being recharged.
Table 2 Lamp indications
Lamp indications Status lamp
Charging time
Lit red
On continuously
30 minutes until charging complete.
Charge
30 minutes
time Charging time
Lit orange
On continuously
20 minutes until charging complete.
lamp
20 minutes
(red/ Charging time
Lit green
On continuously
5 minutes until charging complete.
orange/
5 minutes
green)
Overheat standby
Flashing
On 0.3 seconds, off 0.3 seconds
Battery overheated. Unable to charge.
red
(Charging will commence when battery cools.)
Charge
Before charging
Flashing
On 0.5 seconds, off 0.5 seconds
Power cord is connected to
status
red receptacle.
lamp
Charging complete Lit green
On continuously
(red/
orange/
Charging Flashing
On 0.1 seconds, off 0.1 seconds
Battery or charger malfunction.
green)
impossible orange ■■■■■■■■■■■

13
English
䡬 When the pilot lamp flickers in red (at 0.2-second
intervals), check for and take out any foreign objects
in the charger’s battery installation hole. If there are
no foreign objects, it is probable that the battery
or charger is malfunctioning. Take it to your
authorized Service Center.
䡬 Since the built-in micro computer takes about 3
seconds to confirm that the battery being charged
with UC24YFA and UC24YJ are taken out, wait for
a minimum of 3 seconds before reinserting it to
continue charging. If the battery is reinserted within
3 seconds, the battery may not be properly charged.
〈
UC18YG
〉
Before using the power tool, charge the battery as
follows.
1. Connect the charger power cord to the receptacle
Connecting the power cord will turn on the charger.
2. Insert the battery into the charger
Insert the battery firmly while observing its direction,
until it contacts the bottom of the charger (See
Fig. 12) (the pilot lamp lights up).
CAUTION
If the pilot lamp does not light up, pull out the
power cord from the receptacle and check the
battery mounting condition.
(1) Regarding the temperatures of the rechargeable battery
The temperatures for rechargeable batteries are as
shown in Table 5.
Table 5 Recharging ranges of batteries
(2) Regarding recharging time
Depending on the combination of the charger and
batteries, the charging time will become as shown
in Table 6.
Table 6 Charging time (At 20°C)
The pilot lamp goes off to indicate that the battery
is fully charged.
The battery charging time becomes longer when a
temperature is low or the voltage of the power
source is too low.
When the pilot lamp does not go off even if more
than 120 minutes have elapsed after starting of the
charging, stop the charging and contact your
HITACHI AUTHORIZED SERVICE CENTER.
CAUTION
If the battery is heated due to direct sunlight,
etc., just after operation, the charger pilot lamp
may not light up. At that time, cool the battery
first, then start charging.
3. Disconnect the charger’s power cord from the
receptacle
4. Hold the charger firmly and pull out the battery
Table 3 Recharging ranges of batteries
(3) Regarding recharging time
Depending on the combination of the charger and
batteries, the charging time will become as shown
in Table 4.
Table 4 Charging time (At 20°C)
NOTE
The charging time may vary according to
temperature and power source voltage.
4. Disconnect the charger’s power cord from the
receptacle
5. Hold the charger firmly and pull out the battery
NOTE
After operation, pull out batteries from the charger
first, and then keep the batteries properly.
Regarding electric discharge in case of new batteries,
etc.
As the internal chemical substance of new batteries
and batteries that have not been used for an
extended period is not activated, the electric
discharge might be low when using them the first
and second time. This is a temporary phenomenon,
and normal time required for recharging will be
restored by recharging the batteries 2 – 3 times.
How to make the batteries perform longer.
(1) Recharge the batteries before they become
completely exhausted
When you feel that the power of the tool becomes
weaker, stop using the tool and recharge its battery.
If you continue to use the tool and exhaust the
electric current, the battery may be damaged and
its life will become shorter.
(2) Avoid recharging at high temperatures
A rechargeable battery will be hot immediately after
use. If such a battery is recharged immediately after
use, its internal chemical substance will deteriorate,
and the battery life will be shortened. Leave the
battery and recharge it after it has cooled for a
while.
CAUTION
䡬 If the battery is charged while it is heated because
it has been left for a long time in a location subject
to direct sunlight or because the batetery has just
been used, the pilot lamp of the charger lights up
green. In such a case, first let the battery cool, then
start charging.
Temperatures at
Rechargeable batteries which the battery
can be recharged
EB1820L 0°C – 45°C
Temperatures at
Rechargeable batteries which the battery
can be recharged
EB1820L –5°C – 60°C
EB1826HL, EB1830HL 0°C – 45°C
Charger
UC24YFA UC24YJ
Battery
EB1820L Approx. 50 min. Approx. 18 min.
EB1826HL,
Approx. 70 min. Approx. 28 min.
EB1830HL
Charger
UC18YG
Battery
EB1820L Approx. 50 min.

14
English
NOTE
After charging, pull out batteries from the charger
first, and then keep the batteries properly.
Regarding electric discharge in case of new batteries,
etc.
As the internal chemical substance of new batteries
and batteries that have not been used for an
extended period is not activated, the electric
discharge might be low when using them the first
and second time. This is a temporary phenomenon,
and normal time required for recharging will be
restored by recharging the batteries 2 – 3 times.
How to make the batteries perform longer.
(1) Recharge the batteries before they become
completely exhausted.
When you feel that the power of the tool becomes
weaker, stop using the tool and recharge its battery.
If you continue to use the tool and exhaust the
electric current, the battery may be damaged and
its life will become shorter.
(2) Avoid recharging at high temperatures.
A rechargeable battery will be hot immediately after
use. If such a battery is recharged immediately after
use, its internal chemical substance will deteriorate,
and the battery life will be shortened. Leave the
battery and recharge it after it has cooled for a while.
PRIOR TO OPERATION
1. Setting up and checking the work environment
Check if the work environment is suitable by
following the precautions.
2. Prepare a wooden workbench (Fig. 13)
Since the saw blade will extend beyond the lower
surface of the lumber, place the lumber on a
workbench when cutting. If a square block is utilized
as a workbench, select level ground to ensure it
is properly stabilized. An unstable workbench will
result in hazardous operation.
CAUTION
To avoid possible accident, always ensure that the
portion of lumber remaining after cutting is securely
anchored or held in position.
ADJUSTING THE SAW PRIOR TO USE
CAUTION
Pull out battery before doing any adjusting.
1. Adjusting the cutting depth
As shown in Fig. 14, hold the handle with one hand
while loosening the wing-nut with the other.
The cutting depth can be adjusted by moving the
base to the desired position. In such manner adjust
the cutting depth and then securely retighten the
wing-nut.
2. Adjusting the angle of inclination
As shown in Fig. 15 by loosening the wing-bolt on
the incline gauge, the saw blade may be inclined
to a maximum angle of 50° in relation to the base.
After having completed the adjustment, reconfirm
that the wing bolt are firmly tightened.
NOTE
Values of the inclined gauge provided on the base
merely serve as a rough guideline. For cutting
operation at an inclined posture, use the circular
saw after adjusting the angle between the base and
the saw blade with a protractor, etc.
3. Regulating the guide (Fig. 17)
The cutting position can be regulated by moving
the guide to the left or right after loosening its
knob-bolt. The guide may be mounted on either the
right or left side of the tool.
HOW TO USE
1. Operation of switch (Fig. 18)
(switch trigger and light switch)
(1) For safe operation of the machine, a “switch lock”
is provided on the side of a handle.
If the “switch trigger” is pulled in a state where
“switch lock” is pressed in the direction of the
arrow mark, the main switch can be turned ON.
And the “switch lock” is used as the “light switch”.
If the “switch lock (light switch)” is pressed in a
state, the light is turned ON.
(2) After the switch is turned ON, even when you
release your hand from the switch lock, the body
continues running and the light continues being
turned ON as long as you keep on pulling the
switch trigger.
(3) If you release the switch trigger, you can turn OFF
the switch and the “switch lock” returns to the
original position automatically and the light turns
OFF too.
CAUTION
䡬 Do not fix and secure the switch lock. Besides, keep
your finger off the switch trigger when the circular
saw is being carried around. Otherwise, the main
body switch can be inadvertently turned ON,
resulting in unexpected accidents.
䡬 Keep the light ON during cutting operation only.
If it is lit ON in other cases, the main body switch
can be inadvertently turned ON, resulting in
unexpected accidents.
䡬 If the main body is left as it is with the battery
inserted, there can be a case where the [switch lock]
touches the floor and/or wall surface and lights up
continuously, depending on the direction of the
body. Be careful, since continuous lighting can easily
make a full-charged battery go dead in about 3
hours.
2. Cutting procedures
CAUTION
䡬 Recheck that the saw blade is securely clamped.
䡬 Confirm that the wing-nut for adjusting the slot
depth, the wing bolt for adjusting the angle of
inclination are securely clamped.
(1) Place the base on the material, then align the
premarked line and the sawblade with the notch
at the front of the base (Fig. 16).
When the base is not slanted, use the large cutout
as the guide (Fig. 16, Fig. 19(A)).
If the base is slanted (45 degrees), use the small
front scale as the guide (Fig. 16, Fig. 19(B)).

15
English
(2) Ensure that the switch is turned to the ON position
before the saw blade comes in contact with the
lumber. The switch is turned ON when the trigger
is squeezed; and OFF when the trigger is released.
Moving the saw straight at a constant speed will
produce optimum cutting.
CAUTIONS
䡬 Before starting to saw, ensure that the saw blade
has reached full speed revolution.
䡬 Should the saw blade be stopped or made an
abnormal noise during operation, turn off the switch
immediately.
䡬 When finished with a job, pull out the battery from
the main body.
䡬 Twisting and forcibly pressing the saw during cutting
can result in unreasonable pressure on the motor,
so try to go straight quietly.
䡬 In the situation where the circular saw is continuously
operated while replacing the battery with stocked
spare batteries one after another, the motor tends
to overheat. Therefore, whenever the housing
becomes hot, give the saw a break for a while.
䡬 Avoid cutting operation in a state where the base
bottom is afloat from the material being cut.
Otherwise, the motor can get locked.
MOUNTING AND DISMOUNTING THE SAW
BLADE
CAUTION
To avoid serious accident, ensure the switch is in
the OFF position, and pull out the battery.
1. Dismounting the saw blade
(1) Set the cutting volume at maximum, and place the
Circular Saw as shown in Fig. 20.
(2) Depress the lock lever, lock the spindle, and remove
the left-hand bolt and washer (B) with the box
wrench.
(3) While holding the lower guard lever to keep the
lower guard fully retracted into the saw cover,
remove the saw blade (Fig. 21).
2. Mounting the Saw Blade
CAUTION
If the left-hand bolt is worked using other tools than
the provided box wrench, excessive tightening and
insufficient tightening may take place resulting in
injury.
(1) Thoroughly remove any sawdust which has
accumulated on the spindle, bolt and washers.
(2) As shown in Fig. 22, the side of Washer (A) with
a projected center the same diameter as the inner
diameter of the saw blade and the concave side
of Washer (B) must be fitted to the saw blade sides.
* Washer (A) is supplied for 2 types of saw blades
with the hole diameters of 16 mm and 30 mm.
(When buying the Circular Saw, one type of
washer (A) is spplied.)
In case the hole diameter of your saw blade
does not correspond to that of washer (A), please
contact the shop where you purchased the
Circular Saw.
(3) To assure proper rotation direction of the saw blade,
the arrow direction on the saw blade must coincide
with the arrow direction on the saw cover.
(4) Using the fingers, tighten the left-hand bolt retaining
the saw blade as much as possible. Then depress
the lock lever, lock the spindle, and thoroughly
tighten the left-hand bolt.
CAUTION
After having attached the saw blade, reconfirm that
the lock lever is firmly secured in the prescribed
position.
REPLACING LIGHT BULB
CAUTION
䡬 Make absolutely sure that the battery is removed
from the main body before replacing the light bulb.
䡬 Immediately after the light is turned OFF, the bulb
retains high temperature. Make sure to cool down
the light bulb thoroughly before replacing it so as
to prevent burns.
䡬 When replacing the light bulb, check the shape of
base as well as the rating (12 V, 5 W), and then
carry out perfect mounting. Otherwise, the light
bulb can come off and/or cause overheat.
1. Detaching light bulb
(1) Remove the convex part of the light cover from the
concave part of the handle cover, and then pull out
the light cover in the arrow-marked direction as
shown in Fig. 23.
(2) Push the back of the socket, and remove the socket
and the light bulb together from the handle cover
(Fig. 24).
(3) Remove the light bulb from the socket (Fig. 25).
2. Attaching light bulb
Take procedures here that are contrary to the
detaching procedures.
NOTE
䡬 When attaching the light bulb to the socket, insert
the light bulb until it lightly bumps against the
socket.
䡬 When attaching the socket to the handle cover,
align the socket with the hole of housing while
watching the back of the socket shown in Fig. 25,
and insert the socket until it lightly bumps against
the handle cover.
MAINTENANCE AND INSPECTION
CAUTION
Pull out battery before doing any inspection or
maintenance.
1. Inspecting the saw blade
Since use of a dull saw blade will degrade efficiency
and cause possible motor malfunction, sharpen or
replace the saw blade as soon as abrasion is noted.
CAUTION
If a dull saw blade is used, reactive force is increased
during cutting operation. Avoid the use of the dull
saw blade without repair.
2. Inspecting the mounting screws
Regularly inspect all mounting screws and ensure
that they are properly tightened. Should any of the
screws be loose, retighten them immediately. Fail-
ure to do so could result in serious hazard.
3. Maintenance of the motor
The motor unit winding is the very “heart” of the
power tool.
Exercise due care to ensure the winding does not
become damaged and/or wet with oil or water.

16
English
4. Performance checkup and maintenance of lower
guard
Keep the lower guard in good shape for smooth
performance at all times. Be sure to make prompt
repair in case of any malfunction.
5. Adjusting the base and saw blade to maintain
perpendicularity
The angle between the base and the saw blade has
been adjusted to 90°, however should this
perpendicularity be lost for some reason, adjust in
the following manner:
(1) Turn the base face up (Fig. 26) and loosen the wing-
bolt.
(2) Apply a square to the base and the saw blade and
turning the slotted set screw with a slotted-head
screwdriver, shift the position of the base to produce
the desired right angle.
6. Check for dust
Dust may be removed with a clean rag or a cloth
dampened with soapy water.
Do not use bleach, chlorine, gasoline or thinner, for
they may damage the plastics.
7. Storage
Storing in a place below 40°C and out of the reach
of children.
8. Service and repairs
All quality power tools will eventually require
servicing or replacement of parts because of wear
from normal use. To assure that only genuine
replacement parts must be used, all service and
repairs must be performed by a HITACHI
AUTHORIZED SERVICE CENTER, ONLY.
9. Service parts list
CAUTION
Repair, modification and inspection of Hitachi Power
Tools must be carried out by a Hitachi Authorized
Service Center.
This Parts List will be helpful if presented with the
tool to the Hitachi Authorized Service Center when
requesting repair or other maintenance.
In the operation and maintenance of power tools,
the safety regulations and standards prescribed in
each country must be observed.
MODIFICATIONS
Hitachi Power Tools are constantly being improved
and modified to incorporate the latest technological
advancements.
Accordingly, some parts may be changed without
prior notice.
NOTE
Due to HITACHI’s continuing program of research and
development, the specifications herein are subject to
change without prior notice.
IMPORTANT
Correct connection of the plug
The wires of the main lead are coloured in accordance
with the following code:
Blue: – Neutral
Brown: – Live
As the colours of the wires in the main lead of this tool
may not correspond with the coloured markings
identifying the terminals in your plug proceed as follows:
The wire coloured blue must be connected to the terminal
marked with the letter N or coloured black.
The wire coloured brown must be connected to the
terminal marked with the letter L or coloured red.
Neither core must be connected to the earth terminal.
NOTE
This requirement is provided according to BRITISH
STANDARD 2769: 1984.
Therefore, the letter code and colour code may not be
applicable to other markets except The United Kingdom.
Information concerning airborne noise and vibration
The measured values were determined according to
EN50260.
The typical A-weighted sound pressure level: 119 dB (A)
The typical A-weighted sound power level: 130 dB (A)
Wear ear protection.
The typical weighted root mean square acceleration value
does not exceed 2.5 m/s
2
.

17
Deutsch
ALLGEMEINE VORSICHTSMASSNAHMEN
WARNUNG! Bei der Arbeit mit akkubetriebenen
Werkzeugen sollten jederzeit grundlegende
Sicherheitsmaßnahmen befolgt werden, um die Gefahr
von Bränden, auslaufenden Akkus und Verletzungen zu
verringern. Dazu zählen die folgenden Dinge:
Lesen Sie diese Anweisungen völlig, bevor Sie dieses
Erzeugnis verwenden, und bewahren Sie diese
Anweisungen auf.
Für sicheren Betrieb:
1. Der Arbeitsplatz sollte sauber gehalten werden.
Unaufgeräumte Arbeitsplätze und Werkbänke
erhöhen die Unfallgefahr.
2. Wählen Sie eine vernünftige Arbeitsumgebung.
Setzen Sie Werkzeuge keinem Regen oder sonstigen
Flüssigkeiten aus. Verwenden Sie Werkzeuge nicht
an feuchten oder gar nassen Stellen. Sorgen Sie
für einen gut beleuchteten Arbeitsbereich.
Verwenden Sie Werkzeuge nicht an Orten, an denen
Brand- oder Explosionsgefahr besteht.
3. Halten Sie Kinder fern. Lassen Sie Werkzeuge
nicht von Zuschauern berühren. Sämtliche
Zuschauer sollten grundsätzlich vom Arbeitsbereich
fern gehalten werden.
4. Verstauen Sie Akkus und Werkzeuge, die nicht
gebraucht werden. Wenn Werkzeuge oder Akkus
nicht im Einsatz sind, sollten sie getrennt
voneinander an einem trockenen, hoch gelegenen
oder verschlossenen Ort außerhalb der Reichweite
von Kindern gelagert werden.
Achten Sie darauf, dass Akkukontake nicht durch
Metallgegenstände wie Schrauben, Nägel, und so
weiter kurzgeschlossen werden können.
5. Werkzeuge sollten nicht mit übermäßiger Gewalt
verwendet werden. Ihre Leistung ist besser und
sicherer, wenn sie mit der vorgeschriebenen
Geschwindigkeit verwendet werden.
6. Benutzen Sie immer das richtige Werkzeug.
Versuchen Sie nicht mit Gewalt, kleinere
Werkzeuge oder Zubehörteile für Arbeiten
einzusetzen, für die ein Hochleistungswerkzeug
erforderlich ist. Verwenden Sie Werkzeuge nicht
für Dinge, für die sie nicht gedacht sind.
7. Die richtige Kleidung tragen. Keine lose Kleidung
oder Schmuck tragen, da sich lose Kleidungsstücke
in den bewegenden Teilen verfangen können. Bei
Arbeiten im Freien sollten Gummihandschuhe und
rutschfeste Schuhe getragen werden. Tragen Sie
eine schützende Haarabdeckung, um langes Haar
zurückzuhalten.
8. Tragen Sie eine Schutzbrille. Benutzen Sie auch
eine Gesichts- oder Staubmaske, wenn Sie Arbeiten
ausführen, bei denen Staub anfällt.
9. Schließen Sie eine Staubabsaugvorrichtung an.
Wenn Vorrichtungen für den Anschluß von
Staubabsaug- und -sammelvorrichtungen
vorhanden sind, so stellen Sie sicher, daß diese
angeschlossen sind und richtig verwendet werden.
10. Gehen Sie sorgsam mit dem Anschlusskabel um
(sofern das Werkzeug mit einem solchen Kabel
ausgestattet ist ). Tragen Sie das Werkzeug niemals
am Kabel umher, ziehen Sie nicht am Kabel, wenn
Sie den Stecker aus der Steckdose ziehen möchten.
Halten Sie das Kabel von Hitze, Öl und scharfen
Kanten fern.
11. Den Arbeitsplatz gut absichern. Zwingen oder einen
Schraubstock zur Befestigung des Werkstücks
verwenden. Das ist sicherer als die Benutzung der
Hände und macht beide Hände zur Bedienung des
Werkzeugs frei.
12. Sich niemals weit überbeugen. Immer einen festen
Stand und ein sicheres Gleichgewicht bewahren.
13. Warten Sie Werkzeuge mit Sorgfalt. Halten Sie
Schneidwerkzeuge scharf und sauber; auf diese
Weise erbringen sie eine bessere und sicherere
Leistung. Halten Sie sich an Vorschriften
hinsichtlich Schmierung und Austausch von
Zubehörteilen. Inspizieren Sie die
Kabelverbindungen des Werkzeugs von Zeit zu
Zeit. Falls diese beschädigt sein sollten, lassen Sie
diese von einer autorisierten Fachkraft reparieren.
Halten Sie Handgriffe trocken, sauber und frei von
Öl und sonstigen Schmiermitteln.
14. Stromversorgung trennen
Wenn es die Bauart erlaubt, trennen Sie das
Werkzeug von seinem Akku, wenn es nicht im
Einsatz ist, vor Wartungsarbeiten und beim
Wechseln von Zubehörteilen wie Klingen, Bits und
Schneidwerkzeugen.
15. Alle Stellkeile und Schraubenschlüssel entfernen.
Vor Einschaltung des Gerätes darauf achten, daß
alle Stellkeile und Schraubenschlüssel entfernt
worden sind.
16. Vermeiden Sie unbeabsichtigten Anlauf des
Werkzeugs. Tragen Sie das Werkzeug nicht mit
dem Finger am Schalter herum.
17. Den Arbeitsvorgang immer unter Kontrolle haben.
Das Gerät niemals in einem abgespannten Zustand
verwenden.
18. Beschädigte Teile überprüfen. Vor Benutzung des
Werkzeugs sollten beschädigte Teile oder
Schutzvorrichtungen sorgfältig überprüft werden,
um festzustellen, ob sie einwandfrei funktionieren
und die vorgesehene Funktion erfüllen,
Ausrichtung, Verbindungen sowie Anbringung sich
bewegender Teile überprüfen. Ebenfalls
uberprufen, ob Teile gebrochen sind. Teile oder
Schutzvorrichtungen, die beschädigt sind, sollten,
wenn in dieser Bedienungsanleitung nichts anderes
erwähnt ist, durch eine autorisierte
Kundendienststelle ausge wechselt oder repariert
werden. Lassen Sie defekte Schalter von einer
autorisierten Fachkraft reparieren. Benutzen Sie
das Werkzeug nicht, wenn es sich nicht am Schalter
ein- und ausschalten lässt.
19. Warnung
䡬 Die Verwendung von anderem Zubehör oder
anderen Zusätzen als in dieser
Bedienungsanleitung empfohlen kann das Risiko
einer Körperverletzung einschließen.
䡬 Vergewissern Sie sich, dass sich der Akku zum
Einsatz mit dem jeweiligen Werkzeug eignet.
䡬 Sorgen Sie dafür, dass die Außenseite von Akkus
und Werkzeugen gereinigt und trocken ist, bevor
Sie das Ladegerät anschließen.
䡬 Achten Sie darauf, dass Akkus mit dem richtigen,
vom Hersteller empfohlenen, Ladegerät aufgeladen
werden. Ein falscher Einsatz kann zu Brandgefahr,
Überhitzung oder zum Austreten ätzender
Flüssigkeiten aus dem Akku führen.
20. Lassen Sie Ihr Werkzeug von einer qualifizierten
Fachkraft reparieren.
Dieses Werkzeug erfüllt die zutreffenden
Sicherheitsbestimmungen. Reparaturen sollten
ausschließlich von qualifizierten Fachkräften unter
Verwendung von Original-Ersatzteilen ausgeführt
werden. Andernfalls kann es zu erheblichen
Gefährdungen des Benutzers kommen.

18
Deutsch
21. Entsorgung von Akkus
Achten Sie darauf, Akkus auf sichere Weise zu
entsorgen. Halten Sie sich dabei an die
Anweisungen des Herstellers.
22. Falls aus irgendwelchen Gründen eine Flüssigkeit
aus dem Akku austreten sollte, vermeiden Sie
jeden Kontakt damit.
Falls dies aus Versehen einmal vorkommen sollte,
spülen Sie sofort gründlich mit Wasser. Falls
Flüssigkeit in Ihre Augen geraten sollte, suchen
Sie sofort einen Arzt auf.
SICHERHEITSHINWEISE FÜR ALLE SÄGEN
GEFAHR!
a) Halten Sie Ihre Hände vom Arbeitsbereich und
dem Blatt fern. Ihre zweite Hand befindet sich
am Nebengriff oder am Motorgehäuse.
Wenn Sie die Säge mit beiden Händen halten,
können Sie sich nicht in die Finger schneiden.
b) Greifen Sie nicht unter das Werkstück.
Die Schutzeinrichtungen können Sie nicht vor
dem Teil des Sägeblattes schützen, der sich
unter dem Werkstück befindet.
c) Passen Sie die Schnitttiefe der Stärke des
Werkstücks an.
Unterhalb des Werkstückes sollte weniger als
ein ganzer Sägezahn sichtbar sein.
d) Halten Sie ein zu schneidendes Werkstück
niemals mit den Händen oder gar über Ihr Bein
gelegt. Befestigen Sie das Werkstück auf einer
stabilen Unterlage.
Es ist wichtig, das Werkstück richtig zu stützen,
damit es nicht zu Körperkontakt, Festfressen des
Sägeblattes oder Kontrollverlust kommt.
e) Halten Sie Elektrowerkzeuge an den isolierten
Griffflächen, wenn Sie Arbeiten ausführen, bei
denen das Schneidwerkzeug verborgene
Leitungen oder sein eigenes Netzkabel berühren
kann.
Der Kontakt mit stromführenden Leitungen setzt
auch Metallteile des Elektrowerkzeugs unter
Strom und führt zum Stromschlag.
f) Benutzen Sie beim Trennen (Längsschnitt)
grundsätzlich einen Parallel- oder Linealanschlag.
Dies verbessert die Schnittpräzision und
erschwert ein Festfressen des Sägeblattes.
g) Benutzen Sie grundsätzlich Sägeblätter der
richtigen Bohrungsgröße und -form (Rund- oder
Diamantform).
Sägeblätter, die nicht exakt zur
Sägeblattaufnahme der Säge passen, laufen
exzentrisch und können außer Kontrolle geraten.
h) Benutzen Sie niemals beschädigte oder
unpassende Sägeblatt-Unterlegscheiben oder -
Schrauben.
Die Sägeblatt-Unterlegscheiben und -Schrauben
wurden speziell für Ihre Säge entwickelt – für
beste Leistung und höchste Betriebssicherheit.
䡬 Verwenden Sie Niemals Schleifscheiben
Das Bersten von Schleifscheiben kann zu
ernsthaften Verletzungen des Bedieners und
anderer Personen führen, die sich im
Arbeitsbereich aufhalten.
WEITERE SICHERHEITSHINWEISE FÜR ALLE
SÄGEN
Ursachen und Vermeidung von Rückschlag:
– der Rückschlag ist eine plötzliche Reaktion auf ein
verklemmtes, verbogenes oder falsch ausgerichtetes
Sägeblatt und führt zum unkontrollierten Springen
der Säge aus dem Werkstück zum Bediener hin;
–wenn sich das Blatt in der enger werdenden
Schnittfuge verklemmt, wird die Drehbewegung des
Blattes blockiert und das Gerät durch die Motorkraft
urplötzlich Richtung Bediener geschleudert;
– wenn sich das Blatt innerhalb der Schnittfuge
verbiegt oder falsch ausrichtet, können sich die
Zähne am rückwärtigen Teil des Sägeblattes in die
Holzoberfläche graben und das Blatt zum Bediener
hin aus der Schnittfuge springen lassen.
Ein Rückschlag ist das Ergebnis missbräuchlicher
Nutzung der Säge und/oder falscher Bedienschritte
oder ungeeigneter Arbeitsbedingungen – und kann
durch geeignete Schutzmaßnahmen (wie
nachstehend) verhindert werden.
a) Halten Sie die Säge mit beiden Händen fest
gepackt und halten Sie Ihre Arme so, dass sie
einem möglichen Rückschlag entgegenwirken.
Stellen Sie sich so hin, dass sich Ihr Körper
seitlich hinter dem Sägeblatt befindet, nicht
jedoch direkt dahinter.
Durch den Rückschlag kann die Säge nach hinten
springen; die Rückschlagkräfte lassen sich vom
Bediener aber in den Griff bekommen, wenn die
richtigen Vorsichtsmaßnahmen getroffen werden.
b) Wenn sich das Blatt festfressen sollte oder Sie
die Schneidarbeit aus sonstigen Gründen
unterbrechen sollten, schalten Sie die Säge ab
und bewegen sie nicht mehr, bis das Blatt
vollständig stillsteht.
Versuchen Sie niemals, das Sägeblatt aus dem
Werkstück zu lösen oder die Säge nach hinten
zu ziehen, während sich das Sägeblatt dreht –
dies kann zum Rückschlag führen.
Überprüfen Sie die Ursache des Festfressens und
treffen Sie entsprechende Gegenmaßnahmen.
c) Wenn Sie die Säge erneut starten, während sich
das Blatt bereits im Werkstück befindet,
zentrieren Sie das Blatt in der Schnittfuge und
vergewissern sich, dass die Sägezähne nicht im
Material stecken.
Falls das Sägeblatt festgefressen ist, kann es
sich beim Anlauf der Säge nach oben arbeiten
oder aus dem Werkstück springen.
d) Unterlegen Sie große Platten, um ein Verklemmen
des Blattes und Rückschlag zu vermeiden.
Große Werkstücke neigen dazu, unter ihrem
Eigengewicht nachzugeben. An beiden Seiten
des Werkstückes müssen Auflagen angebracht
werden – nahe der Schnittlinie und an den Kanten
des Werkstückes.
e) Benutzen Sie keine stumpfen oder beschädigten
Sägeblätter.
Stumpfe oder unsachgemäß eingesetzte
Sägeblätter erzeugen eine enge Schnittfuge und
übermäßige Reibung, führen zum Festfressen
des Blattes und zum Rückschlag.

19
Deutsch
f) Arretierungshebel für Schnitttiefe und Gehrung
müssen straff und sicher angezogen sein, ehe
Sie den Schnitt ausführen.
Falls sich die Sägeblatteinstellung während des
Schnitts verschiebt, kann sich das Blatt
festfressen und Rückschlag eintreten.
g) Lassen Sie bei Eintauchschnitten in Wände und
andere uneinsehbare Bereiche extreme Vorsicht
walten.
Das vordringende Sägeblatt kann in Objekte
eindringen, die einen Rückschlag verursachen.
SICHERHEITSHINWEISE FÜR SÄGEN MIT
PENDELSCHUTZHAUBE
a) Prüfen Sie vor jedem Gebrauch, ob die untere
Schutzabdeckung (Blattschutz) richtig schließt.
Benutzen Sie die Säge nicht, wenn sich die untere
Schutzabdeckung nicht frei bewegen lässt und
sich nicht verzögerungsfrei schließt. Klemmen
oder binden Sie die untere Schutzabdeckung
niemals in geöffneter Position fest.
Falls die Säge aus Versehen fallen gelassen wird,
kann sich die untere Schutzabdeckung verbiegen.
Ziehen Sie die untere Schutzabdeckung mit dem
vorgesehenen Handgriff zurück und überzeugen
Sie sich, dass sie sich frei bewegen lässt und
in sämtlichen Schnittwinkeln und -tiefen nicht
das Sägeblatt berührt.
b) Überprüfen Sie die einwandfreie Funktion der
unteren Schutzabdeckungsfeder. Falls
Schutzabdeckung (Blattschutz) und Feder nicht
einwandfrei arbeiten sollten, müssen diese vor
Arbeitsbeginn instandgesetzt werden.
Die untere Schutzabdeckung kann schwergängig
werden, wenn Teile beschädigt sind, sich
Gummiablagerungen oder sonstige Rückstände
angesammelt haben.
c) Die untere Schutzabdeckung (Blattschutz) sollte
nur bei speziellen Schnitten von Hand
zurückgezogen werden, z. B. bei Eintauch- und
Verbundschnitten. Heben Sie die untere
Schutzabdeckung am vorgesehenen Handgriff
an – sobald das Sägeblatt in das Werkstück
eindringt, muss die Schutzabdeckung wieder
losgelassen werden.
Bei allen anderen Sägearbeiten sollte die untere
Schutzabdeckung automatisch betätigt werden.
d) Achten Sie immer darauf, dass die untere
Schutzabdeckung (Blattschutz) das Sägeblatt
umgibt, ehe Sie die Säge auf der Werkbank oder
dem Boden absetzen.
Ein ungeschütztes, laufendes Sägeblatt löst eine
Rückwärtsbewegung der Säge aus und
zerschneidet alles, was sich im Weg befindet.
Beachten Sie die Zeit vom Abschalten bis zum
Stillstand des Sägeblattes.
VORSICHTSMASSNAHMEN BEI DER
BENUTZUNG DER AKKU-KREISSÄGE
1. Die Batterie immer bei einer Temperatur von 10
– 40°C laden. Laden bei einer Temperatur, die
niedriger als 10°C ist, wird gefährliche Überladung
verursachen. die Batterie kann nicht bei einer Tem-
peratur über 40°C geladen werden. Die beste
Temperatur zum Laden wäre von 20 – 25°C.
2. Nach Beendung einer Ladung, lassen Sie das
Ladegerät ungefähr 15 Minuten ruhen bevor die
nächste Batterieladung unternommen wird.
Nicht mehr als zwei Batterien nacheinander laden.
3. Keine Fremdkörper durch das Anschlußloch der
Batterie eindringen lassen.
4. Niemals die Batterie und das Ladegerät ausein-
andernehmen.
5. Niemals die Batterie kurzschließen.
Kurzschluß der Batterie verursacht eine zu große
Stromzufuhr und überhitzung, wodurch Durch-
brennen oder Schaden beider Batterie entsteht.
6. Die Batterie nicht ins Feuer werfen. Sie könnte
dabei explodieren.
7. Bei kontinuierlicher Verwendung dieses Gerätes
kann sich das Gerät überhitzen und des Motor und
der Schalter können beschädigt werden. Bitte
lassen Sie das Gerät etwa 15 Minuten ruhen, ohne
es zu verwenden.
8. Darauf achten, daß keine Gegenstände durch
Belüftungsschlitze des Aufladers in das Gerät
eindringen. Wenn Metallobjekte oder entzündliche
Gegenstände durch die Belüftungsschlitze des
Aufladers eindringen, kann dies zu elektrischen
Schlägen führen oder den Auflader beschadigen.
9. Benutzung verbrauchter Batterie beschädigt den
Auflader.
10. Bringen Sie die Batterie zum Geschäft, wo Sie ihn
gekauft haben sobald die Lebensdauer der Batterie
abrinnt. Die erschöpfte Batterie nicht wegwerfen.
11. Tragen Sie während des Betriebs zum Schutz Ihrer
Ohren Gehörschutzstöpsel.
12. Halten Sie den Handgriff des Motorwerkzeugs
immer fest, da es sonst durch die Reaktionskraft
zu ungenauem oder sogar gefährlichem Betrieb
kommen kann.
13. Nicht verbogene oder gerissene Sägeblätter
verwenden.
14. Nicht Sägeblätter aus getempertem Stahl verwenden.
15. Nicht Sägeblätter verwenden, die nicht mit den in
dieser Anweisung gegebenen Regeln übereinstimmen.
16. Nicht die Sägeblätter durch seitlichen Druck auf
die Scheibe stoppen.
17. Die Sägeblätter immer scharf halten.
18. Die Schutzhaube muß sich leicht und frei bewegen.
19. Die Kreissäge nie benutzen, wenn die Schutzhaube
in offener Position arretiert ist.
20. Immer sicherstellen, daß der Rückzugmechanismus
des Schutzsystems richtig arbeitet.
21. Die Sägblätter müssen dünner sein als der Spaltkeil
und die Breite des Schnittes, der Kerbschnitt (mit
eingesetzten Zähnen) muß größer sein als die
Stärke des Spaltkeils.
22. Die Kreissäge nie mit schrägstehendem oder
seitlich stehendem Sägeblatt einsetzen.
23. Immer darauf achten, daß das Werkstück keine
fremden Gegenstände wie Nägel enthält.
24. Der Spaltkeil soll immer verwendet werden,
ausgenommen wenn in die Mitte des Werkstücks
gesenkt wird.
25. Der Sägeblattbereich von 165 mm bis 150 mm reichen.
26. Achten Sie auf Rückschlag von der Bremse.
Diese Kreissäge hat eine elektrische Bremse, die
bei Freigabe des Schalters tätig wird. Halten Sie
die Kreissäge sicher fest, da es bei Tätigwerden
der Bremse zu einem gewissen Rückschlag kommt.
27. Sägen Sie nicht, während die Basis nicht auf dem
Material aufliegt. Wenn das Sägeblatt klemmt, oder
wenn Sie das Sägen aus irgendeinem Grund
unterbrechen müssen, so lassen Sie den
Abzugschalter los und bewegen Sie die Säge nicht,
bis das Sägeblatt vollständig angehalten hat.
Versuchen Sie niemals, die Säge aus dem Werkstück
zu ziehen oder die Säge nach hinten zu ziehen,
Page is loading ...
Page is loading ...
Page is loading ...
Page is loading ...
Page is loading ...
Page is loading ...
Page is loading ...
Page is loading ...
Page is loading ...
Page is loading ...
Page is loading ...
Page is loading ...
Page is loading ...
Page is loading ...
Page is loading ...
Page is loading ...
Page is loading ...
Page is loading ...
Page is loading ...
Page is loading ...
Page is loading ...
Page is loading ...
Page is loading ...
Page is loading ...
Page is loading ...
Page is loading ...
Page is loading ...
Page is loading ...
Page is loading ...
Page is loading ...
Page is loading ...
Page is loading ...
Page is loading ...
Page is loading ...
Page is loading ...
Page is loading ...
Page is loading ...
Page is loading ...
Page is loading ...
Page is loading ...
Page is loading ...
Page is loading ...
Page is loading ...
Page is loading ...
Page is loading ...
Page is loading ...
Page is loading ...
Page is loading ...
Page is loading ...
Page is loading ...
Page is loading ...
Page is loading ...
Page is loading ...
Page is loading ...
Page is loading ...
Page is loading ...
Page is loading ...
Page is loading ...
Page is loading ...
Page is loading ...
Page is loading ...
Page is loading ...
Page is loading ...
Page is loading ...
Page is loading ...
Page is loading ...
Page is loading ...
Page is loading ...
Page is loading ...
Page is loading ...
Page is loading ...
Page is loading ...
Page is loading ...
Page is loading ...
Page is loading ...
Page is loading ...
Page is loading ...
Page is loading ...
-
 1
1
-
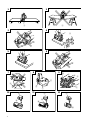 2
2
-
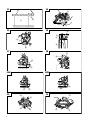 3
3
-
 4
4
-
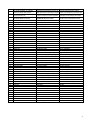 5
5
-
 6
6
-
 7
7
-
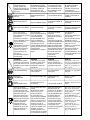 8
8
-
 9
9
-
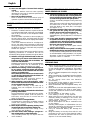 10
10
-
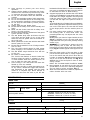 11
11
-
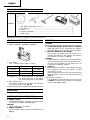 12
12
-
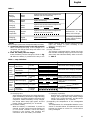 13
13
-
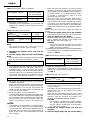 14
14
-
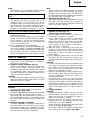 15
15
-
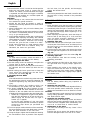 16
16
-
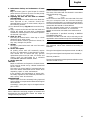 17
17
-
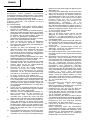 18
18
-
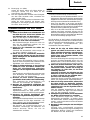 19
19
-
 20
20
-
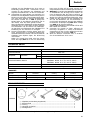 21
21
-
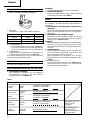 22
22
-
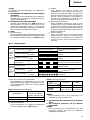 23
23
-
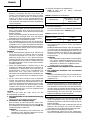 24
24
-
 25
25
-
 26
26
-
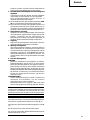 27
27
-
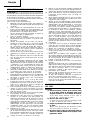 28
28
-
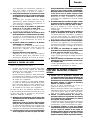 29
29
-
 30
30
-
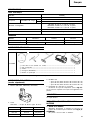 31
31
-
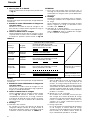 32
32
-
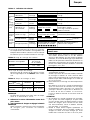 33
33
-
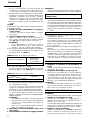 34
34
-
 35
35
-
 36
36
-
 37
37
-
 38
38
-
 39
39
-
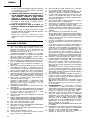 40
40
-
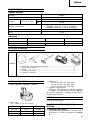 41
41
-
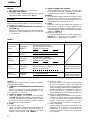 42
42
-
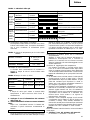 43
43
-
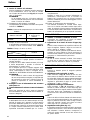 44
44
-
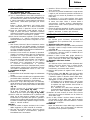 45
45
-
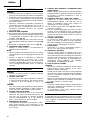 46
46
-
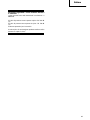 47
47
-
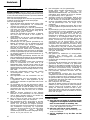 48
48
-
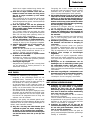 49
49
-
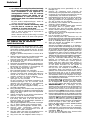 50
50
-
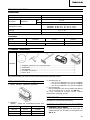 51
51
-
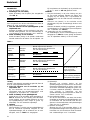 52
52
-
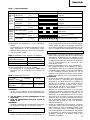 53
53
-
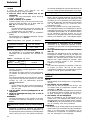 54
54
-
 55
55
-
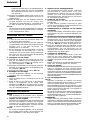 56
56
-
 57
57
-
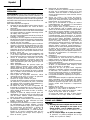 58
58
-
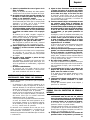 59
59
-
 60
60
-
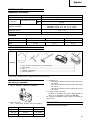 61
61
-
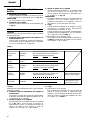 62
62
-
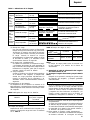 63
63
-
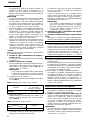 64
64
-
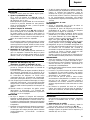 65
65
-
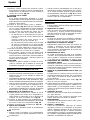 66
66
-
 67
67
-
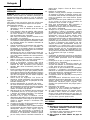 68
68
-
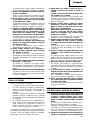 69
69
-
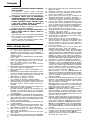 70
70
-
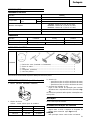 71
71
-
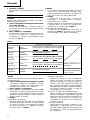 72
72
-
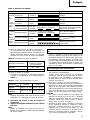 73
73
-
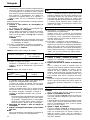 74
74
-
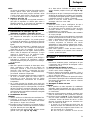 75
75
-
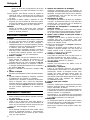 76
76
-
 77
77
-
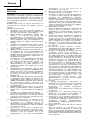 78
78
-
 79
79
-
 80
80
-
 81
81
-
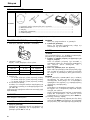 82
82
-
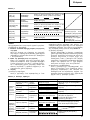 83
83
-
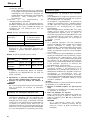 84
84
-
 85
85
-
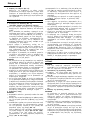 86
86
-
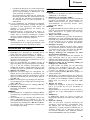 87
87
-
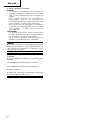 88
88
-
 89
89
-
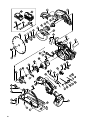 90
90
-
 91
91
-
 92
92
-
 93
93
-
 94
94
-
 95
95
-
 96
96
-
 97
97
-
 98
98


Ask a question and I''ll find the answer in the document
Finding information in a document is now easier with AI
in other languages
- italiano: Hitachi C 18DMR Manuale utente
- français: Hitachi C 18DMR Manuel utilisateur
- español: Hitachi C 18DMR Manual de usuario
- Deutsch: Hitachi C 18DMR Benutzerhandbuch
- Nederlands: Hitachi C 18DMR Handleiding
- português: Hitachi C 18DMR Manual do usuário
Related papers
-
Hitachi C 18DMR Handling Instructions Manual
-
Hitachi C 18DSL Handling Instructions Manual
-
Hitachi c6bu2 User manual
-
-
-
Hitachi C 7SS Handling Instructions Manual
-
-
Hitachi CR18DMR User manual
-
Hitachi C 13U Owner's manual
-
Other documents
-
Hitachi Koki C 6U2 Handling Instructions Manual
-
Defort DCS-185N Owner's manual
-
Defort DCS-165N User manual
-
Bort BHK-185U User manual
-
Bort BHK-160U User manual
-
Infocus CR 18DMR User manual
-
Ferm CSM1034 User manual
-
Makita 5017RKB User manual
-
Makita BSS610RFE Owner's manual
-
Makita 5008 mg Owner's manual