Page is loading ...

ARE YOU INSTALLING THIS PRODUCT?
Please read the installation instructions BEFORE INSTALLATION.
If the product is not installed in accordance with these instructions, your ADP
warranty may be void and the homeowner may have a claim against you
(the installer).
This product must be installed by a qualified tradesperson.
PLEASE RETURN TO HOME OWNER - IMPORTANT CARE & WARRANTY INFORMATION INSIDE.
For more information visit www.adpaustralia.com.au.
ANTONIO METAL FRAME VANITY
INSTALLATION INSTRUCTIONS
CARE & MAINTENANCE
PRIOR TO INSTALLATION
INSTALLATION INSTRUCTIONS
DRAWER ALIGNMENT & INSTALLATION
CARE & MAINTENANCE
ADP WARRANTY
2
4
6
7
8
V1
IMPORTANT - It is the responsibility of the installer to make
any adjustments to doors/drawers after installation if required.
There may have been some movement in transportation and installation which causes
doors/drawers to become unaligned.

PRIOR TO INSTALLATION CHECKLIST
IMPORTANT TIPS
This product must be installed by a qualied tradesperson and we would expect the installation to
be undertaken in a tradesperson like manner and nished to a tradesperson standard. This product
carries a full warranty against faulty workmanship and materials.
Please inspect thoroughly before installation to ensure that the product has not been damaged
and is correct. No claims for damage or incorrect items will be recognised after installation.
Check Products For Any Damages
Positioning & Ventilation
Check for Support Beams
Check for Plumb Walls & Level Floors
Check Plumbing Positions Align with Product Interior Congurations.
Please Note: If you cannot nd the installation instructions for your ADP product in this booklet please go to
www.adpaustralia.com.au/installation-warranty to nd applicable instructions.
Within 48 hours of receiving your goods, unpack your ADP
product and check for any possible freight damages or incorrect
items.
Please contact your place of purchase to report damages or
missing parts.
No claims for damages will be recognised after installation.
Please note: xing screws/bolts are not supplied for installation.
Planning your bathroom furniture placement is critical.
Furniture must be at least 300mm away from any
wet areas. Materials used in the construction of our
furntiture units are moisture resistant, not water proof.
Do not expose furniture to shower spray.
It is important that your bathroom is adequatley
ventilated to eliminate moisture build up.
High humidity will lead to permanent dampness and
mould resulting in a deterioration of the materials in
your bathroom.
Wall hung furniture & basins require xing to a support
beam tted between the studs to give a solid wall backing
to attach the vanity to.
If necessary, x additional support noggins at desired height
for cabinet and basin xing prior to sheeting the wall.
Ensure total width of support noggin exceeds vanity width.
1
2
3
4
5
Ensure the wall is plumb and straight, ensure oor is level. If
you x the product to a non-plumb wall or oor the following
could happen:
• Your door or drawers will not operate correctly.
• Door or drawers will not align.
• Basins will not sit level, which may cause water to pool
or not drain properly.
If it is not possible to make the wall or oor plumb and
straight you must pack the vanity out so that it does not
follow the out of aligned wall.
Floor standing vanities must sit on a level oor or be packed
so they sit level and true.
Please note if your vanity is xed to a bowed wall, the
fastening of the xings will force your cabinet to twist and
benchtop materials may crack due to increased stress on
joins and materials.
Please note if your product has any electrical ttings
please allow for this and talk to your electrician
Take note of clearances behind drawers when
considering water supply ttings inside cabinet.
ENSURE ALL TILES EXTEND BEHIND AND BENEATH THE BATHROOM FURNITURE.
ADP do not recommend tiling in furniture due to moisture and mould build up which
can damage the material and void the warranty.
ALL AREAS WHERE CABINET/TOP MEETS WALL AND/OR FLOOR MUST BE SEALED
USING A NEUTRAL CURE SILICONE.
All edges where vanity top meets cabinet, wall or surrounding furniture must also be
sealed with a continuous bead of silicone.
Ventilation is
important to
prevent mould
& moisture
build up
300mm
(minimum clearance)
BATH
IT IS THE RESPONSIBILITY OF THE INSTALLER TO MAKE ANY ADJUSTMENTS TO
DOORS/DRAWERS AFTER INSTALLATION IF REQUIRED.
IT IS THE RESPONSIBILITY OF THE INSTALLER TO MAKE ANY ADJUSTMENTS TO
DOORS/DRAWERS AFTER INSTALLATION IF REQUIRED.
There may have been some movement in transportation and installation which causes
doors/drawers to become unaligned.

INSTALLATION INSTRUCTIONS: ANTONIO METAL FRAME
Pre-drill hole locations Apply silicone
Fix metal frame to wall through top rail Pre-drill and x metal frame to wall through
bottom rail
Apply silicone
Support Beam Location
Measure & mark vanity position
PLEASE NOTE
Mark vanity height
Support Beam
For FLOOR MOUNT installation go to Step 4
WALL HUNG: Once the wall
has been sheeted, mark the
position of the support beam
on the wall.
WALL HUNG: Mark on the wall the overall height
of the vanity (including top). Recommended
height is 850mm.
Measure down 150mm and mark wall, this will
determine the location of the screws/bolts in
frame. Mark a level line across the wall (approx
width of the vanity). Use a level to ensure accurate
line.
1
5 6
7 8
9
2
4
3
WALL HUNG: It is recommended
that a 150 x 35mm timber
support beam be pre-installed
into the framework prior to
sheeting the wall.
The recommended height of the
support beam is approximately
760mm from the nished oor
level. This will determine the
overall height of the vanity.
4.2 - WALL HUNG:
Measure the positions of the pre-drilled holes on the top back rail of
metal frame. Mark these positions on your line.
4.2 - FLOOR MOUNT:
Place in position and adjust feet to level vanity. Mark position through
pre-drilled holes in top back rail.
4.1 - PRE-DRILL HOLES
Pre-drill holes in back rails, starting no further than 100mm from each
end of the frame and spacing the holes a maximum of 300mm apart.
Pre-drill hole locations into the wall. Be sure to use an
appropriate drill bit for your wall covering (tiles etc).
Make sure you have drilled into the support beam.
Apply silicone to all of the back surfaces of vanity, including
metal frame, drawer and shelf.
Secure vanity to the wall using appropriate screw/bolts through
the pre-drilled holes on the top rail.
Pre-drill your wall through the bottom rail hole locations and
secure metal frame to the wall using appropriate screw/bolt.
Where a stud or support beam cannot be located, use an
appropriately sized hollow wall anchor.
Note: It is not recommended to ONLY use hollow wall anchors
to x vanity to the wall however these can be used if one or two
pilot holes do not penetrate into support beam.
7
6
0
m
m
S UPPORT BEAM
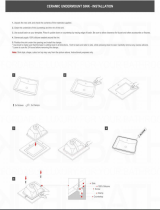
Apply silicone to all top surfaces of the metal frame
(excluding the hand towel rail).
Apply silicone to back edge of ceramic top.
Place ceramic top on metal frame
10
Seal the external edges
11
Seal the external edges of ceramic top and bottom shelf to wall.
Allow silicone to set for 48 hours before use.
SUPPORT BEAM
Overall height of vanity
150mm
300mm
300mm
100
100

LATERAL ADJUSTMENT
PUSH-TO-OPEN BLUM LEGRABOX DRAWERS
REMOVING DRAWER INSERTING DRAWER
NOTE: Please use a star/torx screwdriver for adjusting the Blum Legrabox.
TILT ADJUSTMENT DEPTH ADJUSTMENT
HEIGHT ADJUSTMENT
DRAWER FRONT REMOVAL DRAWER FRONT INSTALLATION
2
+
_
2
+
_
m
in
2
.5
+
2
-
1
CARE & MAINTENANCE
TIPS
• ADP products are produced from materials that are well suited to the bathroom, however it is important that your bathroom
has sufcient ventilation to avoid excessive moisture. High humidity will lead to permanent dampness and mould, resulting
in deterioration of the materials.
• Care must always be taken to dry any excessive moisture or water spillage.
CABINETS
• To maintain the nish on your cabinet use only a soft cloth and weak solution of non abrasive detergent.
• To remove scratches, marks, etc. on two pack polyurethane, rub gently with car cutting compound, car polish or household
brass/silver cleaner.
• Goods used in construction are water/moisture-resistant, but not water-proof.
• All cabinets should be installed at least 300mm away from showers or bathtubs to avoid water damage.
CERAMIC BASINS AND TOPS
• To maintain the nish on your ceramic top use only a soft cloth and weak solution of non abrasive detergent.
• Due to the glazed surface of ceramic tops, scratches cannot be repaired or removed.
• Due to ceramic being a handcrafted product that is red at high temperatures, some visual distortion may occur. This is not
a defect but can be seen to add to the beauty of the product.
METAL FRAME
• To maintain the nish on your metal frame, dust regularly and use only a soft cloth and weak solution of non abrasive
detergent to wipe over the metal frame.
• Minor scratches can be touched up, please contact ADP to purchase appropriate touch up paint.

Our products come with guarantees that cannot be excluded under the Australian Consumer Law. You are entitled to a replacement
or refund for a major failure upon inspection by an authorised representative where a product is found to be defective in construction,
material or assembly. You are also entitled to have the goods repaired or replaced if the goods fail to be of acceptable quality and
the failure does not amount to a major failure, free of charge.
CONDITIONS
1. Items must be installed by a licensed tradesperson.
2. Failure is due to a fault in the manufacture of the product.
3. Proof of purchase is provided.
4. The installation of the product is in accordance with the instructions provided.
EXCLUSIONS
To the fullest extent permitted by law, the manufacturer excludes all liability for damage or injury to any person, damage to any
property and any indirect consequential or other loss or damage. Manufacturer will not be liable for the cost of installation or removal
of any unit and the warranty will be VOIDED if damage occurred during or after INSTALLATION or a damaged or incorrect unit has
been installed. Door and drawer adjustment; Unsuitable or improper use; Incorrect installation or installation not in accordance
with the instructions provided; Installation or part installation by the purchaser or any person other than a LICENSED tradesperson;
Normal wear and tear; Inadequate or complete lack of maintenance; chemical, electrochemical or electrical inuences; excessive
heat damage or Harsh detergents or abrasive cleaners used on product nishes, are NOT considered a warranty issue.
CLAIM PROCEDURE
For all warranty queries customers are to contact the branch where the product was purchased. These details can be found on your
purchase invoice.
WARRANTY AGREEMENT - HOME OWNER TO KEEP
Architectural Designer Products Pty Ltd.
P.O. Box 1455, Unanderra NSW 2526 | ABN 34 073 064 721
www.adpaustralia.com.au
(02) 4271 2444 @adpaustralia
SERVICE CALL OUT FEES & CHARGES
In the event of a call out for issues covered under the ADP manufacturer warranty, no call out fees will apply.
If ADP is called out and the cause of the issue falls within the warranty exclusions or the installation instructions have not been
adhered to, the following charges will apply:
Call out fee: $198.00 initial cost, rst 15 minutes included.
Service time onsite: $24.75 / billed in 15 minute increments.
Call out times: Business hours 9am - 5pm.
Note: Response time will depend on technician availability.
IMPORTANT: Warranty form to be completed by a licensed qualied tradesperson responsible for the intsallation of this unit.
Any warranty will be VOIDED if unit is not installed by a licensed qualied tradesperson.
Cabinet Installed by:
Trade & license number:
Product name/description:
Product Warranty Number (found on door or drawer inside unit):
Phone:
Date: | |
Purchase Date: | |
WARRANTY
NOTE: Unless otherwise stated warranties for ADP products are as follows:
PRODUCT
DOMESTIC
WARRANTY
COMMERCIAL
WARRANTY
Antonio Vanity (excluding ceramic top) 10 years 1 year
Ceramic Top 1 year 1 year
/