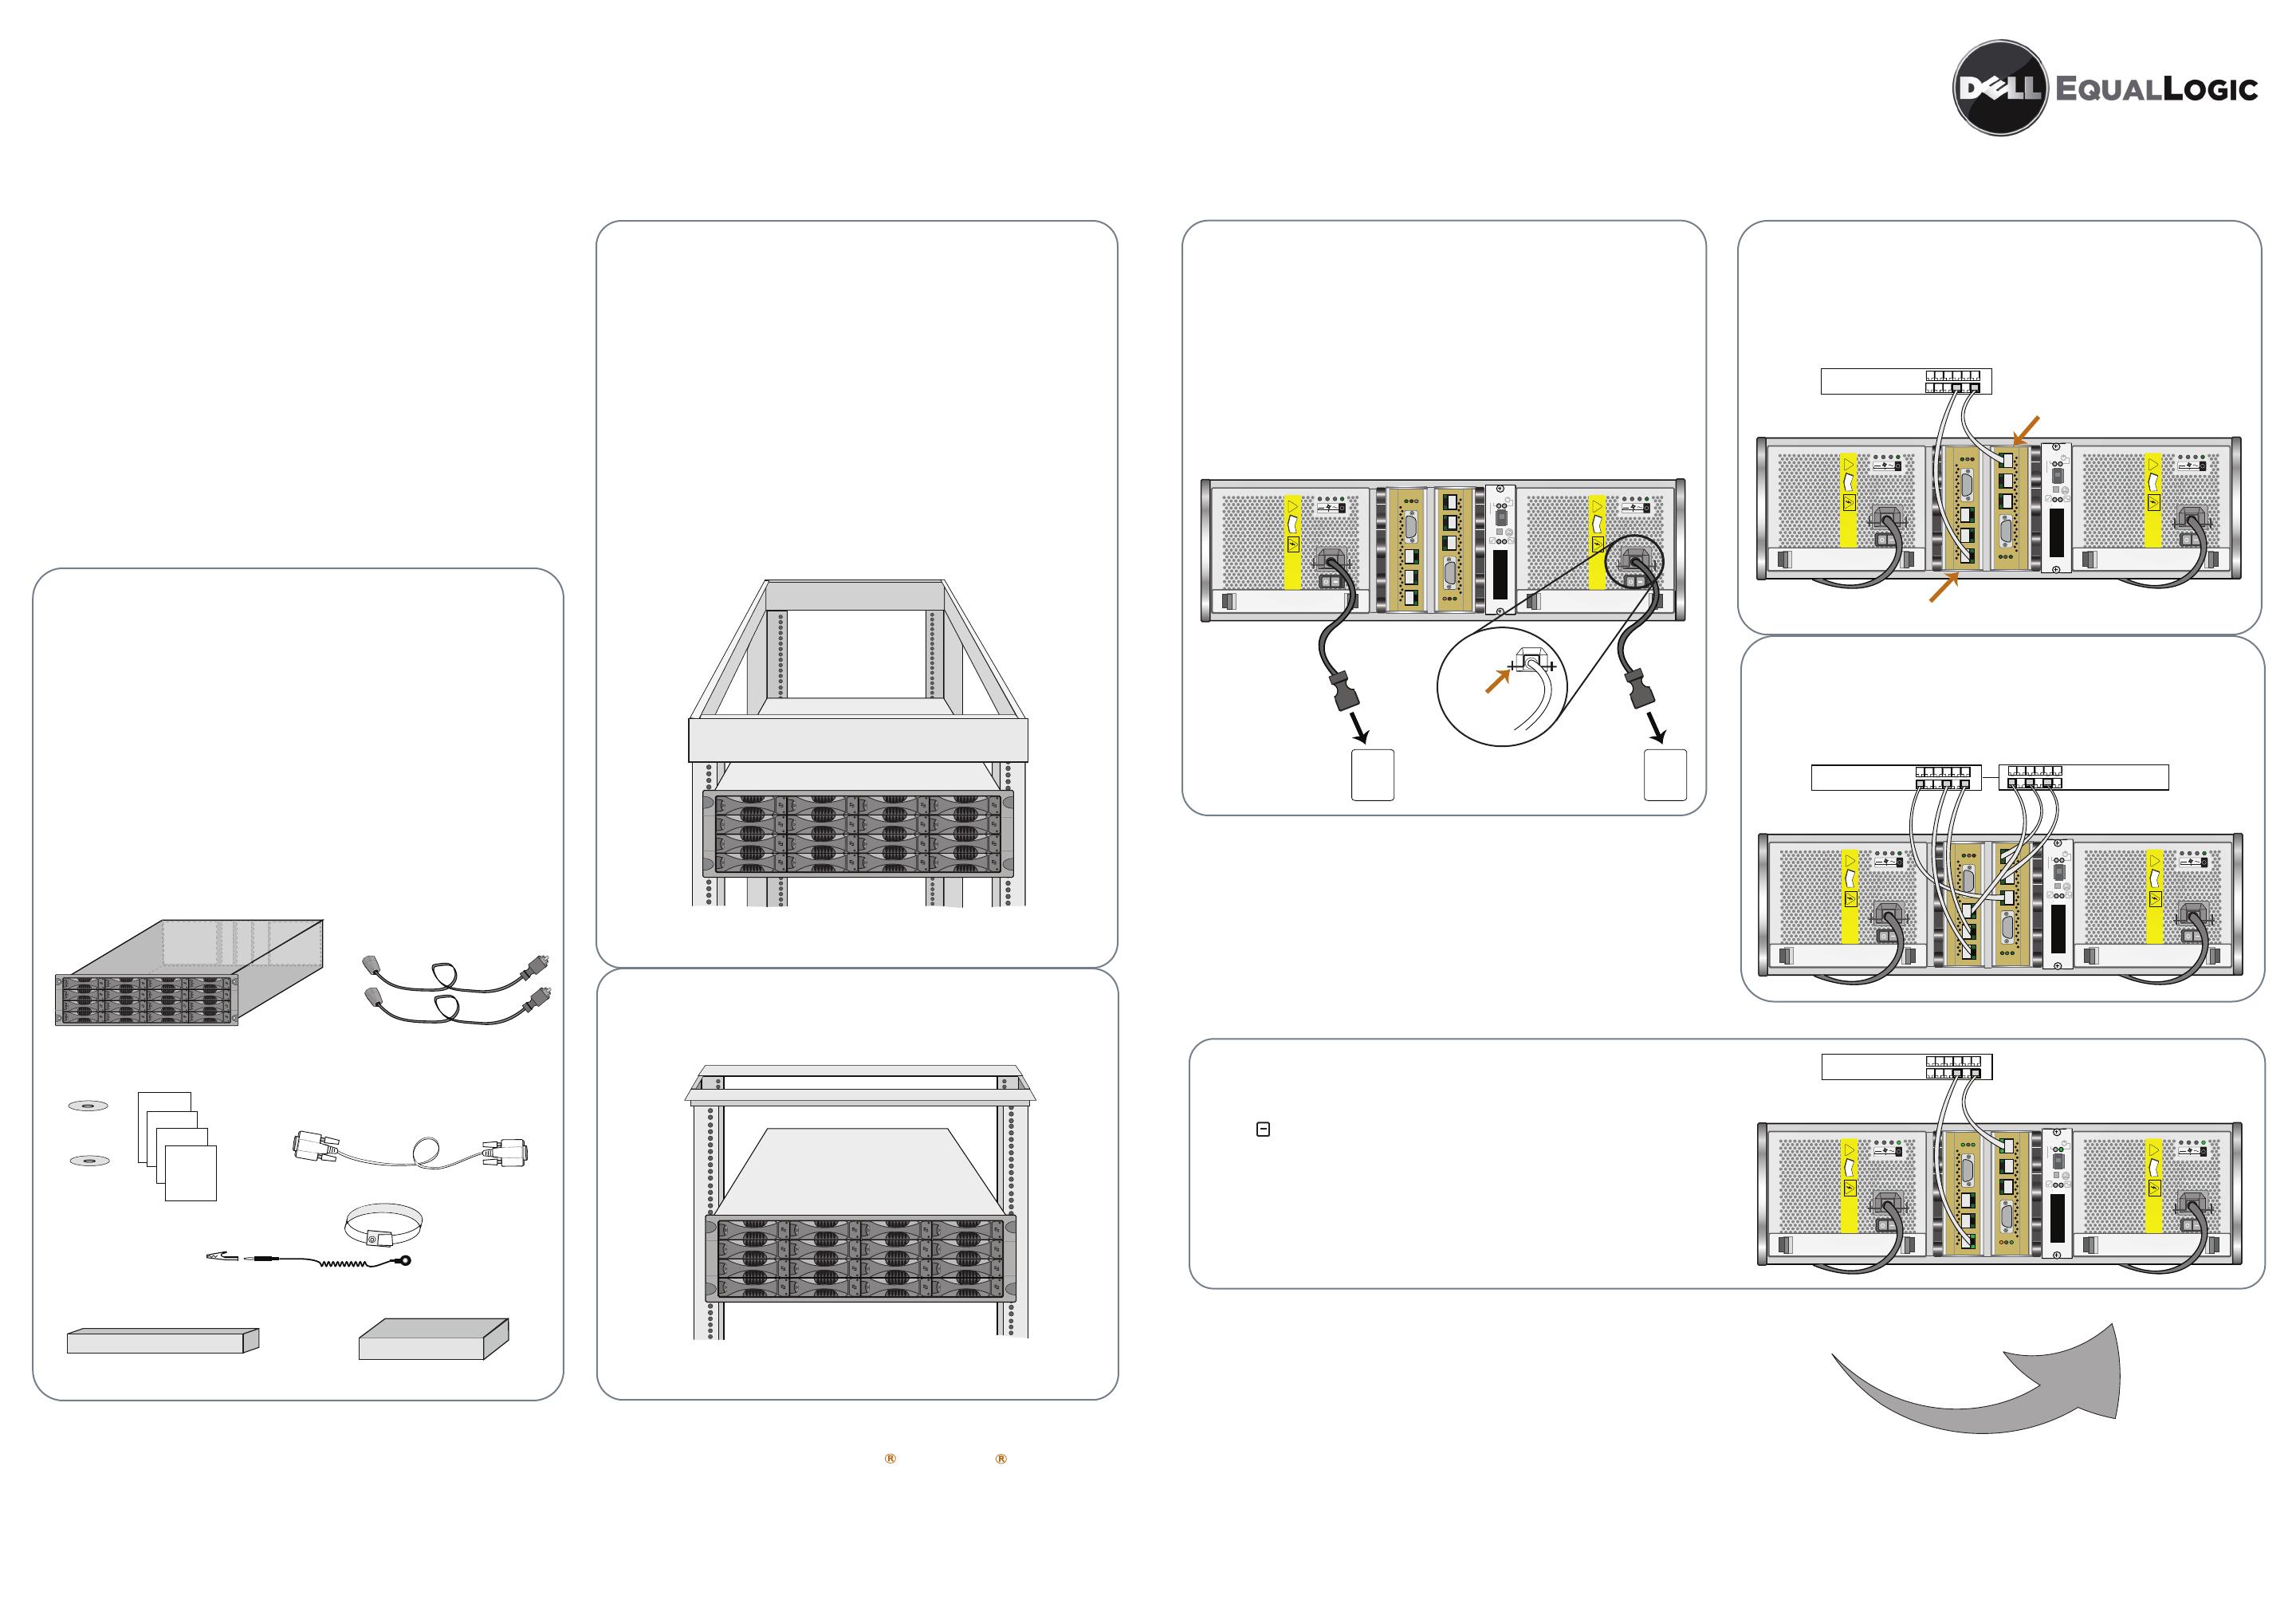
1. Unpack the PS Series shipping box.
Protect sensitive hardware. When handling the chassis, disks,
and control modules, be sure to use an electrostatic wrist strap.
2. Install the array in a rack.
3. Connect the array power cables.
Power Cables
4. Connect the array to the network.
Connect a network cable to Ethernet 0 on each control module
and to a network switch.
5. Turn on power to the array and switches.
Minimum Network Configuration
Before You Begin
PS Series Storage Arrays
PS5000 Hardware Installation
Wait! Do not turn on power to the array at this time.
High-Bandwith, High-Availability Network Configuration
Press
-
on the rocker switch on both power supplies. When
all the components are fully initialized, the power LED will be
green on both control modules, both power supply and cooling
modules, and the operations panel.
Mount the array in a two-pole or four-pole 19” rack. Instructions
for rack assembly and mounting an array are included with each
assembly kit in the array shipping box.
High availability. Connect each power supply to its own circuit.
Stop! If an LED remains red, contact your PS Series support
provider.
Networking
Standard Ethernet and TCP/IP networking rules apply to a
PS Series SAN.
Hardware Requirements
In addition to the hardware described in Step 1, you need:
-
Standard 19” two or four-pole rack.
-
One to six network cables. Copper-based networks
require Cat 5E or Cat 6 cables with RJ45 connectors.
Be sure you have all the necessary hardware, including the
network cables and rack, which are not included in the box.
High performance and availability. Connect cables to all
network interfaces and distribute the connections across
multiple network switches.
Non-Windows installation. If you will not be configuring the SAN from a Microsoft Windows
system, you must connect the serial cable (shipped with the array) to a console terminal and
run the setup utility to configure the SAN. See the PS Series QuickStart for details.
Environment
Be sure the site meets the array power and cooling requirements
described in the PS5000 QuickStart.
PN: 110-5011-R1
Gigabit Ethernet is recommended for optimal performance.
If using multiple switches, they must have inter-switch links.
After installing the hardware for all the PS Series arrays,
turn the page for SAN configuration instructions.
Hardware installation is complete.
Storage Array Chassis
Front of chassis (16 SAS
or SATA disks or blanks)
Rear of chassis (Type 4 or Type 5 control modules,
power supply and cooling modules, and operations panel)
Documentation
Assembly Kit for Two-Pole Rack
Power Cables
Assembly Kit for Four-Pole Rack
Electrostatic Wrist Strap
EqualLogic
. . .
Serial Null Modem Cable
Hardware
Maintenance
PS Series
CD-ROM
QuickStart
PWR WARN ALRM
Used for non-Windows installations and when
there is no network access to the array or group.
Power cables for various electrical
configurations may be provided. Use
these cables only with this product.
Host Integration
Tools CD-ROM
SAN Setup
Poster
Instructions for assembly installation and racking are included in each kit.
Release Notes
Four-Pole Rack Installation
Two-Pole, Mid-Mount Rack Installation
The array is heavy! Do not attempt to lift it without assistance.
Stabilize rack. It is recommended that you attach the rack
to the floor for added stability.
Support array. Be sure to support the array until it is
completely mounted in the rack.
Air flow and ventilation. Be sure there is sufficient space
for air flow in front of and behind the array. The location of
the array must be properly vented.
At this point, power cables are only for grounding purposes.
Be sure to use the cable strain relief to secure each power
cable to the array.
SATA CONTROL
MODULE 5
ETHERNET 0
ETHERNET 1
ETHERNET 2
PWR
ERR
ACT
SERIAL PORT 0
. . . . .
. . . .
SATA CONTROL
MODUL5 5
ETHERNET 0
ETHERNET 1
ETHERNET 2
PWR
ERR
ACT
SERIAL PORT 0
. . . . .
. . . .
!
- - -
.
.
.
.
z
!
- - -
.
.
.
.
z
Power
source
Power
source
. . . . .
. . . .
. . . . .
. . . .
!
- - -
.
.
.
.
z
!
- - -
.
.
.
.
z
Network Switch
Ethernet 0
. . . . .
. . . .
. . . . .
. . . .
!
- - -
.
.
.
.
z
!
- - -
.
.
.
.
z
Network Switch
Network Switch
Shipping Box Contents
. . . . .
. . . .
. . . . .
. . . .
!
- - -
.
.
.
.
z
!
- - -
.
.
.
.
z
Network Switch
Cable
strain
relief
SATA CONTROL
MODULE 5
PWR
ERR
ACT
SERIAL PORT 0
ETHERNET 2
ETHERNET 1
ETHERNET 0
Ethernet 0
SATA CONTROL
MODULE 5
ACT
ERR
PWR
SERIAL PORT 0
ETHERNET 2
ETHERNET 1
ETHE
SATA CONTROL
MODULE 5
ETHERNET 1
ETHERNET 0
ACT
ERR
PWR
SERIAL PORT 0
SATA CONTROL
MODULE 5
PWR
ERR
ACT
SERIAL PORT 0
HERNET 2
ETHERNET 0
ACT
ERR
PWR
SERIAL PORT 0
SATA CONTROL
MODULE 5
SATA CONTROL
MODULE 5
SERIAL PORT 0
PWR
ERR
ACT
ETHERNET 1
ETHERNET 2
ETHERNET 2
ETHERNET 1
ETHERNET 0
ETHE
A PS5000 supports Type 4 control modules (gray faceplate)
for use with SAS disks (black disk release button), and Type 5
control modules (olive faceplate, as shown in this poster) for
use with SATA disks (gray disk release button).
Copyright 2008 EqualLogic, Inc.
