Delfield F18BC Installation guide

Type
Installation guide

This manual is also suitable for

September 2010
F18 SERIES
Service and Installation Manual
Refrigerated Work Tables, Salad Tables & Freezer Bases
Please read this manual completely before attempting to install or operate this equipment! Notify carrier of damage! Inspect all
components immediately.
IMPORTANT INFORMATION
READ BEFORE USE
PLEASE SAVE THESE INSTRUCTIONS!
F18 Series Service and Installation Manual
For customer service, call (800) 733-8829, (800) 773-8821, Fax (989) 773-3210, www.delfield.com
2
WARNING Read This Manual Thoroughly Before Operating, Installing, Or Performing
Maintenance On The Equipment.
WARNING Failure To Follow Instructions In This Manual Can Cause Property Damage,
Injury Or Death.
WARNING Do Not Store Or Use Gasoline Or Other Flammable Vapors Or Liquids In The
Vicinity Of This Or Any Other Appliance.
WARNING Unless All Cover And Access Panels Are In Place And Properly Secured, Do
Not Operate This Equipment.
WARNING Do Not Clean With Water Jet.
CAUTION Observe the following:
Minimum clearances must be maintained from all walls and combustible
materials.
Keep the equipment area free and clear of combustible material.
Adequate clearance for air openings.
Operate equipment only on the type of electricity indicated on the
specification plate.
Retain this manual for future reference.
Important Warning And Safety Information
F18 Series Service and Installation Manual
3
For customer service, call (800) 733-8829, (800) 773-8821, Fax (989) 773-3210, www.delfield.com
The serial number on all self-contained F18 Series refrigerated
work tables and freezer bases is located on the electrical
specifications tag affixed inside the compressor section next
to the pressure control.
On remote refrigerated bases with doors, the tag is inside the
unit on the coil side. On remote refrigerated bases with drawers,
the tag is affixed to the drawer divider. On remote freezer bases,
the tag is located on the inside back of the unit.
Always have the serial number of your unit available when
calling for parts or service. A complete list of authorized
Delfield parts depots is available at www.delfield.com.
©2010 The Delfield Company. All rights reserved. Reproduction without
written permission is prohibited. “Delfield” is a registered trademark of The
Delfield Company.
Contents
Serial Number Location
Even though most equipment is shipped crated, care should be
taken during unloading so the equipment is not damaged while
being moved into the building.
1. Visually inspect the exterior of the package an skid or
container. Any damage should be noted and reported to
the delivering carrier immediately.
2. If damaged, open and inspect the contents with the
carrier.
3. In the event that the exterior is not damaged, yet upon
opening, there is concealed damage to the equipment
notify the carrier. Notification should be made verbally as
well as in written form.
4. Request an inspection of the concealed equipment. This
should be done within 10 days from receipt of the
equipment.
5. Check the lower portion of the unit to be sure legs or
casters are not bent.
6. Also open the compressor compartment housing and
visually inspect the refrigeration package. Be sure lines are
secure and base is still intact.
7. Freight carriers can supply the necessary forms upon
request.
8. Retain all crating material until an inspection has been
made or waived.
Uncrating the Equipment
First cut and remove the banding from around the crate.
Remove the front of the crate material, use of some tools will
be required. If the unit is on legs remove the top of the crate as
well and lift the unit off the skid. If the unit is on casters it can
be "rolled" off the skid.
Receiving and Inspecting the Equipment
Serial Number Location ........................................................3
Receiving & Inspecting .........................................................3
Specifications .................................................................... 4-6
Installation ............................................................................7
Operation ..............................................................................8
Pressure Control Settings .....................................................8
Maintenance .................................................................... 9-10
Wiring Diagrams ........................................................... 11-12
Replacement Part Lists ................................................. 13-16
Replacement Part Assemblies ...................................... 17-20
Warranties..................................................................... 21-23
F18 Series Service and Installation Manual
For customer service, call (800) 733-8829, (800) 773-8821, Fax (989) 773-3210, www.delfield.com
4
Specifications
Remote Refrigerated Work Tables
Model # Of Doors
Shelf Max
Load (lbs)
Base Storage
Cap. FT
3
Shelf
Area FT
2
Volts/Hertz/
Phase Amps BTU Load EVAP. BTU/°TD
F18WR31
(1) 19” 70 7.56 2.56 115/60/1 3.0 383 120/3°
F18WR39
(1) 27” 124 10.23 3.95 115/60/1 3.0 465 120/4°
F18WR44
(2) 19” 70 12.14 5.12 115/60/1 3.0 605 120/5°
F18WR52
(1) 19” & (1) 27” 70/124 15.12 6.51 115/60/1 3.0 686 120/6°
F18WR60
(2) 27” 124 18.10 7.90 115/60/1 3.0 768 120/6°
F18WR70
(2) 32” 140 21.23 9.64 115/60/1 3.0 869 120/7°
F18WR79
(2) 27” & (1) 19” 124/70 24.48 10.29 115/60/1 6.0 1050 240/4°
F18WR87
(3) 27” 124 27.46 11.85 115/60/1 6.0 1131 240/5°
Self-Contained Refrigerated Work Tables
Model # Of Doors
Shelf Max
Load (lbs)
Base Storage
Cap. FT
3
Shelf
Area FT
2
Volts/Hertz/
Phase Amps BTU Load BTU System Cap.
R-404A
oz. H.P.
NEMA
Plug
F18WC39
(1) 19” 70 7.56 2.56 115/60/1 8.0 383 1462 16 1/5 5-15P
F18WC47
(1) 27” 124 10.23 3.95 115/60/1 8.0 465 1462 16 1/5 5-15P
F18WC52
(2) 19” 70 12.14 5.12 115/60/1 8.0 605 1462 16 1/5 5-15P
F18WC60
(1) 19” & (1) 27” 70/124 15.12 6.51 115/60/1 8.0 686 1462 16 1/5 5-15P
F18WC68
(2) 27” 124 18.10 7.90 115/60/1 10.0 768 1462 16 1/4 5-15P
F18WC78
(2) 32” 140 21.23 9.64 115/60/1 10.0 869 1994 16 1/4 5-15P
F18WC87
(2) 27” & (1) 19” 124/70 24.48 10.29 115/60/1 10.0 1050 2261 16 1/4 5-15P
F18WC95
(3) 27” 124 27.46 11.85 115/60/1 10.0 1131 2261 16 1/4 5-15P
Remote Refrigerated Mega Top Salad Tables
Model # Of Doors
Shelf Max
Load (lbs)
Base Storage
Cap. FT
3
# of Pans
Volts/Hertz/
Phase Amps
BTU Load
Base/Rail
EVAP. BTU/°TD
Base/Rail
F18MR31A
(1) 19” 70 4.14 6 115/60/1 3.0 280/265 120/2°/12/22°
F18MR44A
(2) 19” 70 7.15 6 115/60/1 3.0 444/265 120/4°/12/22°
F18MR44D
(2) 19” 70 7.15 12 115/60/1 3.0 444/529 120/4°/22/25°
F18MR52A
(1) 19” & (1) 27” 70/124 8.97 6 115/60/1 3.0 515/265 120/4°/12/22°
F18MR52D
(1) 19” & (1) 27” 70/124 8.97 12 115/60/1 3.0 515/529 120/4°/22/25°
F18MR52E
(1) 19” & (1) 27” 70/124 8.97 18 115/60/1 3.0 515/794 120/4°/31/26°
Self-Contained Refrigerated Mega Top Salad Tables
Model # Of Doors
Shelf Max
Load (lbs)
Base Storage
Cap. FT
3
# of Pans
Volts/Hertz/
Phase Amps
BTU Load
Base/Rail
BTU System Cap.
Base/Rail
R-404A
oz. H.P.
NEMA
Plug
F18MC39A
(1) 19” 70 4.14 6 115/60/1 10.0 280/265 1903/925 16 1/4 5-15P
F18MC39D
(1) 19” 70 4.14 12 115/60/1 10.0 280/529 1903/1156 16 1/4 5-15P
F18MC52A
(2) 19” 70 7.15 6 115/60/1 10.0 444/265 1903/925 16 1/4 5-15P
F18MC52D
(2) 19” 70 7.15 12 115/60/1 10.0 444/529 1903/1156 16 1/4 5-15P
F18MC52E
(2) 19” 70 7.15 18 115/60/1 10.0 444/794 1903/1321 16 1/4 5-15P
F18MC60A
(1) 19” & (1) 27” 70/124 8.97 6 115/60/1 10.0 515/265 2314/864 16 1/4 5-15P
F18MC60D
(1) 19” & (1) 27” 70/124 8.97 12 115/60/1 10.0 515/529 2314/1141 16 1/4 5-15P
F18MC60E
(1) 19” & (1) 27” 70/124 8.97 18 115/60/1 10.0 515/794 2314/1361 16 1/4 5-15P
F18MC60F
(1) 19” & (1) 27” 70/124 8.97 24 115/60/1 10.0 515/1058 2314/1540 16 1/4 5-15P
F18 Series Service and Installation Manual
5
For customer service, call (800) 733-8829, (800) 773-8821, Fax (989) 773-3210, www.delfield.com
Specifications
Remote Refrigerated Salad Top Tables
Model # Of Doors
Shelf Max
Load (lbs)
Base Storage
Cap. FT
3
# of
Pans
Volts/Hertz/
Phase Amps
BTU Load
Base/Rail
Evap. BTU/°TD
Base/Rail
F18SR31A
(1) 19” 70 4.14 6 115/60/1 3.0 280/265 120/2°/13/21°
F18SR44A
(2) 19” 70 7.15 6 115/60/1 3.0 491/441 120/4°/13/21°
F18SR44B
(2) 19” 70 7.15 8 115/60/1 3.0 491/441 120/4°/16/22°
F18SR44C
(2) 19” 70 7.15 10 115/60/1 3.0 491/441 120/4°/19/23°
F18SR52A
(1) 19” & (1) 27” 70/124 8.97 6 115/60/1 3.0 532/529 120/4°/13/21°
F18SR52B
(1) 19” & (1) 27” 70/124 8.97 8 115/60/1 3.0 532/529 120/4°/16/22°
F18SR52C
(1) 19” & (1) 27” 70/124 8.97 10 115/60/1 3.0 532/529 120/4°/19/23°
F18SR52D
(1) 19” & (1) 27” 70/124 8.97 12 115/60/1 3.0 532/529 120/4°/23/23°
Self-Contained Refrigerated Salad Top Tables
Model # Of Doors
Shelf Max
Load (lbs)
Base Storage
Cap. FT
3
# of
Pans
Volts/Hertz/
Phase Amps
BTU Load
Base/Rail
BTU System
Cap. Base/Rail
R-404A
oz. H.P.
NEMA
Plug
F18SC39A
(1) 19” 70 4.14 6 115/60/1 10.0 280/265 1903/745 16 1/4 5-15P
F18SC39B
(1) 19” 70 4.14 8 115/60/1 10.0 280/353 1903/867 16 1/4 5-15P
F18SC52A
(2) 19” 70 7.15 6 115/60/1 10.0 444/265 1903/745 16 1/4 5-15P
F18SC52B
(2) 19” 70 7.15 8 115/60/1 10.0 444/353 1903/867 16 1/4 5-15P
F18SC52C
(2) 19” 70 7.15 10 115/60/1 10.0 444/441 1903/971 16 1/4 5-15P
F18SC52D
(2) 19” 70 7.15 12 115/60/1 10.0 444/529 1903/1061 16 1/4 5-15P
F18SC60A
(1) 19” & (1) 27” 70/124 8.97 6 115/60/1 10.0 515/265 2314/667 16 1/4 5-15P
F18SC60B
(1) 19” & (1) 27” 70/124 8.97 8 115/60/1 10.0 515/353 2314/798 16 1/4 5-15P
F18SC60C
(1) 19” & (1) 27” 70/124 8.97 10 115/60/1 10.0 515/441 2314/916 16 1/4 5-15P
F18SC60D
(1) 19” & (1) 27” 70/124 8.97 12 115/60/1 10.0 515/529 2314/1023 16 1/4 5-15P
Remote Refrigerated Reduced Height Rail
Model # Of Doors
Shelf Max
Load (lbs)
Base Storage
Cap. FT
3
Shelf
Area FT
2
# of
Pans
Volts/Hertz/
Phase Amps
BTU Load
Base/Rail
Evap. BTU/°TD
Base/Rail
F18DR44
(2) 19” 70 9.54 5.12 10 115/60/1 3.0 547/441 120/5°/19/23°
F18DR52
(1) 19” & (1) 27” 70/124 13.89 6.51 12 115/60/1 3.0 625/529 120/5°/23/23°
F18DR60
(2) 27” 124 16.64 7.9 16 115/60/1 5.0 703/617 120/6°/26/24°
F18DR70
(2) 32” 140 22.96 9.64 18 115/60/1 5.0 800/794 120/7°/32/24°
F18DR79
(1) 19” & (2) 27” 70/124 22.47 10.29 18 115/60/1 5.0 962/882 240/4°/36/25°
F18DR87
(3) 27” 124 25.22 11.85 22 115/60/1 5.0 1032/970 240/4°/39/25°
Self-Contained Refrigerated Reduced Height Rail
Model # Of Doors
Shelf Max
Load (lbs)
Base Storage
Cap. FT
3
Shelf
Area FT
2
# of
Pans
Volts/Hertz/
Phase Amps
BTU Load
Base/Rail
BTU System
Cap. Base/Rail
R-404A
oz. H.P.
NEMA
Plug
F18DC52
(2) 19” 70 9.54 5.12 12 115/60/1 10.0 547/529 1903/1061 16 1/4 5-15P
F18DC60
(1) 19” & (1) 27” 70/124 13.89 6.51 14 115/60/1 12.0 625/617 2314/1121 24 1/3 5-15P
F18DC68
(2) 27” 124 16.64 7.9 18 115/60/1 12.0 703/794 2314/1544 24 1/3 5-15P
F18DC82
(2) 32” 140 22.96 9.64 20 115/60/1 14.0 800/882 3097/1648 32 1/2 5-20P
F18DC91
(1) 19” & (2) 27” 70/124 22.47 10.29 22 115/60/1 14.0 962/1058 3807/1839 32 1/2 5-20P
F18DC99
(3) 27” 124 25.22 11.85 24 115/60/1 14.0 1032/1147 3807/1839 32 1/2 5-20P
F18 Series Service and Installation Manual
For customer service, call (800) 733-8829, (800) 773-8821, Fax (989) 773-3210, www.delfield.com
6
Specifications
Remote Refrigerated Reduced Height Rail
Model # Of Doors
Shelf Max
Load (lbs)
Base Storage
Cap. FT
3
Shelf
Area FT
2
Volts/Hertz/
Phase Amps
BTU Load
Base/Rail
Evap. BTU/°TD
Base/Rail
# of
Pans
F18RR44
(2) 19” 70 9.49 5.12 115/60/1 3.0 547/441 120/5°/19/23° 10
F18RR52
(1) 19” & (1) 27” 70/124 11.81 6.51 115/60/1 3.0 625/529 120/5°/23/23° 12
F18RR60
(2) 27” 124 14.14 7.9 115/60/1 5.0 703/617 120/6°/26/24° 16
F18RR70
(2) 32” 140 17.05 9.64 115/60/1 5.0 800/794 120/7°/32/24° 18
F18RR79
(1) 19” & (2) 27” 70/124 18.68 10.29 115/60/1 5.0 962/882 240/4°/36/25° 18
F18RR87
(3) 27” 124 21.30 11.85 115/60/1 5.0 1032/970 240/4°/39/25° 22
Self-Contained Refrigerated Reduced Height Rail
Model # Of Doors
Shelf Max
Load (lbs)
Base Storage
Cap. FT
3
Shelf
Area FT
2
Volts/Hertz/
Phase Amps
BTU Load
Base/Rail
BTU System
Cap. Base/Rail
# of
Pans
R-404A
oz. H.P.
NEMA
Plug
F18RC52
(2) 19” 70 9.49 5.12 115/60/1 10.0 547/529 1903/1061 12 16 1/4 5-15P
F18RC60
(1) 19” & (1) 27” 70/124 11.81 6.51 115/60/1 12.0 625/617 2314/1121 14 24 1/3 5-15P
F18RC68
(2) 27” 124 14.14 7.9 115/60/1 12.0 703/794 2314/1544 16 24 1/3 5-15P
F18RC82
(2) 32” 140 17.05 9.64 115/60/1 14.0 800/882 3097/1648 20 32 1/2 5-20P
F18RC91
(1) 19” & (2) 27” 70/124 18.68 10.29 115/60/1 14.0 962/1058 3807/1839 22 32 1/2 5-20P
F18RC99
(3) 27” 124 21.30 11.85 115/60/1 14.0 1032/1147 3807/1839 24 32 1/2 5-20P
Remote Freezer Base
Model # Of Doors
Shelf Max
Load (lbs)
Base Storage
Cap. FT
3
Shelf
Area FT
2
Volts/Hertz/
Phase Amps
BTU Load
Base/Rail Evap. BTU/°TD
F18FR35
(1) 19” 70 5.58 2.56 115/60/1 10.0 943 160/6°
F18FR50
(2) 19” 70 12.21 5.12 115/60/1 10.0 1471 160/9°
F18FR58
(1) 19” & (1) 27” 70/124 15.00 6.51 115/60/1 10.0 1844 160/10°
F18FR66
(2) 27” 124 17.79 7.9 115/60/1 10.0 2020 160/11°
F18FR76
(2) 32” 140 21.28 9.64 115/60/1 10.0 2437 160/13°
Self-Contained Freezer Base
Model # Of Doors
Shelf Max
Load (lbs)
Base Storage
Cap. FT
3
Shelf
Area FT
2
Volts/Hertz/
Phase Amps
BTU Load
Base/Rail
BTU System
Cap. Base/Rail H.P.
R-404A
oz.
NEMA
Plug
F18FC43
(1) 19” 70 5.58 2.56 115/60/1 10.0 943 1558 1/3 24 5-15P
F18FC62
(2) 19” 70 12.21 5.12 115/60/1 12.0 1471 1776 1/2 40 5-15P
F18FC70
(1) 19” & (1) 27” 70/124 15.00 6.51 115/60/1 16.0 1647 2713 3/4 56 5-20P
F18FC78
(2) 27” 124 17.79 7.9 115/60/1 16.0 1824 2713 3/4 56 5-20P
F18FC88
(2) 32” 140 21.28 9.64 115/60/1 16.0 2045 2713 3/4 56 5-20P
Self-Contained Dual Rails
Model # Of Doors
Shelf Max
Load (lbs)
Base Storage
Cap. FT
3
Shelf
Area FT
2
Volts/Hertz/
Phase Amps
BTU Load
Base/Rail
BTU System
Cap. Base/Rail H.P.
R-404A
oz.
NEMA
Plug
F18PD48
(1) 27”
124
9.38 3.95
115/60/1 10.0 424/1058 2001/1865 1/5, 1/3 40 5-20P
F18PD72
(2) 27”
124
16.64 7.90
115/60/1 12.7 703/1588 2001/3174 1/5. 1/2 48 5-20P
F18 Series Service and Installation Manual
7
For customer service, call (800) 733-8829, (800) 773-8821, Fax (989) 773-3210, www.delfield.com
CAUTION
Installation
Location
These units are intended for indoor use only. Be sure the
location chosen has a floor strong enough to support the
total weight of the cabinet and contents. A fully loaded 72”
(183cm) long model may weigh as much as 1500 pounds
(680kg)! Reinforce the floor as necessary to provide for
maximum loading.
It is very important to allow for proper air flow, both inside
and outside.
Avoid hot corners and locations near stoves, ovens and
other pieces of cooking equipment.
It is recommended that the unit be installed no
closer than 1(2.54cm) from any wall. Do not
install the unit near any combustible material or
object affected by heat or moisture.
PDL models also require 14" (36cm) clearance
at the top and 6" (15cm) clearance at the bottom
(casters).
Leveling
A level cabinet looks better and will perform better because
the drain pan will drain properly, the doors will line up with
the frames properly, and the cabinet will not be subject to
undue strain.
A unit on legs will have an adjustable bullet foot on each
leg, adjust each for a level unit. A unit on casters will not
be adjustable. Be sure the unit is on a level floor, make
necessary changes to the floor for proper level.
Lock all front casters to ensure the stability of the unit.
Plumbing
Self-contained models are standard with a condensate evaporator.
If, for some reason a unit does not have a condensate evaporator,
or if the evaporator fails, the unit’s drain must have an outlet to
an appropriate drainage area or container. A refrigerated rail
will have a 1" (2.54cm) drain which will need to be run to an
appropriate floor drain or container. The drain will be stubbed
to the bottom of the machine compartment. Either run drain
to a floor drain or add a valve to the base of the machine
compartment and drain the rail to a container when convenient.
The LiquiTec option will NOT have a drain available.
Moisture collecting from improper drainage can
create a slippery surface on the floor and a hazard
to employees. It is the owners responsibility to
provide a container or outlet for drainage.
Electrical connection
Refer to the specification pages amperage data, the serial tag,
your local code or the National Electrical Code to be sure the unit
is connected to the proper power source. A protected circuit of
the correct voltage and amperage must be run for connection of
the line cord, or permanent connection of the unit.
Self-contained units with a cord and plug have an ON/OFF
switch located directly behind the louvered panel covering the
compressor section. Simply turn the switch to ON to begin
operation.
The power switch must be turned to OFF and the
unit disconnected from the power source whenever
performing service or maintenance functions.
Never operate the unit without the louvered panel
in place!
If electrical receptacles are to be mounted in the unit’s
backsplash, they must be wired independently from the
existing unit wiring.
F18 Series Service and Installation Manual
For customer service, call (800) 733-8829, (800) 773-8821, Fax (989) 773-3210, www.delfield.com
8
Pressure Control Settings
Factory recommended low-pressure control settings are:
HFC-404A refrigerators: 85psi (5.86bar) cut-in and 65psi
(4.48bar) cut-out to maintain
approximate interior temperature of
38°F (3°C).
Differential setting of 20psi (1.38bar).
HFC-404A freezers: 32psi (2.21bar) cut-in and 8psi (.552bar)
cut-out to maintain approximate
interior temperature of 0°F to 5°F
(-18°C to -15°C).
Differential setting of 24psi (1.65bar).
HFC-404A refrigerators with LiquiTec Rail:
20psi (1.38bar) cut-in and 10psi
(.689bar) cut-out
Differential setting of 10psi (.689bar)
Temperature control for LiquiTec Rail,
25°F (-4°C) cut in and 18°F (-8°C) cut-
out.
Pressure control settings are measured in pressure,
not temperature.
Operation
After turning the ON/OFF switch to ON the unit’s compressor
will begin operating. Delfield refrigerated bases are designed
to maintain an operational temperature of 36°F to 40°F (2°C to
4°C). Temperature in the salad top and refrigerated rail opening
is 33°F to 41°F (0°C to 5°C) with pans recessed 2” (5.1cm) on
a standard wrapped refrigerated rail or flush with the LiquiTec
option at 86°F (30°C) ambient room temperature. Freezer
bases are designed to maintain an operational temperature of
0°F (-18°C).
Do not place hot pans on/against the blue ABS liner.
Do not throw items into the storage area. Failure
to heed these recommendations could result in
damage to the interior of the cabinet or to the
blower coil.
Overloading the storage area, restricting the air
flow, and continuous opening and closing of the
doors and drawers will hamper the units ability to
maintain operational temperature.
Refrigerated rail units
Product in the rail should be removed to the refrigerated base
at the end of the day. This allows you to turn the rail off at night
to save energy and the rail will have time to defrost as needed.
It also helps maintain product quality. The standard wrapped
refrigerated units are controlled by the pressure control which
is set to maintain the proper rail temperature. An on/off switch
is also provided for the rail and is required to be shut off at
night. The rail switch shuts off the rail only. With a LiquiTec rail
a thermostat is provided to maintain rail temperature as well as
the rail on/off switch. The LiquiTec rail is required to be shut
off at night as well to allow for defrosting. To ensure product
quality in the rail it is recommended that product be rotated
every four hours.
If adding any item to the unit, be sure to keep
in mind the location of the refrigeration lines on
wrapped rail units. A refrigeration leak in a rail
is extremely difficult and costly to repair. In some
cases it cannot be repaired at all.
F18 Series Service and Installation Manual
9
For customer service, call (800) 733-8829, (800) 773-8821, Fax (989) 773-3210, www.delfield.com
Maintenance
Door Gasket Maintenance
Door gaskets require regular cleaning to prevent mold and mildew
build up and also to retain the elasticity of the gasket. Gasket cleaning
can be done with the use of warm soapy water. Avoid full strength
cleaning products on gaskets as this can cause them to become
brittle and crack. Never use sharp tools or knives to scrape or clean
the gasket. Gaskets can be easily replaced and do not require the use
of tools or an authorized service person. The gaskets are “Dart” style
and can be pulled out of the groove in the door and new gaskets can
be “pressed” back into place.
Drain Maintenance - Base
Each unit has a drain located inside the unit that removes the
condensation from the evaporator coil and routes it to an external
condensate evaporator pan. Each drain can become loose or
disconnected during normal use. If you notice water accumulation
on the inside of the unit be sure the drain tube is connected to the
evaporator drain pan. If water is collecting underneath the unit make
sure the end of the drain tube is in the condensate evaporator in the
machine compartment. The leveling of the unit is important as the
units are designed to drain properly when level. Be sure all drain lines
are free of obstructions.
Drawer Maintenance
Drawer Assembly Cleaning
The drawer assembly is designed to be cleaned easily. Both drawer
and tracks are removable without tools. The drawer tracks are
dishwasher safe or can be cleaned in a sink with detergents and a
soft bristle brush. Drawers and tracks should be cleaned on a weekly
basis.
Remove Drawers
Pull the drawer box out until it stops. Lift up on the drawer front and
pull the drawer box completely out. Using a soft bristle brush, clean
the track on the bottom of the drawer box. When finished, it should
be wiped clean of all food and debris.
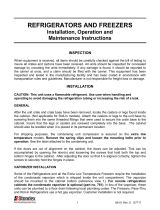
Tracks
The drawer box assembly must be removed. Pull the drawer tracks
out until they hit a stop. Locate blue safety clips towards the back
of each drawer track. Blue safety clips have a tab on the top. Push
the tab back until it clicks. Lift up and pull the drawer tracks all
the way out of the drawer
cage. The drawer tracks
are dishwasher safe or
can be cleaned in a sink
with detergents and a soft
bristle brush. Drawers and
tracks should be cleaned on
a weekly basis. Using a soft
bristle brush, wash the track making sure each roller is thoroughly
cleaned. The drawer cage should be cleaned with a soft bristle brush,
removing any food and debris gathered on the bottom ledge. Once it’s
cleaned thoroughly with a soft bristle brush, wipe remaining debris
clean with a soft towel.
Reassembly
Push the drawer tracks into the drawer cage. The blue safety clip
must remain pushed towards the back. Lift up and slide the drawer
track all the way into the drawer cage. The blue safety clip will lock
in place automatically. Once all tracks are replaced, insert the drawer
box. Rest the drawer box bottom track on the front track roller. Then
push the drawer back in place SLOWLY. When the drawer box is about
half way in you will hit a STOP. You must lift the front of the drawer up
approximately ½” (1.3cm) to continue inward. Clean tracks as often
as possible. The cleaner the tracks are the better they will operate.
Caster Maintenance
Wipe casters with a damp cloth monthly to prevent corrosion.
The power switch must be turned to OFF and the
unit disconnected from the power source whenever
performing service, maintenance functions or cleaning
the refrigerated area.
Refrigerators and Freezers
The interior and exterior can be cleaned using soap and warm water.
If this isn’t sufficient, try ammonia and water or a nonabrasive liquid
cleaner. When cleaning the exterior, always rub with the “grain” of
the stainless steel to avoid marring the finish. Do not use an abrasive
cleaner because it will scratch the stainless steel and can damage the
breaker strips and gaskets.
Stainless Steel Care and Cleaning
To prevent discoloration of rust on stainless steel several important
steps need to be taken. First, we need to understand the properties
of stainless steel. Stainless steel contains 70- 80% iron, which will
rust. It also contains 12-30% chromium, which forms an invisible
passive film over the steels surface, which acts as a shield against
corrosion. As long as the protective layer is intact, the metal is still
stainless. If the film is broken or contaminated, outside elements
can begin to breakdown the steel and begin to form discoloration of
rust. Proper cleaning of stainless steel requires soft cloths or plastic
scouring pads.
NEVER USE STEEL PADS, WIRE BRUSHES OR SCRAPERS!
Cleaning solutions need to be alkaline based or non-chloride cleaners.
Any cleaner containing chlorides will damage the protective film of
the stainless steel. Chlorides are also commonly found in hard water,
salts, and household and industrial cleaners. If cleaners containing
chlorides are used be sure to rinse repeatedly and dry thoroughly.
Routine cleaning of stainless steel can be done with soap and water.
Extreme stains or grease should be cleaned with a non-abrasive
cleaner and plastic scrub pad. Always rub with the grain of the
steel. There are stainless steel cleaners available which can restore
and preserve the finish of the steels protective layer. Early signs of
stainless steel breakdown are small pits and cracks. If this has begun,
clean thoroughly and start to apply stainless steel cleaners in attempt
to restore the passivity of the steel.
Never use an acid based cleaning solution! Many food
products have an acidic content, which can deteriorate
the finish. Be sure to clean the stainless steel surfaces
of ALL food products. Common items include, tomatoes,
peppers and other vegetables.
tab on top of
blue safety clip
F18 Series Service and Installation Manual
For customer service, call (800) 733-8829, (800) 773-8821, Fax (989) 773-3210, www.delfield.com
10
Cleaning the Condenser Coil
In order to maintain proper refrigeration performance, the
condenser fins must be cleaned of dust, dirt and grease regularly.
It is recommended that this be done at least every three months.
If conditions are such that the condenser is totally blocked in three
months, the frequency of cleaning should be increased. Clean the
condenser with a vacuum cleaner or stiff brush. If extremely dirty, a
commercially available condenser cleaner may be required.
Failure to maintain a clean condenser coil can initially cause high
temperatures and excessive run times. Continuous operation with
a dirty or clogged condenser coil can result in compressor failure.
Neglecting the condenser coil cleaning procedures will void any
warranties associated with the compressor and cost to replace the
compressor.
Never use a high-pressure water wash for this cleaning
procedure as water can damage the electrical components
located near or at the condenser coil.
Doors/Hinges
Over time and with heavy use doors the hinges may become loose. If
this happens tighten the screws that mount the hinge brackets to the
frame of the unit. Loose or sagging doors can cause the hinges to pull
out of the frame, which may damage both the doors and the hinges. In
some cases this may require qualified service agents or maintenance
personnel to perform repairs.
Do not place hot pans on/against the blue ABS liner.
Do not throw items into the storage area. Failure to
follow these recommendations could result in damage
to the interior of the cabinet or to the blower coil.
Overloading the storage area, restricting the airflow,
and continuous opening and closing of the doors and
drawers will hamper the units ability to maintain
operational temperature.
Refrigerated rail units
Product in the rail should be removed to the refrigerated base at the
end of the day. This allows you to turn the rail off at night to save
energy and to defrost the rail. It also helps maintain product quality.
The standard wrapped refrigerated rail units are controlled by a low-
pressure control that is set to maintain the proper rail temperature.
An on/off switch is also provided for the rail and is required to be shut
off at night. With a LiquiTec rail a thermostat is provided to maintain
rail temperature as well as the rail on/off switch. The LiquiTec rail
is required to be shut off at night as well to allow for defrosting. To
ensure product quality in the rail it is recommended that product be
rotated every four hours.
If adding any item to the unit, be sure to keep in mind
the location of the refrigeration lines on wrapped rail
units. A refrigeration leak in a rail is extremely difficult
and costly to repair. In some cases it cannot be repaired
at all.
Preventing blower coil corrosion
To help prevent corrosion of the blower coil, store all acidic items,
such as pickles and tomatoes, in sealable containers. Immediately
wipe up all spills.
Units with pans should be operated with pans in place.
Operating the unit without all pans in place will lower
efficiency and may damage the unit.
Continuous opening and closing of the doors will hamper the unit’s
ability to maintain optimum refrigeration temperature. Top section is
not intended for overnight storage. Product should be removed from
pans. Pans can remain in unit while empty.
Maintenance, continued
F18 Series Service and Installation Manual
11
For customer service, call (800) 733-8829, (800) 773-8821, Fax (989) 773-3210, www.delfield.com
Wiring Diagram, F18WC
L1
N
CONDENSING UNIT
ON/OFF SWITCH
POWER CORD
PROVIDED ON
SELF-CONTAINED
MODELS
G
PRESSURE CONTROL
EVAPORATOR FAN(S)
L1
N
CONDENSING UNIT
ON/OFF SWITCH
POWER CORD
PROVIDED ON
SELF-CONTAINED
MODELS
G
PRESSURE CONTROL
T'STAT
SOLENOID VALVE(S)
EVAPORATOR FAN(S)
SWITCH
SOLENOID VALVE
BASE
RAIL
T'STAT
RECEPTACLE FOR OPTIONAL
FAN PACKAGE
*NOTE: with
LiquiTec same
drawing but
remove receptacle
for optional fan
package.
*Not on LiquiTec
Only on LiquiTec
Wiring Diagram, F18MC, F18SC, F18BC & F18RC
F18 Series Service and Installation Manual
For customer service, call (800) 733-8829, (800) 773-8821, Fax (989) 773-3210, www.delfield.com
12
Wiring Diagram, F18PD
L1
N
CONDENSING UNIT
ON/OFF SWITCH
G
PRESS
EVAP
FANS
TIMER
42
1
X
N
SWITCH
PURPLE
ORANGE
ORANGE
WHITE
RED
FAN
DELAY
BLACK/
DEFROST
HEATER
HEATER
DOOR FRAME
3
C1
C1
C1
C1
HEATER
MULLION
RAIL SWITCH
BASE COIL
POWER SWITCH
RAIL CONDENSING UNIT
BASE CONDENSING UNIT
NEUTRAL
GROUND
L1
Wiring Diagram, F18FC
F18 Series Service and Installation Manual
13
For customer service, call (800) 733-8829, (800) 773-8821, Fax (989) 773-3210, www.delfield.com
Replacement Parts
F18DC
3516053 Coil, solenoid, 120V/50/60HZ (rail)
**000-248-0001 Coil assembly, R404A
*000-248-0002 Coil assembly, R404A, with solenoid
*000-BN5-0035 Condensing unit, 1/2hp, R404a
*000-BN5-0037 Condensing unit, 1/3hp, R404a
*000-BN5-0030 Condensing unit, 1/4hp, R404a
2193927 Control, presure, low
3234392 Hinge, pan cover, center
3234282 Hinge, pan cover, left
3234266 Hinge, pan cover, right
9321374 Hinge, pin (for pan cover)
0160179 Hinge Kit
3234645 Leg, 6", s/s
3977984 Shelf, 19" door
3977998 Shelf, 24" door
3978014 Shelf, 27" door
3977983 Shelf, 32" door
2190154 Switch, rocker
3516225 Valve, expansion (rail)
3516102 Valve, solenoid (rail)
3234290 Shelf support, 1" blue
9321040 Shelf support screw (coil side)
9321132 Shelf support screw (wall side)
F18DR
3516053 Coil, solenoid, 120V/50/60HZ (rail)
*000-248-0001 Coil assembly, R404A
3234392 Hinge, pan cover, center
3234282 Hinge, pan cover, left
3234266 Hinge, pan cover, right
9321374 Hinge, pin (for pan cover)
0160179 Hinge Kit (left or right hinged)
3234645 Leg, 6", s/s
3977984 Shelf, 19" door
3977998 Shelf, 24" door
3978014 Shelf, 27" door
3977983 Shelf, 32" door
3234290 Shelf support, 1" blue
9321040 Shelf support screw (coil side)
9321132 Shelf support screw (wall side)
2190154 Switch, rocker
2194201 Thermostat, rail
3516225 Valve, expansion (rail)
3516102 Valve, solenoid (rail)
F18FC
*000-AMR-0030 Condensate Evaporator Pan Assembly
*000-BN5-003G Condensing unit, 1/3HP, low temp
*000-BN5-0034 Condensing unit, 3/4HP, low temp
*000-BN5-0033 Condensing unit, 1/2HP, low temp
*000-249-0000 Coil, assembly, freezer, R404a
2193942 Control, pressure, dual
2193927 Control, pressure, low
0160179 Hinge Kit
3234645 Leg, 6", s/s
9321040 Shelf support screw (coil side)
9321132 Shelf support screw (wall side)
3234290 Shelf support, 1" blue
3977984 Shelf, 19" door
3977998 Shelf, 24" door
3978014 Shelf, 27" door
3977983 Shelf, 32" door
2194099 Switch, SPST, 15amp
2194241 Switch, SPST, 20amp
2194151 Timer, defrost
F18FR
*000-249-0000 Coil, assembly, freezer, R404a
3516053 Coil, solenoid, 120V/50/60HZ
0160179 Hinge Kit
3234645 Leg, 6", s/s
9321040 Shelf support screw (coil side)
9321132 Shelf support screw (wall side)
3234290 Shelf support, 1" blue
3977984 Shelf, 19" door
3977998 Shelf, 24" door
3978014 Shelf, 27" door
3977983 Shelf, 32" door
3516056 Temperature control
2194151 Timer, defrost
3516102 Valve, solenoid
*Replacement part assemblies on pages 17-20.
F18 Series Service and Installation Manual
For customer service, call (800) 733-8829, (800) 773-8821, Fax (989) 773-3210, www.delfield.com
14
F18MC
3516053 Coil, solenoid, 120V/50/60HZ (rail)
*000-248-0001
Coil assembly, R404A, with thermostat and
solenoid
*000-BN5-0030 Condensing unit, 1/4hp, R404a
2193927 Control, pressure, low
3234392 Hinge, pan cover, center
3234282 Hinge, pan cover, left
3234266 Hinge, pan cover, right
9321374 Hinge, pin (for pan cover)
0420068 Hinge kit, lo prole (left or right)
2190154 Switch, rocker
3516225 Valve, expansion (rail)
3516102 Valve, solenoid (rail)
3234645 Leg, 6", s/s
F18MR
3516053 Coil, solenoid, 120V/50/60HZ (rail)
*000-248-0001 Coil assy, R404A, w/ thermostat & solenoid
3234392 Hinge, pan cover, center
3234282 Hinge, pan cover, left
3234266 Hinge, pan cover, right
9321374 Hinge, pin (for pan cover)
0420068 Hinge kit, lo prole (left or right)
3234645 Leg, 6", s/s
9321041 Nut, acorn (for pan cover)
2190154 Switch, rocker
2194201 Thermostat, rail
3516225 Valve, expansion (rail)
3516102 Valve, solenoid (rail)
F18PD48
*000-248-0003 Coil Assembly, r404a, std
*000-BN5-0040 Condensing Assembly, 1/3-1/5 Stacked
2193927 Control, pressure, low
*000-402-0056 Cover Assembly, hinged, 6 pan, l/t
*000-187-006B Door Assembly, ref, 27x26, lt
3234645 Leg, 6, s/s, removable Foot
*356-478-0038 Panel, louver, 14.0, sw Cut, lh
3978014 Shelf, wire, coated
3234290 Support, shelf, plastic
2190154 Switch, rocker, 20a/125v
3516135 Thermometer, hanging, 4
000-282-0051 Tstat Assembly, danfoss
F18PD72
*000-248-0003 Coil Assembly, r404a, std
*000-BN5-003Y Condensing Assembly, 1/2-1/5 Stacked
2193927 Control, pressure, low
000-282-003Z Control Assembly, t-stat, 2sw,l/t
*000-402-0056 Cover Assembly, hinged, 6pan, l/t
*000-187-006B Door Assembly, ref, 27x26, lt
*000-187-006A Door Assembly, ref, 27x26, rt
3234645 Leg, 6, s/s, removable Foot
*356-478-0039 Panel, louver, 18.0, sw Cut, lh
3978014 Shelf, wire, coated
3234290 Support, shelf, plastic
2190154 Switch, rocker, 20a/125v
3516135 Thermometer, hanging, 4
000-282-0051 Tstat Assembly, danfoss
Replacement Parts, continued
*Replacement part assemblies on pages 17-20.
F18 Series Service and Installation Manual
15
For customer service, call (800) 733-8829, (800) 773-8821, Fax (989) 773-3210, www.delfield.com
Replacement Parts, continued
F18RC
3516053 Coil, solenoid, 120V/50/60HZ (rail)
*000-248-0001 Coil assembly, R404A
*000-248-0002 Coil assembly, R404A, with solenoid
*000-BN5-0035 Condensing unit, 1/2hp, R404a
*000-BN5-0037 Condensing unit, 1/3hp, R404a
*000-BN5-0030 Condensing unit, 1/4hp, R404a
2193927 Control, pressure, low
3234392 Hinge, pan cover, center
3234282 Hinge, pan cover, left
3234266 Hinge, pan cover, right
9321374 Hinge, pin (for pan cover)
0160179 Hinge Kit
3234645 Leg, 6", s/s
3977984 Shelf, 19" door
3977998 Shelf, 24" door
3978014 Shelf, 27" door
3977983 Shelf, 32" door
3234290 Shelf support, 1" blue
9321040 Shelf support screw (coil side)
9321132 Shelf support screw (wall side)
2190154 Switch, rocker
3516225 Valve, expansion (rail)
3516102 Valve, solenoid (rail)
F18RR
3516053 Coil, solenoid, 120V/50/60HZ (rail)
*000-248-0001 Coil assembly, R404A
*000-248-0002 Coil assembly, R404A, with solenoid
3234392 Hinge, pan cover, center
3234282 Hinge, pan cover, left
3234266 Hinge, pan cover, right
9321374 Hinge, pin (for pan cover)
0160179 Hinge Kit
3234645 Leg, 6", s/s
3977984 Shelf, 19" door
3977998 Shelf, 24" door
3978014 Shelf, 27" door
3977983 Shelf, 32" door
3234290 Shelf support, 1" blue
9321040 Shelf support screw (coil side)
9321132 Shelf support screw (wall side)
2190154 Switch, rocker
3516225 Valve, expansion (rail)
3516102 Valve, solenoid (rail)
F18SC
3516053 Coil, solenoid, 120V/50/60HZ (rail)
*000-248-0001
Coil assembly, R404A, with thermostat and
solenoid
*000-BN5-0030 Condensing unit, 1/4hp, R404a
2193927 Control, presure, low
3234392 Hinge, pan cover, center
3234282 Hinge, pan cover, left
3234266 Hinge, pan cover, right
9321374 Hinge, pin (for pan cover)
0420068 Hinge kit, lo prole (left or right)
3234645 Leg, 6", s/s
2190154 Switch, rocker
3516225 Valve, expansion (rail)
3516102 Valve, solenoid (rail)
F18SR
3516053 Coil, solenoid, 120V/50/60HZ (rail)
*000-248-0001
Coil assembly, R404A, with thermostat and
solenoid
3234392 Hinge, pan cover, center
3234282 Hinge, pan cover, left
3234266 Hinge, pan cover, right
9321374 Hinge, pin (for pan cover)
0420068 Hinge kit, lo prole (left or right)
3234645 Leg, 6", s/s
2190154 Switch, rocker
2194201 Thermostat, rail
3516225 Valve, expansion (rail)
3516102 Valve, solenoid (rail)
*Replacement part assemblies on pages 17-20.
F18 Series Service and Installation Manual
For customer service, call (800) 733-8829, (800) 773-8821, Fax (989) 773-3210, www.delfield.com
16
Replacement Parts, continued
F18WC
*000-248-0003 Coil assembly, R404A
*000-BN5-0030 Condensing unit, 1/4hp, R404a
*000-BN5-0031 Condensing unit, 1/5hp, R404a
2193927 Control, pressure, low
0160179 Hinge Kit
3234645 Leg, 6", s/s
3977984 Shelf, 19" door
3977998 Shelf, 24" door
3978014 Shelf, 27" door
3977983 Shelf, 32" door
2194099 Switch, SPST, 15amp
3234290 Shelf support, 1" blue
9321040 Shelf support screw (coil side)
9321132 Shelf support screw (wall side)
F18WR
*000-248-0001 Coil assembly, R404A
*000-248-0002 Coil assembly, R404A, with solenoid
0160179 Hinge Kit (left or right hinged)
3234645 Leg, 6", s/s
3977984 Shelf, 19" door
3977998 Shelf, 24" door
3978014 Shelf, 27" door
3977983 Shelf, 32" door
3234290 Shelf support, 1" blue
9321040 Shelf support screw (coil side)
9321132 Shelf support screw (wall side)
*Replacement part assemblies on pages 17-20.
F18 Series Service and Installation Manual
17
For customer service, call (800) 733-8829, (800) 773-8821, Fax (989) 773-3210, www.delfield.com
3
1
4
5
6
7
8
9
10
2
5
4
8
2
1
7
6
3
9
1
2
3
4
6
7
5
Replacement Part Assemblies
Key Part Number Description
- 000-248-0001 Coil Assembly, R404A
1 3516103 Solenoid Coil
2 3516102 Solenoid Valve
3 3516273 Expansion Valve
4 3516095 Evap Coil
5 3516172 Fan Blade
6 2194536 Thermostat
7 2162691 Fan Motor
8 039-231-0000 Drip Pan
9 270-235-0000 Fan Motor Bracket
10 3516173 Fan Guard
- 2183312 Harness, coil, with solenoid
Key Part Number Description
- 000-248-0002 Coil Assembly, R404A, Solenoid
1 3516095 Evap Coil
2 3516173 Fan Guard
3 3516103 Solenoid Coil
4 2162691 Fan Motor
5 039-231-0000 Drip Pan
6 3516102 Solenoid Valve
7 3516273 Expansion Valve
8 3516172 Fan Blade
9 270-235-0000 Fan Motor Bracket
Key Part Number Description
- 000-248-0003 Coil Assembly, R404A, STD
1 2162691 Fan Motor
2 3516095 Evap Coil
3 3516273 Expansion Valve
4 3516173 Fan Guard
5 3516172 Fan Blade
6 039-231-0000 Drip Pan
7 270-235-0000 Fan Motor Bracket
Key Part Number Description
- 000-249-0000 Coil Assembly, Freezer, R404A
1 3516173 Guard, fan
2 3516172 Blade, fan
3 3516271 Valve, expansion, 1/2hp, R404a
4 2194046 Control, limit, fan delay/defrost
5 031-264-0000 Bracket, fan motor
6 2162691 Motor, fan, 115V
7 3516073 Coil, Evaporator
8 000-BNH-Z0000 Pan, freezer evaporator
9 2194034 Heater, defrost
- 2194631 Fuse, defrost heater, 7amp
- 2183310 Harness, coil
- 2194235 Switch, safety heater
- 3977980 Tie, wire, stainless
7
9
8
3
1
5
2
4
6
F18 Series Service and Installation Manual
For customer service, call (800) 733-8829, (800) 773-8821, Fax (989) 773-3210, www.delfield.com
18
Replacement Part Assemblies, continued
1
2
4
5
6
8
3
7
Key Part Number Description
- 000-BN5-0030 Assembly, 1/4 HP Condensing Unit
1 3516457 Fan Blade
2 2160020 Fan Guard
3 2162717 Fan Motor
4 3526999 Compressor, Danfoss, NF5.5CLX
5 2194787 Start Capacitor
6 3516322 Filter Dryer
7 075-231-0030 Condensate Pan
8 3516454 Condenser Coil
- 3516444 Comp, Relay, Overload, NF5.5CLX
Key Part Number Description
- 000-BN5-0031 Assembly, 1/5 Condensing Unit
1 3516457 Fan Blade
2 2160020 Fan Guard
3 2162717 Fan Motor
4 3526997 Compressor, Danfoss, TF4CLS
5 2194787 Start Capacitor
6 3516322 Filter Dryer
7 075-231-0030 Condensate Pan
8 3516454 Condenser Coil
- 3516446 Comp, Relay, Danfoss
Key Part Number Description
- 000-BN5-0034 Assembly, 3/4 HP Cond, Low
1 2160019 Guard, fan condenser
1 2162716 Motor, condenser fan 16W, 155V
1 3516433 Blade, fan 10” CW
2 3527002 Compressor, SC18CLS.2, 115V60hz
2 3516442 Capacitor, start, run assembly
3 3516322 Filter drier
4 3516456 Coil, condenser, 3/4hp
1
2
3
4
3
2
4
5
8
7
6
1
9
Key Part Number Description
- 000-BN5-0033 Assembly, 1/2HP Cond, Low
1 3516554 Blade, Fan, 9.00”
2 2160019 Guard, Fan, Wire
3 2162716 Motor, Fan, 16W, 115V, CW
4 3516324 Cutout, High Pressure
5 3527001 Compressor, SC12CLX.2,115/60HZ
6 3516322 Drier, Filter, (2)Inlet
7 2194789 Capacitor, Start, 240MFD
8 3516441 Relay, Comp, SC12CLX.2
9 3516455 Coil, Condenser, 1/2 HP
- 024-034-0031 Pan, Comp, 18.00
F18 Series Service and Installation Manual
19
For customer service, call (800) 733-8829, (800) 773-8821, Fax (989) 773-3210, www.delfield.com
1
2
3
4
5
6
7
8
Key Part Number Description
- 000-BN5-0037 Assembly, 1/3 Condensing Unit
1 3516457 Fan Blade
2 2160020 Fan Guard
3 3527000 Compress, Danfoss, NF7CLS
4 2194788 Start Capacitor
5 3516322 Filter Drier
6 075-231-0030 Pan, Condensate
7 2162717 Fan Motor
8 3516454 Condenser Coil
- 3516438 Relay, overload, compressor
2
1
3
5
7
8
4
9
6
Key Part Number Description
- 000-BN5-0035 Assembly, 1/2HP Condenser, Med
1 3516554 Condenser fan blade
2 2160019 Condenser fan guard
3 2162716 Condenser fan motor, 115V
4 3516462 Capacitor, start-run assy
5 3527026 Compressor, Danfoss, SC12MLX
6 3516331 Hi pressure switch
7 3516322 Filter Drier
8 075-231-0031 Pan, Condensate
9 3516455 Condenser coil
Replacement Part Assemblies, continued
2
1
3
4
6
7
8
5
Key Deleld Part # Description
- 000-BN5-003G Condensing Unit Assembly, 115V
1 3516457 Blade, Fan, 7.25”
2 2162717 Motor, fan, 9W, 115V
3 2160020 Guard, Fan, 7.25”
4 3527000 Compressor, NF7.0. 115V/60Hz, Danfoss
5 3516324 High pressure switch
6 2194788 Capacitor, Start 320MFD
7 3516438 Compressor relay and overload, NF7CLX
8 3516454 Condenser Coil
Key Part Number Description
- 000-AMR-0030 Assembly, Condensate Evap Pan
1 2194199 Element, Heating, Cond Evap
- 2183387 Cord, #51C Evap
1
F18 Series Service and Installation Manual
For customer service, call (800) 733-8829, (800) 773-8821, Fax (989) 773-3210, www.delfield.com
20
000-BN5-003Y Assembly, 1/2-1/5 Stacked,
3516457 Blade, Fan, 7.25 Dia.,
3516433 Blade, fan, 25deg, 10", cw
2194789 Capacitor, start, 240mfd
2194787 Capacitor, start, 280mfd
3516454 Coil, Condenser, 1/5, 1/4,
3516455 Coil, Condenser, 1/2 Hp
3526997 Compressor, 1/5hp, 115/60, r404a
3527001 Compressor, sc12clx.2, 115/60hz,
3516322 Drier, lter, (2)inlet
2160020 Guard, Fan, 7.25
2160019 Guard, fan, wire
2162717 Motor, fan, 9w, 115v, cw
2162513 Motor, fan, 35w, blast
3516193 Regulator, pressure, 1/2
3516446 Relay, Compressor, Danfoss
3516441 Relay, compressor, sc12clx.2
3516225 Valve, expansion, frz, 1/4ton
000-BN5-0040 Assy, 1/3-1/5 Stacked,
3516457 Blade, Fan, 7.25 Dia.
2194787 Capacitor, start, 280mfd
2194788 Capacitor, start, 320mfd
3516454 Coil, Cond., 1/5, 1/4
3526997 Comp, 1/5hp, 115/60, r404a
3527000 Comp, nf7cls, 115v/60hz
3516322 Drier, lter, (2)inlet
2160020 Guard, Fan, 7.25
2162717 Motor, fan, 9w,115v,cw
3516193 Regulator, pressure, 1/2
3516446 Relay, Comp, Danfoss
3516438 Relay, comp, ovld, nf7clx
3516225 Valve, exp, frz, 1/4ton
359-478-003E Panel, louver, 15.0, ptb
359-478-003D Panel, louver, 18.0, ptb
356-478-0038 Panel, louver, 14.0, sw Cut,lh
356-478-0039 Panel, louver, 18.0, sw Cut, lh
000-187-0081 Door Assembly, ref, 27x26, rt, 430
000-187-0082 Door Assembly, ref, 27x26, lt, 430
000-187-006B Door Assembly, ref, 27x26, lt
000-187-006A Door Assembly, ref, 27x26, rt
1701185 Gasket, door, 27, mark7
0420067 Hinge Kit
000-402-0054 Cover Assembly, hinged, 6 Pan, ptl
000-402-0056 Cover Assembly, hinged, 6pan, l/t
9321374 Pin, hinge, salad Pan
3234266 Hinge, pan Cover, end, rh,
3234282 Hinge, pan Cover, end, lh,
3234392 Hinge, pan Cover,
Replacement Part Assemblies, continued
  • Page 1 1
  • Page 2 2
  • Page 3 3
  • Page 4 4
  • Page 5 5
  • Page 6 6
  • Page 7 7
  • Page 8 8
  • Page 9 9
  • Page 10 10
  • Page 11 11
  • Page 12 12
  • Page 13 13
  • Page 14 14
  • Page 15 15
  • Page 16 16
  • Page 17 17
  • Page 18 18
  • Page 19 19
  • Page 20 20
  • Page 21 21
  • Page 22 22
  • Page 23 23
  • Page 24 24

Delfield F18BC Installation guide

Type
Installation guide
This manual is also suitable for

Ask a question and I''ll find the answer in the document

Finding information in a document is now easier with AI