MANUZOID
Explore
Explore
Bookmarks
Polycom
VVX 500
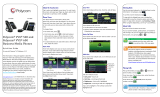
Polycom VVX 500 Quick Manual
Type
Quick Manual
Brand
Polycom
Size
1.00 MB
Category
Telephones
Pages
2
Language
English
View document
Polycom VVX 500 User guide
Type
User guide
Brand
Polycom
Size
383.46 KB
Pages
2
Language
English
View document
Polycom VVX 500 User manual
Type
User manual
Brand
Polycom
Size
399.37 KB
Category
Telephones
Pages
2
Language
English
View document
Polycom VVX 500 User manual
Type
User manual
Brand
Polycom
Size
2.43 MB
Category
IP phones
Pages
92
Language
English
Table of contents
About This Guide
5
Conventions Used in This Guide
5
Information Elements
5
Typographic Conventions
6
Writing Conventions
6
Coding Conventions
7
What’s in This Guide?
7
Getting Started
8
Recommended Software Tools
8
Getting Help and Support Resources
8
Planning Your XML API Interface Requirements
8
Strategies for Web Application Development
9
Best Practices for Web Application Development
9
Best Practices for Microbrowser Web Application Development
10
Understanding Web Application Development on Polycom Phones
12
What is the Browser?
13
What is the Microbrowser?
14
What is XHTML?
16
What Are the Differences Between the Microbrowser and Browser?
16
What’s in the Software Development Kit?
16
Launching the Polycom SDK
17
What’s New in the Latest Polycom UC Software Updates?
17
Getting to Know the XML API Application Interface
19
Using Telephone Integration URIs
19
Using Push Requests
22
HTTP URL Push
23
HTML Data Push
25
Using Telephony Notification Events
27
Viewing an Incoming Call Event
29
Viewing an Outgoing Call Event
30
Viewing an Offhook Event
30
Viewing an Onhook Event
31
Viewing a Phone Lock Event
31
Viewing a Phone Unlock Event
32
Viewing a Call State Change Event
32
Viewing a Line Registration Event
33
Viewing a Line Unregistration Event
33
Viewing a User Login/Logout Event
34
Using Phone State Polling
34
Receiving Call Line Information
35
Receiving Device Information
36
Receiving Network Configuration
37
Writing Your Web Application
40
Developing Your Browser Application
40
Supporting HTTP
40
Launching the Browser from VVX Phones
41
Navigating and Form Editing on the Main Browser
42
Viewing the Idle Browser
43
Using Browser JavaScript DOM Extensions
44
Developing Microbrowser-Specific Applications
47
Supporting XHTML Elements
47
Supporting HTTP
62
Launching the Microbrowser from the Phone
62
Navigating and Form Editing Behavior on the Main Browser
63
Viewing the Idle Browser
64
Sample Microbrowser Web Applications
64
Using Configuration Parameters
73
Configuring Web Application Parameters
74
Configuring Push Request Parameters
75
Configuring Telephone Event Notification Parameters
76
Configuring Phone State Polling Parameters
77
Configuring Programmable Soft Keys
77
Sample Configuration
80
Getting Help
83
Polycom and Partner Resources
83
The Polycom Community
83
Troubleshooting
84
Understanding Microbrowser Application Errors
84
References
86
Additional Information
86
Unsupported XHTML elements on the Microbrowser
86
JavaScript Examples for the Browser
90
View document
Polycom VVX 500 User manual
Type
User manual
Brand
Polycom
Size
3.01 MB
Category
IP phones
Pages
119
Language
English
View document
Polycom VVX 500 User manual
Type
User manual
Brand
Polycom
Size
7.17 MB
Category
IP phones
Pages
207
Language
English
Table of contents
Before You Begin
9
Who Should Read this Guide?
9
Typographic Conventions
9
Get Started
10
View Your Phone Keys and Hardware
10
VVX 300 and VVX 310 Phones Hardware
11
VVX 400 and VVX 410 Phones Hardware
13
VVX 500 and 600 Phones Hardware
15
VVX 1500 Phone Hardware
17
Secure Your Phone with the Security Slot
19
Navigate Your Phone Interface
19
Understand Phone Screens
19
Home Screen
20
Calls Screen
20
Lines Screen
21
Active Call Screen
22
Switch among Phone Screens
22
Understand Phone Icons and Status Indicators
23
Enter Information in Data Fields
27
Enter Information Using the Dialpad
28
Enter Information Using the Onscreen Keyboard
29
Use PinYin to Input Chinese Characters
30
Use the PinYin Input Widget
30
Log In to and Lock Your Phone
32
Log In to Your Phone
32
Log In and Out of Your Phone
32
Change Your Password
33
Sign In and Out of Lync on Your Phone
33
Sign In Using Your BroadSoft UC-One Credentials
34
Lock Your Phone
34
Lock and Unlock Your Phone
35
Change Your User Password
35
Audio Calls
36
Place and Answer Audio Calls
36
Place Audio Calls
37
Place Calls from the Dialer
37
Place Calls from Recent Call Lists
38
Place Calls from Favorites
38
Place Calls from Directories
38
Place Calls from a Locked or Logged Out Phone
39
Place an Intercom Call
39
Place a Call from a VVX Expansion Module
40
Place a Call with a Hidden Number
41
Redial a Number
41
Use H.323 Protocol to Place Audio Calls
41
Answer Audio Calls
42
Answer a Call When in a Call
43
Answer Calls on Shared Lines
43
Answer Calls Automatically
43
Answer Calls on a Locked Phone
44
Answer Calls from VVX Expansion Modules
44
Switch among the Handset, Headset, and Speakerphone
44
Mute Audio
45
End Audio Calls
45
Hold and Transfer Calls
45
Hold and Resume Calls
45
Resume Calls on VVX Expansion Modules
46
Transfer Calls
46
Park and Retrieve Calls
47
Park and Retrieve Calls on the Lync Server
47
Park Calls
47
Retrieve Parked Calls
48
Park and Retrieve Calls on the BroadWorks Server
48
Park Calls
48
Retrieve or Ignore Parked Calls
49
Manage Multiple Calls
50
Manage Calls on VVX 1500 phones
50
Manage Calls on VVX 300, 400, 500, and 600 Phones
51
Manage Calls Remotely
52
Manage Calls with BroadSoft UC-One BroadWorks Anywhere
52
Enable BroadWorks Anywhere
53
Edit BroadWorks Anywhere Locations
53
Manage Calls with BroadSoft UC-One Remote Office
54
Add a Remote Office Number
54
Disable Remote Office
54
Edit Your Remote Office Number
55
Ignore or Reject Incoming Calls
55
Ignore or Silence Incoming Calls
55
Reject Incoming Calls
56
Reject Calls from a Contact
56
Reject Calls with Do Not Disturb
56
Reject Calls with Do Not Disturb with Multiple Lines
57
Reject Anonymous Calls
57
Redirect Incoming Calls
58
Forward Incoming Calls to a Contact
58
Forward an Incoming Call to a Contact
58
Forward All Incoming Calls to a Contact
58
Forward Incoming Lync Calls
59
Divert Calls to a Contact
60
Initiate and Manage Conference Calls
60
Tips for Conference Calls
61
Initiate Conference Calls
61
End Conference Calls
62
Hold and Resume Conference Calls
62
Split Conference Calls
62
Manage Conference Call Participants
62
Initiate and Manage Lync Conference Calls
63
Initiate a Lync Conference Call
64
Initiate a Group Conference Call
64
Initiate a Conference Call during a Call
65
Add Contacts to a Lync Conference Call
65
View a Roster of Conference Participants
65
Manage Lync Conference Participants
66
Mute Conference Participants
66
Demote or Promote Conference Participants
67
Enable and Disable Conference Announcements
67
Lock a Conference Call
67
Admit or Deny Participants to a Locked Conference Call
68
Work with Shared Lines
68
Missed Calls on Shared Lines
68
Hold Calls Privately on Shared Lines
69
Use Multiple Appearance Directory Number - Single Call Appearance
69
Place a Call
70
Answer Calls
70
Barge In on an Active Call
70
Hold and Resume Calls
71
Enable Privacy
71
Use Lync Boss-Admin
72
Assign Delegates
73
Set a Ringtone for Boss Calls
75
Edit the Delegates Group
76
Manage Calls on the Boss’s Line
76
Respond to Incoming Calls
77
View Call Status on the Boss’s Line
78
View and Resume Held Calls
78
Transfer Boss Calls
79
Call on Behalf of a Boss
79
Join Conference Calls
80
Create a Personal Ring Group with BroadSoft UC-One Simultaneous Ring
80
Add Numbers to Your Simultaneous Ring List
81
Delete Numbers from the Simultaneous Ring List
81
Record Calls on VVX 500, 600, and 1500 Phones
81
Guidelines when Recording Calls
82
Record, Pause, and End Recordings
82
Record Conference Calls
83
Play Recorded Calls
84
Browse, Edit, and Open Recorded Calls
84
Video Calls
86
Tips for Video Calls
86
Use a VVX Camera with the VVX 500 and 600 Phones
87
View Status Indicators and Messages for the VVX Camera
88
Change Video Call Settings
89
Set the Call Rate for Video Calls
89
Stop Video for All Calls
89
Change Video Clarity
90
Change the Video Call and PIP Displays
91
Change How PIP Video Displays
92
Change How Far-Side Video Displays
92
Display All Video Calls in Full Screen Mode
93
Place a Video Call on VVX 500, 600, and 1500 Phones
93
Display Video Calls in Full Screen
95
Swap Video
96
Handle Video and Audio Calls
96
Handle Conference Calls with Video
97
Manage Video Calls without a VVX Camera on VVX 500 and 600 Phones
98
Manage Audio and Video Calls
98
View Video in Full Screen during Calls
99
Handle a Mixture of Video and Audio-Only Calls
100
Place Audio-Only Calls
100
Manage Call Lists and Directories
101
View Recent Calls
101
View Recent Lync Calls
103
Manage the Contact Directory
103
Manage the Corporate Directory
105
Search the Lync Directory
106
Save Contacts from the Lync Directory
107
Search the Outlook Directory
107
Search the BroadSoft Directory
108
Manage the GENBAND Address Books
109
Use the Global Address Book
109
Use the Personal Address Book
110
Edit the Personal Address Book
111
Edit Contacts Locally
111
Edit Contacts Remotely
112
Update Your Presence Status
113
Update Your Lync Presence
113
Update Your Buddy Status
114
Manage Buddy Lists, Favorites, and Contact Lists
115
Manage Favorites
115
View Favorites
116
Manage Favorites
116
Use Buddy Lists
116
Add Contacts to Your Buddy List
117
Monitor Contacts on Your Buddy List
118
Block Contacts from Viewing Your Status
118
Manage Lync Contacts
119
Manage Your Microsoft Lync Contact List
119
View Lync Contacts’ Presence Information
120
View the Lync Contact Card for Contact Information
123
Manage BroadSoft UC-One Favorites and Contacts
124
View BroadSoft UC-One Contacts’ Presence Information
124
View BroadSoft UC-One Contacts and Favorites
125
View Contacts and Groups
126
Search for BroadSoft UC-One Contacts
126
Access, Send, and Broadcast Messages
128
Access Voicemail and Video Messages
128
Access Lync Voicemail Messages
129
Manage Lync Voicemail Messages
129
Send Instant Messages
130
Manage Instant Messages
130
Broadcast Messages with Group Paging
131
Send and Receive Pages
131
Send Pages
131
Receive Pages
132
Receive Pages When You’re Not in an Active Call
132
Receive Pages during Active Calls
132
Change Group Paging Settings
133
Change the Default Paging Group
133
Update Paging Group Subscriptions
133
Enable Pages to Play during Active Calls
133
Broadcast Messages with Push to Talk
134
Send and Receive PTT Broadcasts
134
Send PTT Broadcasts
135
Receive PTT Broadcasts
135
Receive PTT Broadcasts When Not in an Active Call
136
Receive PTT Broadcasts during Active Calls
136
Reply to PTT Broadcasts
136
End PTT Broadcasts
136
Change PTT Settings
137
Change the Default Channel
137
Update Channel Subscriptions
137
Enable PTT Broadcasts to Play During Active Calls
138
Use Applications on Your Phone
139
Use the Calendar
139
Navigate the Calendar
139
Use Meeting Reminders
140
Choose a Meeting Reminder Type
141
Disable Meeting Reminders
141
Join Meetings from the Calendar
142
Join Lync Meetings from the Calendar
142
Navigate the Browsers
142
View the Idle Browser
143
Use the Web Browser
143
User Browser Navigation Soft Keys
143
Enter Information into the Browser
144
Use the Launch Pad on VVX 1500 Phones
144
Use the Launch Pad
145
Enable My Info Portal
145
Customize Your Phone
147
Set the Language
147
Set the Time and Date Display
147
Set the Backlight Intensity and Timeout
148
Select a Background Picture
149
Add Personal Photos as Your Background
149
Use the Web Configuration Utility
150
Use a USB Flash Drive
151
Enable Transparent Line Keys
151
Enable Screen Savers
152
Enable Screen Savers
152
Use Personal Photos as Screen Savers
153
Disable Screen Savers
154
Use Your Phone as a Digital Picture Frame
154
Use Power-Saving Mode
156
Change Your Office Hours
156
Change Timeouts
157
Change Audio Settings
157
Change Incoming Call Notifications
158
Set a Ringtone for Incoming Calls
158
Set a Ringtone for Individual Contacts
158
Change the Volume
159
Use Accessibility Features on Your Phone
160
Features for Hearing-Impaired Users
160
Features for Vision-Impaired and Blind Users
161
Features for Mobility-Impaired Users
162
Extend Your Phone’s Capabilities with Accessories
163
Use a Headset with Your VVX Phone
163
Use Your Headset for All Calls
164
Use Electronic Hookswitch
164
Set the Headset Base Unit Options
165
Enable Electronic Hookswitch
165
Use Electronic Hookswitch
166
Disconnect Your Headset
166
Use Bluetooth Headsets with Your VVX 600 Phone
166
Enable Bluetooth and Connect a Headset
167
Manage Calls with Your Bluetooth Headset
167
Disconnect and Remove Your Bluetooth Headset
168
Use the Polycom Desktop Connector
168
Set Up and Enable the Polycom Desktop Connector
168
Use the Direct Method
169
Use the Indirect Method
170
Disable the Polycom Desktop Connector
171
Use the Polycom Desktop Connector
171
Enter Text in a Different Language
174
Connect a Wi-Fi Adapter to Your Phone
175
Connect the Wi-Fi Adapter
175
Connect Polycom VVX Expansion Modules to Your Phone
177
Set Up VVX Expansion Modules
177
Use VVX Expansion Modules
178
View VVX Expansion Module Hardware Features
179
Assign Busy Lamp Field Contacts, Microsoft Lync Contacts, and Favorites
182
Assign Favorites
182
Assign Microsoft Lync Presence Contacts
183
Identify Line Key Assignments
183
Generate the VVX Expansion Module Directory Card
183
Navigate VVX Color Expansion Module Paging
184
Use the Smart Paging Feature
185
Use Alternate Paging
187
Change the Backlight Intensity
187
Connect to Lync on Your Phone using Better Together over Ethernet
187
Install the Polycom Better Together over Ethernet Connector
187
Download Polycom BToE Connector
188
Install the Polycom BToE Connector
188
Enable and Pair Better Together over Ethernet
190
Use BToE to Manage Calls on Your Phone and Lync client
191
Answer Calls
192
Place Calls
192
Pause and Resume Calls
193
Move Call Audio between Your Phone and Computer
193
Use Your Phone as Your Primary Audio Device for Your Computer
193
Disable and Stop BToE on Your Phone and Computer
194
Uninstall the Polycom BToE Connector
194
Maintenance Tasks
196
Investigate Phone Warnings
196
Restart the Phone
196
Update the Phone Configuration
197
Test Phone Hardware
197
Clean the Touchscreen
198
View Software Details
198
Update the Phone Software
198
Update the Phone Software
199
Postpone Software Updates
199
Update Your Lync Phone Software
200
Troubleshoot Issues
201
Troubleshoot General Phone Issues
201
Speakerphone Issues
201
USB Port Issues
201
Troubleshoot Application Issues
201
Calendar
202
Troubleshoot Login Issues
202
Troubleshoot GENBAND Address Book Issues
202
Troubleshoot Polycom Desktop Connector Issues
203
Troubleshoot Headset Issues
203
Echo Cancellation Issues
203
Bluetooth Headset Issues
204
Troubleshoot Recording Issues
204
Troubleshoot Better Together over Ethernet Issues
205
The Polycom BToE Connector installation failed.
205
The Polycom BToE Connector failed to start.
205
My phone isn’t pairing with my computer.
205
Get Help
207
View document
Polycom VVX 500 User manual
Type
User manual
Brand
Polycom
Size
4.34 MB
Category
IP phones
Pages
230
Language
English
Table of contents
Before You Begin
17
Who Should Read this Guide?
17
Typographic Conventions
17
Related Documentation
18
Get Started with Polycom VVX Business Media Phones
19
Overview of Phone Hardware and Keys
19
VVX 101 and VVX 201 Hardware
20
VVX 300 Series Hardware
22
VVX 400 Series Hardware
24
VVX 500 Series and VVX 600 Series Hardware
26
VVX 1500 Hardware
28
Securing Your Phone with the Security Slot
30
Overview of the Phone Interface
30
User Screens
30
Home Screen
31
Calls Screen
31
Lines Screen
32
Active Call Screen
33
Switch among Phone Screens
33
Icons and Status Indicators
34
Entering Information in Data Fields
39
Entering Information Using the Dial Pad
39
Enter Information Using the Onscreen Keyboard
40
Inputting Chinese Characters with PinYin
41
Using the PinYin Input Widget
41
Log Into and Lock Your Phone
44
Log Into Your Phone
44
Log Out of Your Phone
45
Change Your Password
45
Log Into a Visitor Desk Phone
45
Log Out of a Visitor Desk Phone
46
Sign In Using Your Skype for Business Credentials
46
Set the Time and Date Format
46
Sign Out of Skype for Business
47
Sign In Using Your BroadSoft UC-One Credentials
47
Locking Your Phone
47
Lock Your Phone
48
Unlock Your Phone
48
Change Your User Password
48
Audio Calls
50
Placing and Answering Audio Calls
50
Placing Audio Calls
51
Place Calls from the Dialer
51
Place an International Call
51
Place Calls from Recent Call Lists
51
Place Calls to Favorites
52
Place Calls from Directories
52
Place Calls from a Locked or Logged Out Phone
53
Place an Intercom Call
53
Place a Call from a VVX Expansion Module
54
Place a Call with a Hidden Number
54
Redial a Number
55
Use H.323 Protocol to Place Audio Calls
55
Answer Audio Calls
56
Answer Incoming Calls
56
Answer Calls from the Calls Screen
57
Answer a Call When in a Call
57
Answering Calls on Shared Lines
57
Answer Calls Automatically
57
Answer Calls on a Locked Phone
58
Answer Skype for Business Calls on a Locked Phone
58
Answer Intercom Calls
58
Answer Calls from VVX Expansion Modules
59
Switch among the Handset, Headset, and Speakerphone
59
Mute and Unmute Audio
59
End Audio Calls
59
End Held Calls
60
Holding and Resuming Calls
60
Hold Calls
60
Resume Calls
60
Resume Calls on VVX Expansion Modules
60
Transferring Calls
61
Choose a Default Transfer Type
61
Transfer a Call
61
Cancel a Transfer
61
Parking and Retrieving Calls
62
Parking and Retrieving Calls on the Skype for Business Server
62
Park Skype for Business Calls
62
Retrieving Parked Skype for Business Calls
62
Parking and Retrieving Calls on the BroadSoft BroadWorks Server
63
Park BroadSoft Calls
63
Retrieve BroadSoft Calls
64
Managing Multiple Calls
65
Managing Calls on VVX 1500 Phones
65
View a List of Calls
65
Manage Calls
66
Managing Calls on VVX 101, 201, 300, 400, 500, and 600 Series Phones
66
Display Calls from the Lines Screen
66
Display Calls from the Calls Screen
67
Manage Calls from the Calls Screen
67
Managing Calls Remotely
68
Managing Calls with BroadSoft UC-One BroadWorks Anywhere
68
Enable BroadWorks Anywhere
68
Edit BroadWorks Anywhere Locations
69
Disable BWA Locations
69
Remove BWA Locations
69
Managing Calls with BroadSoft UC-One Remote Office
69
Add a Remote Office Number
70
Disable Remote Office
70
Edit Your Remote Office Number
70
Ignoring or Rejecting Incoming Calls
70
Ignore or Silence Incoming Calls
71
Reject Incoming Calls
71
Reject Calls from a Contact
71
Rejecting Calls with Do Not Disturb
71
Enable Do Not Disturb
72
Reject Calls with Do Not Disturb on Multiple Lines
72
Reject Anonymous Calls
73
Redirecting Incoming Calls
73
Forwarding Incoming Calls to a Contact
73
Forward an Incoming Call to a Contact
73
Forward All Incoming Calls to a Contact
74
Disable Call Forwarding
74
Forwarding Incoming Skype for Business Calls
74
Forward Skype for Business Calls to a Contact
75
Forward Skype for Business Calls to Voicemail
75
Simultaneously Ring a Group of Contacts
75
Forward Calls to Delegates
76
Simultaneously Ring Delegates
76
Divert Calls to a Contact
76
Audio Conference Calls
77
Tips for Conference Calls
77
Audio Conference Calls
77
Initiate Conference Calls
78
Join Calls to Create a Conference Call
78
End Conference Calls
79
Hold Conference Calls
79
Resume Conference Calls
79
Split Conference Calls
79
Manage Conference Call Participants
79
Skype for Business Conference Calls
80
Initiating a Skype for Business Conference Call
80
Initiate a Skype for Business Conference on Your Phone
81
Initiate a Conference Call in the Skype for Business Client
81
Initiating a Group Conference Call
81
Initiate a Group Conference Call on Your Phone
81
Initiate a Group Conference Call in the Skype for Business Client
82
Initiate a Conference Call during a Skype for Business Call
82
Add Contacts to a Skype for Business Conference Call
82
Send Contacts Active Conference Information
82
Viewing a Roster of Skype for Business Conference Participants
83
Exit the Roster
83
Return to the Roster
83
Managing Skype for Business Conference Participants
83
Muting Conference Participants
83
Demote or Promote Conference Participants
84
Enable and Disable Conference Announcements
84
Remove Conference Participants
85
Lock and Unlock a Conference Call
85
Alcatel-Lucent Advanced Conference Calls
86
Initiate an Advanced Conference Call
86
Initiate an Advanced Conference Call During a Call
86
Add Contacts to an Advanced Conference Call
86
Join Calls to an Advanced Conference Call
87
Join Two Calls into an Advanced Conference Call
87
Viewing a Roster of Conference Participants
87
Exit the Roster
87
Return to the Roster
87
Managing Advanced Conference Participants
88
Muting Conference Participants’ Audio
88
Remove Conference Participants
88
Shared Lines
89
Shared Line Limitations
89
Missed and Received Calls on Shared Lines
89
Hold Calls Privately on Shared Lines
90
Barge In on Calls for Busy Lamp Field Lines
90
GENBAND’s Multiple Appearance Directory Number - Single Call Appearance
91
Placing a MADN Call
91
Answering MADN Calls
91
Barge In on an Active Call
91
Leave a Bridge Call
92
Resume Held MADN Calls
92
Enabling Privacy
92
Enable Privacy
93
Disable Privacy Temporarily
93
Enable Privacy on a Bridge Call
94
Shared Line Appearance for Skype for Business
94
Shared Line Appearance Limitations
94
Answering SLA Calls
94
Resume Held SLA Calls
94
Boss-Admin for Skype for Business
95
Assign Delegates
95
View the Delegates Group
96
View the Boss Group
97
Set a Ringtone for Boss Calls
98
Edit the Delegates Group
98
Managing Calls on the Boss’s Line
98
Respond to Incoming Boss Calls
99
Viewing Call Status on the Boss’s Line
99
View Held Boss Calls
100
Resume Held Boss Calls
100
Transfer Boss Calls
101
Call on Behalf of a Boss
101
Join Conference Calls for a Boss
102
Alcatel-Lucent Shared Call Appearance
102
Placing a SCAP Call
103
Answering SCAP Calls
103
Bridging into Active Calls
103
Leave a Bridge Call
103
Make Active Calls Public
103
Holding or Passing Calls
104
Pass SCAP Calls
104
Create a Personal Ring Group with BroadSoft UC-One Simultaneous Ring
105
Add Numbers to Your Simultaneous Ring List
105
Delete Numbers from the Simultaneous Ring List
105
Record Audio Calls
107
Guidelines when Recording Calls
107
Record a Call
107
Pause a Recording
108
Resume a Recoding
108
Stop Recording
108
Record Conference Calls
109
Browse Recorded Calls
109
Play Recorded Calls
109
Pause and Resume Played Recordings
110
Stop Playing a Recording
110
Rename a Recording
110
Delete Recordings
110
Video Calls
111
Tips for Video Calls
111
Using a VVX Camera
112
Control the Lens Angle
112
Stop Sending Video with the Privacy Shutter
112
Status Indicators and Messages for the VVX Camera
113
Changing Video Call Settings
114
Set the Call Rate for Video Calls
114
Stop Video for All Calls
114
Change Video Clarity
115
Changing the Video Call and PIP Displays
115
Change How PIP Video Displays
117
Change How Far-Side Video Displays
117
Display All Video Calls in Full Screen Mode
118
Place a Video Call
118
Stop Sending Video
119
No Video from the Far Side
119
Display Video Calls in Full Screen
120
Exit Full Screen View
120
Swap Video
120
Handling Video and Audio Calls
121
Handle Conference Calls with Video
121
Managing Video Calls without a VVX Camera
122
Managing Audio and Video Calls
122
View Video in Full Screen during Calls
123
Handling a Mixture of Video and Audio-Only Calls
124
Place Audio-Only Calls
124
Call Lists and Directories
125
View Recent Calls
125
View Call Details
126
Save a Recent Contact
126
Delete a Contact
126
Edit Recent Contact Entries
126
Sort Recent Call Entries
126
Sort Entries by Call Type
127
View Recent Skype for Business Calls
127
View Recent Skype for Business Calls in Outlook
127
Managing the Contact Directory
128
Search for Contacts in the Contact Directory
128
Add a Contact to the Contact Directory
128
View Contact Information
129
Update a Contact’s Information
129
Delete a Contact
129
Managing the Corporate Directory
130
Searching the Corporate Directory
130
Perform a Quick Search of the Corporate Directory
130
Perform an Advanced Search of the Corporate Directory
130
Save Corporate Directory Search Results
131
Clear Corporate Directory Search Results
131
Add Contacts from the Corporate Directory to the Contact Directory
131
Search the Skype for Business Directory
131
Saving Contacts from the Skype for Business Directory
132
Save Contacts to Skype for Business Contacts
132
Save Skype for Business Contacts to the Contact Directory
132
Search the Outlook Directory
132
Save Outlook Contacts to the Contact Directory
133
Searching the BroadSoft Directory
133
Perform a Simple Search of the BroadSoft Directory
133
Perform an Advanced Search of the BroadSoft Directory
133
Add BroadSoft Contacts to the Contact Directory
134
Managing the GENBAND Address Books
134
Using the Global Address Book
135
Searching the Global Address Book
135
Save a Global Address Book Contact to the Contact Directory
135
Save Global Address Book Search Results
136
Using the Personal Address Book
136
View Contacts in the Personal Address Book
136
Search Your Personal Address Book
137
Add Contacts to the Personal Address Book
137
Delete Contacts from the Personal Address Book
137
Edit Contacts in the Personal Address Book
137
Favorites and Contact Lists
139
Managing Favorites
139
Add Favorites
139
View Favorites
140
View Favorites on the Home Screen
140
View Favorites from the Lines Screen
140
Reorder Favorites
140
Delete Favorites
140
Using Buddy Lists
141
Add Contacts to Your Buddy List
141
View Your Buddy List
141
Monitor Contacts on Your Buddy List
142
View Your Watcher List
142
Block Contacts from Viewing Your Status
142
View a List of Blocked Contacts
143
Managing Skype for Business Contacts
143
Add a Contact to Your Microsoft Skype for Business Contact List
143
View Skype for Business Favorites and Groups
144
Assign Skype for Business Contacts to Line Keys
144
Skype for Business Contacts’ Presence Information
145
View Contact’s Activity on VVX 201, 300, and 400 Phones
147
View Contact Information on the Lines Screen
147
View the Skype for Business Contacts’ Information
148
Change the Privacy Relationship for a Contact
148
Managing BroadSoft UC-One Favorites and Contacts
149
BroadSoft UC-One Contacts’ Presence Information
149
View BroadSoft UC-One Contacts and Favorites
149
View BroadSoft UC-One Favorites in the Contact List
150
View BroadSoft Contacts and Groups
151
Search for BroadSoft UC-One Contacts
151
Update Your Presence Status
153
Update Your Skype for Business Presence
153
Update Your Buddy Status
154
Automatically Update Your Buddy Status
154
Access, Send, and Broadcast Messages
155
Access Voicemail and Video Messages
155
Remove the Message Alert
156
Access Skype for Business Voicemail Messages
156
Managing Skype for Business Voicemail Messages
157
Call a Contact from Voicemail
157
Delete Voicemail Messages
157
Mark Message as Read
157
Send Instant Messages
157
Read Instant Messages
158
Reply to Instant Messages
158
Delete Instant Messages
158
Broadcasting Messages with Group Paging
158
Sending and Receiving Pages
159
Send Pages
159
Receiving Pages
159
Group Paging Settings
160
Change the Default Paging Group
160
Update Paging Group Subscriptions
161
Enable Pages to Play during Active Calls
161
Broadcasting Messages with Push to Talk
161
Sending and Receiving PTT Broadcasts
162
Send PTT Broadcasts
162
Receiving PTT Broadcasts
163
Listen to PTT Broadcasts during Active Calls
163
Reply to PTT Broadcasts
163
End PTT Broadcasts
164
Push-To-Talk Settings
164
Change the Default Channel
164
Update Channel Subscriptions
165
Enable PTT Broadcasts to Play During Active Calls
165
Use Applications on Your Phone
166
Using the Calendar
166
Open the Calendar
166
Navigate Day View
166
Navigate Month View
167
Display Meeting View
167
Return to Day View
167
Use Meeting Reminders
168
Choose a Meeting Reminder Type
168
Choose an Alert Tone
168
Disable Meeting Reminders
169
Joining Calendar Meetings
169
Join Meetings from the Calendar
169
Join a Meeting from a Meeting Reminder
169
Join a Meeting with an Alternate Number
169
Join Skype for Business Meetings from the Calendar
170
Navigating the Browsers
170
View the Idle Browser
170
Use the Web Browser
170
Browser Navigation Soft Keys
171
Enter Information into the Browser
171
Using the Launch Pad on VVX 1500 Phones
172
Access the Launch Pad
172
Open Applications
172
Navigate the Launch Pad
173
Display the Launch Pad’s Main Screen
173
Enable My Info Portal
173
Customize Your Phone
174
Password Required to Customize Your Phone
174
Set the Language
174
Customize the Time and Date Display
175
Disable the Time and Date Display
175
Setting the Backlight Intensity and Timeout
175
Set the Backlight Intensity
176
Set the Backlight Timeout
176
Select a Background Picture
176
Adding Personal Photos as Your Background
177
Using the Web Configuration Utility to Add a Background
177
Use a USB Flash Drive to Add a Background
178
Reset Your Background
178
Enable Transparent Line Keys
179
Enable Line Key Customization
179
Enabling Screen Savers
180
Enable Screen Savers
180
Use Personal Photos as Screen Savers
180
Disable Screen Savers
181
Use Your Phone as a Digital Picture Frame
182
Performing Tasks in the Picture Frame
183
Using Power-Saving Mode
183
Change Your Office Hours
183
Change Timeouts
184
Changing Audio Settings
184
Change Incoming Call Notifications
185
Set a Ringtone for Incoming Calls
185
Set a Ringtone for Individual Contacts
185
Change the Volume
186
Extend Your Phone’s Capabilities with Accessories
187
Using a Headset with Your Phone
187
Connecting a Headset
188
Use Your Headset for All Calls
188
Reactivate Headset Memory Mode
188
Using Electronic Hookswitch
189
Setting the Headset Base Unit Options
189
Enable Electronic Hookswitch
189
Using Electronic Hookswitch
190
Disconnect Your Headset
190
Using Bluetooth Headsets with VVX 600 Phones
190
Enable Bluetooth and Connect a Headset
191
Managing Calls with Your Bluetooth Headset
191
Disconnect and Remove Your Bluetooth Headset
192
Using the Polycom Desktop Connector
192
Setting Up and Enabling the Polycom Desktop Connector
192
Use the Direct Method
192
Using the Indirect Method
193
Disable the Polycom Desktop Connector
195
Using the Polycom Desktop Connector
195
Access Your Phone Screens
195
Using Keyboard Shortcuts to Perform Tasks on Your Phone
196
Enter Text in a Different Language
198
Connecting a Netgear Wi-Fi Adapter to Your Phone
199
Connect the Wi-Fi Adapter
199
Connecting Polycom VVX Expansion Modules to Your Phone
200
VVX Expansion Module Hardware Features
201
Connect VVX Expansion Modules
204
Connect Additional Expansion Modules
204
Assigning Contacts and Favorites to VVX Expansion Modules
204
Assign Favorites to VVX Expansion Modules
205
Assign Skype for Business Contacts to VVX Expansion Modules
205
Identify Line Key Assignments
206
Generate the VVX Expansion Module Directory Card
206
Insert the Directory Card on the VVX Expansion Module
207
Navigate VVX Color Expansion Module Paging
207
Smart Paging
207
Alternate Paging
209
Changing the Backlight Intensity
209
Connecting to Skype for Business on Your Phone Using Better Together over Ethernet
210
Installing the Polycom Better Together over Ethernet Connector
210
Download the Polycom BToE Connector
210
Install the Polycom BToE Connector
210
Enable and Pair Better Together over Ethernet
212
Set Your Phone as Your Primary Audio Device
212
Using BToE to Manage Calls on Your Phone and Skype for Business client
213
Answer BToE Calls
213
Place BToE Calls
214
Pause and Resume BToE Calls
214
Move Call Audio between Your Phone and Computer
214
Use Your Phone as Your Primary Audio Device for Your Computer
215
Disable BToE on Your Phone
215
Stop BToE on Your Computer
215
Uninstall the Polycom BToE Connector
216
Accessibility Features on Your Phone
217
Features for Hearing-Impaired Users
217
Features for Vision-Impaired and Blind Users
218
Features for Mobility-Impaired Users
219
Maintain Your Phone
220
Investigate Phone Warnings
220
Remove Warnings
220
Restart the Phone
221
Update the Phone Configuration
221
Test Phone Hardware
221
Clean the Touchscreen
222
View Software Details
222
Update the Phone Software
222
Exit the Software Update Notification
223
Update Software Later
223
Postpone Software Updates
223
Update Your Skype for Business Phone Software
224
View Software Update Information
224
Update Skype for Business Software Later
224
Troubleshooting
225
Speakerphone
225
USB Port
225
Troubleshoot the Calendar
225
Login Credentials
225
GENBAND Address Book
226
View the Status of the Personal Address Book
226
Polycom Desktop Connector
226
Troubleshoot Audio and Echo Issues
227
Bluetooth Headset
227
Recording
228
Better Together over Ethernet
228
Troubleshoot Polycom BToE Connector Installation
228
Troubleshoot Polycom BToE Connector Start Issues
229
Troubleshoot Pairing
229
View document
Polycom VVX 500 User manual
Type
User manual
Brand
Polycom
Size
2.03 MB
Category
IP phones
Pages
196
Language
English
Table of contents
Contents
3
Before You Begin 1
3
Overview of Polycom VVX Business Media Phones 3
3
Logging Into and Locking Your Phone 26
4
Audio Calls 32
4
Conference Calls 56
6
Shared Lines 62
7
Recording Audio Calls 74
8
Video Calls 78
8
Call Lists and Directories 92
9
Favorites and Contact Lists 104
10
Updating Your Presence Status 112
10
Accessing, Sending, and Broadcasting Messages 114
11
Phone Applications 124
11
Customizing Your Phone 132
12
Phone Accessories and Computer Applications 146
13
Accessibility Features on Your Phone 170
14
Maintaining Your Phone 173
14
Troubleshooting 177
14
Before You Begin
16
Who Should Read this Guide?
16
Related Documentation
16
Overview of Polycom VVX Business Media Phones
18
Overview of Phone Hardware and Keys
18
Related information:
18
VVX 101 and VVX201 Hardware
18
Figure 1: VVX 101 and 201 hardware features
19
1
19
Hookswitch
19
Cradles the handset and end calls.
19
2
19
Line keys
19
Enable you to select a phone line, view calls on a line, or quickly call a favorite contact.
19
3
19
Speaker
19
Provides ringer and speakerphone audio output.
19
4
19
Dialpad keys
19
Enable you to enter numbers, letters, and special characters. You can also use the dialpad keys to select menu items that have index numbers.
19
5
19
Microphone
19
Transmits audio to other phones.
19
6
19
Volume keys
19
Adjust the volume of the handset, headset, speaker, and ringer.
19
7
19
Mute key
19
Mutes local audio during calls and conferences.
19
8
19
Speakerphone key
19
Enables you to place and receive calls using the speakerphone.
19
9
19
Headset key
19
Enables you to place and receive calls through a headset.
19
10
19
Security slot (on side)
19
Enables you to attach a universal security cable lock to your phone so you can secure it to a desktop.
19
11
19
Navigation keys / Select key
19
Scrolls through information or options displayed on the phone's screen. Selects a field of displayed data.
19
12
20
Soft keys
20
Enable you to select context sensitive keys that display along the bottom of the screen.
20
13
20
Home key
20
Displays the Home screen from other screens, and displays the Lines and Calls screen from the Home screen.
20
14
20
Screen
20
Shows a 2.5-inch (6.35 cm) diagonal screen with a backlight that enables you to view menus and data.
20
VVX 101 phones do not have a backlight.
20
15
20
Message Waiting Indicator
20
Flashes red to indicate when you have new messages.
20
VVX 300 Series Hardware
20
Figure 2: VVX 300 series hardware features
20
Reference Number
20
Feature
20
Feature Description
20
1
20
Security slot (on top)
20
Enables you to attach a universal security cable lock to your phone so you can secure it to a desktop.
20
2
21
Reversible tab
21
Secures the handset in the cradle when your phone stand is positioned at a high angle. To secure the handset, remove the tab, reverse it so the protrusion points up, and re-insert it. Position the handset so the protrusion on the tab fits into the sl...
21
3
21
Speaker
21
Provides ringer and speakerphone audio output.
21
4
21
Soft keys
21
Enable you to select context sensitive keys that display along the bottom of the screen.
21
5
21
Transfer key
21
Transfers an active call to a contact.
21
6
21
Dialpad keys
21
Enable you to enter numbers, letters, and special characters. You can also use the dialpad keys to select menu items that have index numbers.
21
7
21
Messages key
21
Enables you to access and manage instant and voice messages.
21
8
21
Hold key
21
Holds an active call or resumes a held call.
21
9
21
Microphone
21
Transmits audio to other phones.
21
10
21
Volume keys
21
Adjust the volume of the handset, headset, speaker, and ringer.
21
11
21
Mute key
21
Mutes local audio during calls and conferences. The key glows red when activated.
21
12
21
Speakerphon e key
21
Enables you to place and receive calls using the speakerphone. The key glows green when activated.
21
13
21
Headset key
21
Enables you to place and receive calls through a headset. The key glows green when an analog headset is activated, and blue when a USB or Bluetooth headset is activated.
21
14
21
Navigation key/ Select key
21
Scrolls through information or options displayed on the phone's screen. Selects a field of displayed data.
21
15
21
Home key
21
Displays the Home screen from other screens, and displays the Lines and Calls screen from the Home screen.
21
16
21
Line keys
21
Enable you to select a phone line, view calls on a line, or quickly call a favorite contact.
21
17
21
Screen
21
Shows a 3.2-inch (8.3 cm) diagonal screen with a backlight that enables you to view menus and data.
21
18
21
Message Waiting Indicator
21
Flashes red to indicate when you have new messages.
21
VVX 400 Series Hardware
21
Figure 3: VVX 400 series hardware features
22
Reference Number
22
Feature
22
Feature Description
22
1
22
Security slot (on top)
22
Enables you to attach a universal security cable lock to your phone so you can secure it to a desktop.
22
2
22
Reversible tab
22
Secures the handset in the cradle when your phone stand is positioned at a high angle. To secure the handset, remove the tab, reverse it so the protrusion points up, and re-insert it. Position the handset so the protrusion on the tab fits into the sl...
22
3
22
Speaker
22
Provides ringer and speakerphone audio output.
22
4
22
Soft keys
22
Enable you to select context sensitive keys that display along the bottom of the screen.
22
5
22
Transfer key
22
Transfers an active call to a contact.
22
6
22
Dialpad keys
22
Enable you to enter numbers, letters, and special characters. You can also use the dialpad keys to select menu items that have index numbers.
22
7
22
Messages key
22
Enables you to access and manage instant and voice messages.
22
8
22
Hold key
22
Holds an active call or resumes a held call.
22
9
22
Microphone
22
Transmits audio to other phones.
22
10
22
Volume keys
22
Adjust the volume of the handset, headset, speaker, and ringer.
22
11
23
Mute key
23
Mutes local audio during calls and conferences. The key glows red when activated.
23
12
23
Speakerphone key
23
Enables you to place and receive calls using the speakerphone. The key glows green when activated.
23
13
23
Headset key
23
Enables you to place and receive calls through a headset. The key glows green when an analog headset is activated, and blue when a USB or Bluetooth headset is activated.
23
14
23
Navigation key/ Select key
23
Scrolls through information or options displayed on the phone's screen. Selects a field of displayed data.
23
15
23
Home key
23
Displays the Home screen from other screens, and displays the Lines and Calls screens from the Home screen.
23
16
23
Line keys
23
Enable you to select a phone line, view calls on a line, or quickly call a favorite contact.
23
17
23
Screen
23
Shows a 3.5-inch (8.89 cm) diagonal screen with a backlight that enables you to view menus and data.
23
18
23
Message Waiting Indicator
23
Flashes red to indicate when you have new messages.
23
VVX 500 Series and VVX 600 Series Hardware
23
Figure 4: VVX 500 series and VVX 600 series hardware features
24
Reference Number
24
Feature
24
Feature Description
24
1
24
Reversible tab
24
Secures the handset in the cradle when your phone stand is positioned at a high angle. To secure the handset, remove the tab, reverse it so the protrusion points up, and re-insert it. Position the handset so the protrusion on the tab fits into the sl...
24
2
24
Speaker
24
Provides ringer and speakerphone audio output.
24
3
24
Dialpad keys
24
Enable you to enter numbers, letters, and special characters. You can also use the dialpad keys to select menu items that have index numbers.
24
4
24
Security slot (on side)
24
Enables you to attach a universal security cable lock to your phone so you can secure it to a desktop.
24
5
24
Microphone
24
Transmits audio to other phones.
24
6
24
Volume keys
24
Adjust the volume of the handset, headset, speaker, and ringer.
24
7
24
Mute key
24
Mutes local audio during calls and conferences. The key glows red when activated.
24
8
24
Speakerphone key
24
Enables you to place and receive calls using the speakerphone. The key glows green when activated.
24
9
24
Headset key
24
Enables you to place and receive calls through a headset. The key glows green when an analog headset is activated, and blue when a USB or Bluetooth headset is activated.
24
10
25
Touchscreen
25
Enables you to select items and navigate menus on the touch-sensitive screen. Tap the screen to select and highlight screen items. To scroll, touch the screen, and swipe your finger up, down, right, or left.
25
11
25
Home key
25
Displays the Home screen from other screens, and displays the Lines and Calls screens from the Home screen.
25
12
25
Message Waiting Indicator
25
Flashes red to indicate when you have new messages.
25
13
25
USB port
25
Enables you to attach a USB flash drive, a USB headset, or a VVX Camera.
25
VVX 1500 Hardware
25
Figure 5: VVX 1500 hardware features
25
Reference Number
26
Feature
26
Feature Description
26
1
26
Camera
26
Provides near-site video. The camera barrel is located directly behind the camera lens. The camera barrel adjusts the camera angle.
26
2
26
Touchscreen
26
Enables you to select items and navigate menus on the touch-sensitive screen. Tap the screen to select and highlight screen items. To scroll, touch the screen, and swipe your finger up and down.
26
3
26
Menu key
26
Enables you to access your phone and organization's features as well as other menu options.
26
4
26
Applications key
26
Enables you to access the Web Browser and Launch Pad.
26
5
26
Video key
26
Controls the size, position, and transmission of video images.
26
6
26
Dialpad keys
26
Enable you to enter numbers, letters, and special characters. You can also use the dialpad keys to select menu items that have index numbers.
26
7
26
Security slot (on side)
26
Enables you to attach a universal security cable lock to your phone so you can secure it to a desktop.
26
8
26
Speaker
26
Provides ringer and speakerphone audio output.
26
9
26
Transfer key
26
Transfers an active call to a contact.
26
10
26
Headset key
26
Enables you to place and receive calls through a headset. The key glows green when headset memory mode is enabled.
26
11
26
Hold key
26
Holds an active call or resumes a held call.
26
12
26
Speakerphone key
26
Enables you to place and answer calls using the speakerphone. The key glows green when the speakerphone is in use.
26
13
26
Do Not Disturb key
26
Cancels ringing and directs incoming calls to your mailbox. The key glows red when activated.
26
14
26
Headset connector
26
Enables you to connect a headset to the phone.
26
15
26
USB port
26
Enables you to connect a USB flash drive to display pictures on your phone, and to record and play back calls.
26
16
26
Mute key
26
Mutes your audio during calls and conferences. The key glows red when activated.
26
17
26
Volume keys
26
Adjust the volume of the handset, headset, speaker, and ringer.
26
18
26
Conference key
26
Enables connection with another party for a conference.
26
19
26
Delete key
26
Deletes data displayed on the screen.
26
20
26
Redial key
26
Dials your most recently called contact.
26
21
27
Arrow keys
27
Enable you to scroll through lists, highlight items, and scroll through active and inactive calls. The Left and Right arrow keys enable you to enable and disable fields, scroll through values for a field, and position the cursor within text to update...
27
22
27
Messages key
27
Enables you to access and manage instant, voice, and video messages.
27
23
27
Directory key
27
Enables you to access the Contact and Corporate directories, as well as call lists.
27
24
27
Message Waiting Indicator
27
Flashes red when you have new messages, when the phone is in power-saving mode, or when the software is loading on your phone.
27
25
27
Privacy Shutter
27
Covers and uncovers the camera.
27
Securing Your Phone with the Security Slot
27
Related information:
27
Overview of the Phone Interface
27
User Screens
27
Home Screen
27
Figure 6: Home screen and Page Indicator on VVX 300 series phones
28
Figure 7: Additional lines and favorites from the Home screen on VVX 500 series phones
28
Related information:
28
Calls Screen
28
Figure 8: Calls screen on VVX 500 and 600 series phones
29
Display the Calls Screen
29
Lines Screen
29
Figure 9: Phone line, favorites, and soft keys on the Lines screen on the VVX 300 series
29
Display the Lines Screen
30
Active Call Screen
30
Figure 10: Active Call screen on VVX 500 series phones
30
Display the Active Call Screen
30
Switch among Phone Screens
30
Icons and Status Indicators
31
Registered line
31
Unregistered line
31
Placing a call
31
Active call using Polycom HD Voice
31
Held call
31
Incoming call
31
Active conference
31
Placed call
31
Received call
32
Missed call
32
Favorite
32
Do Not Disturb enabled
32
Phone warning
31
Login credentials invalid
31
Shared line
31
Shared line with a held call
31
Call forwarding is enabled
31
New message
31
Presence status (Available)
31
Presence status (Busy or In a Call)
31
Presence status (Away)
32
Presence status (Do Not Disturb)
32
Presence status (Offline)
32
Presence status (Unknown)
32
Icon
32
Description
32
Registered line
32
Unregistered line
32
Placing a call
32
Active call using Polycom HD Voice
32
Held call
32
Incoming call
32
Active conference
32
Placed call
32
Received call
32
Missed call
32
Favorite
33
Do Not Disturb enabled
33
Icon
32
Description
32
Phone warning
32
Login credentials invalid
32
Shared line
32
Shared line with a held call
32
Call forwarding is enabled
32
New message
32
Presence status (Available)
32
Presence status (Busy or In a Call)
32
Presence status (Away)
32
Presence status (Do Not Disturb)
32
Presence status (Offline)
33
Presence status (Unknown)
33
Icon
33
Description
33
Registered line
33
Unregistered line
33
Placing a call
33
Active call using Polycom HD Voice
33
Held call
33
Incoming call
33
Active conference
33
Placed call
33
Received call
33
Missed call
33
Favorite
33
Do Not Disturb enabled
33
USB flash drive attached
33
(VVX 401/411 only)
33
Recording in progress or paused (VVX 401/411 only)
33
Icon
33
Description
33
Phone warning
33
Login credentials invalid
33
Shared line
33
Shared line with a held call
33
Call forwarding is enabled
33
New message
33
Presence status (Available)
33
Presence status (Busy or In a Call)
33
Presence status (Away)
33
Presence status (Do Not Disturb)
33
Presence status (Offline)
33
Presence status (Unknown)
33
Recording paused
33
(VVX 401/411 only)
33
Recording in progress
33
(VVX 401/411 only)
33
Registered line
34
Unregistered line
34
Placing a call
34
Active call using Polycom HD Voice
34
Held call
34
Incoming call
34
Active conference
34
USB flash drive attached
34
Recording paused
34
Placed call
34
Received call
34
Missed call
34
Bluetooth available
34
(VVX 600/601 only)
34
Bluetooth disconnected (VVX 600/601 only)
34
New message
34
Status indicators in Lines screen. A flashing red bar indicates held calls. A green bar indicates an active call.
34
Do Not Disturb enabled
34
Phone warning
34
Login credentials invalid
34
Shared line
34
Call forwarding is enabled
34
Select to access recent calls
34
USB flash drive in use
34
Recording in progress
34
Presence status (Available)
34
Presence status (Busy)
34
Presence status (Away)
34
Presence status (Do Not Disturb)
34
Presence status (Offline)
34
Presence status (Unknown)
34
Icon
35
Description
35
Line (registered, private)
35
Line (registered, shared)
35
Line (unregistered)
35
Buddy Status (Online)
35
Busy Lamp Field (BLF) indicator (line is idle)
35
Buddy Status (Busy, Do Not Disturb)
35
Buddy Status (Be Right Back, Away, Out to Lunch)
35
Buddy Status (Offline)
35
Busy Lamp Field (BLF) indicator (line is busy)
35
New message
35
Missed calls indicator
35
Audio muted
35
Speed Dial Key
35
USB device attached and idle
35
USB device attached and playing back
35
USB device attached and recording
35
USB device attached and recording paused
35
Presence status (Available)
35
Presence status (Busy)
36
Presence status (Away)
36
Icon
35
Description
35
Audio-only Call
35
Audio Call with Polycom HD Voice
35
Video Call
35
Video Call with Polycom HD Voice
35
Call on hold (private line)
35
Call on hold (shared line)
35
Call without Polycom HD Voice (private line)
35
Call (shared line)
35
Conference call
35
Do Not Disturb enabled
35
Forward (Always)
35
Headset attached
35
Login credentials invalid
35
Video stopped and muted
35
Video stopped
35
Presence status (Do Not Disturb)
35
Presence status (Offline)
36
Presence status (No information)
36
Related information:
36
Entering Information in Data Fields
36
Mode Options
36
Encoding Options
36
Abc (to capitalize the first letter only, and use lowercase for the remaining letters)
36
Abc
36
ABC (to enter uppercase only)
36
ABC
36
abc (to enter lowercase only)
36
abc
36
123 (to enter numbers only)
36
123
36
ASCII (for regular text)
36
Latin (to enter accented characters)
36
Katakana (for Japanese characters)
36
Unicode (to store characters as double bytes)
36
Cyrillic (for Russian characters)
36
Related information:
37
Entering Information Using the Dial Pad
37
Data Type
37
Action
37
Enter numbers, or characters in uppercase, lowercase, or title case mode
37
Select Encoding or Mode, and select ABC,abc, or Abc.
37
Enter only numbers
37
Select Encoding or Mode, and select 123.
37
Enter text in another language
37
Select Encoding, and select one of the language options.
37
Enter a character
37
Press a dial pad key repeatedly to view the character options and stop when the character you want to enter is displayed in the field. Wait one second, and enter the next character.
37
Enter a number
37
Select Encoding or Mode, and select 123, or press a dial pad key repeatedly to enter the number that displays on that key.
37
Enter a special character
37
Select Encoding, and select Abc, ABC, or abc. Press the 1, 0, asterisk, *, or pound # key one or more times to enter one of the following special characters:
37
You cannot access special characters when you are in numerical (123) mode.
37
Enter a space
37
Select Encoding, and select one of the alphabetic Abc, ABC, or abc. Press the 0 key.
37
You cannot enter a space when you are in numerical (123) mode.
37
Delete one or more characters
37
Use the arrow keys to position the cursor to the right of the character, or drag your finger across the characters until the cursor is positioned to the right of the character(s) you want to delete. Press the Delete key, press the << soft key, or tap .
37
Related information:
37
Enter Information Using the Onscreen Keyboard
38
1 Tap .
38
2 Tap and select Abc, ABC, abc, 123, or one of the special character options.
38
3 Press your finger on each character you want to enter.
38
4 When you finish, tap .
38
Task
38
Action
38
Select an Encoding option (title case, uppercase, lowercase, numbers-only, ASCII, Latin, Katakana, Unicode, Cyrillic)
38
Tap and select the Encoding options you want.
38
Enter text
38
Tap Abc and select the characters you want.
38
Enter uppercase characters
38
Tap ABC and select the characters you want.
38
Enter lowercase characters
38
Tap abc and select the characters you want.
38
Enter numbers
38
Tap 123 and select the numbers you want.
38
Enter special characters
38
Tap ASCII and select the characters you want.
38
Exit the onscreen keyboard, enter the information, and update the next field
38
Tap .
38
Delete one or more characters
38
Drag your finger across the characters to highlight them in yellow and .
38
Replace characters
38
Highlight the characters you want to replace then enter the new characters.
38
Related information:
38
Inputing Chinese Characters with PinYin
38
Using the PinYin Input Widget
39
Figure 11: PinYin input widget in the Contact Directory
39
Enter Chinese Characters with the Dial Pad Keys
39
1 Enter the PinYin text that corresponds with the letters on the phone's dial pad.
39
2 Press the Star key to toggle between selections.
39
3 Use the left and right arrow keys or swipe the recommendation area on the touch screen to change the selected character.
39
4 Press the Select key to select the character from the recommendation area.
39
5 After the character is selected, it is displayed in the input field at the cursor location.
39
6 Repeat preceding steps until entry is complete.
39
Enter Chinese Characters with the Onscreen Keyboard
39
1 Tap .
40
2 Tap to verify that PinYin is the default input mode.
40
3 Ensure that XT9 PinYin is selected.
40
4 Enter the PinYin text using the onscreen keyboard.
40
5 Tap on the onscreen keyboard to select the character from the recommendation area.
40
6 Repeat preceding steps until entry is complete.
40
Logging Into and Locking Your Phone
41
Related information:
41
Log In to Your Phone
41
1 Do one of the following:
41
2 From the User Login screen, enter your user ID and password, and select Log in.
41
Related information:
41
Log Out of Your Phone
42
1 Select the Log out soft key, or select Settings > Features > User Login > Log out.
42
2 Select Yes.
42
Change Your Login Password
42
1 Log in to a phone on your network.
42
2 Navigate to Settings > Features > User Login > Change User Login Password.
42
3 From the Change User Login Password screen, enter your old and new password information and select Enter.
42
Log In to a Visitor Desk Phone
42
1 Do one of the following:
42
2 From the Visitor Login screen, enter your user ID and password, and select Log in.
43
Log Out of a Visitor Desk Phone
43
Log In to a Host Phone
43
1 Do one of the following:
43
2 From the Guest In screen, enter your username and password, and select OK.
43
Related information:
43
Log Out of a Host Phone
43
1 Select the Guest Out soft key.
44
2 If prompted, enter your guest PIN.
44
Log In to a Guest ACD Phone
44
Log Out of a Guest ACD Phone
44
Sign In Using Your BroadSoft UC-One Credentials
44
1 Navigate to Settings > Basic > UC-One Credentials.
44
2 Enter the Server Address.
45
3 For User, enter the username for your account.
45
4 For Password, enter your password for your account.
45
Related information:
45
Locking Your Phone
45
Lock Your Phone
45
1 Select Lock or navigate to Settings > Basic > Lock Phone.
45
2 From the Lock Phone screen, select Allow ringing when locked (the default setting) if you want your phone to ring when you have an incoming call.
45
3 Select Lock.
46
Related information:
46
Unlock Your Phone
46
1 Select Unlock.
46
2 Enter your user password, or guest PIN if signed in as a guest on a host phone, and select Enter.
46
Related information:
46
Change Your User Password
46
1 Navigate to Settings > Advanced.
46
2 Enter your user password, and select Enter.
46
3 From the Advanced screen, select Change User Password.
46
4 From the Change User Password screen, enter your old and new password information, and select Enter.
46
Audio Calls
47
Placing and Answering Audio Calls
47
Placing Audio Calls
47
Related information:
47
Call Charges for Outgoing Calls
47
Related information:
48
Place a Call from the Dialer
48
1 Do one of the following:
48
2 Enter a number or select a recent contact.
48
3 Select Dial or tap .
48
Place an International Call
48
1 In the Dialer, quickly press the star key * twice.
48
2 Enter the rest of the number and press Dial or tap .
48
Place a Call from Recent Calls
48
1 Do one of the following:
48
2 From the Calls List screen, select a contact and select Dial.
48
Calling Favorites
49
Call Favorites from the Favorites List
49
1 Select New Call.
49
2 From the Dialer, select Favorites.
49
3 Select a favorite, and select Dial.
49
Call Favorites from the Home or Lines Screen
49
Calling Contacts from the Directory
49
Call a Contact from a Directory
49
1 Do one of the following:
49
2 Choose a directory.
49
3 From your directory, select a contact.
49
4 From the Contact Information screen, select the contact's phone number.
50
5 On VVX 101, 201, 300 series, 400 series, and 1500 phones, select Dial.
50
Call a Contact from the Directory Search Screen
50
1 Select Directories.
50
2 Select Search, enter your contact's first or last name, and select Search.
50
3 Select your contact.
50
4 In the Contact Information screen, select the contact's number, and select Dial.
50
Place a Call from a Locked or Logged Out Phone
50
1 Select New Call.
50
2 From the Place an Authorized Call screen, select a number, and select Dial, or tap .
50
Related information:
50
Placing Intercom Calls
50
Place an Intercom Call
50
1 From the Home screen, select the Intercom icon or select the Intercom soft key.
50
2 Enter a number or select a contact.
50
3 Select Dial, or on VVX 500/501 and 600/601 phones, tap .
51
4 Speak your message and wait for a response.
51
5 If you do not need to wait for a response, select End Call.
51
Place an Intercom Call During a Call
51
1 Select Hold, and select the Intercom soft key.
51
2 Enter a number or select a contact.
51
3 Select Dial or tap .
51
4 After the call is answered, speak your message and select End Call.
51
5 Select Resume.
51
Place a Call from a VVX Expansion Module
51
Related information:
51
Place a Call with a Hidden Number
51
1 Select UC-One on the Home screen or navigate to Settings > Features > UC-One Call Settings.
51
2 If you have more than one line registered, select a line.
51
3 Select Line ID Delivery Blocking and select Enabled.
52
Redial a Number
52
Redial a Contact when the Contact is Available
52
Choosing a Protocol for Audio Calls
52
Place an Audio Call using H.323
52
1 Select New Call.
52
2 In the Dialer, tap Use H.323 to place an H.323 call.
53
3 Enter your contact's H.323 URL name.
53
Related information:
53
Set a Protocol for Placing Calls Automatically
53
1 Tap New Call.
53
2 In the Dialer, tap Use Auto to enable your phone to automatically select the protocol to use.
53
Related information:
53
Answering Audio Calls
53
Answer an Incoming Call
53
Figure 1: Incoming Call window
53
Related information:
54
Answer a Call from the Calls Screen
54
Answer a Call When in a Call
54
Answer Calls Automatically
54
1 Navigate to Settings > Basic > Preferences > Auto Answer.
54
2 From the Auto Answer screen, select Auto Answer SIP Calls, and select Yes.
54
3 If your phone supports H.323 protocol, select Auto Answer H.323 Calls, and select Yes.
54
4 Select Microphone Mute, and choose Yes (the default setting) to mute the microphone for auto-answered calls.
55
5 For VVX 1500, 500/501, and 600/601 phones, select Video Mute, and select Yes to mute the video when video calls are auto-answered.
55
6 Select Save.
55
Related information:
55
Answer a Call on a Locked Phone
55
1 From the Incoming Call screen, select Answer.
55
2 Enter your user password or guest PIN and select Enter.
55
Related information:
55
Answer Intercom Calls
55
Related information:
55
Answer a Call from a VVX Expansion Module
55
Related information:
55
Switch among the Handset, Headset, and Speakerphone
56
Related information:
56
Mute and Unmute Audio
56
1 During a call, including a conference call, press .
56
2 Press again to unmute the microphone.
56
Holding and Resuming Calls
56
Related information:
56
Hold a Call
56
Resume a Call
57
Resume a Call on a VVX Expansion Module
57
End an Active Audio Call
57
End a Held Call
57
Transferring Calls
57
Related information:
57
Choose a Default Transfer Type
57
1 Navigate to Settings > Basic > Preferences > Default Transfer Type.
58
2 On the Default Transfer Type screen, choose a transfer type.
58
Transfer a Call
58
1 During a call, do one of the following
58
2 Dial a number or choose a contact from the call list or directory.
58
3 If the transfer type is set to Consultative, press Transfer after speaking with your contact.
58
Cancel a Transfer
58
Parking and Retrieving Calls on the BroadSoft BroadWorks Server
58
Park a BroadSoft Call
58
Retrieve a BroadSoft Call
59
1 Press and hold the line key with the parked call.
59
2 Press the Park Info soft key.
59
3 Press Retrieve.
59
Retrieve a Parked BroadSoft Call on Another Phone
59
Ignore a Parked Call
60
1 Press and hold the line key with the parked call.
60
2 Press the Park Info soft key.
60
3 Press Ignore.
60
Managing Calls on VVX 101, 201, 300, 400, 500, and 600 Series Phones
60
Figure 2: Multiple Calls on phone lines on the Lines screen
60
Display Calls from the Lines Screen
60
Display Calls from the Calls Screen
61
Figure 3: Active and held calls for each line on the Calls screen on 400 series
61
Manage a Call from the Calls Screen
61
1 Select a call.
61
2 Do one of the following:
61
Managing Calls on VVX 1500 Phones
61
Figure 4: Active and held calls on a VVX 1500 phone
62
View a List of Calls
62
Manage a Call
62
1 Tap the line with the held calls.
62
2 Tap or use the right arrow key to view additional held calls.
62
3 Tap a held call.
62
4 Do one of the following:
62
Managing Calls Remotely
63
Managing Calls with BroadSoft UC-One BroadWorks Anywhere
63
Enable BroadWorks Anywhere
63
1 Select UC-One on the Home screen or navigate to Settings > Features > UC-One Call Settings.
63
2 Select a line.
63
3 Select BroadWorks Anywhere and press Add.
63
4 Enter information for the Status, Name, Primary Number, and Alt. Number/SIP URI fields, if applicable.
63
5 Choose the settings you want to enable.
63
6 Press Save.
63
Edit BroadWorks Anywhere Locations
64
1 Select UC-One on the Home screen or navigate to Settings > Features > UC-One Call Settings.
64
2 Select a line.
64
3 Select BroadWorks Anywhere and select a location.
64
4 Edit the selection.
64
5 Press Save when you finish editing.
64
Disable BWA Locations
64
1 Select UC-One on the Home screen or navigate to Settings > Features > UC-One Call Settings.
64
2 Select a line.
64
3 Select BroadWorks Anywhere and select a location.
64
4 Select Status > Disabled.
64
5 Press Save.
64
Remove BWA Locations
64
1 Select UC-One on the Home screen or navigate to Settings > Features > UC-One Call Settings.
64
2 Select a line.
64
3 Select BroadWorks Anywhere and select a location.
64
4 Press Delete.
64
Managing Calls with BroadSoft UC-One Remote Office
64
Add a Remote Office Number
65
1 Select UC-One on the Home screen or navigate to Settings > Features > UC-One Call Settings.
65
2 Select a line.
65
3 Select Remote Office.
65
4 Enter your remote office number and press Enabled.
65
5 Press Save.
65
Disable Remote Office
65
1 Select UC-One on the Home screen or navigate to Settings > Features > UC-One Call Settings.
65
2 Select a line.
65
3 Select Remote Office > Disabled.
65
4 Press Save.
65
Edit Your Remote Office Number
65
1 Select UC-One on the Home screen or navigate to Settings > Features > UC-One Call Settings.
65
2 Select a line.
65
3 Select Remote Office.
65
4 Enter the new number, and press Save.
65
Ignoring or Rejecting Incoming Calls
65
Ignore or Silence an Incoming Call
66
Reject Incoming Calls
66
Reject Calls from a Contact
66
1 Navigate to Directories > Contact Directory.
66
2 From your Contact Directory, select a contact.
66
3 From the Contact Information screen, select Edit or tap .
66
4 From the Edit Contact screen, select Auto Reject > Enabled and select Save.
66
Rejecting Calls with Do Not Disturb
66
Enable and Disable Do Not Disturb
67
Reject Calls with Do Not Disturb on Multiple Lines
67
1 Select DND.
67
2 Select Set All to enable DND for all lines.
67
Reject Calls with Do Not Disturb on One Line
67
1 Select DND.
67
2 From the Line Select screen, select a line.
67
3 From the Do Not Disturb screen, select Enable.
68
Reject Anonymous Calls
68
1 Select UC-One on the Home screen or navigate to Settings > Features > UC-One Call Settings.
68
2 If your phone has multiple lines, select a phone line.
68
3 Select Anonymous Call Reject.
68
4 On the Anonymous Call Reject screen, select Enabled.
68
Redirecting Incoming Calls
68
Forwarding Incoming Calls to a Contact
68
Forward an Incoming Call to a Contact
68
1 In the Incoming Call screen, select Forward.
68
2 From the Call Forwarding screen, enter the forwarding number, and select Forward.
68
Forward All Incoming Calls to a Contact
69
1 Select Forward or navigate to Settings > Features > Forward.
69
2 If your phone has multiple lines, select a line.
69
3 From the Forwarding Type Select screen, select a forwarding type.
69
4 Enter a contact's number, URL, or IP address, if enabled, and select Enable.
69
5 If you selected the No Answer option, enter the number of rings before your phone forwards the call.
69
Disable Call Forwarding
69
1 Select Forward.
69
2 If your phone has multiple lines, select a line.
69
3 From the Forwarding Type Select screen, select your forwarding type, and select Disable.
69
Divert Calls to a Contact
69
1 Select Directories > Contact Directory.
69
2 From the Contact Directory, select a contact.
69
3 From the Contact Information screen, select Edit or tap .
69
4 From the Edit Contact screen, select Divert Contact, and enter a contact's number.
69
5 Select Auto Divert > Enabled.
70
6 Select Save.
70
Conference Calls
71
Related information:
71
Tips for Conference Calls
71
Audio Conference Calls
71
Related information:
71
Initiate a Conference Call
72
1 Call a contact.
72
2 After the contact answers, select the Conference soft key, or on VVX 1500 phones, press the Conference key.
72
3 Enter another contact's number or select a contact from the directory or the call lists.
72
4 When the contact answers, select the Conference soft key, or on VVX 1500 phones, press the Conference key.
72
Join Calls to Create a Conference Call
72
End a Conference Call
72
Hold a Conference Call
72
Related information:
72
Resume a Conference Call
73
Split a Conference Call
73
Manage Conference Call Participants
73
1 Initiate a conference call.
73
2 Select Manage.
73
3 Select the participant you want to manage.
73
4 Do one of the following:
73
5 Select Back to exit the conference management function.
74
Related information:
74
Alcatel-Lucent Advanced Conference Calls
74
Related information:
74
Initiate an Advanced Conference Call
74
1 Press Meet Now.
74
2 Press Invite and choose the contacts you want to add to the conference from a directory, Recent Calls, or Favorites.
74
3 Press Invite.
74
Initiate an Advanced Conference Call During a Call
74
1 During an active call, select the Conference soft key.
75
2 Enter another contact's number or select a contact from the directory or the call lists.
75
3 When the contact answers, select the Conference soft key.
75
Add Contacts to an Advanced Conference Call
75
1 During a conference call, press Invite.
75
2 Select a contact to join the meeting.
75
Join Calls to an Advanced Conference Call
75
1 During a conference call, answer the incoming call.
75
2 Press the Join soft key.
75
Join Two Calls into an Advanced Conference Call
75
Viewing a Roster of Conference Participants
75
Exit Participant Roster
76
Return to Participant Roster
76
Managing Advanced Conference Participants
76
Muting Advance Conference Participants
76
Mute and Unmute All Advanced Conference Participants
76
1 Press Mute All.
76
2 Press Unmute to enable participants to speak in the conference.
76
Mute and Unmute Individual Advance Conference Participants
76
1 Select a participant and press Far Mute.
76
2 Select the muted participant and press Unmute.
76
Remove Advanced Conference Participants
76
Shared Lines
77
Shared Line Limitations
77
Answering Calls on Shared Lines
77
Missed and Received Calls on Shared Lines
77
Related information:
77
Hold a Call Privately on a Shared Line
77
Related information:
78
Barge In on Calls for Busy Lamp Field Lines
78
1 During an active call, select Barge In.
78
2 On the Barge In screen, select a mode.
78
GENBAND's Multiple Appearance Directory Number - Single Call Appearance
79
Placing a MADN Call
79
Answering a MADN Call
79
Barge In on an Active Call
79
1 Press and hold the corresponding line key for the shared line for one second.
79
2 Select the Barge In soft key and lift the handset.
79
Leave a Bridge Call
79
Resume a Held MADN Call
80
Enabling Privacy
80
Enable Privacy
80
For example, dial *91.
80
Disable Privacy Temporarily
80
1 During an active call, press the PRLA soft key or select Hold and dial the PRLA code given to you by your administrator.
81
2 After other MADN members have joined the call, press the PRLA soft key or select Hold and dial the PRLC code given to you by your administrator.
81
Enable Privacy on a Bridge Call
81
Alcatel-Lucent Shared Call Appearance
81
Placing a SCAP Call
81
Answering a SCAP Call
81
Bridge In to an Active Call
82
1 Press and hold the line key with the active call for one second.
82
2 Select Bridge In.
82
Related information:
82
Leave a Bridge SCAP Call
82
Make an Active Call Public
82
Related information:
82
Make an Active Call Private
82
Holding or Passing Calls
83
Related information:
83
Pass an SCAP Call
83
Resume a Passed SCAP Call
83
BroadSoft UC-One Simultaneous Ring
83
Create a Personal Ring Group
83
1 Select UC-One on the Home screen or navigate to Settings > Features > UC-One Call Settings.
83
2 Select a line.
84
3 Select Simultaneous Ring Personal.
84
4 Select Status > Enabled.
84
Add Numbers to Your Simultaneous Ring List
84
1 Select UC-One on the Home screen or navigate to Settings > Features > UC-One Call Settings.
84
2 Select a line.
84
3 Select Simultaneous Ring Personal > Add.
84
4 Enter an extension or phone number.
84
5 Select Answer Confirmation Required to receive confirmation that the call was answered.
84
6 Press Save.
84
Delete Numbers from the Simultaneous Ring List
84
1 Select UC-One on the Home screen or navigate to Settings > Features > UC-One Call Settings.
84
2 Select a line.
84
3 Select Simultaneous Ring Personal.
84
4 Select the numbers you want to remove and press Delete.
84
BroadSoft Executive-Assistant
84
Filter Executive Calls
85
1 On the executive’s phone, navigate to Settings > Basic > Executive Settings.
85
2 Select Call Filtering, then select On.
85
Filter Calls for an Executive
85
1 On the assistant’s phone, navigate to Settings > Basic > Executive Management.
85
2 Select Executives, then choose an executive.
85
3 Select Call Filtering, then select On.
85
Screen Executive Calls
85
1 On the executive’s phone, navigate to Settings > Basic > Executive Settings.
85
2 Select Call Screen, then select On.
85
Enable Call Screening for an Executive
85
1 On the assistant’s phone, navigate to Settings > Basic > Executive Management.
86
2 Select Executives, then choose an executive.
86
3 Select Call Screening, then select On.
86
Answering Executive Calls
86
Place a Call on Behalf of an Executive
86
1 Press the Executive soft key, and choose an executive.
86
2 Select On behalf, and enter the contact’s number or choose a contact from Recent Calls or the directory.
86
3 Select Dial or tap .
86
Push an Active Call to an Executive
86
Pick Up a Held Executive Call on a Shared Line
86
1 Press and hold the line key with the held call.
86
2 Select the held call, and select the Pick Call soft key.
86
Pick Up a Held Executive Call on a Private Line
87
1 On the Home screen, select the Executive menu.
87
2 Select an executive, then select Pick Call.
87
Barge In on an Executive Call
87
1 During an active call on the executive's line, press and hold the executive line key.
87
2 Select the Barge In soft key.
87
Silently Barge In on an Executive Call
87
1 During an active call on the executive's line, press and hold the executive line key.
87
2 Select the S-Barge In soft key.
87
Opt In or Opt Out of being an Assistant for an Executive
87
1 Navigate to Settings > Basic > Executive Management.
87
2 Select Executives, then choose an executive.
87
3 Select Opted-In, then do one of the following:
87
Divert Filtered Executive Calls
88
1 Navigate to Settings > Basic > Executive Management.
88
2 Select Call Diversion, then select Yes.
88
3 Enter the number where you want to divert executive calls.
88
Recording Audio Calls
89
Related information:
89
Guidelines when Recording Calls
89
Record a Call
89
Manage a Call while Recording
90
1 During a recording, select Back and choose a task to perform.
90
2 Select Record to view the Recording soft keys again.
90
Pause a Recording
90
Resume a Recoding
90
Stop Recording
90
Record a Conference Call
91
Browse Recorded Calls
91
Related information:
91
Play a Recorded Call
91
1 Navigate to Settings > Features > Removable Storage Media > Browse Recordings.
91
2 From the Browse Recordings screen, select a file, and select Open.
91
3 Select Play.
91
Pause and Resume Played Recordings
92
1 While the recording plays, select Pause.
92
2 Select Resume to continue playing the recording.
92
Stop Playing a Recording
92
Rename a Recording
92
1 Navigate to Settings > Features > Removable Storage Media > Browse Recordings.
92
2 From the Browse Recordings screen, select a recording.
92
3 Select Rename, update the filename, and select OK.
92
Delete a Recording
92
1 Navigate to Settings > Features > Removable Storage Media > Browse Recordings.
92
2 From the Browse Recordings screen, select a recording.
92
3 Select Delete.
92
Video Calls
93
Tips for Video Calls
93
Related information:
93
Using a VVX Camera
94
Figure 1: VVX 500/501 phone and VVX Camera
94
Related information:
94
Control the Lens Angle
94
Stop Sending Video with the Privacy Shutter
94
Status Indicators and Messages for the VVX Camera
94
LED State
95
No LED
95
Flashes red and green
95
Flashes amber and green
95
Flashes green
95
Green
95
Amber
95
Phone State
95
One of the following:
95
Camera is booting up
95
Camera firmware is updating
95
Incoming video call
95
Video call is connected
95
One of the following:
95
Message
95
VVX Camera attached. Firmware sync in progress, do not remove camera.
95
VVX Camera firmware sync complete. Camera ready.
95
VVX Camera firmware sync complete. Contact administrator to enable video.
95
VVX Camera firmware sync complete. Camera rebooting.
95
VVX Camera firmware sync complete. Video available when next idle.
95
VVX Camera attached, camera ready.
95
VVX Camera attached. Contact administrator to enable video.
95
VVX Camera attached. Video available when next idle.
96
VVX Camera removed.
96
VVX Camera is not connected
96
Action
95
Your camera is upgrading. Do not remove your camera during this process. The upgrade is complete when you receive a message stating that either “firmware sync complete” or “upgrade failed”.
95
Indicates that your camera is ready to use.
95
Indicates that your camera is ready to use. However, your phone is not enabled to send and receive video. Contact your system administrator to enable video calls.
95
Indicates that the camera firmware sync is finished, and your camera is in the process of rebooting.
95
Indicates that your camera is ready to use for your next video call.
95
Indicates that your camera is ready to use.
95
Indicates that your camera is ready to use. However, your phone isn't enabled to send and receive video. Contact your system administrator to enable video calls.
95
Indicates that your camera is ready to use for your next video call.
96
Indicates that you have detached your camera from your phone.
96
Indicates that a VVX Camera is not attached to your phone, but you are accessing a feature or function that requires that the camera be attached.
96
Related information:
96
Changing Video Call Settings
96
Related information:
96
Set the Call Rate for Video Calls
96
1 Navigate to Settings > Basic > Call Rate.
96
2 From the Call Rate screen, select the maximum call rate you want to use for video calls.
96
Stop Video for All Calls
96
1 Navigate to Settings > Basic > Video > Video Call Settings.
97
2 From the Video Call Settings screen, select Auto Start Video Tx > Disabled.
97
Related information:
97
Change Video Clarity
97
1 Navigate to Settings > Basic > Video > Camera Settings.
97
2 From the Camera Settings screen, select and adjust the desired camera settings.
97
Related information:
97
Changing the Video Call and PIP Displays
98
Figure 2: Picture-in-Picture video on the Home screen
98
Figure 3: Call window with PIP and far-side video
98
Related information:
99
Change How PIP Video Displays
99
1 Navigate to Settings > Basic > Video > Local Camera View.
99
2 From the Local Camera View screen, select and adjust the PIP settings.
99
3 Select Save.
99
Change How Far-Side Video Displays
99
Figure 4: Far-side video display settings
100
1 Navigate to Settings > Basic > Video > Video Screen Mode.
100
2 From the Video Screen Mode screen, select and adjust the video screen settings.
100
3 Select Save.
100
Related information:
100
Display All Video Calls in Full Screen Mode
100
1 Navigate to Settings > Basic > Video > Video Call Settings.
100
2 From the Video Call Settings screen, select Auto Video Full Screen > Enable.
100
3 Select Save.
100
Related information:
100
Place a Video Call
101
1 Tap New Call, enter a number or select a contact, and tap or Send.
101
2 After your contact answers, press the Video or Start Video soft key.
101
Related information:
101
Swap Video
101
Display Video Calls in Full Screen
101
Figure 5: Full screen mode on VVX 600/601 phone
102
Exit Full Screen View
102
Stop Sending Video
102
Related information:
102
No Video from the Far Side
103
Figure 6: Call window with No Video icon
103
Handling Video and Audio Calls
103
Figure 7: Video and audio calls on the Calls screen
103
Handle Conference Calls with Video
103
Related information:
104
Managing Video Calls without a VVX Camera
104
Figure 8: Held video call
104
View Video in Full Screen during Calls
104
Related information:
105
Handling a Mixture of Video and Audio-Only Calls
105
Figure 9: Video calls on the Calls screen
105
Place Audio-Only Calls
105
1 Navigate to Settings > Basic > Video > Video Call Settings.
106
2 From the Video Call Settings screen, select Default Call Mode, and select Audio Only.
106
Related information:
106
Call Lists and Directories
107
Recent Calls
107
View Recent Calls
107
Related information:
107
Sort Recent Call Entries
108
1 Select Sort or tap .
108
2 Under Sort, choose Time or Name.
108
3 Under Order, choose Ascending or Descending.
108
Sort Entries by Call Type
108
1 Select Type or tap .
108
2 Choose Missed Calls, Received Calls, or Placed Calls.
108
Edit Recent Contact Entries
108
1 Select Info or tap next to a call record.
108
2 Select Edit or tap .
108
3 Edit the number, and select Dial or tap .
108
Delete a Recent Contact
108
1 Select Info or tap next to a call record.
108
2 Select Delete or tap .
108
Save a Recent Contact
108
1 Select Info or tap next to a call record.
109
2 From the Call Details screen, select Save.
109
View Call Details
109
Managing the Contact Directory
109
Related information:
109
Search for a Contact in the Contact Directory
109
1 Navigate to Directories > Contact Directory.
109
2 In the Contact Directory, select Search.
109
3 From the Search screen, do one of the following:
109
Add a Contact to the Contact Directory
110
1 In the Contact Directory, select Add or tap .
110
2 From the Add Contact screen, enter your contact's information in the available fields.
110
3 Select Save.
110
Related information:
110
View Contact Information
110
1 Navigate to Directories > Contact Directory.
110
2 In your Contact Directory, select a contact.
110
Update a Contact's Information
111
1 From the Contact Directory, select a contact.
111
2 From the Contact Informationscreen, do one of the following:
111
3 From the Edit Contactscreen, update the contact's information.
111
4 Select Save.
111
Delete a Contact
111
1 From your Contact Directory, select a contact.
111
2 From the Contact Information screen, do one of the following:
111
3 Select Yes to delete the contact.
111
Managing the Corporate Directory
111
Related information:
111
Searching the Corporate Directory
111
Search of the Corporate Directory
112
1 Navigate to Directories > Corporate Directory.
112
2 From the Corporate Directory, enter the first few characters of the contact's first or last name, and select Submit.
112
3 Select a contact and select View to view the contact's information.
112
Search of the Corporate Directory using Advanced Find
112
1 Navigate to Directory > Corporate Directory.
112
2 In the Corporate Directory, select AdvFind.
112
3 From the Advanced Findscreen, enter your search criteria, and select Submit.
112
4 Select a contact and select Viewto view the contact's information.
112
Save Corporate Directory Search Results
112
1 Navigate to Settings > Basic > Preferences > Corporate Directory > View Persistency.
112
2 From the View Persistency screen, select Enabled.
112
Clear Corporate Directory Search Results
112
Add Contacts from the Corporate Directory to the Contact Directory
113
1 From the Corporate Directory, search for a contact.
113
2 From the search results, select the contact, and select View.
113
3 From the Contact Information screen, select Save.
113
Searching the BroadSoft Directory
113
Perform a Simple Search of the BroadSoft Directory
113
1 Navigate to Directories > BroadSoft Directory.
113
2 Enter your search criteria, and select Submit.
113
Perform an Advanced Search of the BroadSoft Directory
113
1 Navigate to Directories > BroadSoft Directory.
113
2 Select Advanced Searchin the BroadSoft Directory.
114
3 In the Advanced Search screen, choose to search for a contact by first name, last name, or a contact number.
114
4 Enter your search criteria, and select Submit.
114
5 Choose your contact.
114
Add BroadSoft Contacts to the Contact Directory
114
Related information:
114
Managing the GENBAND Address Books
114
Using the Global Address Book
114
Perform a Simple Search of the Global Address Book
115
1 Navigate to Directories > Global Address Book.
115
2 Enter your search criteria and select Submit.
115
Perform an Advanced Search of the Global Address Book
115
1 Navigate to Directories > Global Address Book.
115
2 In the Global Address Book screen, select AdvFind.
115
3 Select a search option and select Next. You can choose to search by a contact’s last name, first name, or phone number.
115
4 Enter your search criteria and press Next.
115
Save a Global Address Book Contact to the Contact Directory
115
1 After you find your contact, select View.
115
2 In the Edit Contact screen, select Save.
115
Related information:
115
Save Global Address Book Search Results
116
1 Navigate to Settings > Basic > Preferences > Global Address Book > View Persistency.
116
2 Select Enable.
116
Using the Personal Address Book
116
View Contacts in the Personal Address Book
116
1 Navigate to Directories > Contact Directory.
116
2 Select a contact and select Edit.
116
Search Your Personal Address Book
116
1 In the Contact Directory screen, select Search. Select the Moresoft key if you do not see the Search soft key.
116
2 Enter your search criteria and select Search.
117
Add Contacts to the Personal Address Book
117
1 In the Contact Directory, select Add or tap .
117
2 Enter your contact's information, create a nickname for the contact, and select Save.
117
Delete Contacts from the Personal Address Book
117
1 In the Contact Directory screen, select a contact and select Delete.
117
2 Select Yes to delete the contact entry.
117
Editing Contacts in the Personal Address Book
117
Edit Contacts Locally
117
1 In the Contact Directory screen, select a contact and select Edit.
117
2 Edit the information in the contact fields and select Save.
117
Editing Contacts Remotely
117
Favorites and Contact Lists
119
Managing Favorites
119
Related information:
119
Add Favorites
119
1 Navigate to Directories > Contact Directory.
119
2 From your Contact Directory, select a contact.
119
3 Select Add or Add to Favorites.
119
4 Select Yes to automatically accept an index number or select Edit Index to enter a unique index number.
120
Viewing Favorites
120
View Favorites
120
Related information:
120
View Favorites on the Home Screen
120
View Favorites from the Lines Screen
120
Reorder Favorites
120
1 From your Contact Directory, select a contact.
120
2 From the Contact Information screen, select Edit or tap .
120
3 From the Edit Contact screen, select Favorite Index, and enter a new favorite index number.
120
4 Select Save.
120
Related information:
120
Delete Favorites
120
1 From your Contact Directory, select the contact.
121
2 From the Contact Information screen, select Edit or tap .
121
3 From the Edit Contact screen, select Favorite Index, and delete the favorite index number.
121
4 Select Save.
121
Using Buddy Lists
121
Add Contacts to Your Buddy List
121
1 From your Contact Directory, select a contact.
121
2 From the Contact Information screen, select Edit or tap .
121
3 From the Edit Contact screen, select Watch Buddy > Enabled.
121
4 Select Save.
121
Related information:
121
View Your Buddy List
121
Monitor Contacts on Your Buddy List
122
Related information:
122
Buddies' Presence Information
122
Buddy Status
122
Available
122
Busy
122
Away
122
Do Not Disturb
122
Offline
122
Icon
122
View Your Watcher List
122
Block Contacts from Viewing Your Status
122
1 From your Contact Directory, select a contact.
123
2 From the Contact Information screen, select Edit or tap .
123
3 From the Edit Contact screen, select Block Buddy > Enabled.
123
4 Select Save.
123
View a List of Blocked Contacts
123
Unblock a Contact
123
1 Navigate to Settings > Features > Presence > Blocked List.
123
2 From the Blocked List screen, select a contact.
123
3 Select Unblock.
123
Managing BroadSoft UC-One Favorites and Contacts
123
BroadSoft UC-One Contacts' Presence Information
123
Icon
124
Description
124
Visible
124
Away
124
Do Not Disturb
124
Invisible, Offline, Unknown
124
Viewing BroadSoft UC-One Contacts and Favorites
124
View BroadSoft UC-One Contacts and Favorites
124
View BroadSoft UC-One Favorites in the Contact List
125
1 Select Directories > UC-One Contacts.
125
2 Select the group name to view the list of contacts for that group, as shown next.
125
View BroadSoft UC-One Groups
125
Related information:
125
Filter BroadSoft UC-One Favorites
125
1 Select Directories > UC-One Contacts.
125
2 Select Filter or tap .
125
3 Choose your desired filter selection:
125
Search for BroadSoft UC-One Contacts
126
1 Select Directories > UC-One Contacts.
126
2 Select Search or tap .
126
3 Enter your contact's first or last name.
126
Updating Your Presence Status
127
Updating Your Buddy Status
127
Update Your Buddy Status
127
1 Select My Status, or navigate to Settings > Features > Presence > My Status.
127
2 From the My Status screen, select your desired status.
127
Automatically Update Your Buddy Status
128
1 Navigate to Settings > Basic > Preferences > Presence > Idle Timeout.
128
2 From the Idle Timeout screen, enable an Office Hours and Off Hours timeout, and enter the number of minutes your phone should be idle before your status changes to Away.
128
Related information:
128
Accessing, Sending, and Broadcasting Messages
129
Accessing Voice and Video Messages
129
Access Voicemail and Video Messages
129
1 From the Home screen, navigate to Messages > Message Center.
129
2 If you have multiple lines on your phone, select the line that has the new message.
129
3 From the Messages screen, select Connect and follow the prompts to access your messages.
129
Remove the Message Alert
130
Instant Messaging
130
Send Instant Messages
130
1 From the Home screen, navigate to Messages > Instant Message.
130
2 If you have multiple lines on your phone, select a line.
130
3 From the Instant Messages screen, select the New soft key.
130
4 Enter a contact's phone number, URL, or IP address, and select OK.
130
5 Do one of the following:
130
6 Select Send.
130
Read Instant Messages
130
1 From the Home screen, navigate to Messages > Instant Message.
130
2 If you have multiple lines on your phone, select a line.
130
3 Select the Next or Previous soft key to read additional messages, if available.
131
Reply to Instant Messages
131
1 From the Instant Messages screen, select the Reply soft key.
131
2 Enter a message and select Send.
131
Delete Instant Messages
131
Broadcasting Messages with Group Paging
131
Send a Group Page
131
1 From the Lines screen, select the Pagingsoft key.
131
2 From the Paging Groupsscreen, select the paging group to send the page to.
132
3 To begin a page, select Page.
132
4 Begin speaking.
132
5 To end the page, select End Page.
132
Related information:
132
Receiving Pages
132
Related information:
132
Listen to a Page during an Active Call
132
Receiving Pages When You're Not in an Active Call
132
Group Paging Settings
133
Change the Default Paging Group
133
1 Navigate to Settings > Basic > Preferences > Paging/PTT Configuration > Group Paging.
133
2 From the Group Paging Configuration screen, select Default Group, and select a new paging group number.
133
Related information:
133
Update Paging Group Subscriptions
133
1 Navigate to Settings > Basic > Preferences > Paging/PTT Configuration > Group Paging.
133
2 From the Group Paging Configuration screen, select Group Subscriptions.
133
3 From the Group Subscriptions screen, select the group you want to subscribe to, and select Yes.
133
Related information:
133
Enable Pages to Play during Active Calls
134
1 Navigate to Settings > Basic > Preferences > Paging/PTT Configuration > Group Paging.
134
2 From the Group Paging Configuration screen, scroll to Accept While Busy, and enable or disable the setting.
134
Broadcasting Messages with Push to Talk
134
Send a PTT Broadcast
134
1 Select Talk.
135
2 From the PTT Channels screen, select a channel.
135
3 Press and hold Talk to start the broadcast.
135
4 Begin speaking.
135
5 When you finish your broadcast, do one of the following:
135
When you release Talk while sending the broadcast, the broadcast temporarily stops and enters a 10-second waiting period. During this period, the channel remains open to give others a chance to reply. At any time during the waiting period, you can re...
135
After you select End PTT, you can immediately initiate another broadcast on another channel, even if the previous broadcast is in the waiting period.
135
Related information:
135
Receiving PTT Broadcasts
135
Related information:
135
Listen to a PTT Broadcast during an Active Call
135
Receiving PTT Broadcasts When Not in an Active Call
136
Reply to PTT Broadcasts
136
1 During the 10-second waiting period, press and hold Talk
136
2 Begin talking.
136
3 When you finish talking, release Talk.
136
End PTT Broadcasts
136
The broadcast enters a waiting period, and you cannot initiate another broadcast on another channel until the waiting period ends.
136
The broadcast ends, and you cannot resume the broadcast by pressing and holding Talk on the same channel. You can immediately initiate another broadcast on another channel.
136
Push-To-Talk Settings
136
Change the Default Channel
137
1 Navigate to Settings > Basic > Preferences > Paging/PTT Configuration > PTT Push to Talk.
137
2 From the PTT Channel Configuration screen, select Default Channel, and select the number of the channel you want to use.
137
Related information:
137
Update Channel Subscriptions
137
1 Navigate to Settings > Basic > Preferences > Paging/PTT Configuration > PTT Push to Talk.
137
2 From the PTT Channel Configuration screen, select Channel Subscriptions.
137
3 From the Channel Subscriptions screen, select the channel you want to subscribe to, and select Yes.
137
Related information:
137
Enable PTT Broadcasts to Play During Active Calls
137
1 Navigate to Settings > Basic > Preferences > Paging/PTT Configuration > PTT Push to Talk.
138
2 From the PTT Channel Configuration screen, select Accept While Busy, and select Enable.
138
Phone Applications
139
Using the Calendar
139
Open the Calendar
139
Related information:
139
Navigate Day View
139
Navigate to Other Views
140
Navigate Month View
140
Display Meeting View
140
Return to Day View
140
Meeting Reminders
140
Manage Meeting Reminders
141
Figure 1: Meeting reminder on VVX 500 series phones
141
Choose a Meeting Reminder Type
141
1 Navigate to Settings > Basic > Preferences > Calendar Settings > Reminder Settings.
141
2 From the Reminder Settings screen, select Reminder Type, and choose a type.
141
Choose an Alert Tone
141
1 Navigate to Settings > Basic > Preferences > Calendar Settings.
141
2 From the Calendar Settings screen, select Alert Tone.
141
3 Choose an alert tone and tap Play to hear the tone.
141
Disable Meeting Reminders
141
1 Navigate to Settings > Basic > Preferences > Calendar Settings > Reminder Settings.
142
2 From the Reminder Settings screen, select Reminder > Disable.
142
Joining Calendar Meetings
142
Join Meetings from the Calendar
142
1 From Day view, select the meeting.
142
2 In Meeting view, select a meeting number.
142
Join a Meeting from a Meeting Reminder
142
Join a Meeting with an Alternate Number
142
Navigating the Browsers
142
View the Idle Browser
143
Related information:
143
Open the Web Browser
143
Figure 2: Navigation bar in the Web Browser
143
Browser Navigation Soft Keys
143
Icon
143
Action
143
Returns to the previous web page.
143
Refreshes the current web page.
143
Returns to the browser's home page.
143
Displays the toolbar permanently so it does not hide every three seconds.
143
Enables the toolbar to hide every three seconds. To display a hidden toolbar, you have to press the touchscreen until the toolbar displays. (VVX 1500, 500/501, and 600/601 phones)
143
Exits the Web Browser and returns to the phone's Home screen.
143
Using the Launch Pad on VVX 1500 Phones
144
Related information:
144
Access the Launch Pad
144
Open Applications
144
Related information:
145
Navigate the Launch Pad
145
Display the Launch Pad's Main Screen
145
Enable My Info Portal
145
1 Press the Applications key.
145
2 Select the My Info Portal icon.
145
3 From the My Info Portal - Welcome screen, select Sign Up, and enter your account information.
145
4 After you enter your account information, select Sign Up.
145
Related information:
146
Customizing Your Phone
147
Password Required to Customize Your Phone
147
Choose a Theme for Your Phone
147
Figure 1: Themes on VVX 500 phones
147
1 Navigate to Settings > Basic > Preferences > Themes.
147
2 Select Classic or Modern.
147
3 Select Yes.
147
Set the Language
148
1 Navigate to Settings > Basic > Preferences > Language.
148
2 From the Language screen, select a language.
148
Change the Time and Date Format
148
1 Navigate to Settings > Basic > Preferences > Time & Date.
148
2 From the Time & Date screen, do one of the following:
148
3 From the Clock Date, Clock Time, or Clock Order screen, select the format you want.
148
Disable the Time and Date Display
148
1 Navigate to Settings > Basic > Preferences > Time & Date.
148
2 From the Time & Date screen, select Disable to turn off the time and date display.
148
Backlight Intensity and Timeout
149
Related information:
149
Set the Backlight Intensity
149
1 Navigate to Settings > Basic > Backlight Intensity.
149
2 From the Backlight Intensity screen, select Backlight On Intensity.
149
3 From the Backlight On Intensity screen, select the intensity you want, and select Back.
149
4 From the Backlight Intensity screen, select Backlight Idle Intensity.
149
5 From the Backlight Idle Intensity screen, select the intensity you want, and select Back.
149
6 From the Backlight Intensity screen, select Maximum Intensity.
149
7 From the Maximum Intensity screen, select Up or Down, or drag your finger along the slider, to increase or decrease the maximum intensity.
149
Set the Backlight Timeout
150
1 Navigate to Settings > Basic > Backlight Timeout.
150
2 From the Backlight Timeout screen, select the number of seconds the phone is idle before the backlight dims.
150
Changing Your Background
150
Change the Background Picture
150
1 Navigate to Settings > Basic > Preferences > Background.
150
2 Select a background image, if available.
150
Related information:
150
Adding Personal Photos as Your Background
150
Related information:
151
Add a Background Using the Web Configuration Utility
151
1 Find you phone’s IP address by navigating to Settings > Status > Platform > Phone.
151
2 Enter your phone's IP address into the web browser on your computer.
151
3 Select User, and enter 123 for the Password.
151
4 From the menu bar, select Preferences > Background.
151
5 Click + Add a new background image.
151
6 Click Select a file from PC/Desktop, and click Choose File for Phone Image.
151
7 Choose your picture file, and click Open.
151
8 Click Save.
151
9 On your phone, navigate to Settings > Basic > Preferences > Background.
151
10 Select your background image.
151
Use a USB Flash Drive to Add a Background
151
1 Attach a USB flash drive to the USB port on your phone.
152
2 Navigate to Settings > Features > Removable Storage Media > Picture Frame.
152
3 Tap the arrow keys to find your picture, and then tap .
152
Related information:
152
Reset Your Background
152
1 Navigate to Settings > Basic > Preferences > Background.
152
2 From the Background screen, select Default.
152
Enable Transparent Line Keys
152
1 Navigate to Settings > Basic > Preferences > Idle Screen Settings.
152
2 On the Idle Screen Settings screen, select Transparent Lines, and select Enabled.
153
Screen Savers
153
Related information:
153
Enable Screen Savers
153
1 Navigate to Settings > Basic > Preferences > Screen Saver.
153
2 From the Screen Saver screen, select Screen Saver and select Enabled.
153
3 Select Wait Time and enter the number of minutes the phone can wait after no activity before displaying the screen saver.
153
4 Select Type and select either Default or Idle Browser.
153
5 Press Save.
153
Related information:
153
Use Personal Photos as Screen Savers
154
1 Place one or more pictures on a USB flash drive, either in the root directory or in a folder.
154
2 Attach the USB flash drive to your phone.
154
3 Navigate to Settings > Basic > Preferences > Picture Frame.
154
4 From the Picture Frame screen, select Folder, and enter the name of the folder you placed your images in on the USB flash drive.
154
5 Select Time Per Image, and enter the number of seconds you want each picture to display.
154
6 Select Save.
154
7 Navigate to Settings > Basic > Preferences > Screen Saver.
154
8 From the Screen Saver screen, select Screen Saver, and select Enabled.
154
9 Select Wait Time, and enter the number of minutes the phone should wait, after no activity, before displaying the screen saver.
154
10 Select Save.
154
Related information:
155
Disable the Screen Saver
155
1 Navigate to Settings > Basic > Preferences > Screen Saver.
155
2 From the Screen Saver screen, select Screen Saver, and select Disabled.
155
3 Select Save.
155
Use Your Phone as a Digital Picture Frame
155
Related information:
156
Picture Frame Tasks
156
Icons
156
Action
156
View thumbnails of your pictures.
156
View the previous picture.
156
View the next picture.
156
Pause and display the current picture only.
156
Starts the display of pictures one-by-one again.
156
Stop displaying the pictures. The pictures do not display again until you access the Picture Frame feature (unless you have a screen saver enabled).
157
Set the picture that currently displays as the background picture for your phone.
157
Using Power-Saving Mode
157
Related information:
157
Change Your Office Hours
157
1 Navigate to Settings > Basic > Power Saving > Office Hours > Start Hour.
157
2 From the Start Hour screen, select a day of the week.
157
3 Enter a start time using the 24-hour clock.
157
4 Select Save.
157
5 From the Office Hours screen, select Duration.
157
6 From the Duration screen, select a day of the week.
157
7 Enter a duration of 0 to 12 hours per day.
157
8 Select Save.
157
Related information:
158
Change Timeouts
158
1 Navigate to Settings > Basic > Power Saving > Timeouts.
158
2 Select Office Hours Idle Timeout, and enter the number of minutes the phone should wait, during office hours, before starting power-saving mode.
158
3 Select Off Hours Idle Timeout, and enter the number of minutes the phone should wait, during off-hours, before starting power-saving mode.
158
4 Select User Input Idle Timeout, and enter the number of minutes the phone should wait after a key press or screen select before starting power-saving mode.
158
5 Select Save.
158
Related information:
158
Changing Audio Settings
158
Related information:
159
Change Incoming Call Notifications
159
1 Navigate to Settings > Basic > Preferences > Audible Ringer.
159
2 From the Audible Ringer screen, select a location to hear sound effects:
159
Set a Ringtone for Incoming Calls
159
1 Navigate to Settings > Basic > Ring Type.
159
2 When there are multiple lines on your phone, select a line.
159
3 From the Ring Type screen, select a ringtone.
159
4 Select Play to hear the ringtone.
159
Set a Ringtone for Individual Contacts
159
1 From your Contact Directory, select a contact.
159
2 From the Contact Information screen, select Edit or tap .
159
3 From the Edit Contact screen, select Ring Type and select a ringtone.
159
4 Select Play to hear the ringtone.
159
5 From the Edit Contact screen, select Save.
159
Change the Volume
159
Related information:
160
Phone Accessories and Computer Applications
161
Using a Headset with Your Phone
161
Connecting a Headset
161
Related information:
162
Use Your Headset for All Calls
162
1 Navigate to Settings > Basic > Preferences > Headset > Headset Memory.
162
2 From the Headset Memory Mode screen, select Enabled.
162
3 Press the headset key twice.
162
Related information:
162
Reactivate Headset Memory Mode
162
Using Electronic Hookswitch
163
Setting the Headset Base Unit Options
163
Enable Electronic Hookswitch
163
1 Connect your headset and EHS adapter to your phone.
163
2 Navigate to Settings > Basic > Preferences > Headset > Hookswitch Mode.
163
3 Select one of the below modes for your specific headset:
163
Related information:
164
Change the Headset Mode
164
Controlling Calls with Electronic Hookswitch
164
Disconnect Your Headset
164
1 Navigate to Settings > Basic > Preferences > Headset > Hookswitch Mode.
164
2 Select Regular Mode.
164
3 Remove the EHS adapter from the serial port on the back of the phone.
164
Using Bluetooth Headsets with VVX 600 Phones
164
Enable Bluetooth and Connect a Headset
165
1 Navigate to Settings > Basic > Bluetooth Settings > Bluetooth Radio.
165
2 Tap On.
165
3 Turn your Bluetooth headset on and place the headset in Discovery mode.
165
4 Navigate to Settings > Basic > Bluetooth Settings > Manage BT Headsets.
165
5 Tap Scan to find your headset.
165
6 Select your headset and tap Add to begin the pairing process.
165
7 Select your headset and select Connect.
165
Related information:
165
Managing Calls with Your Bluetooth Headset
165
Disconnect and Remove Your Bluetooth Headset
166
1 Navigate to Settings > Basic > Bluetooth Settings > Manage BT Headsets.
166
2 From the Manage BT Headsets screen, select your headset, and select Disconnect.
166
3 Select your headset, and select Remove.
166
Controlling Your Phone with Polycom Desktop Connector
166
Related information:
166
Setting Up and Enabling the Polycom Desktop Connector
166
Use the Direct Method
167
1 Click Start > Programs > Polycom > Polycom Desktop Connector.
167
2 On your phone, navigate to Settings > Basic >PDC Configuration.
167
3 On the PDC Configuration screen, set the Status field to Enabled and select Save.
167
4 On the PDC Configuration screen, select Reconnect.
167
5 A dialog box is displayed on your phone screen asking if you wish to share your remote keyboard and mouse.
167
6 A dialog box is displayed asking you to specify your phone's position.
167
7 A dialog box is displayed on your computer asking to allow remote control of your phone.
167
Using the Indirect Method
168
1 Click Start > All Programs > Accessories > Command Prompt.
168
2 In the Command Prompt, type ipconfig and press Enter.
168
3 Note your server address on the IPv4 Address line, as shown next.
168
Connect Using the Indirect Method
168
1 Click Start > Programs > Polycom > Polycom Desktop Connector.
168
2 On your phone, navigate to Settings > Basic >PDC Configuration.
168
3 From the PDC Configuration screen, set the Status field to Enabled.
168
4 In the Phone Orientation field, specify whether your phone is to the left or right of your computer monitor.
168
5 In the Desktop User field, enter your Windows login name.
169
6 In the Server Address field, enter your computer's IP address or FQDN.
169
7 Select Save.
169
8 A message is displayed asking you to allow sharing with your computer.
169
9 A dialog box is displayed on your computer asking if you wish to allow remote control of your phone.
169
Disable the Polycom Desktop Connector
169
Related information:
169
Using the Polycom Desktop Connector
169
Access Your Phone Screens
169
Using Keyboard Shortcuts to Perform Tasks on Your Phone
170
F1
170
F2
170
F3
170
F4
171
F5
171
F6
171
F7
171
F8
171
F9
171
F10
171
F11
171
F12
171
Left-most soft key
170
Second soft key from the left
170
Third soft key from the left
170
Fourth soft key from the left
171
Right-most soft key
171
Talk soft key (if PTT is
171
enabled)
171
NA
171
Alt + F1
170
Alt + F2
170
Alt + F3
170
Alt + F4
171
Alt + F5
171
Alt + F6
171
Alt + F7
171
Alt + F8
171
Alt + F9
171
Alt + F10
171
Alt + F11
171
Alt + F12
171
New Call soft key
171
End Call soft key
171
Settings
171
N/A
171
Function Key
171
F1
171
F2
171
F3
171
F4
171
F6
171
F7
171
F8
171
F9
171
F10
172
F11
172
F12
172
Phone Key
171
First soft key from the left on your phone's current screen
171
Second soft key from the left on your phone's current screen
171
Third soft key from the left on your phone's current screen
171
Fourth soft key from the left on your phone's current screen
171
Directories menu
171
Messages menu
171
Talk soft key (if PTT is enabled)
171
ACD Sign In (if enabled)
172
Applications
172
Alt Key
171
Alt+F1
171
Alt+F2
171
Alt+F3
171
Alt+F4
171
Alt+F6
171
Alt+F7
171
Alt+F8
171
Alt+F9
171
Alt+F10
172
Alt+F11
172
Alt+F12
172
Phone Key
171
N/A
171
Redial
171
Transfer
171
Conference
171
Do Not Disturb
171
New Call soft key
171
End Call soft key
171
Settings.
172
ACD Sign Out (if enabled)
172
Enter Text in a Different Language
172
1 On your computer, click Start > Control Panel > Region and Language > Keyboard and Languages > Change keyboards.
172
2 Choose a computer keyboard language, as shown next.
172
3 Move your cursor onto your phone's display screen.
172
4 On the phone, enter text in your chosen language.
173
Related information:
173
Connecting a Netgear Wi-Fi Adapter to Your Phone
173
Connect the Wi-Fi Adapter
173
1 Disconnect any wireless connection to the router and/or remove the Ethernet cable currently connected to the computer.
173
2 Connect the adapter to your computer using the Ethernet cable and USB cable.
174
3 Wait until both the Power and LAN LEDs on the Wi-Fi adapter are solid green.
174
4 Make sure the computer gets the IP address.
174
5 Open your browser.
174
6 Follow the instructions on the setup page.
174
7 After completing the setup, disconnect the Ethernet and USB cables from your computer.
174
8 Connect the Ethernet and USB cables on the WNCE2001 to the VVX phone.
174
Connecting Polycom VVX Expansion Modules to Your Phone
174
Related information:
175
VVX Expansion Module Hardware Features
175
Figure 1: VVX Color Expansion Module features
176
1
177
2
177
3
177
4
177
5
177
6
177
Line Key
177
LED Indicators
177
Page Keys
177
Base Stand
177
LED Page Indicators
177
Color Display
177
Selects available line key contacts, functions, and assignments.
177
Indicates a line or busy lamp field contact's status. The following lists the LED Indicator behaviors shown on the expansion modules:
177
Navigates between pages on the expansion module.
177
Hooks into the back of the expansion module to stand up the display.
177
Indicates a page's status.
177
Displays line numbers, busy lamp field contacts, and favorites.
177
Figure 2: VVX Expansion Module with paper display features
178
1
178
2
178
3
178
4
179
5
179
Line key
178
LED Indicators
178
Base Stand
178
Plastic Cover Overlying Directory Card
179
Plastic Cover Cut Out
179
Selects available line key contacts, functions, and assignments.
178
Indicates a line or busy lamp field contact's status. The following lists the LED Indicator behaviors shown on the expansion modules:
178
Hooks into the back of the expansion module to stand up the display.
178
Protects the directory card. The directory card is a paper sheet that displays line numbers, busy lamp field contacts, favorites, and line key functions.
179
Helps insert or remove the plastic cover.
179
Connect VVX Expansion Modules
179
Connect Additional Expansion Modules
179
1 Connect an auxiliary cable from the AUX 2 port on the first module connected to the phone to the AUX 1 port on the second module.
179
2 Connect an auxiliary cable from the AUX 2 port on the second module to the AUX 1 port on the third module.
179
Assigning Contacts and Favorites to VVX Expansion Modules
179
Supported Phone Model
180
VVX 300 series
180
VVX 400 series
180
VVX 500 series
180
VVX 600 series
180
Maximum Display Spaces Supported
180
6
180
12
180
12
180
16
180
Assign Favorites to VVX Expansion Modules
180
1 Press and hold an available line key on your expansion module.
180
2 From the Add Contact screen, enter the contact's information, including a unique favorite index, and select Save.
180
Related information:
180
Identify Line Key Assignments
180
1 Navigate to Settings > Status > Line Key Information.
180
2 Press a line key on the expansion module.
180
3 Press the line key twice to return to the previous menu, or select Back.
180
Generate the VVX Expansion Module Directory Card
181
1 In your Internet browser, enter your phone's IP address into your browser's address bar.
181
2 Log in as a User, enter the default password 123, and click Submit.
181
3 Click Utilities > EM Directory.
181
4 Select the VVX Expansion Module you want to generate a PDF for.
181
5 In the confirmation dialog box, select Yes to download the directory card.
181
6 Select Save > Open.
181
Insert the Directory Card on the VVX Expansion Module
181
1 Place the tip of a paper clip under the plastic cover cut out of the VVX Expansion Module plastic cover to remove it.
181
2 Place the directory card on your VVX Expansion Module.
181
3 Align the tabs on either side of the plastic cover with the corresponding indents on the expansion module and bend the plastic cover into place to reinsert the cover over the directory card for protection.
181
Navigate VVX Color Expansion Module Paging
182
Smart Paging
182
Alternate Paging
183
Figure 3: Alternate Paging on VVX Color Expansion Modules
184
Changing the Backlight Intensity
184
Related information:
184
Accessibility Features on Your Phone
185
Features for Hearing-Impaired Users
185
Accessibility Feature
185
Visual Message Waiting Indicator (MWI)
185
Adjustable ring tone and volume
185
Adjustable call volume
185
Visual notifications
185
Visual ringing
185
Electronic hookswitch support
185
Headset Memory Mode
185
Hearing Aid Compatible (HAC) handsets
186
TTY support
186
Description
185
An indicator light on the phone indicates that new messages are waiting. Icons on the phone screen also indicate that the phone has new messages.
185
You can choose from a variety of ring tones for your phone. You can also change the volume of the ringer to suit your needs, and choose different ring tones for contacts.
185
If you're in a call, you can raise or lower the volume of the voice on the far end and of other phone sounds you hear.
185
Indicators on the phone screen (such as flashing bars or icons) let you know when calls are incoming or outgoing, or if a call is active or held. Indicators can also indicate phone status and if certain features are activated.
185
Certain VVX models have visual ringing that enables the screen to flash bright orange for incoming calls (contact your system administrator).
185
If you use a headset that supports electronic hookswitch (EHS), you can use the controls on your headset to answer and end calls. In addition, you may be able to mute calls and control volume from your headset.
185
If you use a headset, you can set up your phone so that all calls use your headset.
185
All VVX handsets are Hearing Aid Compatible (HAC) and have telecoils that magnetically couple to most forms of wearable hearing aids per FCC section 508 (compliant to ADA Section 508 Recommendations: Subpart B 1194.23).
186
VVX phones support commercial TTY devices such as Ultratec Superprint. In addition, VVX phones provide acoustic coupled TTY support.
186
Related information:
186
Features for Vision-Impaired and Blind Users
186
Accessibility Feature
186
Adjustable backlight settings
186
Tactile “5” key with raised bumps
186
Large keys
186
Physical line keys
186
Variety of feature keys that you can press
186
Tactile-discernible number, feature, and navigation keys
186
Illuminated feature keys
186
Description
186
You can change the brightness of the screen by adjusting backlight intensity settings.
186
The “5” key has two bumps that let you easily discern the position of other keys on the keypad.
186
Large keys on the phone console enable you to easily access phone features and functions.
186
VVX 300 series and 400 series phones have physical line keys that you can press to answer and end calls.
186
Many features on VVX phones are accessible by pressing feature keys on the phone console.
186
Keys on the phone console are easily discernible by their size and shape.
186
Many feature keys are illuminated when activated, so you're easily alerted when a feature is enabled.
186
Related information:
186
Features for Mobility-Impaired Users
187
Auto-answer feature
187
VVX phones can auto-answer calls, so you don't have to lift a handset, push a button, or select a key to answer a call.
187
Dedicated headset jack that enables the auto-answer function
187
If you use a headset, you can set up your phone so that all calls use your headset.
187
Touchscreen
187
VVX 1500, 500/501, and 600/601 phones have large touchscreens that you can select, swipe, and press to perform phone functions and activate features.
187
Large keys
187
VVX phones have large keys that are well-spaced on the phone console.
187
Built-in speakerphone
187
A built-in speakerphone allows you to use the phone without having to use a handset or headset.
187
Adjustable phone stand
187
VVX phones have stands that you can adjust to various angles so your phone sits at a comfortable angle on your desktop (see your phone's Quick Start Guide on Polycom Voice Support web page).
187
Polycom Desktop Connector application
187
You can use your computer's mouse and keyboard to enter information and navigate screens on your VVX phone.
187
Related information:
187
Maintaining Your Phone
188
Investigate Phone Warnings
188
Remove Warnings
188
Restart the Phone
188
1 Navigate to Settings > Basic > Restart Phone.
189
2 Select Yes.
189
Related information:
189
Update the Phone Configuration
189
1 Navigate to Settings > Basic > Update Configuration.
189
2 Select Yes.
189
Related information:
189
Test Phone Hardware
189
1 Navigate to Settings > Status > Diagnostics > Test Hardware.
189
2 From the Test Hardware screen, select one of the following:
189
Clean the Touchscreen
190
1 Navigate to Settings > Basic > Screen Clean.
190
2 Wipe the screen with a clean, dry, microfiber cloth.
190
3 Press any key on the phone dial pad to enable the touchscreen again.
190
View Software Details
190
Updating the Phone Software
190
Update the Phone Software
190
Update Software Later
191
Postpone Software Updates
191
1 When prompted to update your software, select Postpone.
191
2 Select one of the time options.
191
Exit the Software Update Notification
191
Troubleshooting
192
Speakerphone
192
USB Port
192
Related information:
192
Troubleshoot the Calendar
193
1 Navigate to Settings > Features > Calendar.
193
2 From the Calendar screen, select Connect.
193
Related information:
193
Login Credentials
193
Related information:
193
GENBAND Address Book
193
View the Status of the Personal Address Book
193
Polycom Desktop Connector
194
Issue
194
The computer and phone cannot establish a connection.
194
I can't enter information in a phone field using my computer keyboard.
194
I can't place a call.
194
I want to change the phone that is connected to the Polycom Desktop Connector.
194
Corrective Action
194
Verify the Polycom Desktop Connector settings on your phone. You may need to reboot your phone or press the Reconnect soft key.
194
Check to see if the phone field has a flashing cursor. You can use PDC only to enter information in a phone field if the field has a flashing cursor.
194
If you're using PDC, you can't place a call using the New Call soft key. To place a call, enter the phone number and select the Dial soft key or tap .
194
Disable the Polycom Desktop Connector, which is already connected to your computer and is in active state on your phone.
194
Setup and enable the phone you want to connect to Polycom Desktop Connector. Once your computer receives an initial communication from the newly configured phone, it asks you to confirm the connection by displaying the message “You were controlling...
194
Related information:
194
Troubleshoot Audio and Echo Issues
194
1 Navigate to Settings > Basic > Preferences > Headset > Echo Cancellation.
194
2 Select Enabled.
195
Related information:
195
Bluetooth Headset
195
Issue
195
The Bluetooth settings do not display on my phone
195
My headset doesn't pair automatically.
195
Corrective Action
195
Do one of the following:
195
If your headset is an older model, you may need to enter a password before the headset can pair with your phone. Refer to your headset documentation for more information.
195
Related information:
195
Recording
195
Issue
195
The message “USB device is full. Recording canceled” is displayed when I pressed Start.
195
The recording stopped during a call.
195
The message “USB device removed unsafely.Recording canceled” displayed when I removed my USB flash drive during a call.
195
The message “Unsupported USB device attached” displayed.
195
Corrective Action
195
Check that there is sufficient space on the USB flash drive.
195
If the USB flash drive becomes full during recording, recording stops and the message “USB device is full. Recording stopped” is displayed.
195
Delete previous recordings to make space on the USB drive.
195
Do not remove the USB flash drive while recording. If you want to remove the drive during a call, press Stop, and then remove the drive.
195
Refer to Technical Bulletin 38084: Supported USB Devices for a list of USB devices supported on Polycom phones.
195
Related information:
196
View document
Polycom VVX 500 User manual
Type
User manual
Brand
Polycom
Size
3.48 MB
Category
IP phones
Pages
119
Language
English
View document
Polycom VVX 500 User manual
Type
User manual
Brand
Polycom
Size
2.57 MB
Category
Smartphones
Pages
56
Language
English
Table of contents
Contents
3
Before You Begin
6
Audience, Purpose, and Required Skills
6
Related Documentation
6
Get Help
7
Polycom Partner and Solution Resources
7
The Polycom Community
7
Getting Started with a VVX Business Media Phone
8
Overview of Phone Hardware and Keys
8
VVX 201 Hardware
8
VVX 300 Series Hardware
9
VVX 400 Series Hardware
11
VVX 500 Series and VVX 600 Series Hardware
13
Securing Your Phone with the Security Slot
14
Navigating VVX Business Media Phone
14
Accessing Screens on VVX Business Media Phone
14
Access the Home Screen
14
Access the Calls Screen
15
Access the Lines Screen
15
Access the Active Call Screen
16
Switch among Phone Screens
16
Icons and Status Indicators
17
Entering Information in Data Fields
22
Entering Information Using the Dial Pad
23
Enter Information Using the Onscreen Keyboard
23
Entering Chinese Characters with PinYin
24
Using the PinYin Input Widget
24
Enter Chinese Characters with the Dial Pad Keys
25
Enter Chinese Characters with the Onscreen Keyboard
25
Logging Into and Locking Your Phone
26
Sign Into Skype for Business on Your Computer Using BToE
26
Sign Out of Skype for Business
26
Set the Time and Date Format
26
Locking Your Phone
27
Set a Lock Code
27
Lock Your Phone
27
Unlock the Phone
28
Change Your Lock Code
28
Reset Your Lock Code
28
Disable Device Lock
29
Connecting to Skype for Business on Your Phone using Better Together over Ethernet
30
Installing the Polycom Better Together over Ethernet Connector
30
Download the Polycom BToE Connector
30
Install the Polycom BToE Connector
31
Start the Polycom BToE Connector
32
Disable Auto-Start for the Polycom BToE Connector
32
Pairing Your Phone with Your Computer
32
Automatically Pair Your Phone with Your Computer using BToE
33
Manually Pair Your Phone with Your Computer using BToE
33
Set Your Phone as Your Primary Audio Device
35
Use Your Phone as Your Primary Audio Device for Your Computer
35
Use BToE to Open the Web Configuration Utility
35
Using BToE to Lock and Unlock Your Phone
36
Using BToE to Manage Calls on Your Phone and Skype for Business Client
37
Answer BToE Calls
37
Place BToE Calls
38
Pause and Resume BToE Calls
38
Move Call Audio between Your Phone and Computer
38
Disabling BToE and Uninstalling the BToE Connector Application
39
Disable BToE on Your Phone
39
Stop BToE on Your Computer
39
Uninstall the Polycom BToE Connector
39
VVX Business Media Phone Settings
41
Password Required to Access Basic Settings
41
Set the Language
41
Change the Time and Date Format
42
Disable the Time and Date Display
42
Backlight Intensity and Timeout
42
Set the Backlight Intensity
42
Set the Backlight Timeout
43
Changing Your Background
43
Change the Background Picture
43
Adding Personal Photos as Your Background
44
Add a Background Using the Web Configuration Utility
44
Use a USB Flash Drive to Add a Background
44
Reset Your Background
45
Customizing Line Keys
45
Customize the Columns on the Lines Screen
46
Enable Transparent Line Keys
46
Show Only Your Line Registration
46
Enable Line Key Customization
47
Insert an Empty Line Key
47
Clear a Line Key
47
Delete a Line Key
48
Reset Customized Line Keys
48
Screen Savers
48
Enable Screen Savers
48
Use Personal Photos as Screen Savers
49
Disable the Screen Saver
50
Use Your Phone as a Digital Picture Frame
50
Picture Frame Icons
51
Power-Saving Mode
51
Change Your Office Hours
52
Change Timeouts
52
Changing Audio Settings
52
Change Incoming Call Notifications
53
Set a Ringtone for Incoming Calls
53
Set a Ringtone for Individual Contacts
53
Change the Volume
53
Update Your Skype for Business Presence
54
Adding a Profile Photo to Display on the Lock Screen
54
Troubleshooting
55
Better Together over Ethernet
55
Troubleshoot Polycom BToE Connector Installation
55
Troubleshoot Polycom BToE Connector Start Issues
55
Troubleshoot Pairing
56
View document
Polycom VVX 500 User manual
Type
User manual
Brand
Polycom
Size
402.08 KB
Category
Telephones
Pages
2
Language
English
View document
Polycom VVX 500 User manual
Type
User manual
Brand
Polycom
Size
4.72 MB
Category
IP phones
Pages
233
Language
English
Table of contents
Before You Begin
17
Who Should Read this Guide?
17
Typographic Conventions
17
Get Started
18
View Your Phone Keys and Hardware
18
VVX 101 and VVX 201 Phones Hardware
19
VVX 300 and VVX 310 Phones Hardware
21
VVX 500 and VVX 600 Phones Hardware
25
VVX 1500 Phone Hardware
27
Secure Your Phone with the Security Slot
29
Navigating Your Phone Interface
29
Understanding Phone Screens
29
Home Screen
30
Calls Screen
30
Lines Screen
31
Active Call Screen
31
Switch among Phone Screens
32
Understanding Phone Icons and Status Indicators
33
Entering Information in Data Fields
37
Enter Information Using the Dial Pad
38
Enter Information Using the Onscreen Keyboard
39
Inputing Chinese Characters with PinYin
40
Using the PinYin Input Widget
40
Log Into and Lock Your Phone
42
Log Into Your Phone
42
Log Out of Your Phone
43
Change Your Password
43
Log Into a Visitor Desk Phone
43
Log Out of a Visitor Desk Phone
44
Sign Into Lync on Your Phone
44
Sign Out of Lync
44
Sign In Using Your BroadSoft UC-One Credentials
45
Locking Your Phone
45
Lock Your Phone
45
Unlock Your Phone
46
Change Your User Password
46
Audio Calls
47
Placing and Answering Audio Calls
47
Placing Audio Calls
48
Place Calls from the Dialer
48
Place an International Call
49
Place Calls from Recent Call Lists
49
Place Calls to Favorites
49
Place Calls from Directories
50
Place Calls from a Locked or Logged Out Phone
50
Place an Intercom Call
51
Place a Call from a VVX Expansion Module
51
Place a Call with a Hidden Number
52
Redial a Number
52
Use H.323 Protocol to Place Audio Calls
52
Answer Audio Calls
53
Answer Calls in the Incoming Call Screen
53
Answer Calls from the Calls Screen
54
Answer a Call When in a Call
54
Answering Calls on Shared Lines
55
Answer Calls Automatically
55
Answer Calls on a Locked Phone
55
Answer Intercom Calls
55
Answer Calls from VVX Expansion Modules
56
Switch among the Handset, Headset, and Speakerphone
56
Mute and Unmute Audio
56
End Audio Calls
57
Holding and Resuming Calls
57
Hold Calls
57
Resume Calls
57
Resume Calls on VVX Expansion Modules
57
Transferring Calls
58
Choose a Default Transfer Type
58
Transfer a Call
58
Cancel a Transfer
58
Parking and Retrieving Calls
59
Parking and Retrieving Calls on the Lync Server
59
Park Calls
59
Retrieving Parked Calls
59
Parking and Retrieving Calls on the BroadWorks Server
60
Park Calls
60
Retrieve Calls
61
Managing Multiple Calls
62
Managing Calls on VVX 1500 Phones
62
View a List of Calls
62
Manage Calls
63
Managing Calls on VVX 101, 201, 300/310, 400/410, 500, and 600 Phones
63
Display Calls from the Lines Screen
63
Display Calls from the Calls Screen
64
Manage Calls from the Calls Screen
64
Managing Calls Remotely
65
Managing Calls with BroadSoft UC-One BroadWorks Anywhere
65
Enable BroadWorks Anywhere
65
Edit BroadWorks Anywhere Locations
66
Disable BWA Locations
66
Remove BWA Locations
66
Managing Calls with BroadSoft UC-One Remote Office
66
Add a Remote Office Number
67
Disable Remote Office
67
Edit Your Remote Office Number
67
Ignoring or Rejecting Incoming Calls
67
Ignore or Silence Incoming Calls
68
Reject Incoming Calls
68
Reject Calls from a Contact
68
Rejecting Calls with Do Not Disturb
68
Enable Do Not Disturb
69
Reject Calls with Do Not Disturb on Multiple Lines
69
Reject Anonymous Calls
70
Redirecting Incoming Calls
70
Forwarding Incoming Calls to a Contact
70
Forward an Incoming Call to a Contact
70
Forward All Incoming Calls to a Contact
71
Disable Call Forwarding
71
Forwarding Incoming Lync Calls
71
Forward Lync Calls to a Contact
72
Forward Calls to Voicemail
72
Simultaneously Ring a Group of Contacts
72
Forward Calls to Delegates
72
Simultaneously Ring Delegates
73
Divert Calls to a Contact
73
Initiating and Managing Audio Conference Calls
73
Tips for Conference Calls
74
Initiate Conference Calls
74
Join Calls to Create a Conference Call
74
End Conference Calls
75
Hold Conference Calls
75
Resume Conference Calls
75
Split Conference Calls
75
Manage Conference Call Participants
75
Initiating and Managing Lync Conference Calls
76
Initiating a Lync Conference Call
77
Initiate a Lync Conference on Your Phone
77
Initiate a Conference Call in the Lync Client
77
Initiating a Group Conference Call
77
Initiate a Group Conference Call on Your Phone
77
Initiate a Group Conference Call in the Lync Client
78
Initiate a Conference Call during a Lync Call
78
Add Contacts to a Lync Conference Call
78
Send Contacts Active Conference Information
78
Viewing a Roster of Lync Conference Participants
79
Exit the Roster
79
Return to the Roster
79
Managing Lync Conference Participants
79
Muting Conference Participants
79
Demote or Promote Conference Participants
80
Enable and Disable Conference Announcements
80
Remove Conference Participants
81
Lock and Unlock a Conference Call
81
Initiating and Managing Alcatel-Lucent Advanced Conferences
82
Initiate an Advanced Conference Call
82
Initiate an Advanced Conference Call During a Call
82
Add Contacts to an Advanced Conference Call
82
Join Calls to an Advanced Conference Call
83
Join Two Calls into an Advanced Conference Call
83
Viewing a Roster of Conference Participants
83
Exit the Roster
83
Return to the Roster
83
Managing Advanced Conference Participants
84
Muting Conference Participants
84
Remove Conference Participants
84
Working with Shared Lines
84
Viewing Missed and Received Calls on Shared Lines
85
Hold Calls Privately on Shared Lines
85
Barge In on Calls for Busy Lamp Field Lines
85
Using GENBAND’s Multiple Appearance Directory Number - Single Call Appearance
86
Placing a Call
86
Answering Calls
86
Barge In on an Active Call
87
Leave a Bridge Call
87
Resume Held Calls
87
Enabling Privacy
88
Enable Privacy
88
Disable Privacy Temporarily
89
Enable Privacy on a Bridge Call
89
Using Lync Boss-Admin
89
Assign Delegates
89
View the Delegates Group
91
View the Boss Group
91
Set a Ringtone for Boss Calls
92
Edit the Delegates Group
92
Managing Calls on the Boss’s Line
93
Respond to Incoming Calls
93
Viewing Call Status on the Boss’s Line
94
View Held Calls
94
Resume Held Calls
94
Transfer Boss Calls
95
Call on Behalf of a Boss
95
Join Conference Calls
96
Using Alcatel-Lucent Shared Call Appearance
96
Placing a Call
97
Answering Calls
97
Bridging into Active Calls
97
Leave a Bridge Call
97
Make Active Calls Public
97
Holding or Passing Calls
98
Pass SCAP Calls
98
Create a Personal Ring Group with BroadSoft UC-One Simultaneous Ring
99
Add Numbers to Your Simultaneous Ring List
99
Delete Numbers from the Simultaneous Ring List
99
Recording Calls on VVX 500, 600, and 1500 Phones
100
Guidelines when Recording Calls
100
Record a Call
100
Pause a Recording
101
Resume a Recoding
101
Stop Recording
101
Record Conference Calls
102
Browse Recorded Calls
102
Play Recorded Calls
102
Pause and Resume Played Recordings
103
Stop Playing a Recording
103
Rename a Recording
103
Delete Recordings
104
Video Calls
105
Tips for Video Calls
105
Using a VVX Camera with VVX 500 and 600 Phones
106
Control the Lens Angle
106
Use the Privacy Shutter
106
Status Indicators and Messages for the VVX Camera
107
Changing Video Call Settings
108
Set the Call Rate for Video Calls
108
Stop Video for All Calls
108
Change Video Clarity
109
Changing the Video Call and PIP Displays
109
Change How PIP Video Displays
110
Change How Far-Side Video Displays
111
Display All Video Calls in Full Screen Mode
112
Place a Video Call on VVX 500, 600, and 1500 Phones
112
Stop Sending Video
112
No Video from the Far Side
113
Display Video Calls in Full Screen
113
Exit Full Screen View
114
Swap Video
114
Handling Video and Audio Calls
115
Handle Conference Calls with Video
115
Managing Video Calls without a VVX Camera on VVX 500 and 600 Phones
116
Managing Audio and Video Calls
116
View Video in Full Screen during Calls
117
Handling a Mixture of Video and Audio-Only Calls
118
Place Audio-Only Calls
118
Manage Call Lists and Directories
119
View Recent Calls
119
View Call Details
120
Save a Recent Contact
120
Delete a Contact
120
Edit Recent Contact Entries
120
Sort Recent Call Entries
120
Sort Entries by Call Type
121
View Recent Lync Calls
121
View Recent Lync Calls in Outlook
121
Managing the Contact Directory
122
Search for Contacts
122
Add a Contact to the Contact Directory
122
View Contact Information
123
Update a Contact’s Information
123
Delete a Contact
123
Managing the Corporate Directory
124
Searching the Corporate Directory
124
Perform a Quick Search
124
Perform an Advanced Search
124
Save Search Results
125
Clear Search Results
125
Add Contacts to the Contact Directory
125
Search the Lync Directory
125
Saving Contacts from the Lync Directory
126
Save Contacts to Lync Contacts
126
Save Contacts to the Contact Directory
126
Search the Outlook Directory
126
Save Outlook Contacts to the Contact Directory
127
Searching the BroadSoft Directory
127
Perform a Simple Search
127
Perform an Advanced Search
127
Add BroadSoft Contacts to the Contact Directory
128
Managing the GENBAND Address Books
128
Using the Global Address Book
128
Searching the Global Address Book
129
Save a Contact
129
Save Search Results
130
Using the Personal Address Book
130
View Contacts in the Personal Address Book
130
Search Your Personal Address Book
130
Add Contacts to the Personal Address Book
131
Delete Contacts
131
Edit Contacts in the Personal Address Book
131
Manage Buddy Lists, Favorites, and Contact Lists
133
Managing Favorites
133
Add Favorites
133
View Favorites
134
View Favorites on the Home Screen
134
View Favorites from the Lines Screen
134
Reorder Favorites
134
Delete Favorites
134
Using Buddy Lists
135
Add Contacts to Your Buddy List
135
View Your Buddy List
135
Monitor Contacts on Your Buddy List
136
View Watcher List
136
Block Contacts from Viewing Your Status
136
View Blocked List
137
Managing Lync Contacts
137
Add Contact to Your Microsoft Lync Contact List
137
View Lync Favorites and Groups
138
Viewing Lync Contacts’ Presence Information
138
View Contact’s Activity on VVX 201, 300, and 400 Phones
141
View Contact Information on VVX 500 and 600 Phones
141
View the Lync Contact Card for Contact Information
141
Change the Privacy Relationship for a Contact
142
Managing BroadSoft UC-One Favorites and Contacts
143
View BroadSoft UC-One Contacts’ Presence Information
143
View BroadSoft UC-One Contacts and Favorites
143
View Favorites in the Contact List
144
View Contacts and Groups
145
Search for BroadSoft UC-One Contacts
145
Update Your Presence Status
147
Update Your Lync Presence
147
Update Your Buddy Status
148
Automatically Update Your Buddy Status
148
Access, Send, and Broadcast Messages
149
Access Voicemail and Video Messages
149
Remove Message Alert
150
Access Lync Voicemail Messages
150
Managing Lync Voicemail Messages
151
Call a Contact
151
Delete Voicemail Messages
151
Mark Message as Read
151
Send Instant Messages
151
Read Instant Messages
152
Reply to Instant Messages
152
Delete Instant Messages
152
Broadcasting Messages with Group Paging
152
Sending and Receiving Pages
153
Send Pages
153
Receiving Pages
153
Changing Group Paging Settings
154
Change the Default Paging Group
154
Update Paging Group Subscriptions
155
Enable Pages to Play during Active Calls
155
Broadcasting Messages with Push to Talk
155
Sending and Receiving PTT Broadcasts
156
Send PTT Broadcasts
156
Receiving PTT Broadcasts
156
Listen to PTT Broadcasts during Active Calls
157
Reply to PTT Broadcasts
157
End PTT Broadcasts
158
Changing PTT Settings
158
Change the Default Channel
158
Update Channel Subscriptions
158
Enable PTT Broadcasts to Play During Active Calls
159
Use Applications on Your Phone
160
Using the Calendar
160
Open the Calendar
160
Navigate Day View
160
Navigate Month View
161
Display Meeting View
161
Return to Day View
161
Use Meeting Reminders
162
Choose a Meeting Reminder Type
162
Choose an Alert Tone
162
Disable Meeting Reminders
163
Joining Calendar Meetings
163
Join Meetings from the Calendar
163
Join a Meeting from a Meeting Reminder
163
Join a Meeting with an Alternate Number
163
Join Lync Meetings from the Calendar
163
Navigating the Browsers
164
View the Idle Browser
164
Use the Web Browser
164
Browser Navigation Soft Keys
165
Enter Information into the Browser
165
Using the Launch Pad on VVX 1500 Phones
166
Access the Launch Pad
166
Open Applications
166
Navigate the Launch Pad
167
Display the Launch Pad’s Main Screen
167
Enable My Info Portal
167
Customize Your Phone
168
Set the Language
168
Set the Time and Date Display
168
Disable the Time and Date Display
169
Setting the Backlight Intensity and Timeout
169
Change the Backlight Intensity
169
Change the Backlight Timeout
170
Select a Background Picture
170
Adding Personal Photos as Your Background
171
Using the Web Configuration Utility
171
Use a USB Flash Drive
172
Reset Your Background
172
Enable Transparent Line Keys
173
Enabling Screen Savers
173
Enable Screen Savers
173
Use Personal Photos as Screen Savers
174
Disable Screen Savers
175
Use Your Phone as a Digital Picture Frame
176
Performing Tasks in the Picture Frame
176
Using Power-Saving Mode
177
Change Your Office Hours
177
Change Timeouts
178
Changing Audio Settings
178
Change Incoming Call Notifications
178
Set a Ringtone for Incoming Calls
179
Set a Ringtone for Individual Contacts
179
Change the Volume
179
Use Accessibility Features on Your Phone
180
Features for Hearing-Impaired Users
180
Features for Vision-Impaired and Blind Users
181
Features for Mobility-Impaired Users
182
Extend Your Phone’s Capabilities with Accessories
183
Using a Headset with Your Phone
183
Connecting a Headset
183
Use Your Headset for All Calls
184
Reactivate Headset Memory Mode
184
Using Electronic Hookswitch
185
Setting the Headset Base Unit Options
185
Enable Electronic Hookswitch
185
Using Electronic Hookswitch
186
Disconnect Your Headset
186
Using Bluetooth Headsets with Your VVX 600 Phone
186
Enable Bluetooth and Connect a Headset
186
Managing Calls with Your Bluetooth Headset
187
Disconnect and Remove Your Bluetooth Headset
187
Using the Polycom Desktop Connector
188
Setting Up and Enabling the Polycom Desktop Connector
188
Use the Direct Method
188
Using the Indirect Method
189
Disable the Polycom Desktop Connector
191
Using the Polycom Desktop Connector
191
Access Your Phone Screens
191
Using Keyboard Shortcuts to Perform Tasks on Your Phone
192
Enter Text in a Different Language
194
Connecting a Netgear Wi-Fi Adapter to Your Phone
195
Connect the Wi-Fi Adapter
195
Connecting Polycom VVX Expansion Modules to Your Phone
196
View VVX Expansion Module Hardware Features
197
Connect VVX Expansion Modules
200
Connect Additional Expansion Modules
200
Using VVX Expansion Modules
200
Assigning Busy Lamp Field Contacts, Microsoft Lync Contacts, and Favorites
201
Generate the VVX Expansion Module Directory Card
202
Navigate VVX Color Expansion Module Paging
203
Changing the Backlight Intensity
205
Connecting to Lync on Your Phone using Better Together over Ethernet
206
Installing the Polycom Better Together over Ethernet Connector
206
Find Your Operating System Version
206
Download the Polycom BToE Connector
206
Install the Polycom BToE Connector
207
Enable and Pair Better Together over Ethernet
208
Set Your Phone as Your Primary Audio Device
209
Using BToE to Manage Calls on Your Phone and Lync client
209
Answer Calls
210
Place Calls
210
Pause and Resume Calls
210
Move Call Audio between Your Phone and Computer
211
Use Your Phone as Your Primary Audio Device for Your Computer
211
Disable BToE on Your Phone
211
Stop BToE on Your Computer
212
Uninstall the Polycom BToE Connector
212
Maintenance Tasks
213
Investigate Phone Warnings
213
Remove Warnings
213
Restart the Phone
214
Update the Phone Configuration
214
Test Phone Hardware
214
Clean the Touchscreen
215
View Software Details
215
Update the Phone Software
215
Exit the Software Update Notification
216
Update Software Later
216
Postpone Software Updates
216
Update Your Lync Phone Software
217
View Software Update Information
217
Update Software Later
217
Troubleshoot Issues
218
General Phone Issues
218
Speakerphone Issues
218
USB Port Issues
218
Application Issues
219
Troubleshoot Calendar Issues
219
Login Issues
219
GENBAND Address Book Issues
219
View the Status of the Personal Address Book
219
Polycom Desktop Connector Issues
220
Headset Issues
221
Troubleshoot Audio and Echo Issues
221
Bluetooth Headset Issues
221
Recording Issues
221
Better Together over Ethernet Issues
222
Troubleshoot Polycom BToE Connector Installation Issues
222
Troubleshoot Polycom BToE Connector Start Issues
222
Troubleshoot Pairing Issues
223
Get Help
224
Copyright, Safety, and Regulatory Notices
225
Service Agreements
225
Governing Law
225
Limitations of Liability
225
Polycom Limited Warranty and Limitation Liability
225
Exclusions
226
Warranty Exclusive
226
Safety, Compliance, and Disposal Information
226
Part 15 FCC Rules
226
Class B Digital Device or Peripheral
227
Class A Digital Device or Peripheral - VVX Expansion Modules
227
Modifications
227
Installation Instructions
227
Plug Acts as Disconnect Device
227
Industry Canada (IC)
228
Industry Canada (IC) - VVX Expansion Modules
228
CE and VCCI Mark
228
CE Mark R & TTE Directive (EU only)
228
Japan VCCI
229
WARNING Electrical Safety
229
VVX 101 and 201 Phones
229
VVX 300, 310, 400, and 410 Phones
230
VVX 500 and 600 Phones
230
VVX 1500 Phones
230
Russian Compliance
230
Ukrainian Compliance
231
New Zealand Telepermit
231
Special Conditions for this User Guide
231
Connection of this Polycom VVX 1500 VoIP Video Telephone to the Telecom Network
232
UAE
232
Australia
232
Operating Ambient Temperatures
232
Hearing Aid Compatibility (HAC)
233
Waste Electrical and Electronic Equipment (WEEE)
233
Restriction of Hazardous Substances Directive (RoHS)
233
Polycom Take Back
233
Applies to VVX 600 Phones Only
233
View document
Polycom VVX 500 User manual
Type
User manual
Brand
Polycom
Size
731.91 KB
Pages
2
Language
English
View document
Polycom VVX 500 User manual
Type
User manual
Brand
Polycom
Size
6.90 MB
Category
IP phones
Pages
133
Language
English
View document