
INSTALLATION INSTRUCTIONS
Page 1 of 4
2007-2018 WRANGLER JK ROOF RACK MOUNT KIT
PART# JK-6121
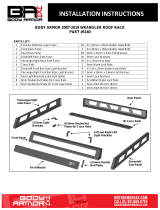
PARTS LIST:
2
Front Mounting Brackets
2
8mm Hex Nut Covers
2
Front Clamping Brackets
8
8-1.25mm x 25mm Hex Bolts
2
Rear Roof Basket “L” Brackets
8
8-1.25mm x 25mm Combo Bolts
2
Rear Window Brackets
18
8mm x 24mm x 2mm Flat Washers
2
89mm x 35mm x 5mm Thick Foam Strips (Use with
Mounting Brackets)
10
8mm Nylon Lock Nuts
4
Rubber Edge Trim (Use with Clamping Brackets)
PROCEDURE:
REMOVE CONTENTS FROM BOX. VERIFY ALL PARTS ARE PRESENT. READ INSTRUCTIONS
CAREFULLY BEFORE STARTING INSTALLATION. ASSISTANCE RECOMMENDED.
1. Open the driver/left side door. On models with 4 doors open the driver/left rear side door. Locate the rain
gutter along the top of the door, (Figure 1). Select (1) Mounting Bracket. Apply (1) Thick Foam Strip to
the bottom of the Mounting Bracket to protect the roof from damage. Next, slide (1) Edge Trim over the
end of the mounting plate. Place the Bracket onto the roof of the vehicle. Slide the mounting tab on the
Bracket into the top of the rain gutter, (Figure 2).
2. Select (1) Clamp Bracket and (1) Edge Trim. Slide the Edge Trim over the bent end on the (1) Clamp
Bracket, (Figure 3). Insert the threaded stud on the Clamp Bracket up and through the mounting hole in
the Mounting Bracket. Secure the Clamp Bracket to the Mounting Bracket with (1) 8mm Flat Washer, (1)
8mm Nylon Lock Nut, (Figure 3). Use (2) 8mm x 25mm Combo Bolts to secure the Clamp Bracket to
the tab on the Mounting Bracket, (Figures 3—4). Do not tighten hardware at this time.
(2) Protective
Caps
(2) Front Mounting Brackets
(2) Thick Foam
Strips
Rear Roof Basket
“L” Brackets
(2) Rear Window
Brackets
(2) Front Clamping
Brackets
(4) Edge Trims
CAUTION: Recommended load rate is 150 lbs. for Basket only, too much weight will greatly
reduce the stability of the vehicle and increase the vehicle’s tendency to overturn or damage roof.
The manufacturer makes no representation or warranty as to the amount of weight that the
vehicle can safely carry. For guidance, we recommend that you consult the vehicle manufacturer.
Secure all payloads properly for safe transportation.

INSTALLATION INSTRUCTIONS
Page 2 of 4
3. Wrap the Clamp Bracket around the rain gutter, (Figure 4). Make sure the Mounting Bracket fits snug
inside the rain gutter.
4. Repeat Steps 1—3 for passenger/right side front Mounting Bracket installation.
5. Open the rear window on the vehicle. Starting on the driver/left side of the rear window, loosen the (2)
factory bolts, (Figure 5). IMPORTANT: Only loosen the hex bolts enough to slide the rear Bracket
between the hinge and the top. DO NOT REMOVE the hex bolts.
6. Select (1) Rear Window Bracket. Slide the Bracket down and between the rear window hinge and the
top, (Figures 6 & 7). Hand tighten factory bolts to secure Bracket in place.
7. Select (1) Rear “L” Bracket, (Figure 8). Attach the Bracket to the rear facing side of the Rear Bracket
with the included (2) 8mm x 25mm Hex Bolts, (4) 8mm x 24mm Flat Washers and (2) 8mm Nylon Lock
Nuts, (Figures 8 & 9). Snug but do not tighten hardware.
8. Repeat Steps 5—7 to attach the remaining Rear Bracket and “L” Bracket to the passenger/right rear
window hinge.
9. Follow the instructions packaged with the Roof Basket to assemble the Basket.
10. With assistance, place the Roof Basket on top of the Brackets. Slide the front Brackets forward or back
as necessary to line up with the Basket. Attach the front Cross Bar on the Basket to the Front Brackets
with the included (4) 8mm x 25mm Combo Hex Bolts, (Figure 10). Do not tighten hardware.
11. Attach the rear of the Basket to the “L” Brackets with (4) 8mm x 25mm Hex Bolts, (8) 8mm x 24mm Flat
Washers and (4) 8mm Nylon Lock Nuts, (Figure 11). Leave hardware loose at this time.
12. Level and center the Roof Basket to the vehicle and tighten all hardware at this time. Slide (1) Plastic
Nut Cap over the Lock Nuts attaching the Clamp Brackets to the front Mounting Brackets, (Figure 3).
13. Do periodic inspections to the installation to make sure that all hardware is secure and tight.
To protect your investment, do not use any type of polish or wax that may contain abrasives that could damage the
finish. Mild soap may be used to clean the Roof Basket
(Fig 2) Place the tab on the Bracket inside
the rain gutter (driver side 2dr model
pictured for instruction purposes only).
Front
Front
(Fig 1) Attach Foam Pad and
Edge Trim to bottom of Bracket

INSTALLATION INSTRUCTIONS
Page 3 of 4
(Fig 6) Slide Rear Window Bracket between the
hinge and the top. Do not remove factory bolts
Front
(2) 8mm x 25mm
Combo Bolts
(Fig 4) Slide the Clamp Bracket
under the rain gutter (arrow)
Front
Attach Clamp Bracket to
Mounting Bracket:
(1) 8mm x 24mm Flat Washer
(1) 8mm Nylon Lock Nut
(1) Plastic Cover
Attach the Edge trim
to the Clamp Bracket
Rear
(Fig 5) Open rear window. Loosen but do not
remove (2) rear window hinge bolts (arrow)
Rear
(Fig 3) Attach Clamp Bracket to Mounting Bracket

INSTALLATION INSTRUCTIONS
Page 4 of 4
(Fig 7) Rear Window Bracket
installed on driver/left side
(Fig 8) Attach Rear Roof Basket “L”
Bracket to Rear Window Bracket
Rear
(2) 8mm x 25mm Hex Bolts
(4) 8mm x 24mm Flat Washers
(2) 8mm Nylon Lock Nuts
(Fig 9) Driver/left rear Roof
Basket “L” Bracket installed
Rear
(Fig 11) Attach the Roof Basket to the
Rear “L” Brackets (driver side pictured)
(Fig 10) Slide Bracket assembly forward or
back to line up with Basket. Attach Basket to
the Front Brackets (driver side pictured)
Rear
“L” Bracket
Note Notch
in Bracket
-
 1
1
-
 2
2
-
 3
3
-
 4
4


Ask a question and I''ll find the answer in the document
Finding information in a document is now easier with AI
Other documents
-
 KC HiLiTES 7311 Installation guide
-
TrailFX JL014T Installation guide
-
-
 Body Armor 5160 Installation guide
-
-
-
-
-
-

