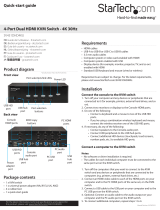
StarTech SV231HU34K6 is a 2-port USB 3.0 KVM switch supporting dual monitors with 4K resolution at 60Hz refresh rate, allowing seamless control of two computers using a single monitor, keyboard, and mouse. It features front panel port selection buttons and LED indicators for easy switching between systems, along with two USB 2.0 hub ports for peripheral sharing, HDCP 2.2 compliance for protected content, and EDID emulation for optimal display compatibility.
StarTech SV231HU34K6 is a 2-port USB 3.0 KVM switch supporting dual monitors with 4K resolution at 60Hz refresh rate, allowing seamless control of two computers using a single monitor, keyboard, and mouse. It features front panel port selection buttons and LED indicators for easy switching between systems, along with two USB 2.0 hub ports for peripheral sharing, HDCP 2.2 compliance for protected content, and EDID emulation for optimal display compatibility.


-
 1
1
-
 2
2
-
 3
3
-
 4
4
-
 5
5
-
 6
6
-
 7
7
-
 8
8
-
 9
9
-
 10
10


StarTech SV231HU34K6 User manual
- Type
- User manual
- This manual is also suitable for
StarTech SV231HU34K6 is a 2-port USB 3.0 KVM switch supporting dual monitors with 4K resolution at 60Hz refresh rate, allowing seamless control of two computers using a single monitor, keyboard, and mouse. It features front panel port selection buttons and LED indicators for easy switching between systems, along with two USB 2.0 hub ports for peripheral sharing, HDCP 2.2 compliance for protected content, and EDID emulation for optimal display compatibility.
Ask a question and I''ll find the answer in the document
Finding information in a document is now easier with AI
Related papers
Other documents
-
 StarTech.com SV431DHD4KU KVM-BRYTER RACK-MONTERING, SVART User manual
-
StarTech com ST12MHDLAN4R User manual
-
StarTech.com StarTech.com VS321HDBTK User manual
-
 StarTech.com USB, DVI KVM Console Extender w/ Serial & Audio User manual
-
StarTech.com SV831DVIU Owner's manual
-
StarTech com SV231TDPU34K User guide
-
 StarTech.com DKT30CHV LAPTOP-DOKKINGSTASJON OG PORTREPLIKATOR KOBLET MED LEDNINGER (IKKE TRÅDLØS) User manual
-
StarTech.com SV231UAF User manual
-
 StarTech.com SV431HDU3A User manual
-
 StarTech.com SV231U3A User manual


