
7
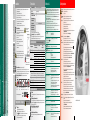
Programme overview also see Page 5
Sort the laundry according to type of textile and fabric. Fabrics must be suitable for tumble drying.
After drying...
c
iron laundry
lightly iron laundry
@c
do not iron laundry
c
mangle laundry
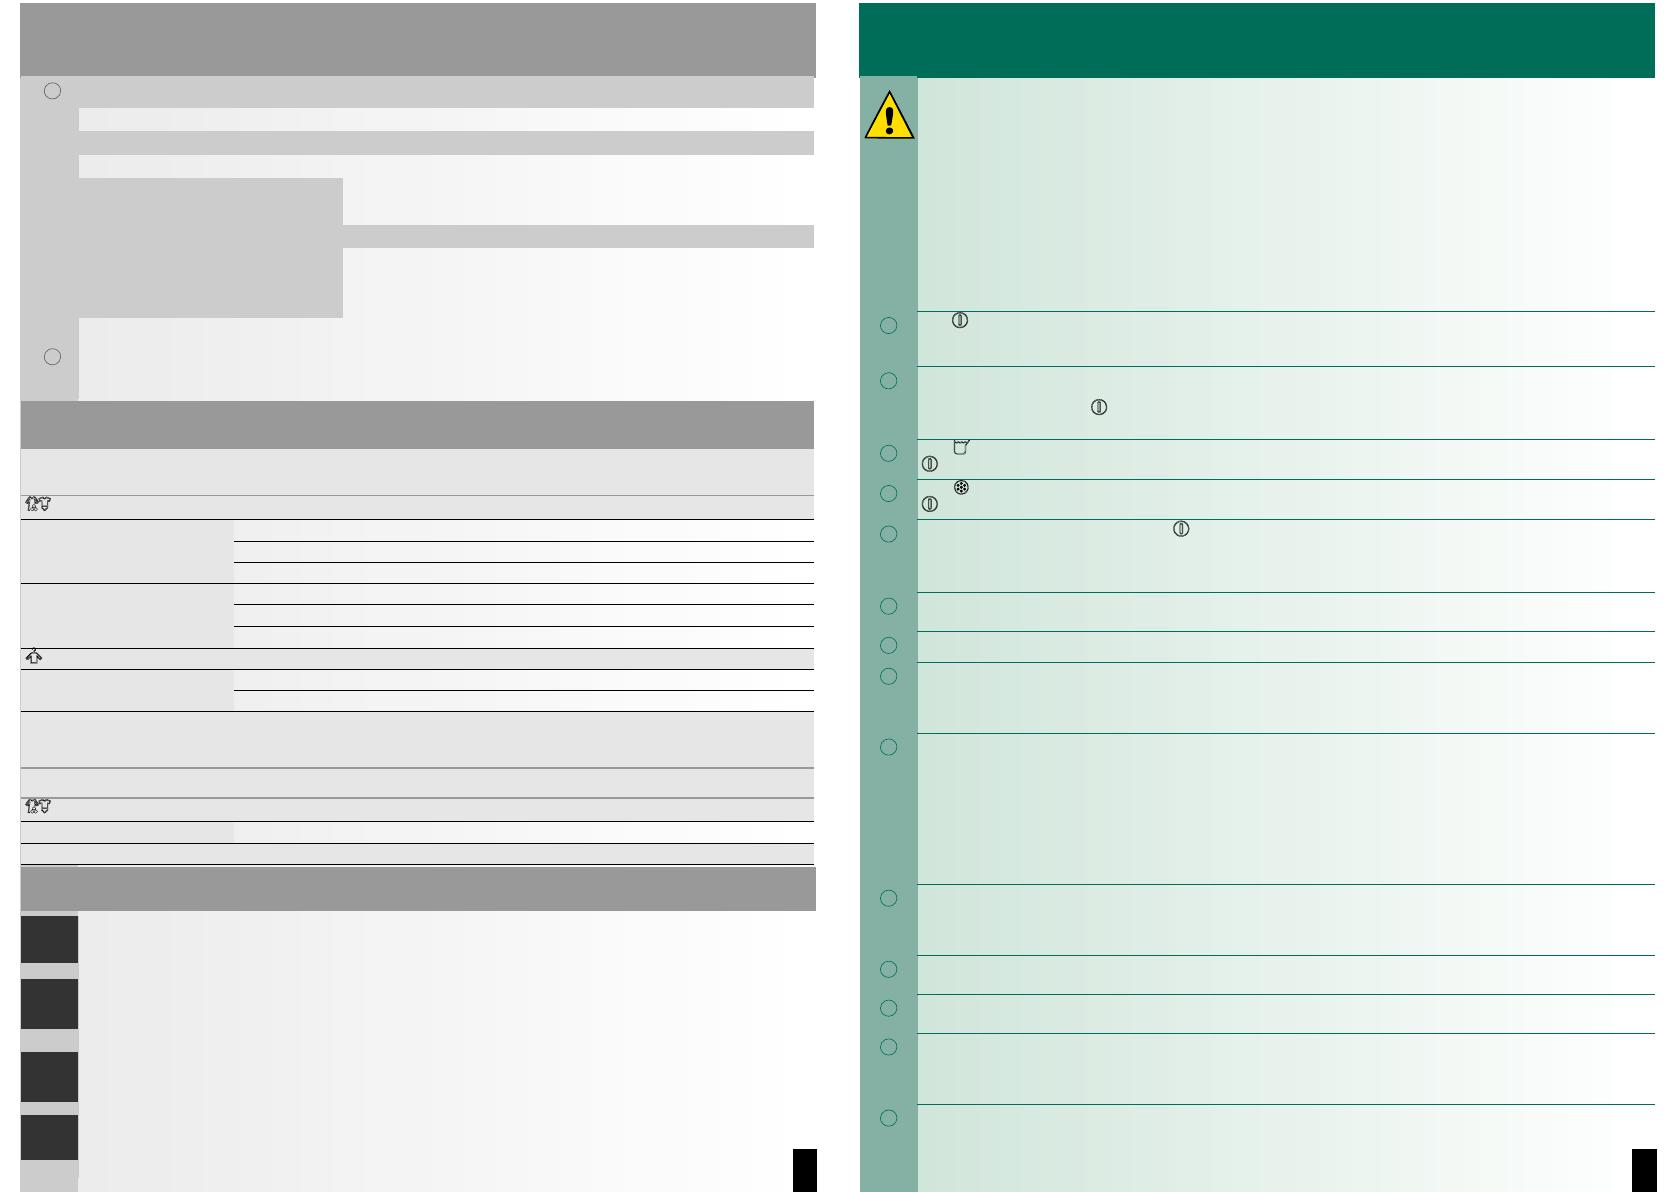
PROGRAMMES TEXTILE TYPE AND INFORMATION
** Cottons
max. 7 kg
Hard-wearing fabrics, boil-resistant fabrics made of cotton or linen.
** Synthetics
max. 3.5 kg Non-iron laundry made of synthetic fibres and blended fabric, easy-care cotton.
**
LIF Mix
max. 3 kg Mixed items of laundry madeof cotton and synthetics (Mix).
Iron Dry
c÷@c Fabrics suitable for ironing (iron fabrics in order to avoid creasing).
+. Cupboard Dry
@ Single-layer fabrics.
*+: Very Dry
@ Fabrics made of thick, multilayered items of clothing.
Timed progr. 20 min
max. 3 kg
Pre-dried, multi-layered, sensitive fabrics made of acrylic fibres, or separate small items of laundry.
Also for subsequent drying.
Super 40’
max. 2 kg
Laundry made of synthetic fibres, cotton or blended fabrics (for example) that needs to be dried quickly. The values may
differ from the those specified depending on the type of fabric, mixture of laundry to be dried, residual moisture in the
fabric and loading capacity.
*for Cottons and Synthetics programmes only
**Dryness levels can be selected individually a
+:Very Dry, +. Cupboard Dry and Iron Dry (depending on the model).
Degree of dryness can be finely adjusted; multi-layered textiles require a longer drying time than single-layered items of clothing. Recommendation: Dry separately.
9306 / 9000847734
*847734*
Robert Bosch Hausgeräte GmbH
Carl-Wery-Str. 34
81739 München/Deutschland
WTE84102SN
8
Installation
– Delivery specification: dryer, instructions for installation and use, woollens basket
(depending on model).
– Check dryer for transport damage.
– The dryer is very heavy. Do not attempt to lift it on your own.
– Be careful to avoid sharp edges.
– Do not lift the dryer by any of the protruding parts (e.g. the door) as they may break off.
– Do not set up in a room that is susceptible to frost.
Freezing water may cause damage.
– If in doubt, have the appliance connected by an expert.
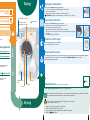
Setting up the dryer
– The appliance plug must always be accessible.
– Ensure that the appliance is installed on a clean, level
and solid surface.
– Keep the cooling grille at the front of the dryer
unobstructed.
– Keep the area around the dryer clean.
– Make the dryer level using the threaded feet
and a spirit level.
Do not remove the threaded feet under any
circumstances.
Mains connection see safety instructions
a
Page 11.
– Connect to an AC earthed socket. If in doubt have the socket checked by an expert.
– The mains voltage and the voltage shown on the rating plate (
a
Page 9) must correspond.
– The connected load and necessary fuse protection are specified on the rating plate.
Converting the installed load Note the fuse protection of the socket.
10/16 Amps
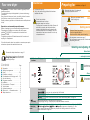
Frost protection / Transport
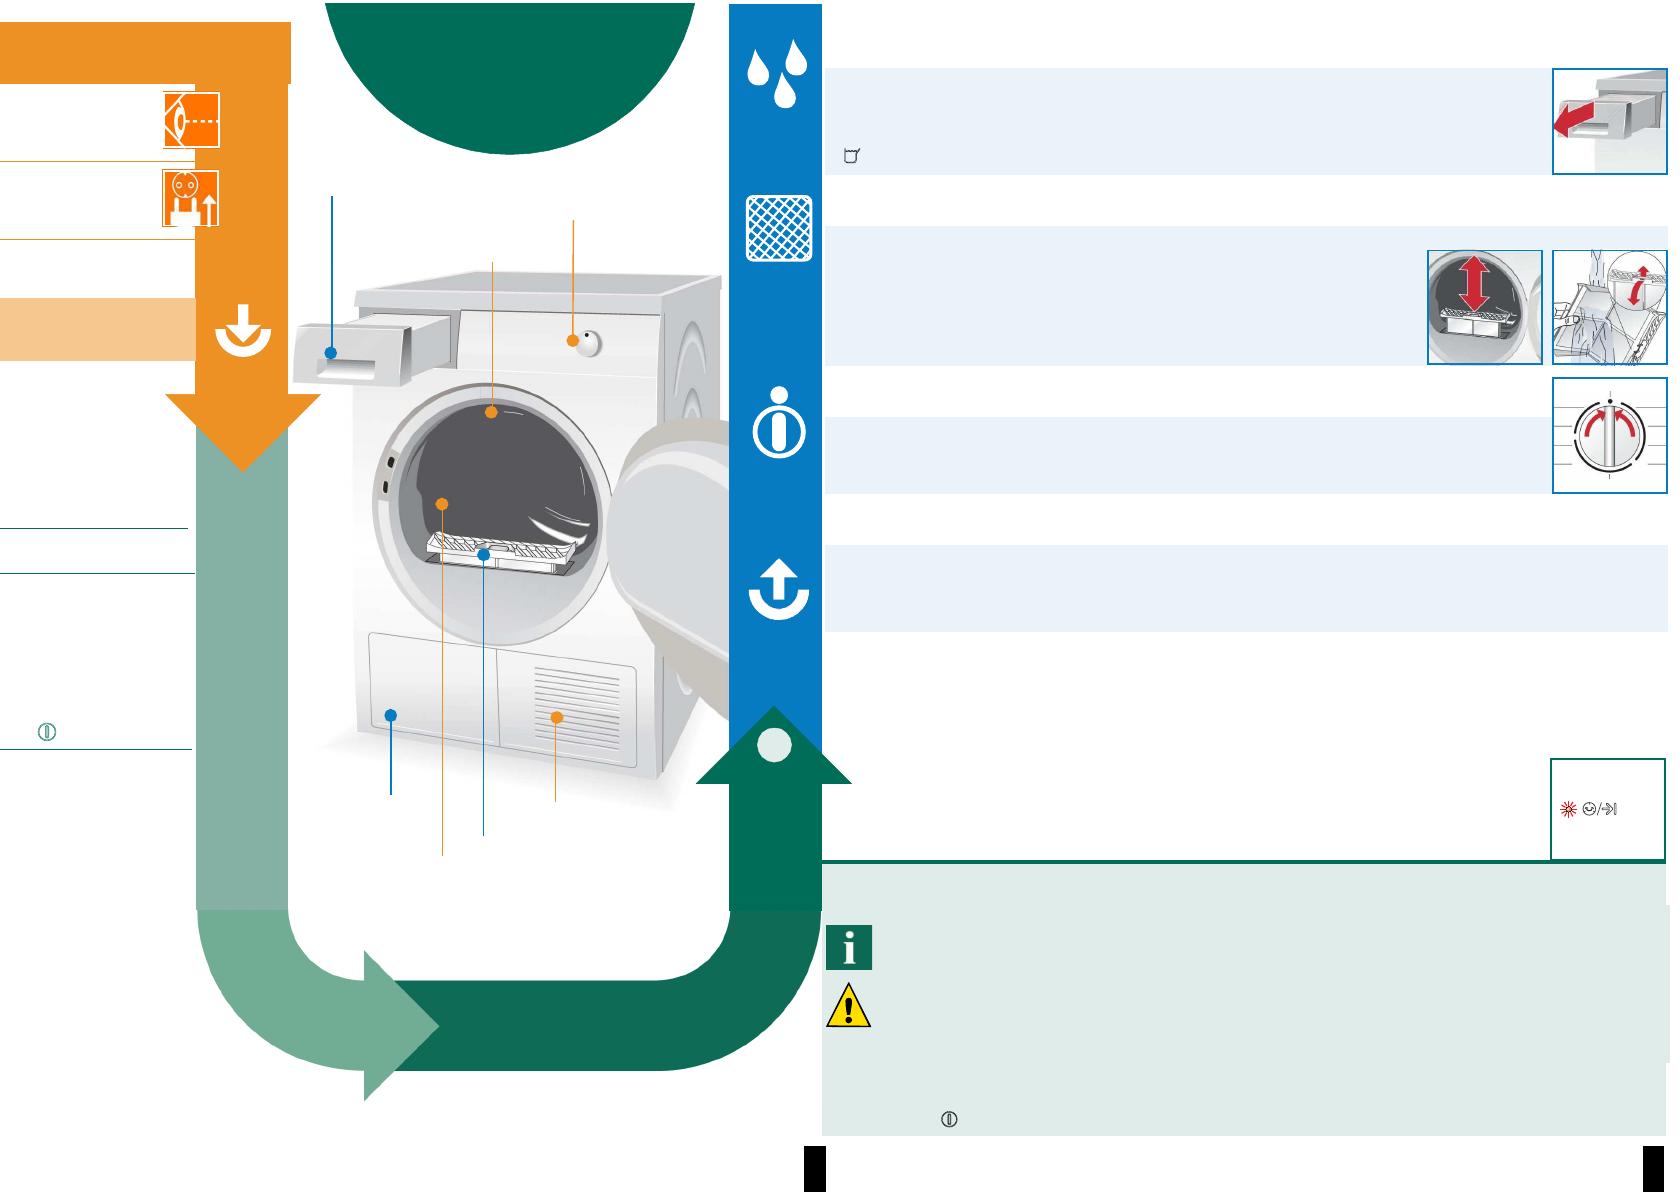
Preparation
1. Empty the condensation container
a
page 4.
2. Select any programme using the programme selector.
3. Press the (start) button
a
condensation is pumped into the container.
4. Wait 5 min., and then empty the condensation container again.
5. Turn the programme selector to 0 (Off).
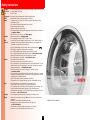
Take all accessory parts
out of the drum.
The drum must be empty.
Make sure that the air
inlet remains unobstructed
Clean and level
turn to
0 (Off)
Press and hold selection
then turn 3 x to the right
turn to
0 (Off)
Set
amperage
1 x to the
right
Feedback (depending on model):
o
ff
flashes
10 A
16 A
3
3
Do not operate the dryer if
there is a danger of frost.
Do not set up the dryer behind a door or sliding
door as this may obstruct or prevent the dryer door
from opening. This will prevent a potentially fatal
danger to children from locking themselves in.
9
Technical data
ʠ
Dimensions (DxWxH) 60 x 60 x 85 cm (height adjustable)
Weight approximately 45 kg
Max. capacity 7 kg
Condensation container 4.2 l
Connection voltage
Connected load
Fuse protection see appliance rating plate
Ambient temperature
Product number/
Production number
You can find the rating plate on the back of the dryer.
ʠ
Drum interior light (depending on model) (bulb E14, 25 W)
The drum lights up after the door is opened or closed, and after the programme starts,
and switches off automatically. Changing the bulb a page 10.
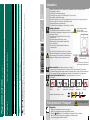
Consumption rates (The value on the label is achieved at the maximum heat setting.)
Fabrics/programmes
Residual moisture in the
fabrics after spinning
Drying time** Energy
consumption**
cCottons 7 kg
10 A 16 A 10 A 16 A
+. Cupboard Dry* 1400 rpm (50%) 112 min 98 min 3.54 kWh 3.54 kWh
1000 rpm (60%) 131 min 115 min 4.13 kWh 4.13 kWh
800 rpm (70%) 150 min 133 min 4.72 kWh 4.72 kWh
Iron Dry* 1400 rpm (50%) 93 min 69 min 2.55 kWh 2.55 kWh
1000 rpm (60%) 111 min 82 min 3.22 kWh 3.22 kWh
800 rpm (70%) 130 min 94 min 3.90 kWh 3.90 kWh
Synthetics 3.5 kg
+. Cupboard Dry* 800 rpm (40%) 48 min 42 min 1.35 kWh 1.35 kWh
600 rpm (50%) 60 min 51 min 1.65 kWh 1.65 kWh
* Programme setting for testing in accordance with applicable standard EN61121.
** The values may differ from those specified, depending on the type of fabric, composition of
laundry to be dried, residual moisture in the fabric and the amount of laundry being loaded.
Fabrics/programmes Drying time Annual energy consumption
cCottons 7 kg / 3.5 kg*
+. Cupboard Dry*** 89 min / per cycle 497 kWh / per year
***Programme setting for testing and energy labelling in accordance with Directive 2010/30/EU.
Optional accessories (from after-sales service using order number)
Platform
For easier loading and unloading. The basket contained in the drawer can be used to carry
the laundry.
Washer-dryer stack connection set
The dryer can be placed on top of a suitable washing machine with the same width and depth
to save space. The dryer must be fastened to the washing machine using this connection set.
With pull-out worktop: WTZ 11300
Connection fittings for condensation outlet
The condensation is conveyed directly via a hose.
Installation underneath the worktop
Instead of the appliance covering plate, you must have a metal cover fitted by
a specialist.
10
What to do if ...
If you cannot rectify a fault yourself (e.g. switching off/on), please contact our after-sales
service. We will always find an appropriate solution and will avoid unnecessary visits by
engineers. Trust the expertise of the manufacturer and rest assured that the repair will be
carried out by trained service technicians using original spare parts. The contact details of your
local after-sales service can be found in the enclosed
after-sales service directory, or by
calling one of these numbers:
– GB 0844 8928979 (Calls from a BT landline will be charged at up to 3 pence per minute.
A call set-up fee of up to 6 pence may apply.)
– IE 01450 2655 (0.03 € per minute at peak. Off peak 0.0088 € per minute.)
When contacting the after-sales service, please quote the appliance's product number (E no.)
and production number (FD) (see the inside of the door).
Set the programme selector to
0 (Off) and remove the appliance plug from the socket.
ʠ
The (start) indicator lamp does
not light up.
Mains plug plugged in?
Programme selected?
Check the socket fuse.
ʠ
The display panel light and
indicator lights (depending on
model) go out and the
(start)
indicator light flashes.
Energy-saving mode is activated
a
see the separate Energy-saving mode instructions.
ʠ
The n (Container) and
(start) indicator lamp flash.
Empty the condensation container.
If featured, check hose for condensation outlet.
ʠ
The o (Filter) and
(start) indicator lamp flash.
Clean the fluff filter and/or air cooler under running water
a
Page 4/6.
ʠ
Dryer does not start.
(start) button selected?
Door closed?
Programme set?
Ambient temperature greater than 5 °C?
ʠ
Water is running out. Align dryer horizontally.
Clean air cooler seal.
ʠ
The door opens by itself. Push the door closed until you hear it engage.
ʠ
Creasing. Laundry load exceeded?
Remove articles of clothing immediately after the end of the
programme, hang up and pull into shape.
Unsuitable programme selected a Page 7.
ʠ
Drying result is not satisfactory
(laundry feels too damp).
Warm laundry feels damper than it actually is.
The selected programme does not suit the load. Use another
drying programme or, in addition, select the time programme a
Page 7.
Use fine adjustment for the drying result a Page 1/2 and 5/6.
Fine layer of limescale on the humidity sensors
a Clean the humidity sensors a Page 6.
Programme termination, e.g. tank full, mains power supply failure,
door open or maximum drying time reached.
ʠ
Drying time too long. Rinse the fluff filters under running water a Page 4.
Insufficient supply of air a ensure that air can circulate.
Air inlet possibly blocked a Clear inlet a Page 8.
Ambient temperature higher than 35 °C a ventilate the room.
ʠ
The humidity in the room
increases significantly.
Make sure the room is sufficiently ventilated.
ʠ
Mains failure. Remove laundry from the dryer immediately and spread out.
This allows the heat to dissipate.
ʠ
One or more indicator lights for
programme status are flashing.
Clean filter and air cooler
a
Page 4/6.
Check installation conditions
a
Page 8.
Switch off, leave to cool down, switch on again, restart
programme.
ʠ
The interior light is not working
(depending on model).
Pull out the appliance plug, remove the cover cap in the interior
above the door (use Torx 20 screw driver) and replace the bulb.
Close the cover cap.
Never operate the dryer without a cover cap.
11
Safety instructions
Emergency
– Pull the appliance plug out of the socket immediately or disconnect the fuse.
ONLY use the
dryer...
– in rooms inside the house.
– to dry fabrics.
The dryer must
NEVER...
– be used for other purposes than those described above.
– be modified in terms of its technology or attributes.
Dangers
– The dryer must not be used by children or persons who have not been
instructed in its use.
– Do not leave children unsupervised near the dryer.
– Keep pets away from the dryer.
– Remove all objects from pockets.
Make especially sure that cigarette lighters are removed as they constitute an
a
explosion hazard.
– Do not lean or sit on the door
a
risk of tipping.
Installation
– Secure loose cables
a
tripping hazard.
– Do not operate the dryer if there is a risk of frost.
Mains
connection
– Connect the dryer according to specifications to an AC earthed socket, as
otherwise it cannot be guaranteed that the appliance is completely safe.
– The cable cross-section must be sufficient.
– Only use earth-leakage circuit breakers with the following symbol:
– The appliance plug and socket must be compatible.
– Do not use multiple plugs/couplings and/or extension cables.
– Do not hold the appliance plug with wet hands
a
risk of electric shock.
– Never pull the appliance plug out of the socket by its cable.
– Do not damage the mains lead
a
risk of electric shock.
Operation
– Only load the drum with laundry.
Check the contents before you switch the dryer on.
– Do not use the dryer if the laundry has been in contact with solvents, oil, wax,
grease or paint (e.g. hair setting spray, nail polish remover, stain remover,
cleaning solvent, etc.)
a
fire/explosion hazard.
– Dust (e.g. coal dust, flour) poses a danger: do not use the dryer
a
explosion hazard.
– Do not put laundry containing foamed material/rubber in the dryer
a
elastic
material may be destroyed and the dryer may be damaged due to possible
deformation of the foamed material.
– Switch off the dryer once the programme has ended.
– Condensation is not drinking water and may be contaminated with fluff.
Defect
– Do not use the dryer if it is defective or if you suspect it is.
Repairs must only be carried out by the after-sales service.
– Do not use the dryer if the mains cable is defective. To avoid danger, only
have the defective mains cable replaced by the after-sales service.
– Always pull the mains plug out of the socket before changing the bulb for the
interior light
a
risk of electric shock.
Spare parts
– Only use genuine spare parts and accessories for safety reasons.
Disposal
– Dryer: pull out the appliance plug, then cut off the mains cable from the
appliance.
Dispose of at municipal waste disposal facility.
– Packaging: do not leave children alone with packing parts
a
risk of suffocation.
– All materials are environmentally sound and can be reused.
Dispose of in an environmentally-responsible manner.
Dryer
en Instruction manual


 1
1
 2
2
 3
3
 4
4
 5
5
 6
6
 7
7
 8
8


Bosch WTE83100IL Operat./Install.Instruct./Program table