Page is loading ...

2
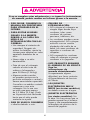
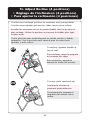
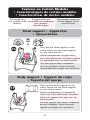
Failure to follow these warnings and the
assembly instructions could result in serious injury or death.
• PLEASE SAVE OWNER’S
MANUAL FOR FUTURE USE.
• TO PREVENT SERIOUS INJURY
OR DEATH FROM CHILD
FALLING OR BEING
STRANGLED IN STRAPS:
• Always use seat belt. After
fastening buckles, adjust belts
to get a snug fit around your
child.
• Never leave child unattended.
• Stop using swing when child
attempts to climb out or
reaches 30 pounds (13.6 kg).
• Some newborns cannot sit in
a reclined or upright position
and have special needs. Check
with your doctor about when
to start using this swing. Do
not use with a child that
weighs less than 5.5 pounds
(2.5 kg). Use in most reclined
position until child can sit up
unassisted.
• STRANGULATION HAZARD:
• DO NOT place swing in any
location where there are cords,
such as window blind cords,
drapes, phone cords, etc.
• Strings can cause
strangulation. DO NOT place
items with a string around
your child’s neck, such as hood
strings or pacifier cords.
• DO NOT suspend strings over
the swing or attach strings to
toys.
• DISCONTINUE USING YOUR
SWING should it become
damaged or broken.
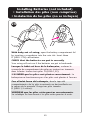
• THIS PRODUCT REQUIRES
ADULT ASSEMBLY. Follow
assembly instructions
carefully. If you experience
any difficulties, please contact
the Customer Service
Department.
• ELECTRONIC TOYS (on
certain models): Do not open.
No serviceable parts inside.
Remove and immediately discard
plastic tab from slot in toy.
• ELECTRONIC MIX N’ MOVE
TOYS (on certain models) are
not intended for use in water.

3
• DO NOT place product near
water and moisture. Do not use
the product near possible wet
areas, such as a bathtub, shower,
wash basin, sink, laundry tub,
swimming pool, wet basement,
etc.
• DO NOT use the AC adapter if it
has been exposed to liquids, has
been dropped, or is damaged.
• Protect the power cord. Place it
so it is not walked on or pinched
by furniture or other items.
• DO NOT use with an extension
cord.
• Use only power cord provided.
Page is loading ...
Page is loading ...
Page is loading ...
Page is loading ...
Page is loading ...
Page is loading ...
Page is loading ...
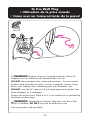
11
SNAP!
ENCLENCHEZ!
¡RUIDO!
SNAP!
ENCLENCHEZ!
¡RUIDO!
J
I
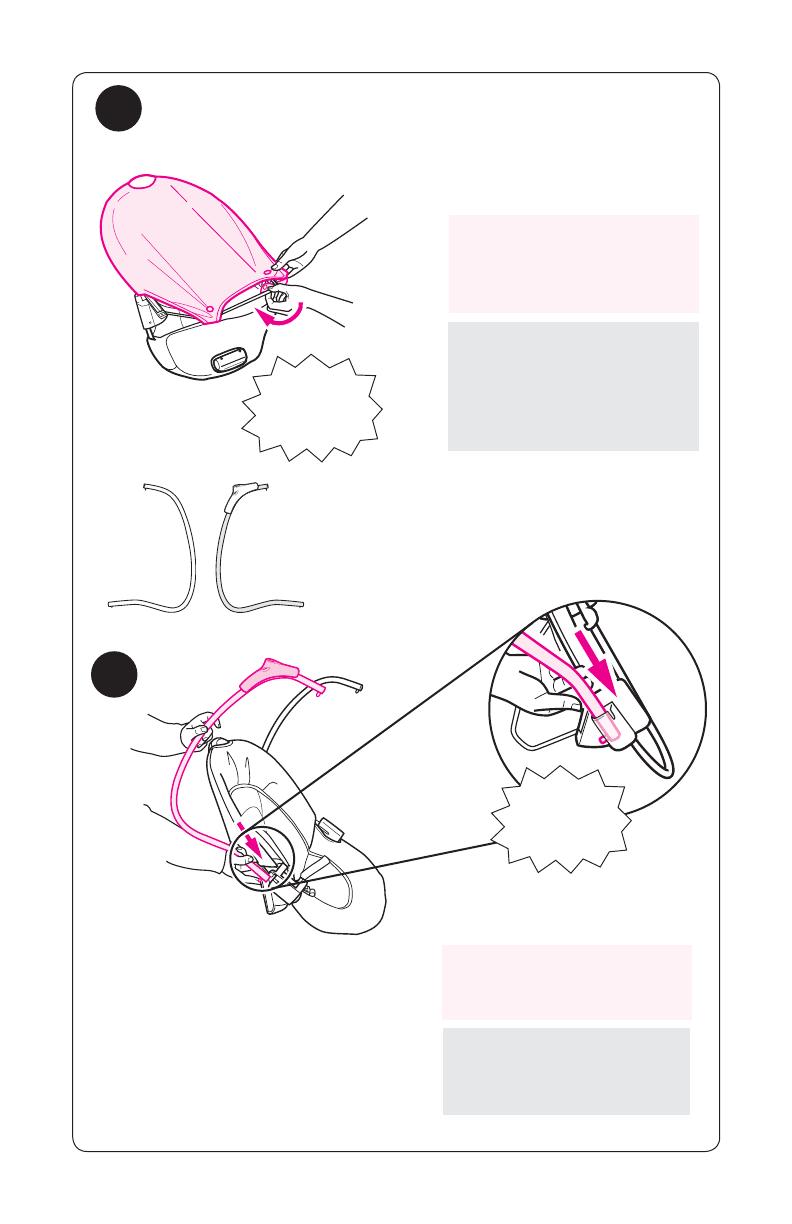
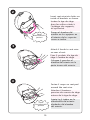
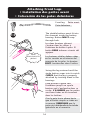
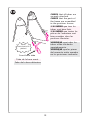
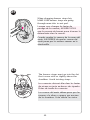
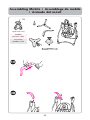
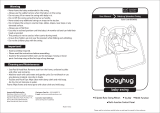
Snap 2 straps on lower
edge of seat pad around
the seat wire.
Sujete las 2 correas en
el borde inferior de la
almohadilla del asiento
alrededor del alambre
del asiento.
Attacher 2 courroies situées
sur le rebord inférieur du
coussin de siège autour
de la tige du siège.
Insert arms into brackets
on each side as shown.
Ponga los brazos en los
soportes en cada costado
como se indica.
Insérer les accoudoirs dans
les supports de chaque
côté, tel qu’illustré.
Page is loading ...
Page is loading ...
Page is loading ...

15
SNAP!
ENCLENCHEZ!
¡RUIDO!
EF
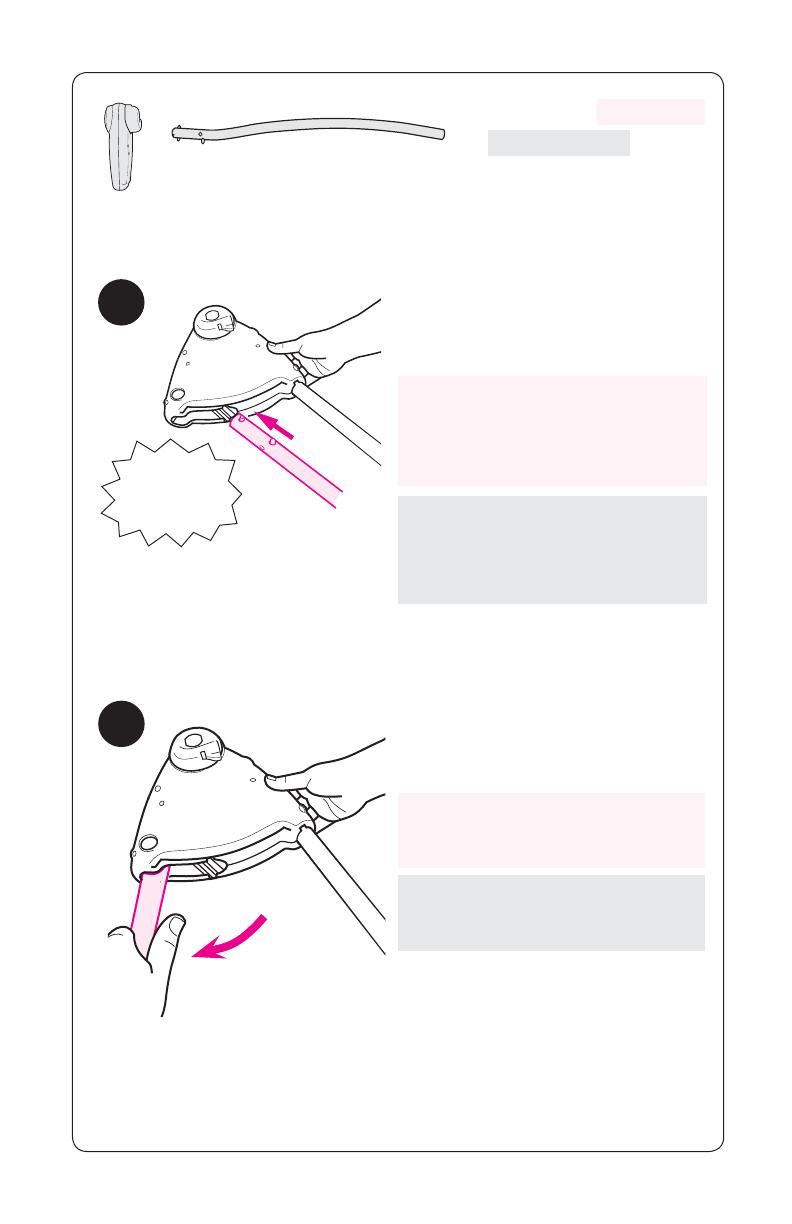
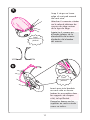
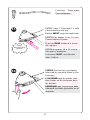
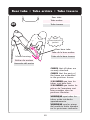
Rear leg
Patte arrière
Pata trasera
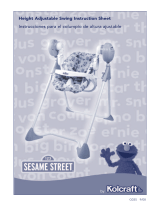
Insert other rear leg into the other housing as shown.
Inserte la otra pata trasera en el otro armazón como se indica.
Insérer l’autre patte arrière dans le boîtier, tel qu’illustré.
One button
Seul bouton
Solo botón
Page is loading ...
17
SNAP!
ENCLENCHEZ!
¡RUIDO!
EI
EJ
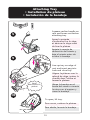
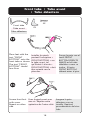
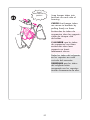
REPEAT steps 13 through 14 with
other housing and leg.
Button MUST snap through hole.
REPITA los pasos 13 a 14 con la
otra pata y armazón.
Le bouton DOIT s’enclencher
dans l’orifice
RÉPÉTER les étapes 13 et 14 avec
l’autre boîtier et patte.
El botón DEBE trabarse a través
del agujero.
VERIFIQUE que la pata esté debi-
damente instalada girándola en el
armazón.
S’ASSURER que les pattes sont
bien fixées en les tournant dans
les boîtiers.
CHECK that the leg is properly
attached by twisting them in the
housings.
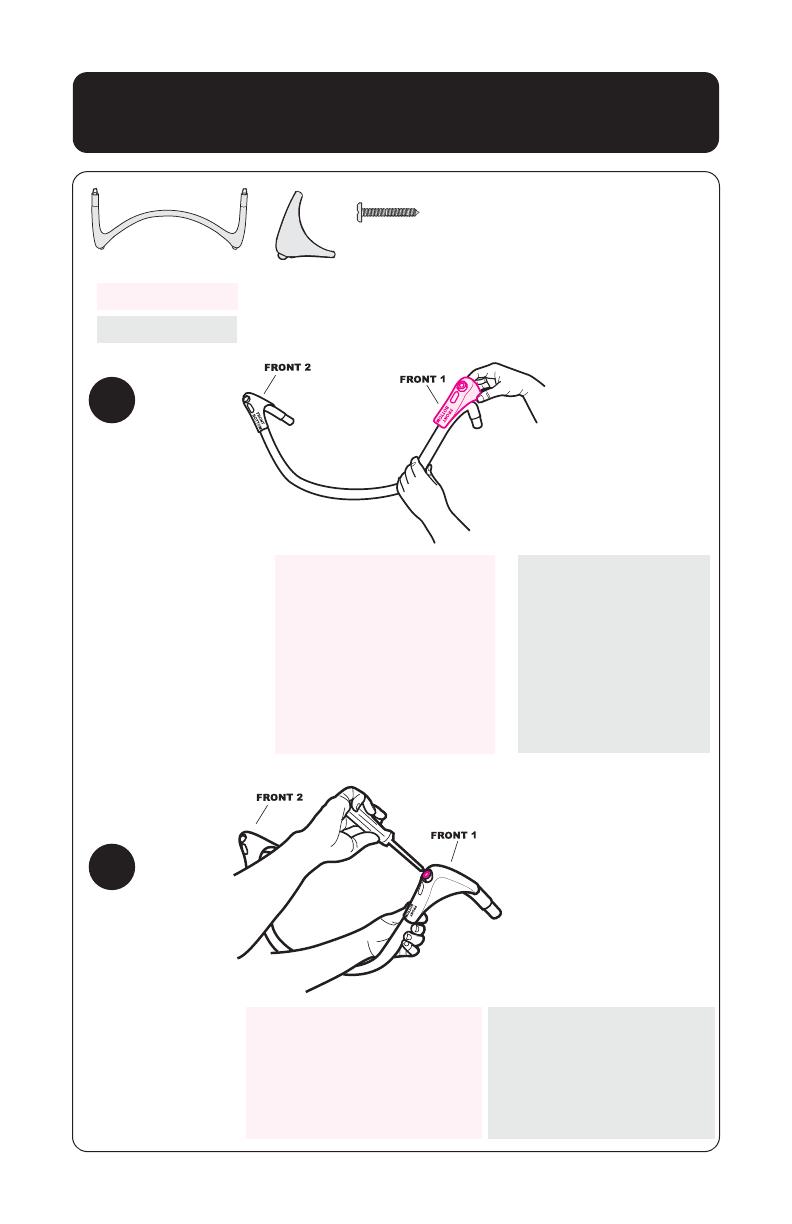
Front leg
Patte avant
Pata delantero
18
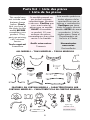
13
14
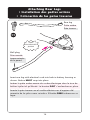
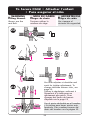
Front tube • Tube avant
• Tubo delantero
Front tube
Tubo delantero
Tube avant
2X
2X
Place feet with the
text “FRONT
BOTTOM” onto the
front tube as shown.
The text “FRONT
BOTTOM” should
face floor.
Installer les pieds
portant l'inscription «
FRONT BOTTOM » sur
le tube avant, tel
qu’illustré. Le texte «
FRONT BOTTOM » doit
être orienté vers le
plancher .
Ponga la pata con el
texto FRONT
BOTTOM (FRENTE
ABAJO) en el tubo
delantero como se
indica. El texto
FRONT BOTTOM
deberá mirar al piso.
Secure front foot
with screw.
Repeat on other
side.
Fixer le pied avant avec
une vis. Répéter cette
opération de l’autre côté.
Asegure la pata
delantera con un
tornillo. Repita el
procedimiento del otro
lado.
EK
EL
19
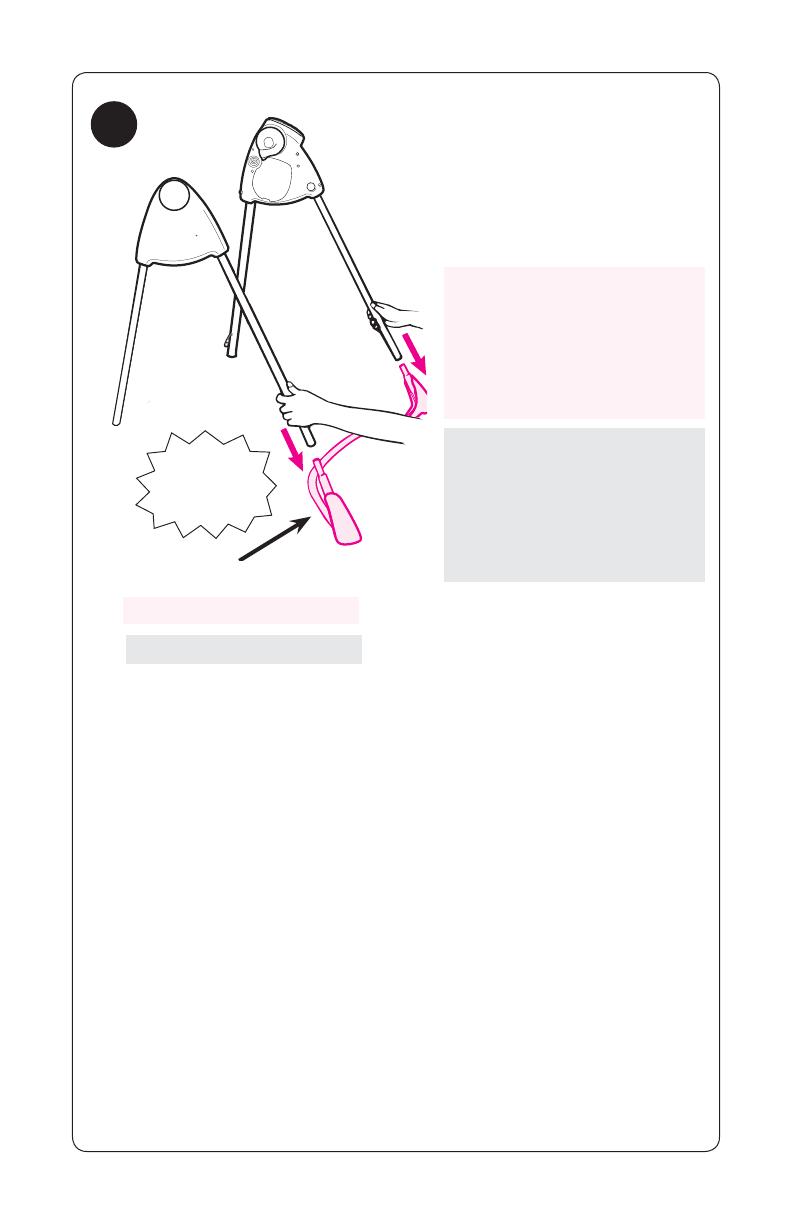
CHECK that all tubes are
securely attached.
CHECK that the parts of
the frame are assembled
in the positions shown.
VERIFIQUE que todos los
tubos estén instalados
apretadamente.
VERIFIQUE que las piezas
del armazón estén armadas
en las posiciones indicadas.
S’ASSURER que tous les
tubes sont bien fixés.
S’ASSURER que toutes les
pièces de l’armature sont
bien montées dans les
positions illustrées.
Front base tube
Tube de la base avant
SNAP!
ENCLENCHEZ!
¡RUIDO!
Tubo de la base delantera
EM
Page is loading ...
Page is loading ...
Page is loading ...
Page is loading ...
Page is loading ...
Page is loading ...

26
For Safe Battery Use
Keep the batteries out of children’s reach.
Any battery may leak battery acid if mixed with a different battery
type, if inserted incorrectly (put in backwards) or if all batteries are
not replaced or recharged at the same time. Do not mix old and
new batteries. Do not mix alkaline, standard (carbon-zinc) or
rechargeable (nickel-cadmium) batteries.
Any battery may leak battery acid or explode if disposed of in fire
or an attempt is made to charge a battery not intended to be
recharged. Never recharge a cell of one type in a recharger made
for a cell of another type.
Discard leaky batteries immediately. Leaky batteries can cause skin
burns or other personal injury. When discarding batteries, be sure to
dispose of them in the proper manner, according to your state and
local regulations.
Always remove batteries if the product is not going to be used for a
month or more. Batteries left in the unit may leak and cause damage.
Recommended type batteries—alkaline disposables, size
D (LR20-1.5V). NEVER mix battery types. Change batteries when
product ceases to operate satisfactorily.

27
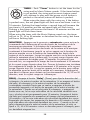
WARNING Changes or modifications to this unit not expressly
approved by the party responsible for compliance could void the user
authority to operate the equipment.
NOTE: This equipment has been tested and found to comply with
the limits for a Class B digital device, pursuant to Part 15 of the
FCC Rules. These limits are designed to provide reasonable
protection against harmful interference in a residential installation.
This equipment generates, uses and can radiate radio frequency
energy and, if not installed and used in accordance with the
instructions, may cause harmful interference to radio
communications.
However, there is no guarantee that interference will not occur
in a particular installation. If this equipment does cause harmful
interference to radio or television reception, which can be
determined by turning the equipment off and on, the user is
encouraged to try to correct the interference by one or more of
the following measures:
• Reorient or relocate the receiving antenna.
• Increase the separation between the equipment and receiver.
• Connect the equipment into an outlet on a circuit different from
that to which the receiver is needed.
• Consult the dealer or an experienced radio/TV technician for help.
Page is loading ...
Page is loading ...
Page is loading ...
Page is loading ...

32
GN
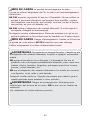
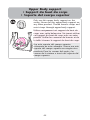
WARNING Product does not recharge batteries. When AC
adapter is in use, batteries will automatically shut off.
DO NOT place product near water and moisture. Do not use the
product near possible wet areas, such as a bathtub, shower, wash
basin, sink, laundry tub, swimming pool, wet basement, etc.
DO NOT use the AC adaptor if it has been exposed to liquids, has
been dropped, or is damaged.
Protect the power cord. Place it so it is not walked on or pinched by
furniture or other items.
WARNING Strangulation Hazard: Keep this cord out of the
reach of children. DO NOT use with an extension cord.
Use only power cord provided.
To Use Wall Plug
• Utilisation de la prise murale
• Cómo usar un tomacorriente de la pared
Page is loading ...

34
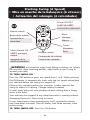
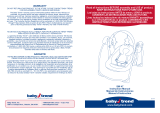
Starting Swing (6 Speed)
• Mise en marche de la balançoire (6 vitesses)
• Activación del columpio (6 velocidades)
GE
WARNING avoid serious injury from falling or sliding out. Always
use seat belt. After fastening buckles, adjust belts to get a snug fit
around your child.
TO TURN SWING ON:
Press On /Off button or press any speed from 1 to 6. When pressing
On/Off button, it automatically starts with the last speed setting that
was selected before the swing was turned off.
Observe the swinging motion for a minute. It takes time for the
swing to adjust to a setting. Change setting if needed.
A small, quiet baby will swing higher on each setting than a larger,
more active baby.
Your seat may be stopped at any time the motor is running without
damaging the motor. Push swing to restart.
If your swing motor stops operating by itself, a protective device
may have been activated. Turn off motor, wait three minutes, then
restart swing.
TO TURN SWING OFF: Press On /Off button.
1
4
3
2
5
6
Power ON/OFF
MARCHE/ARRÊT
ENCENDIDO/APAGADO
Nature sounds
Bruits de la nature
Sonidos de la
naturaleza
Music/Nature Off
ARRÊT musique/
nature
Apagado de la
música/naturaleza
Volume control
Commande de volume
Control del volumen
Music
Musique
Música
Timer
Minuterie
Reloj
Page is loading ...
Page is loading ...

37
NATURE SOUNDS— Push “Nature” button to turn
on nature sound selection. Each press will change to
the next nature sound. After the 5th sound is selected,
it will return to the first track.
SONIDOS DE LA NATURALEZA— Empuje el botón
“naturaleza” (Nature) para activar la selección de
sonidos de la naturaleza. Cada vez que lo oprime
pasará al sonido siguiente de la naturaleza. Después
de seleccionar el 5to. sonido, volverá a la primera
pista.
BRUITS DE LA NATURE— Appuyer sur le poussoir
« Nature » pour activer les bruits de la nature. À
chaque pression sur le bouton, on entend le bruit
de la nature suivant. Après la sélection du 5e bruit,
on revient à la première piste.
VOLUME— Press the plus (+) to raise the volume
and the minus (-) to lower the volume. There are 5
volume settings.
VOLUMEN— Oprima el signo más (+) para
aumentar el volumen y el signo menos (-) para
bajar el volumen. El volumen tiene 5 valores.
VOLUME— Le signe « plus » (+) augmente le
volume et le signe « moins » (-) abaisse le volume. Il
existe 5 niveaux de volume.
MUSIC/NATURE OFF - Press button to turn OFF.
ARRÊT MUSIQUE/BRUITS DE LA NATURE -
Appuyer sur ce bouton pour éteindre.
APAGADO DE LA MÚSICA/NATURALEZA - Oprima
el botón para APAGARLA.
Page is loading ...
39
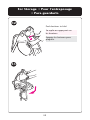
For Storage • Pour l’entreposage
• Para guardarlo
GF
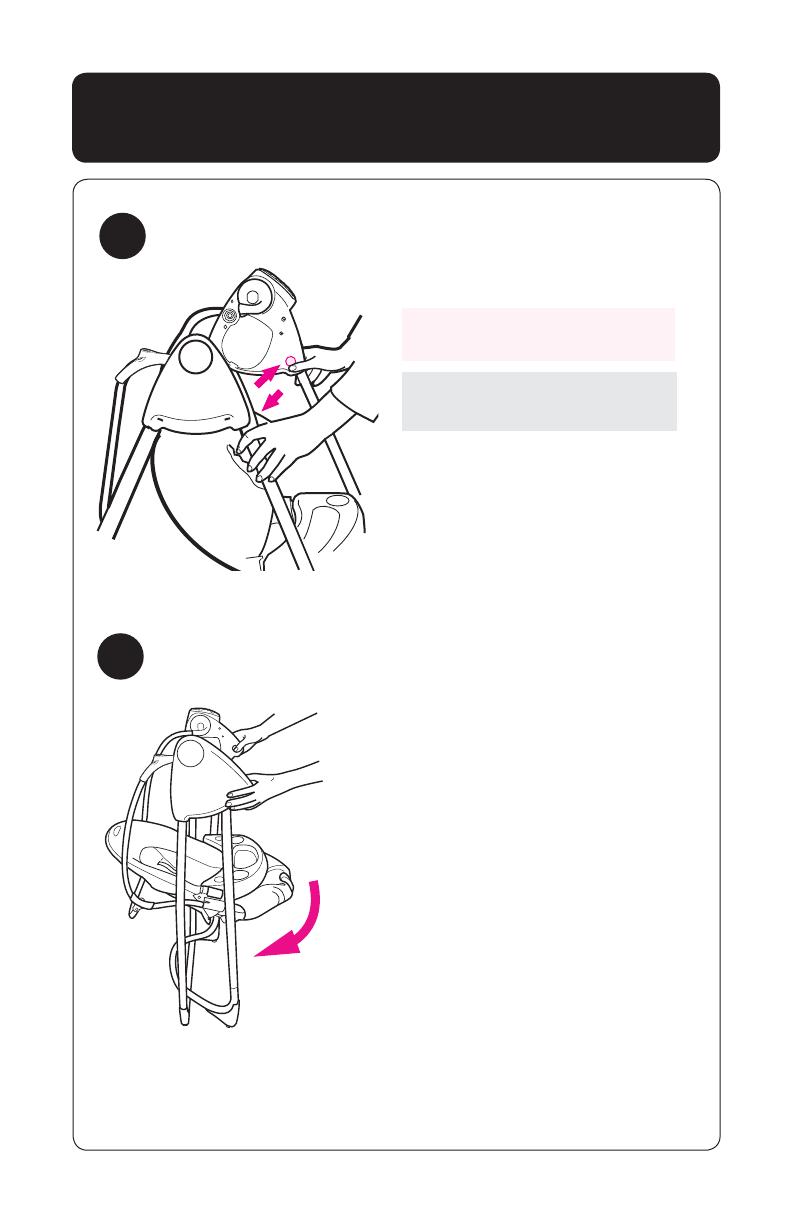
Empuje los botones para
plegarlo.
Push buttons to fold.
Se replie en appuyant sur
les boutons.
GG
40
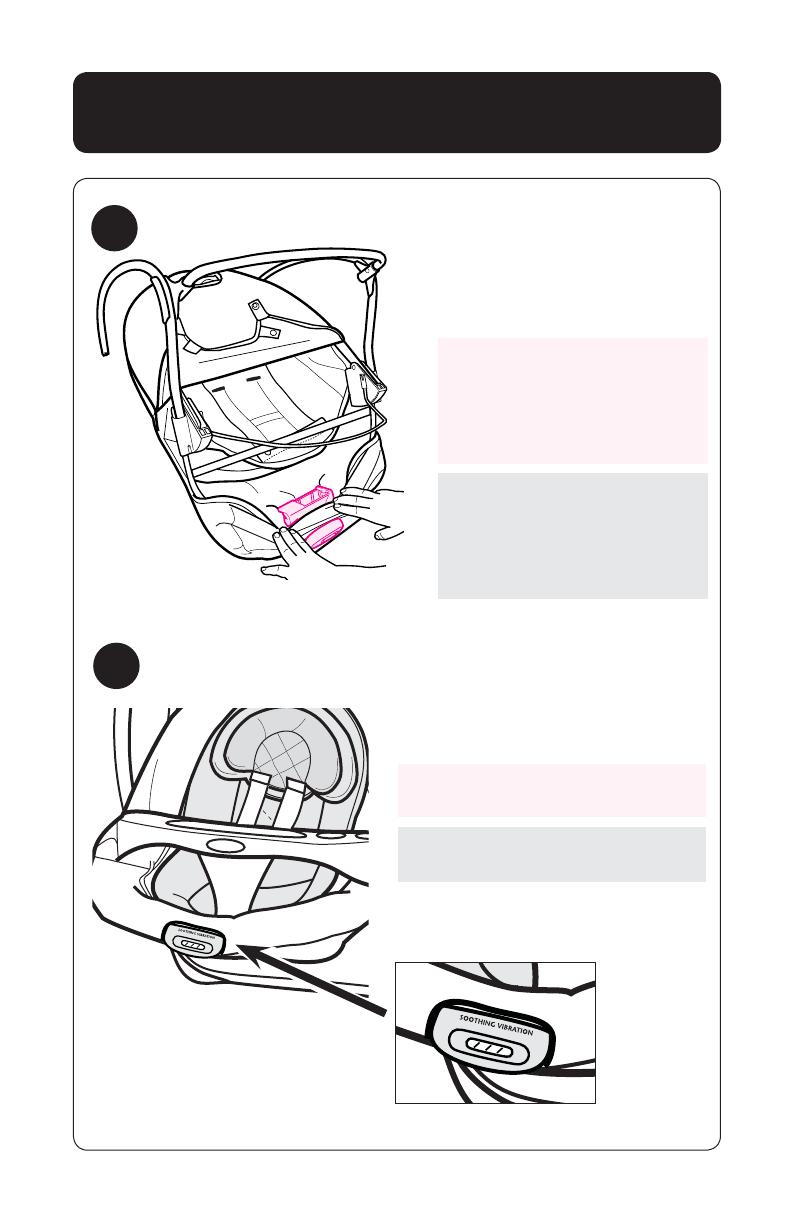
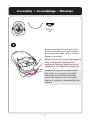
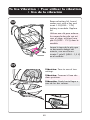
Remove battery lid, found
under seat, with a key and
insert 1-D (LR20 - 1.5V)
battery in module. Replace
lid.
Utilisez une clé pour enlever
le couvercle des pile qui est
sous el siège, et placer une
pile D (LR20 - 1.5 V) dans le
module.
Saque la tapa de la pila que
se encuentra debajo del
asiento, con una llave e
inserte 1 pila D (LR20 - 1,5 V)
en el módulo.
To Use Vibration • Pour utiliser la vibration
• Uso de la vibración
GI
Vibration: Turn to one of two
settings.
Vibration: Tournez à l'une des
deux positions.
Vibración: Gírelo hasta llegar a
uno de los dos valores.
GH
Page is loading ...
Page is loading ...
Page is loading ...
Page is loading ...
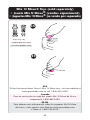
45
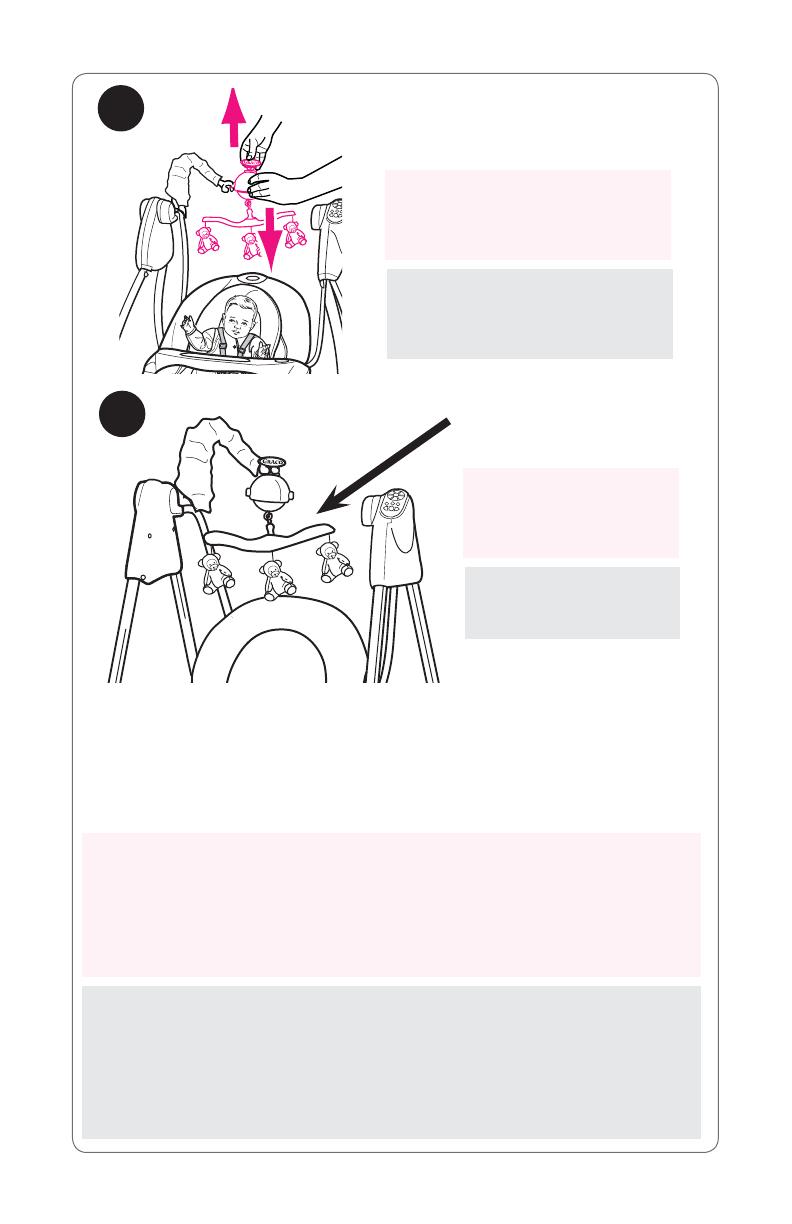
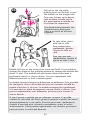
Mobile will spin as the swing rocks back and forth. It is possible to
change the speed of the spinning mobile by turning the mobile ball
about ¼ turn. The mobile will spin fastest when the mount is
positioned exactly as shown above. You can experiment with
different positions to find a desired speed.
El móvil girará a medida que el columpio se mece. Es posible
cambiar la velocidad del móvil giratorio girando la pelota del móvil
aproximadamente ¼ de vuelta. El móvil girará más rápidamente
cuando el montaje está colocado exactamente como se indica
anteriormente. Usted puede experimentar con distintas posiciones
para encontrar la velocidad deseada.
Le mobile tournera lorsque la balançoire se balancera. Il est possible
de changer la vitesse du mobile pivotant en tournant la balle du
mobile d’environ ¼ de tour. Le mobile tournera plus rapidement
si le montant est placé exactement comme illustré ci-dessus. Vous
pouvez expérimenter avec différentes positions pour trouver la
vitesse désirée.
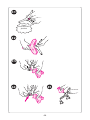
To spin faster, point
axle side to side.
Para que gire más
rápidamente, apunte el
eje de un lado a otro.
Pour tourner plus
rapidement, pointez
l’essieu du côté au
côté.
Pull up on the top while
pulling down on the ball to put
the mobile on the hanger arm.
Tire desde arriba mientras tira
la pelota hacia abajo para
colocar al móvil en el brazo
colgante.
Tirez vers le haut sur le dessus
tout en tirant la balle vers le
bas pour mettre le mobile sur
le crochet de suspension.
HK
HJ

46
Problem Solving
SWING WON’T OPERATE:
1. No batteries in swing.
2. Batteries dead.
3. Speed setting too low.
4. Batteries in backwards — check “+” and “-”.
5. Corrosion on battery terminals. Rotate batteries in place against
terminals, or clean with sandpaper or steel wool if corrosion is
severe.
6. Baby leaning too far forward.
7. Baby grabbing swing legs. (Discontinue use.)
8. Seat not pushed high enough for a good start.
9. Protective device activated. (Turn off motor, wait 3 minutes, then
restart swing.)
SEAT DOESN’T SWING VERY HIGH:
1. Control setting too low.
2. Blanket hanging down, causing increased wind resistance.
3. Batteries too weak.
4. Baby leaning too far forward.
5. Baby too heavy or too active. (Discontinue use.)
6. Soft carpet (swings higher on hard floors).
Page is loading ...
Page is loading ...
Page is loading ...

50
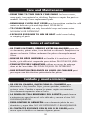
Care and Maintenance
• FROM TIME TO TIME CHECK YOUR SWING for loose screws,
worn parts, torn material or stitching. Replace or repair the parts as
needed. Use only Graco replacement parts.
• REMOVABLE CLOTH SEAT COVER may be machine washed in cold
water on delicate cycle and drip-dried. NO BLEACH.
• TO CLEAN FRAME, use only household soap and warm water.
NO BLEACH OR DETERGENT.
• EXCESSIVE EXPOSURE TO SUN OR HEAT could cause fading
or warping of parts.
Soins et entretien
• DE TEMPS EN TEMPS, VÉRIFIEZ VOTRE BALANÇOIRE pour des
vis desserrées, pièces usées, tissu déchiré ou décousu. Remplacez ou
réparez au besoin. Utilisez seulement les pièces de remplacement
Graco.
• HOUSSE DE SIÈGE AMOVIBLE est lavable à la machine à l'eau
froide, cycle délicat et suspendre pour sécher. PAS D’EAU DE JAVEL.
• POUR NETTOYER L’ARMATURE: utilisez un savon de ménage
doux et de l’eau tiède. PAS D’EAU DE JAVEL OU DÉTERGENT.
• UNE EXPOSITION PROLONGÉE AU SOLEIL OU CHALEUR peut
provoquer une décoloration prématurée des pièces.
Cuidado y mantenimiento
• DE VEZ EN CUANDO, INSPECCIONE EL COLUMPIO para
determinar si hay tornillos flojos, piezas gastadas, material o
costuras rotas. Cambie o repare las piezas según sea necesario.
Use solamente repuestos marca Graco.
• LA FUNDA DE TELA REMOVIBLE DEL ASIENTO puede lavarse
a máquina en agua fria en el ciclo delicado y secarse al aire. NO
USE BLANQUEADOR.
• PARA LIMPIAR EL ARMAZÓN: usar solamente jabón de uso
doméstico y agua tibia. NO USE DETERGENTE O BLANQUEADOR.
• EL CONTACTO EXCESIVO CON EL SOL O EL CALOR podría
causar que se destiña o se tuerzan algunas piezas.
Notes • Notas
51
Page is loading ...
-
 1
1
-
 2
2
-
 3
3
-
 4
4
-
 5
5
-
 6
6
-
 7
7
-
 8
8
-
 9
9
-
 10
10
-
 11
11
-
 12
12
-
 13
13
-
 14
14
-
 15
15
-
 16
16
-
 17
17
-
 18
18
-
 19
19
-
 20
20
-
 21
21
-
 22
22
-
 23
23
-
 24
24
-
 25
25
-
 26
26
-
 27
27
-
 28
28
-
 29
29
-
 30
30
-
 31
31
-
 32
32
-
 33
33
-
 34
34
-
 35
35
-
 36
36
-
 37
37
-
 38
38
-
 39
39
-
 40
40
-
 41
41
-
 42
42
-
 43
43
-
 44
44
-
 45
45
-
 46
46
-
 47
47
-
 48
48
-
 49
49
-
 50
50
-
 51
51
-
 52
52


Ask a question and I''ll find the answer in the document
Finding information in a document is now easier with AI
in other languages
- français: Graco PD162160B Manuel utilisateur
- español: Graco PD162160B Manual de usuario
Related papers
Other documents
-
Century 1470 User manual
-
-
Mattel P0097 User manual
-
 Babyhug Splendour Swing User manual
-
Chicco Polly Swing Up Owner's manual
-
-
-
 Kolcraft G03S 9/08 User manual
-
Swing-N-Slide Playsets NE 5027 Operating instructions
-
 BABYTREND SW 47 Owner's manual


