gohastings.com EC-80 User manual
- Category
- Sanitary ware
- Type
- User manual

INSTALLATION AND OPERATION
MANUAL
Evaporative Coolers
EC-40, -80, -120, -160, -220, -300, -400,
-500, -600, and -750
N O T I C E
Read These Instructions Before Installation
Upon arrival, inspect the unit for shipping damage and
completeness. If any part is missing or damaged, notify
the carrier immediately. Always refer to the unit’s serial
and model numbers located on the specification plate
when making an inquiry regarding maintenance and
parts. To insure unit integrity, use only Factory
Authorized Replacement Parts.
ISEC-1
July 1997

CONTENTS
Precautions .………………………………………………………………………..................... Page 2
Specifications ………………………………………………………………………................... Page 3
Unit Installation …………………………………………………………………………………..
1. Evaporative Cooler ……………………………………………………...................... Page 3
2. Wiring …………………………………………………………………………………... Page 3
3. Water connections ……………………………………………………………………. Page 4
Operation
1. Standard Unit ………………………………………………………………………….. Page 4
2. Unit with automatic Drain Kit …………………………………………….................. Page 5
3. Unit with Automatic Drain Kit and Freeze Protection ……………………………… Page 5
Service and Parts ………………………………………………………….................. Pages 6 and 7
Trouble Shooting ………………………………………………………………………………... Page 8
PRECAUTIONS
1. Read these instructions before installation and operation; save for future reference. This
manual contains necessary information for safe operation and maintenance of the unit.
2. Shut off main power and lock it in the off position when making repairs or replacements of
components.
3. Use extreme caution when making voltage tests with “live” circuits – follow the
established safety procedures.
4. Electrical repairs should be performed by trained, qualified personnel only. (Failure to
follow safe electrical procedures can result in series injury – or death.)
5. Do not attempt to operate unit by jumping, or otherwise bypassing, any circuit.
6. Keep evaporator reservoir clean. Do not allow fine sediments or scale to accumulate in
reservoir, on filter media, or on other components.
7. Do not exceed water pressures recommended in this manual.
WARNING
This equipment was designed and manufactured with safe operation as
a priority. However, the very nature of any equipment having water and
electrical connections presents hazards to personnel which cannot be
completely safeguarded against.
- 2 -

SPECIFICATIONS
Model (EC) 40 80 120 160 220 300 400 500 600 750
Dry Weight 110 176 225 271 310 373 634 726 845 1067
Operation Weight** 335 560 650 825 880 1135 1680 1930 2085 2635
Pump Cap/GPH req.* 270 360 540 720 720 810 540+ 630+ 630+ 630+
Cap/GPH @ Lift* 387 1135 1135 1135 1135 1100 1080 1080 1060 1060
Pump Lift/ft. 3 4 4 4 4 5 6 6 7 7
* These figures do not include the 3 to 6 percent bleed-off rate required to reduce scaling for standard unit.
**Unit in operation, media fully saturated.
+ Per pump
EC = Evaporative cooler
WATER CONNECTIONS ALL UNITS
1-1/2 FPT Overflow ¾ FPT Drain
½ MPT Bleed-off ½ FPT Float Valve
ELECTRICAL SPECIFICATION
Model (EC) 40 80 120 160 220 300 400 500 600 750
Pump Motor Model CP 1000 5 MSP (2) 5 MSP
HP 1/50 1/6 1/6
Amperage 1.1 A 5.0 A 5.0 A
Voltage 115 V
EC = Evaporative Cooler
APPROXIMATE BLEED-OFF FLOW RATE
Model EC-40 -80 EC-120 -160 EC-220 -300 EC-400 -750
Per Minute ½ to 1 qt. 1 to 2 qt. 2 to 3 qt. 2 (2-3 qt.)
CONSTRUCTION AND MEDIA SPECIFICATION
Celdek Glasdek
Maximum Water Temperature 130ºF 165ºF
Maximum Air Temperature 300ºF 300ºF
pH Range 6-9 6-9
Cabinet Aluminized Steel and Painted
Evaporator Reservoir Stainless Steel and Painted
INSTALLATION INSTRUCTIONS
1. When installing the evaporative cooler, special consideration should be given to the physical positioning of
the unit, electrical power supply, the proper water supply, and the structural members to support the
cooler at the operating weights. It is recommended that supports be placed within every four feet to
distribute the weight evenly. Be sure the supports are level.
2. After the unit is properly located, electrical connection may be made. If the Evaporative Cooler has been
purchased separately, wiring from a 115 volt supply may be connected to the junction box supplied with
the unit. Refer to the wiring schematic supplied in owner’s packet or, pages 4 and 5 of typical wiring
schematics, and to drawings for standard unit, units with automatic drain kit, or units with automatic drain
kit and freeze protection.
When the evaporator cooler is purchased with a system exhaust blower and filter, most connections
may have been made already. Refer to schematic with owner’s packets for any additional wiring to be
done.
-3 -

115 VOLT
1 PHASE
1 1/2 NPT
3/4 NPT
UNIT SUPPORT
BY OTHERS
MANUAL DRAIN VALVE
BY OTHERS
ROOF LINE
TO DRAIN BY OTHERS
WATER VALVE BY OTHERS
FRESH WATER
SUPPLY
WATER
LEVEL
RESERVOIR
BLEED OFF
VALVE
FLOAT VALVE
1/2 NPT
OVER FLOW
OF
DR
DV
WV
WP
FV
TO NEUTRAL
PUMP MOTOR
CONTROL RELAY
GRN
WHT
PUMP MOTOR
RED
RED
PUMP MOTOR
CONTROL RELAY
CONTACTS
TO CONTROL CONTACTS
BLU
FL
- 4 -
NEEDS LEGEND
__ __ __ __ __ Field Wired
____________ Factory Wired
__ _______ __ Field Piping
the electrical wiring with all applicable local, state, or provincial and national ordinances and codes.
Water connections (refer to "Specifications') should, and must follow, local codes and ordinances. Connections are provided
on each unit with standard pipe thread sizes. Refer to pages 4 and 5 for your system. For units with automatic drain kit and
freeze protection, the minimum pressure should be 10 PSI so valves will operate properly; for other models, 10 PSI or less.
Set the float valve (FV) to allow fresh water to enter reservoir to a depth of 2 1/2" for models EC-40 through EC-750. By
loosening the thumb screw, located on the float valve assembly, and setting the float until the valve shut off is at the de-
signed depth, no other adjustment needs to be made. Do not forget to tighten the thumb screw securely.
You may now start your unit. Watch for the first few times that the media gets completely saturated and that all phases of
operations (See "Operations") are working properly. If necessary adjust the pump discharge gate valve to avoid dry areas
on the media. Water should be visible trickling down the flutes of the media. Watch also for excess foaming (See
"Trouble Shooting") of the water and media.
After a day of operation you will notice the water to be a shade of green. The media is the cause, and the reservoir
should be drained and refilled a couple of times to correct this.
Now proceed to the "Operation" part of this manual and read about the unit that you have purchased.
3.
4.
5.
6.
CAUTION:
must comply
OPERATION
Refer to the schematic piping and wiring while going through start-up procedure for the particular system you have purchased.
STANDARD UNIT START UP PROCEDURE
1.
2.
3.
4.
5.
6.
OPEN MANUAL SHUT OFF VALVE (WV).
MANUAL DRAIN VALVE (DV) IS CLOSED.
FLOAT VALVE (FV) ALLOWS FRESH WATER TO ENTER
RESERVOIR.
WATER PUMP (WP) WILL START AS SOON AS FLOAT
SWITCH (FL) CLOSES. iF WATER IS TOO LOW PUMP
WON'T RUN. WATER PUMP (WP) SHOULD BE WIRED SO
THAT PUMP CANNOT RUN WITHOUT BLOWER MOTOR IN
OPERATION.
BLEED OFF (BO) TO PREVENT SCALE FORMATION. A
BLEED-OFF AT THE RATE OF 3-6% IS REQUIRED. THE
EXACT AMOUNT WILL DEPEND ON THE pH AND
HARDNESS OF THE WATER, AND THE INTENSITY OF
EVAPORATION.
UNIT CAN BE USED WITH BLOWER ON, AND
EVAPORATIVE COOLER PUMP OFF.

__ __ __ __ __ Field Wired
____________ Factory Wired
__ _______ __ Field Piping
__ __ __ __ __ Field Wired
____________ Factory Wired
__ _______ __ Field Piping
NEEDS LEGEND
NEEDS LEGEND
RESERVOIR
WATER
LEVEL
NP
TIMER
FREEZE
STAT
1/2 NPT
FLOAT
VALVE
FV
1 1/2 NPT
OVER
FLOW
115 VOLT
1 PHASE
3/4 NPT
UNIT SUPPORT
BY OTHERS
ROOF LINE
SOLENOID DUMP
VALVE N.O.
COLD WATER
SUPPLY
B TV
DR
OF
DV
SOLENOID 3 WAY VALVE, A N.C., C N.O.
TO BLDG.
DRAIN BY OTHERS
FL
WATER VALVE
BY OTHERS
WV A
TO NEUTRAL
DV
WHT
YEL
FZ
RED
TM1
GRN
WHT
WHT
PUMP MOTOR
CONTROL RELAY
RED
PUMP MOTOR
BLU
PUMP MOTOR
CONTROL RELAY
CONTACTS
RED
FL
BLK
TO CONTROL
CONTACTS
TO 115 VOLT
SUPPLY
BLK
TIMER MOTOR
TERMINALS IN EVAPORATIVE
COOLER.
BLK
TM
WP
RESERVOIR
WATER
LEVEL
FL
WP
TIMER
1 1/2 NPT
FLOAT
VALVE
FV
1 1/2 NPT
OVER
FLOW
115 VOLT
1 PHASE
3/4 NPT
UNIT SUPPORT
BY OTHERS
DR
OF
SOLENOID DUMP
VALVE N.O.
WATER VALVE BY OTHERS
TO DRAIN BY OTHERS
ROOF LINE
WV
COLD WATER SUPPLY
MANUAL SHUT
OFF VALVE WITH
DRAIN PLUG
WATER CONSERVATION
SOLENOID VALVE - N.C.
SV
DV
FILL VALVE
TO NEUTRAL
DV
TM
TO CONTROL
CONTACTS
TO 115 VOLT
SUPPLY
BLK
TM1
YEL
TERMINALS IN EVAPORATIVE
COOLER
BLK
TIMER MOTOR
PUMP MOTOR
CONTROL RELAY
CONTACTS
FL
RED
RED
PUMP MOTOR
CONTROL RELAY
WHT
WHT
GRN
WHT
BLU
WP
TM
BLK
PUMP MOTOR
- 5 -
SOLENOID & TIMED DRAIN VALVE WITH FREEZE
PROTECTION START UP PROCEDURE
1.
2.
3.
4.
5.
6.
OPEN MANUAL SHUT OFF ALVE (WV).
WHEN EVAPORATIVE COOLER IS ACTIVATED IT CLOSES DUMP
VALVE (DV). 3 WAY VALVE (TV) OPENS AND ALLOWS FRESH
WATER TO FLOAT VALVE. WATER PUMP (WP) WILL START AS
SOON AS FLOAT SWITCH (FL) CLOSES. WATER PUMP (WP)
SHOULD BE WIRED SO THAT PUMP CANNOT RUN WITHOUT
BLOWER MOTOR IN OPERATION.
FLOAT VALVE (FV) ALLOWS FRESH WATER TO ENTER
RESERVOIR.
TIMER (TM) BREAKS CIRCUIT TO DUMP VALVE (DV) N.O. FOR
DAILY SEDIMENT REMOVAL. 3 WAY VALVE (TV) WILL NOT
ALLOW SUPPLY SUPPLY WATER TO FLOAT VALVE (FV) DURING
CYCLE. TIMER IS SET FOR 1 1/2 HOUR MINIMUM FOR DRAINING
RESERVOIR.
FREEZE STAT (FZ) PROVIDES FREEZE PROTECTION BY
AUTOMATICALLY DRAINING RESERVOIR THRU DUMP VALVE
(DV), AND DRAINING COLD WATER SUPPLY FROM FLOAT VALVE
(FV) THRU N.O. PARTS OF 3 WAY VALVE (TV).
UNIT CAN BE USED WITH BLOWER ON AND EVAPORATIVE
COOLER PUMP OFF.
OPEN MANUAL SHUT OFF VALVE (WV).
WHEN EVAPORATIVE COOLER IS ACTIVATED IT OPENS WATER
CONSERVATION SOLENOID VALVE (SV), CLOSES N.O. DUMP
VALVE (DV). WATER PUMP (WP) WILL START AS SOON AS FLOAT
SWITCH (FL) CLOSES. WATER PUMP (WP) SHOULD BE WIRED SO
THAT PUMP CANNOT RUN WITHOUT BLOWER MOTOR IN
OPERATION.
FLOAT VALVE (FV) ALLOWS FRESH WATER TO ENTER
RESERVOIR.
TIMER (TM) BREAKS CIRCUIT TO DUMP VALVE (DV) N.O. FOR
DAILY SEDIMENT REMOVAL. WATER CONSERVATION SOLENOID
VALVE (SV) N.C. WLL NOT ALLOW SUPPLY WATER TO FLOAT
VALVE (FV) DURING CYCLE. TIMER IS SET FOR 1 1/2 HOURS
MINIMUM FOR DRAINING RESERVOIR.
UNIT CAN BE USED WITH BLOWER ON AND EVAPORATIVE
COOLER PUMP OFF.
1.
2.
3.
4.
5.
SOLENOID & TIMED DRAIN VALVE KIT
START UP PROCEDURE
TV
TM
FS

Cover Pipe
PVC Distribution Pipe
Distribution Pad
45 Flute
15 Flute
Air Flow
Red Dot Indicates
Position in Unit
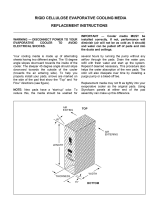
SERVICE AND PARTS
Evaporative cooler media may be removed from the rear for cleaning or replacement, as required, by
removing the upper rear panel. Use only standard garden hose variety, with minimal water pressure, to avoid
damaging the filter media when cleaning. It would be advisable to replace evaporative cooler media every
five years on units that are subject to contaminated atmospheres, or where water has a high mineral content.
Installation of evaporative media requires the 45 deg. angle flutes to slope down toward the air
entering the pad. Use care in handling the pad to avoid damage.
MEDIA INSTALLATION DETAIL
- 6 -

1 1/4 PLASTIC PLUG 76-24-0018-11
UNIT SIDE PLATE
1 1/4 FEMALE ADAPTOR 76-24-0017-18
STANDARD
BLEED OFF KIT
94-1000-13
(OTHER OPTIONS
AVAILABLE)
SIDE PLATE
1/2 CONDUIT NUT
78-14-0051-15
3/4 PLASTIC PLUG
76-24-0019-14
FOR DRAIN
3/4 CLEAR PLASTIC TUBING
FLOAT VALVE DETAIL
FLOAT BALL 76-24-0003-17
STEM 76-24-0002-14
1/2 FLOAT VALVE 76-24-0001-11
1" PIPE PVC 76-18-5001-15
1" TEE PVC 76-24-0007-19
1" PIPE PVC 76-18-5001-15
1" COUPLING PVC 76-24-0008-12
1" TO 1/2" REDUCER BUSHING PVC 76-24-0009-15
1/2 NIPPLE (TBE) PVC 76-24-0010-17
1/2 PLASTIC GLOBE VALVE 76-24-0016-15
1/2 MALE ADAPTOR PVC 76-24-0011-10
1/2 PIPE PVC 76-18-5000-12
1/2 90 DEG. ELL PVC 76-24-0012-13
1/2 PIPE PVC 76-18-5000-12
1/2 CONDUIT NUT 78-14-0051-15
1/2 MALE ADAPTOR PVC 76-24-0011-10
1" 90 DEG. ELL PVC 76-24-0013-16
1" PIPE PVC 76-18-5001-15
1" UNION PVC 76-24-0014-19
1" PIPE PVC 76-18-5001-15
1" MALE ADAPTOR PVC 76-24-0015-12
(FIT INTO PUMP 79-31-0001-10)
1" PIPE PVC 76-18-5001-15
1" PVC GATE VALVE 76-24-0045-19
1" PIPE PVC 76-18-5001-15
1" 90 DEG. ELL PVC 76-24-0013-16
1" PIPE PVC 76-18-5001-15
1" PIPE PVC 76-18-5001-15
USED WHEN BLEED OFF KIT
NOT USED
1 1/4 90 DEG. ELL 76-24-0005-13
1 1/4 TO 1 REDUCER BUSHING 76-24-0006-16
1ST HOLE SMALLER DIA THAN THE OTHERS
UNIT HEADER PIPE (HOLES IN TOP)
1 1/4 PVC (POSITION HOLES
CORRECTLY)
"TYPICAL INTERNAL PIPING DIAGRAM"
- 7 -
UNIT SIDE
PLATE

TROUBLE SHOOTING GUIDE
TROUBLE
CHECK-OUT PROCEDURE AND CORRECTION
Green Water………………………..
1. Usually occurs the first few days of operation; media is being rinsed.
Drain reservoir and refill with fresh water. After a couple of
operations, green should disappear. The 3 to 6 percent bleed-off, for
standard units, will maintain your clear water also.
2. If unit has been in service for a while, algae can grow on the media.
It will not cause deterioration or rot, but may clog the passages and
inhibit the air flow. A commercial algaecide will control the growth
when caught in the early stages.
Foaming Occurs…………………..
1. Some foaming is natural if maintained in the reservoir. If foaming of
the medial occurs after a couple of days of operation, a defoamer
should be added. The exact amount will depend on the severity.
After one application, you will be able to judge how much additional
defoamer to use (see instructions on bottle).
Scaling Occurs…………………….
1. Be sure you have a 3 to 6 percent bleed-off rate (See “Bleed Off
Flow Rates.”) for unit size. If the frost-like scale does appear,
increase water flow by adjusting pump discharge gate valve until it
disappears. The exact amount will depend upon the pH and
hardness of the water and the intensity of evaporation. Clean and
flush distribution header on a regular basis.
Water depositing into Transition
and Reservoir Not Draining……..
1. Reservoir float valve (FV) improperly adjusted (See “Installation
Instructions,” note 4.)
2. Float valve bad, not shutting off. Replace.
3. Check overflow and drain valves for blockage. On models with timed
drain valve, check time clock setting or solenoid valve (DV). Replace
if bad.
4. After initial start-up, look for foaming of the media. If the blower is
pulling foam bubbles off the media into transition, a static pressure or
CFM problem is eminent. (Contact your service or unit
representative.)
Reservoir Dry………………………
1. Check the manual shut-off valve. Is it open?
2. Is the float valve opening? If not, then readjust float level or replace
valve.
3. Units with conservation water solenoid should be checked. Replace
if bad.
1. Water pump is running without the blower running.
Water Out the Backside of
Evaporative Cooler………………..
2.
Damaged media. Replace.
3. If these problems, contact your service or unit representatives:
A. Lack of CFM.
B. Improper static pressure.
P.O. Box 669 · Hastings, Nebraska 68902-0669
Phone (402) 463-9821 · Fax (402) 462-8006
www.hastingshvac.com
E-mail: [email protected]
-
 1
1
-
 2
2
-
 3
3
-
 4
4
-
 5
5
-
 6
6
-
 7
7
-
 8
8


gohastings.com EC-80 User manual
- Category
- Sanitary ware
- Type
- User manual
Ask a question and I''ll find the answer in the document
Finding information in a document is now easier with AI
Other documents
-
 Hessaire CP900 Installation guide
-
 Hessaire BRL Operating instructions
-
 Aspen Snow Cool BRL Installation guide
-
 DIAL 3453 Operating instructions
-
sks MSP User manual
-
Reznor ADFH Installation guide
-
Reznor REC Installation guide
-
Reznor RHH Installation guide
-
-


