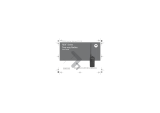
Motorola XT420: This Two-Way Radio comes with 16 channels, a non-removable antenna, and a Lithium-Ion (Li-Ion) battery. You can easily charge the device using the Drop-in Tray Single Unit Charger. It has a push-to-talk button, a channel selector knob, and side buttons that can be configured using Computer Programming Software (CPS). The LED indicator gives information about battery status, power-up status, radio call, and scan status.
Motorola XT420: This Two-Way Radio comes with 16 channels, a non-removable antenna, and a Lithium-Ion (Li-Ion) battery. You can easily charge the device using the Drop-in Tray Single Unit Charger. It has a push-to-talk button, a channel selector knob, and side buttons that can be configured using Computer Programming Software (CPS). The LED indicator gives information about battery status, power-up status, radio call, and scan status.


-
 1
1
-
 2
2
-
 3
3
-
 4
4
-
 5
5
-
 6
6
-
 7
7
-
 8
8
-
 9
9
-
 10
10
-
 11
11
-
 12
12
-
 13
13
-
 14
14
-
 15
15
-
 16
16
-
 17
17
-
 18
18


Motorola XT420: This Two-Way Radio comes with 16 channels, a non-removable antenna, and a Lithium-Ion (Li-Ion) battery. You can easily charge the device using the Drop-in Tray Single Unit Charger. It has a push-to-talk button, a channel selector knob, and side buttons that can be configured using Computer Programming Software (CPS). The LED indicator gives information about battery status, power-up status, radio call, and scan status.
Ask a question and I''ll find the answer in the document
Finding information in a document is now easier with AI