Lenovo 81A4005PUK is a versatile and portable device that offers a range of capabilities to enhance your productivity and entertainment. With its compact size and lightweight design, you can easily take it with you wherever you go. The device features a high-resolution display that delivers stunning visuals for an immersive viewing experience. Whether you're browsing the web, watching videos, or working on creative projects, the display provides sharp and vibrant images.
Lenovo 81A4005PUK is a versatile and portable device that offers a range of capabilities to enhance your productivity and entertainment. With its compact size and lightweight design, you can easily take it with you wherever you go. The device features a high-resolution display that delivers stunning visuals for an immersive viewing experience. Whether you're browsing the web, watching videos, or working on creative projects, the display provides sharp and vibrant images.


-
 1
1
-
 2
2
-
 3
3
-
 4
4
-
 5
5
-
 6
6
-
 7
7
-
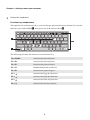 8
8
-
 9
9
-
 10
10
-
 11
11
-
 12
12
-
 13
13
-
 14
14
-
 15
15
-
 16
16
-
 17
17
-
 18
18
-
 19
19
-
 20
20
-
 21
21
-
 22
22
-
 23
23
-
 24
24
-
 25
25
-
 26
26
-
 27
27
-
 28
28
-
 29
29


Lenovo 81A4005PUK is a versatile and portable device that offers a range of capabilities to enhance your productivity and entertainment. With its compact size and lightweight design, you can easily take it with you wherever you go. The device features a high-resolution display that delivers stunning visuals for an immersive viewing experience. Whether you're browsing the web, watching videos, or working on creative projects, the display provides sharp and vibrant images.
Ask a question and I''ll find the answer in the document
Finding information in a document is now easier with AI
Related papers
-
Lenovo 4991011 User guide
-
Lenovo 80TJ000UUK User manual
-
Lenovo Ideapad Y700-15ISK Owner's manual
-
-
-
-
-
Lenovo S210 Owner's manual
-
Lenovo IdeaPad S410p User manual
-