
Thank you for purchasing Samsung product.
To receive more service, please register your
product at
www.samsung.com/register
Model Serial No.
LED TV
Installation manual
Figures and illustrations in this User Manual are provided for reference only and may differ from actual product
Introduction
and lets you limit some user (guest) controls.
Operational Modes
This TV has two modes: Interactive and Stand-alone mode.
y
full control to the SBB or STB.
y
The TV has a Hotel (Hospitality) Menu that lets you easily set its various hospitality functions. Please see pages 22 to 26.
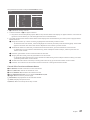
Still image warning
y Avoid displaying the same TV channel for long periods.
y Always try to display a full screen image.
y
y
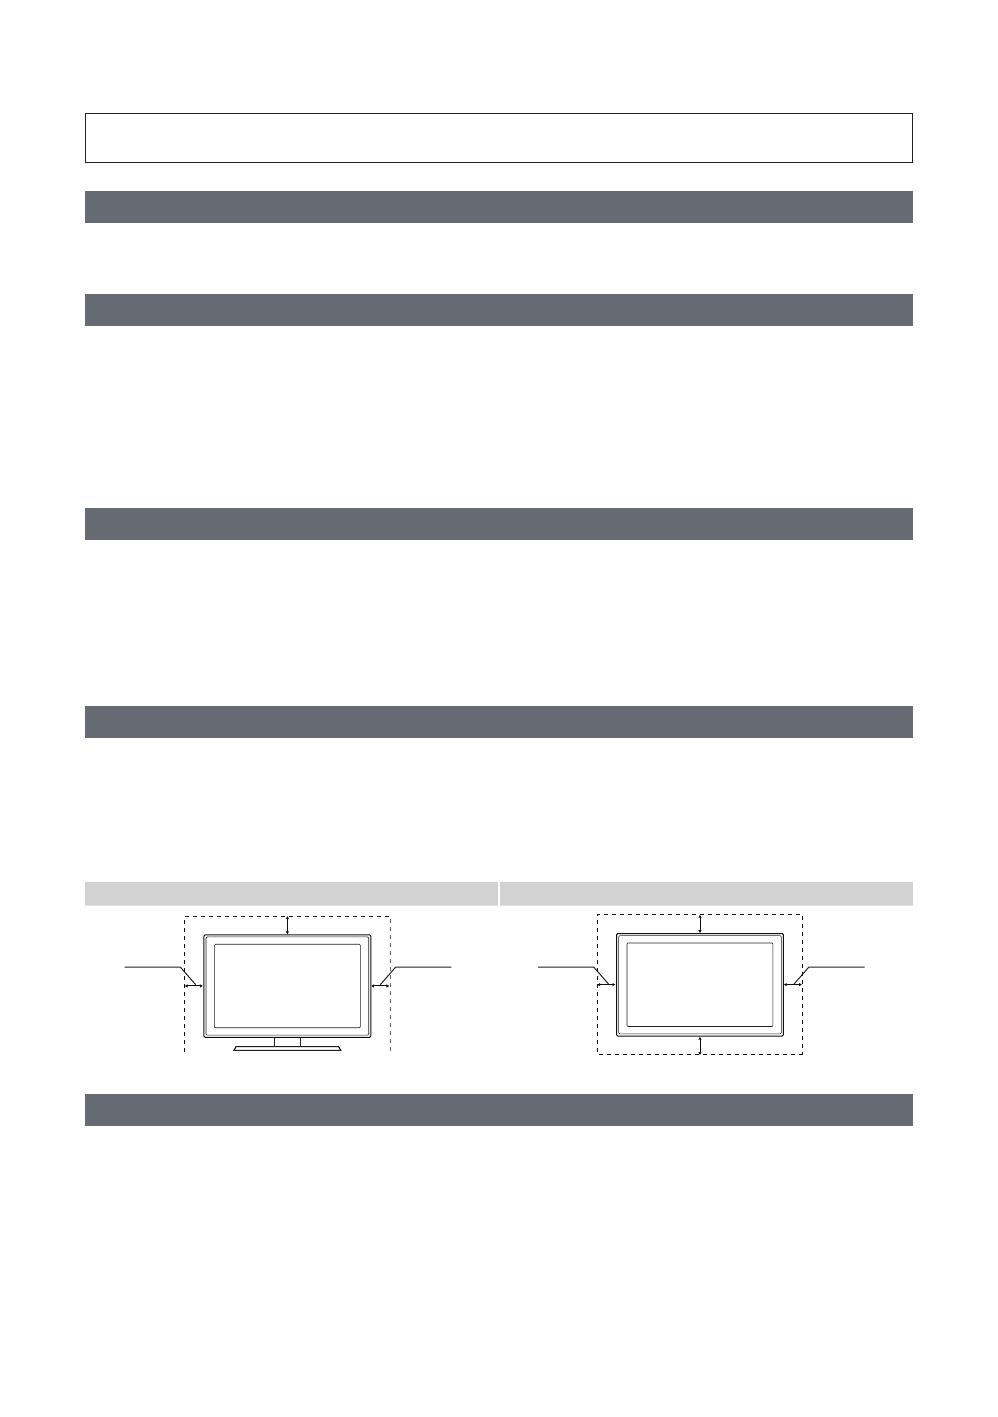
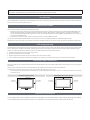
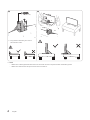
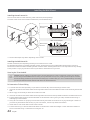
Ensuring Proper Ventilation
ventilation.
✎
–
to serious injury.
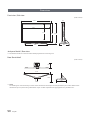
Installation with a stand. Installation with a wall-mount.
Additional Information
✎ The appearance of the TV and its accessories may differ from the illustrations in this manual, depending on the TV.
✎

3
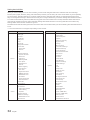
Contents
ENGLISH
English
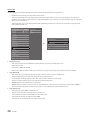
Symbols Used in this Manual
t
TOOLS
Indicates that you can press the
TOOLS
control to use this function.
NOTE One-Touch Button
y Accessories ....................................................................................................................................................................
y Installing the LED TV Stand ....................................................................................................................................... 5
y Using the TV's Controller ............................................................................................................................................ 7
y The Connection Panel .................................................................................................................................................. 8
y The Remote Control ..................................................................................................................................................... 10
y Using the Samsung Smart Control ........................................................................................................................... 12
y Connecting to the Network ........................................................................................................................................ 17
y Connecting the TV to an SBB or STB ......................................................................................................................... 19
y Setting the Hotel Option Data ................................................................................................................................... 21
y ...........................................................................................................................................
y Anti-theft Kensington Lock ........................................................................................................................................
y ................................................................................................................................................................
y Supported Resolutions for UHD Input Signals .......................................................................................................
y Display Resolution .......................................................................................................................................................
y Dimensions .................................................................................................................................................................... 50
y .......................................................... 51
y License ........................................................................................................................................................................... 52
4
English
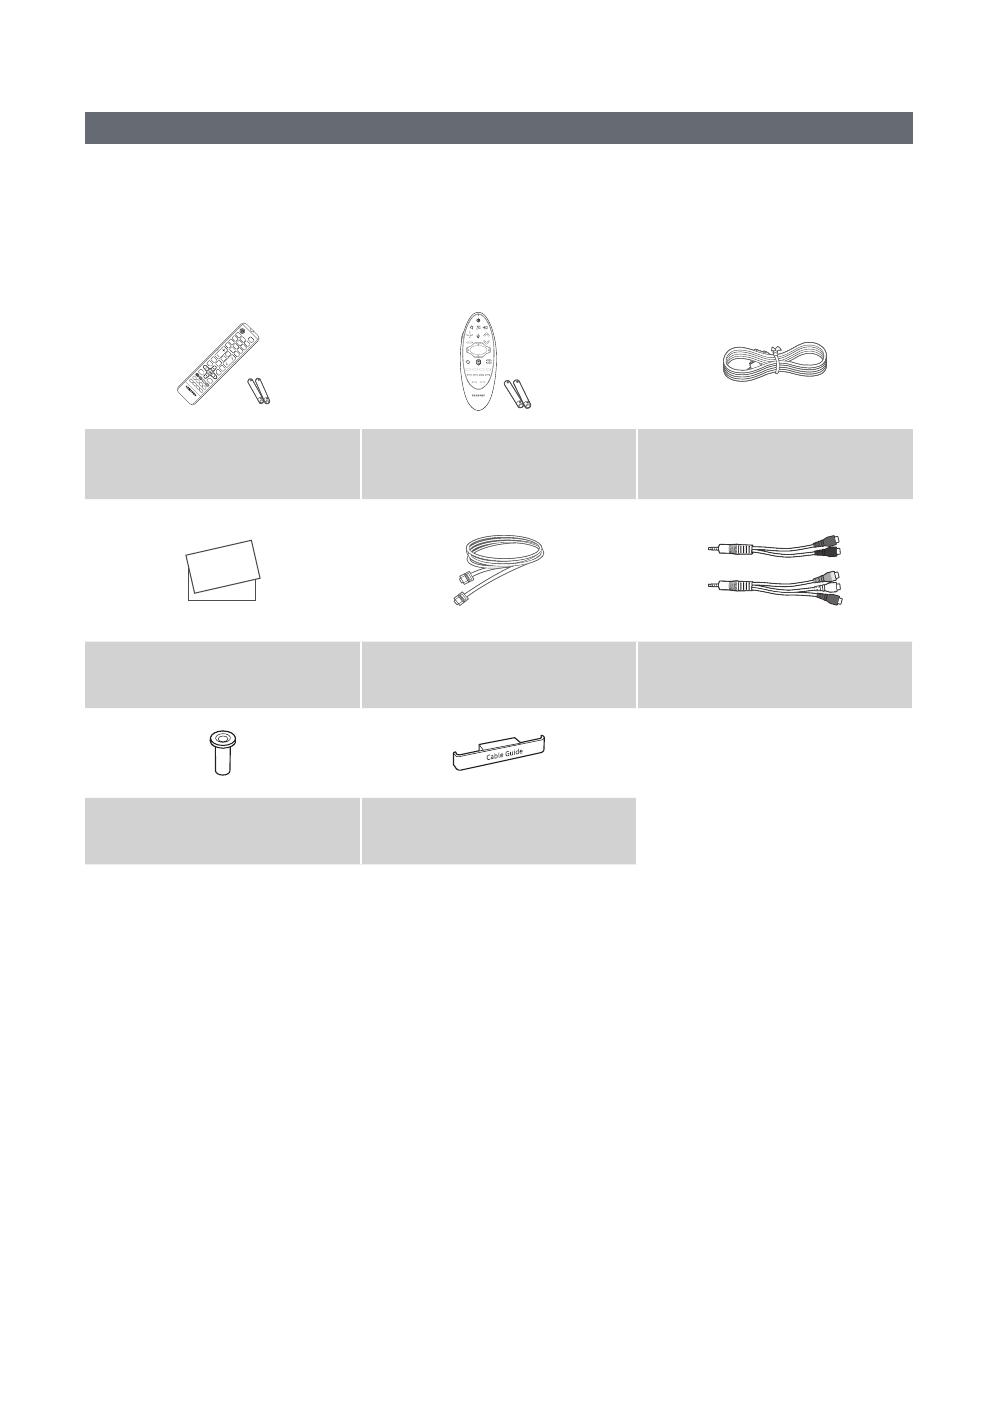
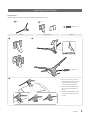
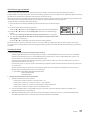
Accessories
✎ Please make sure the following items are included with your LED TV. If any items are missing, contact your dealer.
✎ The items’ color and shape may vary, depending on the model.
✎ The parts for the stand are listed under Stand Components on the following page.
List of Parts
Remote Control (AA59-00817A) &
Samsung Smart Control
Power Cord
Safety Guide / Quick Setup Guide /
Regulatary Guide
(depending on the model)
COMPONENT IN / AV IN Adapter

5
English
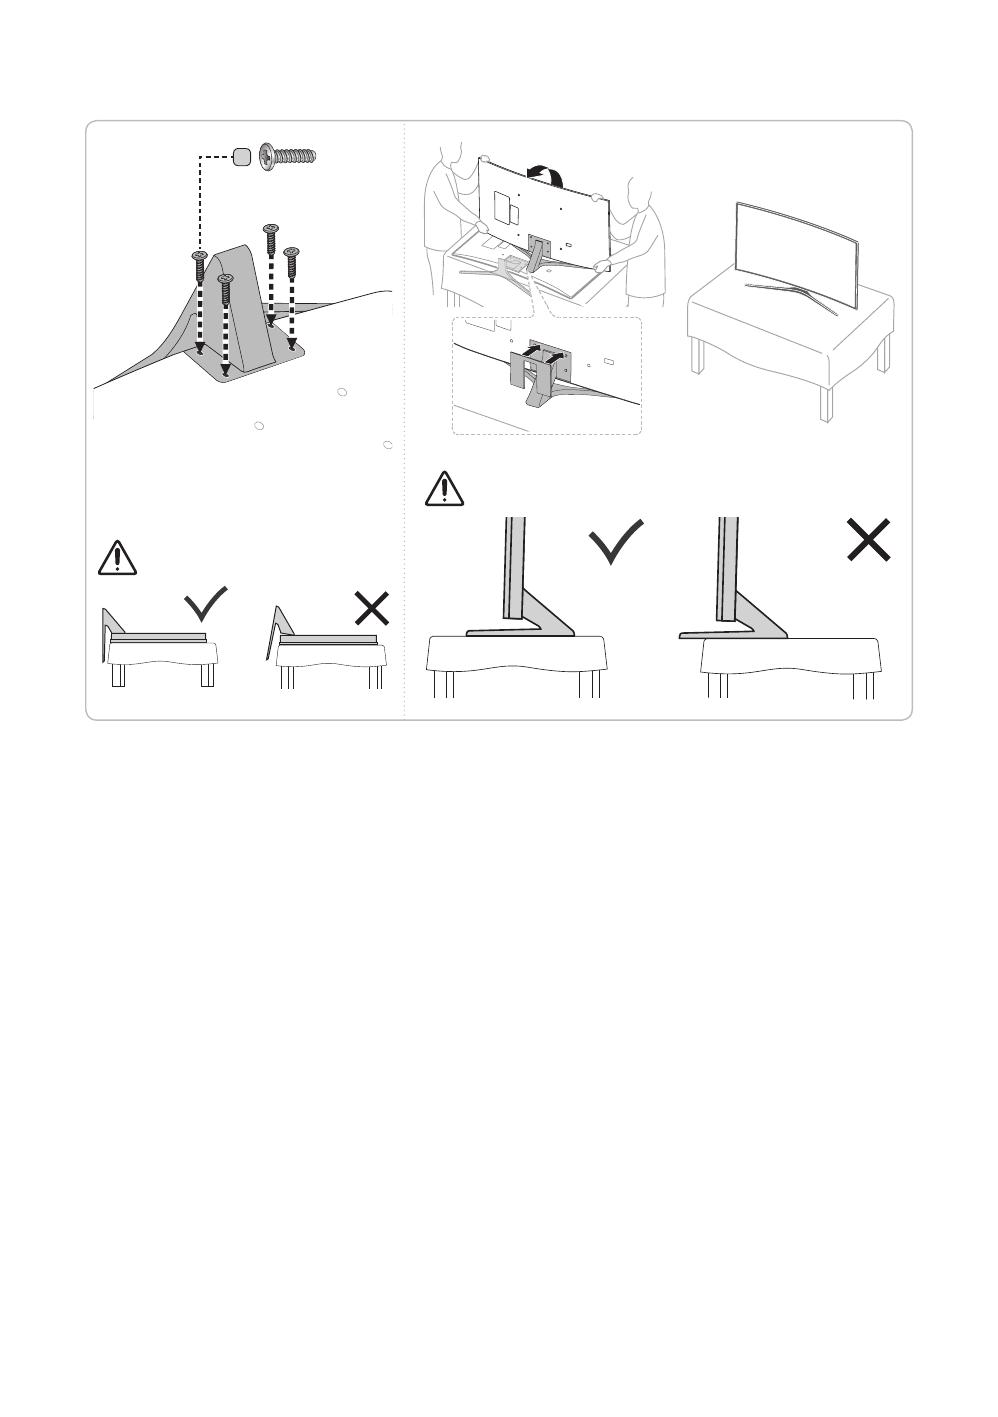
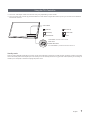
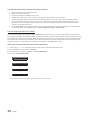
Installing the LED TV Stand
Components
1 EA
A
B
1 EA
C
Stand Guide Stand Screws
1 2
3
✎ Place a soft cloth over the
then place the TV on the
cloth screen-side down.
✎ Insert the Stand Guide into
the TV.
✎
end line in the direction of
arrow.
C
6
English
✎
the manual’s order.
4 5
C
✎ NOTE
–
– Make sure that at least two persons lift and move the TV.

7
English
Using the TV's Controller
✎ The color and shape of the TV Controller may vary depending on the model.
✎
the remote control.
Press: Move
Press & Hold: Select
The TV controller
TV controller / Remote control sensor
: Power off
: Channel Up
: Channel Down
: Volume Up
: Volume Down
: Source
Control Menu
Standby mode
8
English
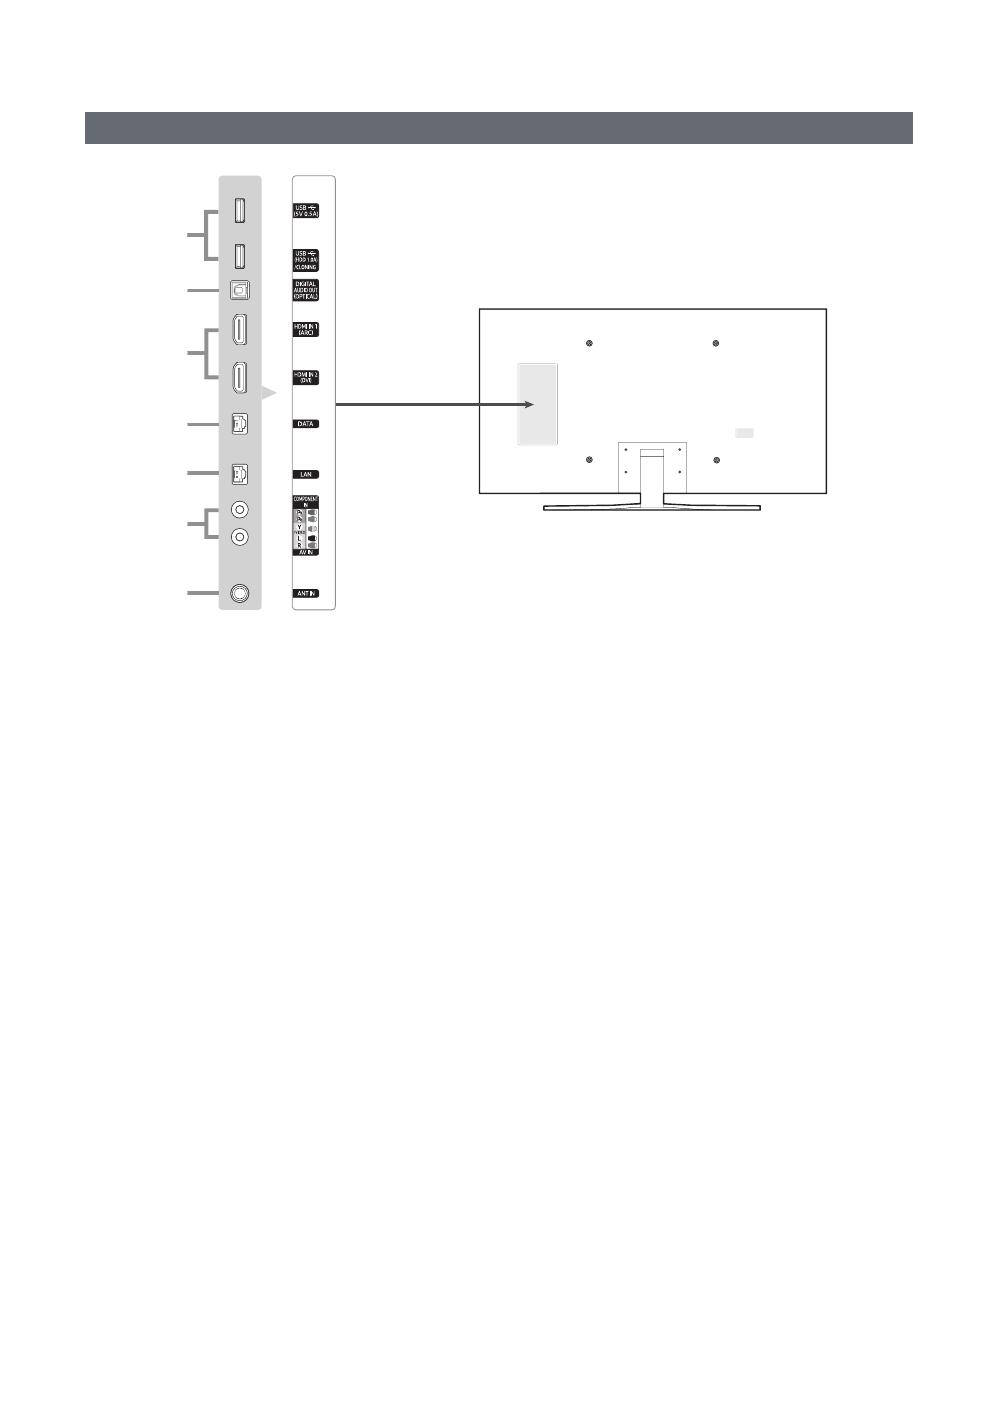
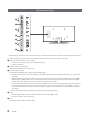
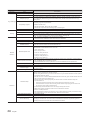
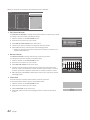
The Connection Panel
4
2
3
1
6
5
7
✎
✎
1
USB (5V 0.5A), USB (HDD 1.0A) / CLONING
– Connector for software upgrades and Media Play, etc.
– Service connection.
2
DIGITAL AUDIO OUT (OPTICAL)
Connects to a Digital Audio component.
3
HDMI IN 1 (ARC), 2 (DVI)
Connects to the HDMI jack of a device with an HDMI output.
✎
and video.
✎ Use the HDMI IN 2 (DVI)
adapter (DVI to HDMI) for the video connection and the PC/DVI AUDIO IN jacks for audio. Some DVI or HDMI
devices may not or should not need a DVI AUDIO IN connection for audio.
✎
contact to the Samsung customer care center. Refer to page 51 for the information of the Samsung customer
care center.
✎
4
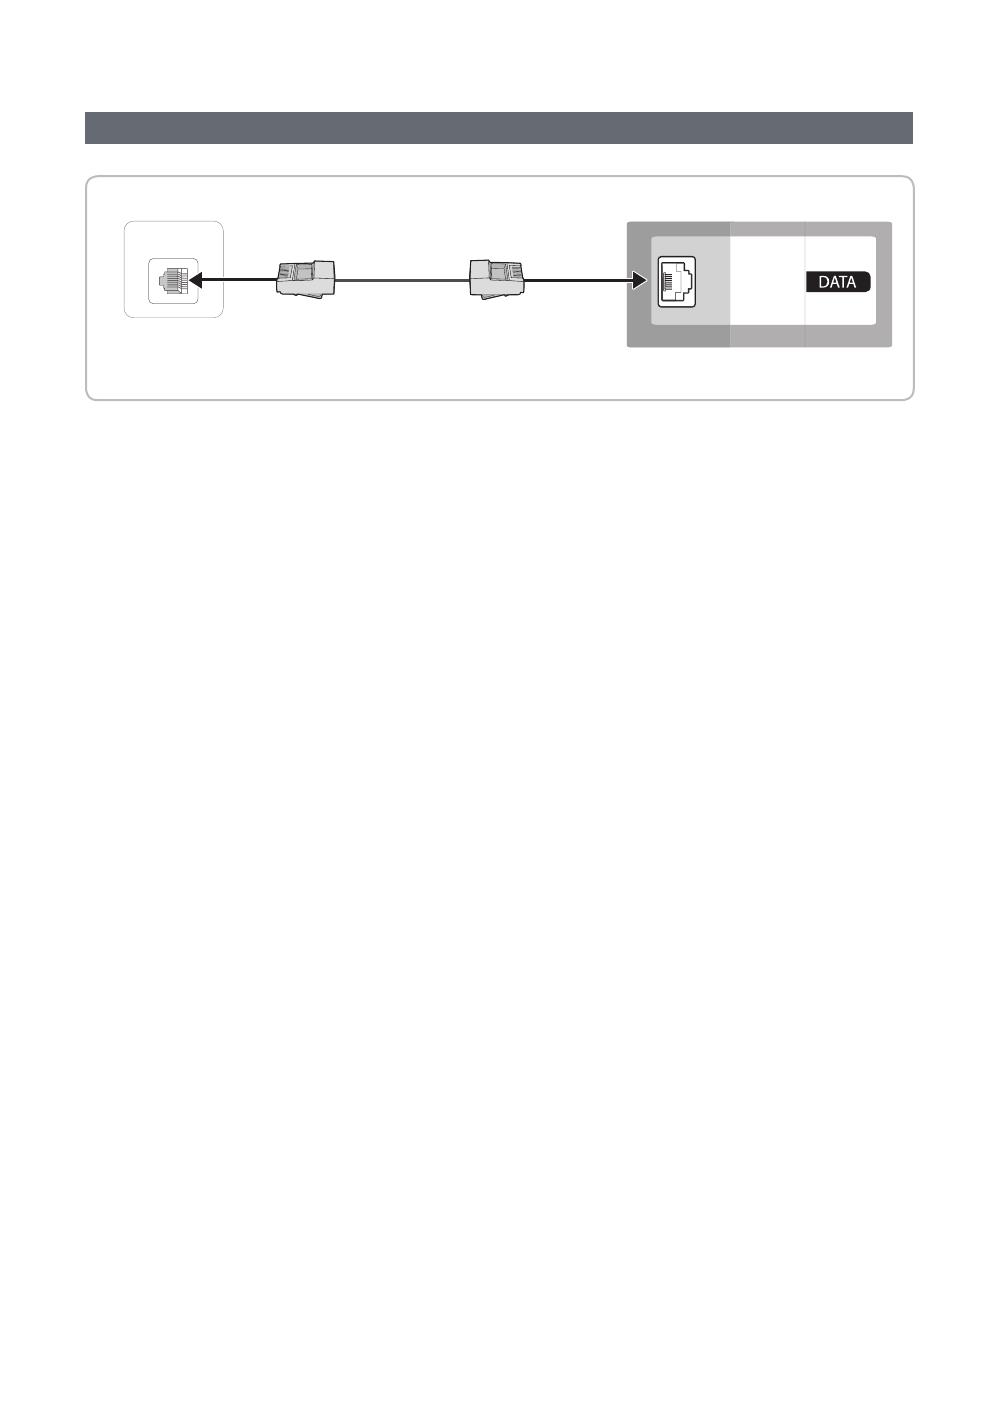
DATA
–
– Connects using RJ-12 TV type plugs.
5
LAN

9
English
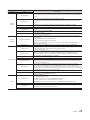
6
COMPONENT IN / AV IN
– Use to connect to Component video / audio devices such as DVD players and AV (Composite) devices such as
VCRs.
–
Component devices.
– The COMPONENT IN jack is also used as the VIDEO jack.
–
and the other ends to corresponding component video out jacks on a DVD player. Match the colors on the jacks
–
–
–
– AV IN [Y/VIDEO]
AV IN [Y/VIDEO] jack (Green/Yellow) .
7
ANT IN
– To view television channels correctly, the TV must receive a signal from one of the following sources:
–
10
English
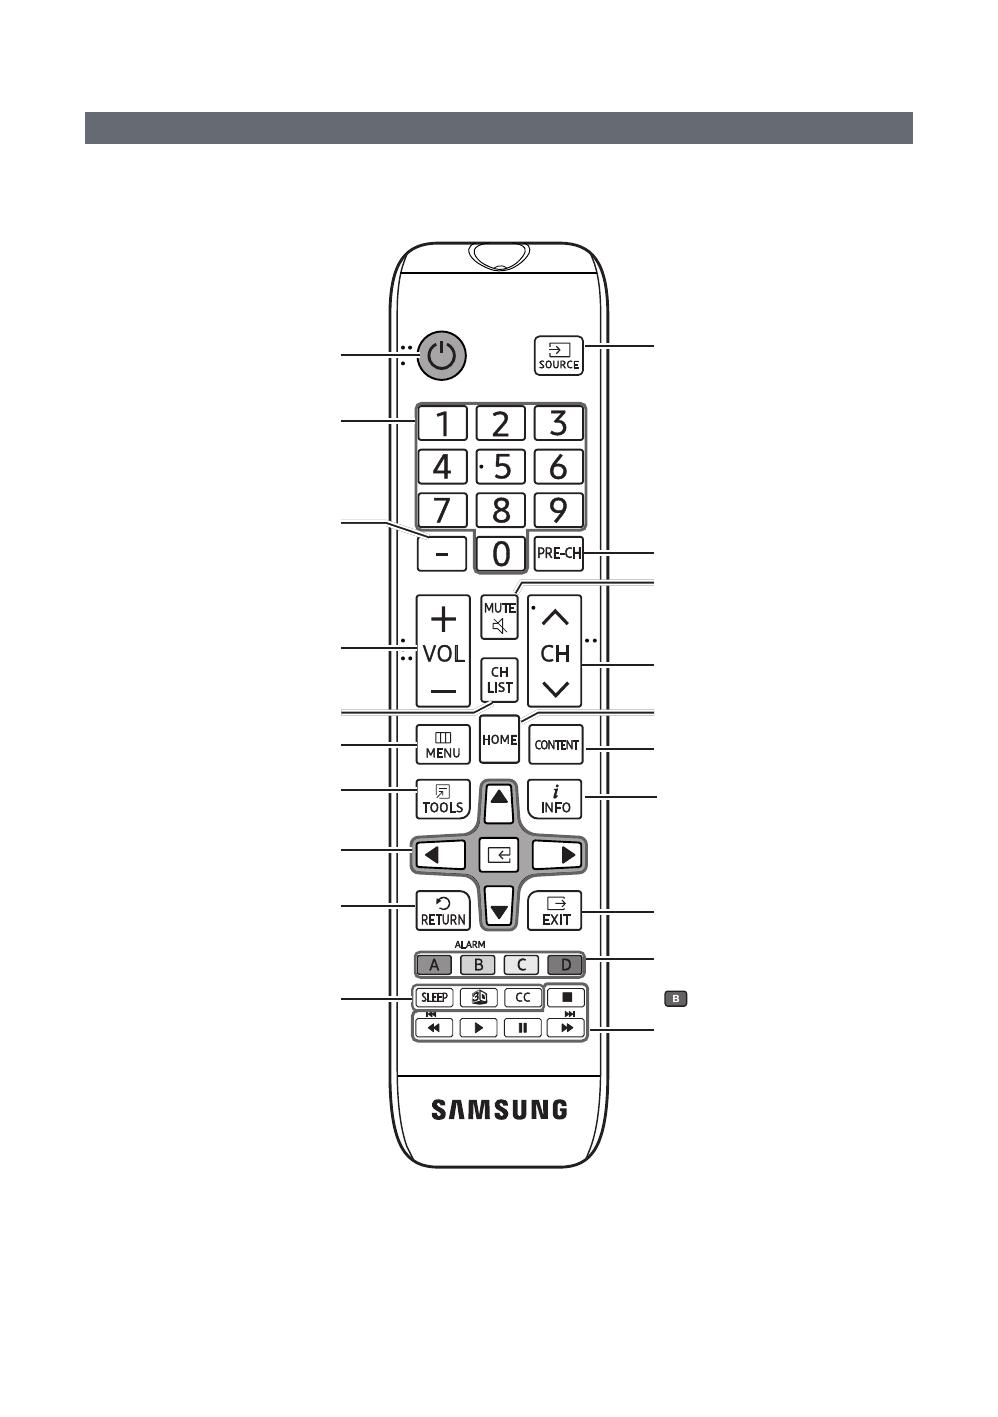
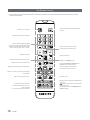
The Remote Control
✎
impaired customers.
Turns the TV on and off.
sources.
Return to the previous channel.
Change channels.
Displays My Contents, Watch TV and
Source icons on the TV screen.
Press to display channel and TV
information on the TV screen.
SLEEP: Sets the Sleep Timer.
X
CC: Controls the caption decoder.
Cut off the sound temporarily.
Press to directly access channels.
Adjust the volume.
Display the channel list on the screen.
Display the main on-screen menu.
Switch to the HOME Screen.
Quickly select frequently used functions.
Return to the previous menu.
Media Play and
Anynet+ modes.
Select on-screen menu items and change
menu values.
Press to select additional digital
Buttons used in Channel list, Media Play
menu, etc.
TV to turn on.
11
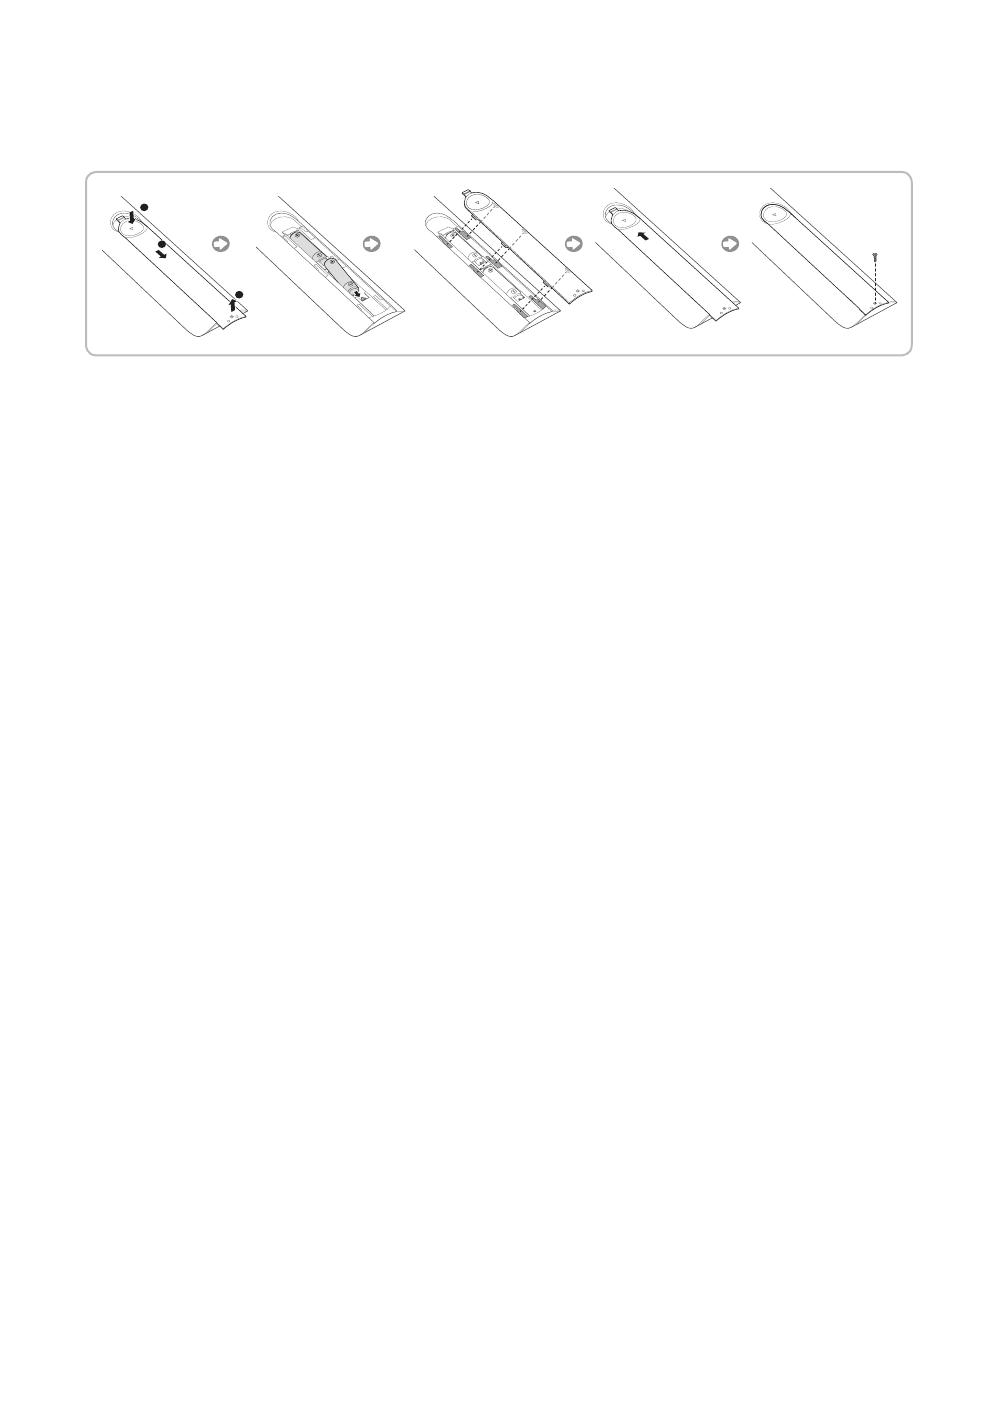
English
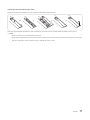
Installing batteries (Battery size: AAA)
✎ NOTE
–
– Bright light may affect the performance of the remote control. Avoid using near fluorescent lights or neon signs.
– The color and shape of the remote may vary depending on the model.

12
English
Using the Samsung Smart Control
Buttons and Functions
SEARCH
PVOICE
RETURN
EXIT
GUIDE
CH.LIST
SMART HUB
KEYPAD
TV
SOURCE
MIC
MENUTTXREC
M.SCREEN
¢: Cuts off the sound
temporarily.
RETURN
EXIT
GUIDE
CH.LIST
SMART HUB
KEYPAD SOURCE
VOL
CH
VOICE
CC ALARM
3D
SLEEP
MENU
HOME
SEARCH
MIC
TV
MIC: Use the microphone with the Voice Control and Voice functions.
– The Voice Control
pronunciation, voice level, or surrounding noise.
Turns the TV on and off.
SEARCH
KEYPAD: Displays the On-Screen Remote.
SOURCE: Displays and lets you select video sources.
VOICE
voice.
Changes channels.
Adjusts the volume.
Touch pad
The pointer on the screen moves in the direction you moved the
Samsung Smart Control.
Press the touch pad to run the focused item.
< > ¡ £: Moves the cursor, selects the on-screen menu items, and
changes the values seen on the TV's menu.
RETURN: Returns to the previous menu.
SMART HUB: Brings up Smart Hub applications.
– ™
GUIDE: Displays the EPG (Electronic Program Guide).
directions on the TV's screen.
3D
SLEEP
CC: Controls the caption decoder and displays captions on the screen.
ALARM
MENU: Displays the menu on the screen.
HOME: Press to display the HOME menu or the REACH menu or the SINC menu.

13
English
Installing Batteries into the Samsung Smart Control
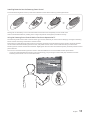
Using the Samsung Smart Control Motion Function to Operate the TV
Smart Control and using it much like a cordless mouse.
on the screen. Move the Samsung Smart Control, and pointer moves on the screen in the direction you moved the
Samsung Smart Control and the same distance. Highlight an item on the screen with the pointer, and then press the touch
pad to select it.
– If you stop using the Motion Function, even momentarily, put your finger on the touch pad, and then move the
Samsung Smart Control to re-start the function.

14
English
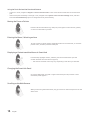
Using the Touch Pad and the Directional Buttons
– In the TV's menu, navigate to Support > Smart Control Tutorial to view a tutorial that shows how to use the touch
pad.
– If the touch pad's sensitivity is too high or low, navigate to the System > Smart Control Settings menu, and then
select the Touch Sensitivity option to change the touch pad sensitivity.
Moving the Focus or Pointer
or cursor in the direction you want.
Entering the Menu / Selecting an Item
To enter a menu or select an item, highlight the item or the menu title, or move the
pointer over it, and then press the touch pad.
Displaying a Context-sensitive Menus in Smart Hub
–
Changing the Smart Hub Panel
Scrolling on the Web Browser
15
English
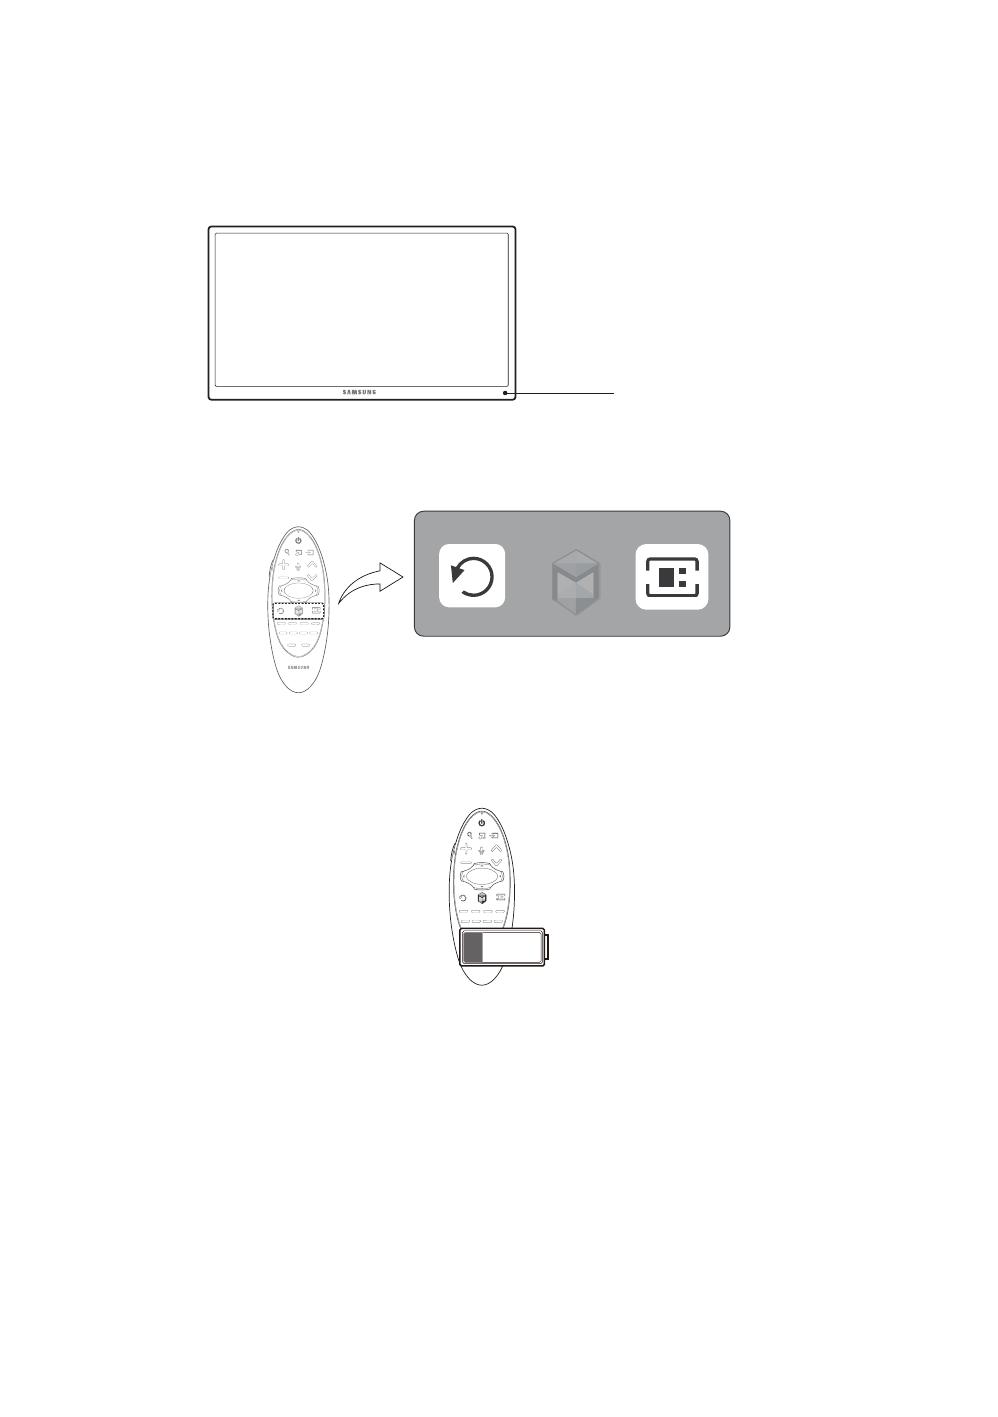
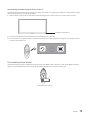
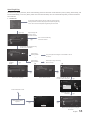
Reconnecting the Samsung Smart Control to the TV
pair the Samsung Smart Control and TV again.
1. Move to within a foot of the TV, and then aim the Samsung Smart Control at the TV's remote control receiver.
Remote Control Sensor
2. Press the RETURNGUIDE
3. The connection icon appears on the screen. A few moments later, the connected icon appears. The Samsung Smart
Control is paired to the TV.
The Low Battery Alarm Window
16
English
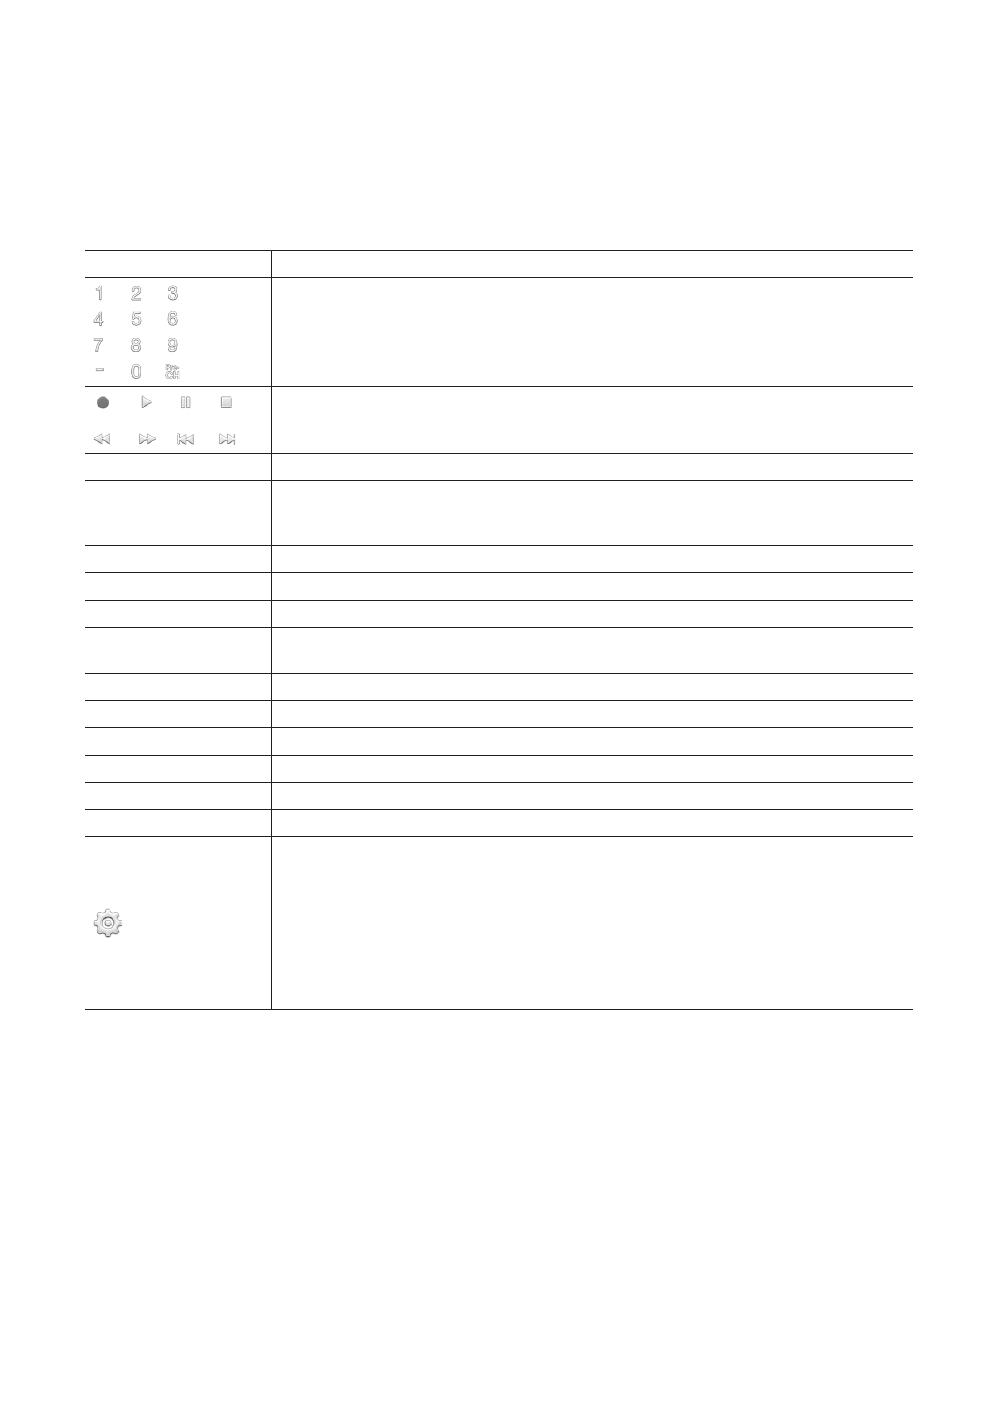
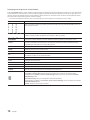
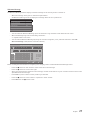
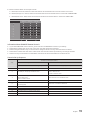
Displaying and Using the On-Screen Remote
Press the KEYPAD
the touch pad on the Samsung Smart Control to select.
–
Button Description
Pre-CH to return to
the previous channel.
a, b, {, }
TOOLS
Press to display the Tools menu while you are watching TV. The Tools menu gives you easy
depending on how you are currently using the TV.
INFO
MENU Displays the TV's menu on the screen.
3D
PIP
CC
P.Size Changes the picture size.
SLEEP This function automatically shuts off the TV after a preset period of time.
P.Mode Lets you select the Picture Mode.
Web Browser
ALARM
Move To The Right / Move To The Left: Moves the Onscreen Remote on the screen.
Large Size / Normal Size: Resizes the Onscreen Remote on the screen. Alternatively,
navigate to the System > Smart Control Settings menu and select and set the Onscreen
Remote Size option.
Touch Sensitivity: Lets you change the touch pad sensitivity.
Alternatively, navigate to the System > Smart Control Settings menu and select and set the
Touch Sensitivity option.
Cancel: Select to close a pop up menu.

17
English
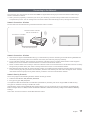
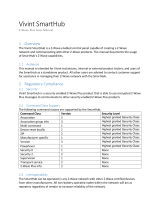
Connecting to the Network
You can set up your TV so that it can access the SMART TV applications through your local area network (LAN) using a
wired or wireless connection.
✎ After you have “physically” connected your TV to your network, you must configure the network connection to
complete the process. You can configure the connection after the Initial Setup process, through the TV’s menu.
Network Connection - Wireless
Connect the TV to the Internet using a standard wireless router or modem.
that has a DHCP Server
Network Connection - Wireless
y
Otherwise, when you play video over a network connection, the video may not play smoothly.
y
DHCP, the TV can use a DHCP or static IP address to connect to the wireless network.
y Select a channel that is not currently in use for the wireless router. If the channel set for the wireless router is currently
y
must enter this security key into any other devices you want to connect to the wireless network.
Network Security Protocols
The TV only supports the following wireless network security protocols:
y
y
encryption in networks running in the 802.11n mode.
settings.

18
English
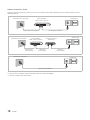
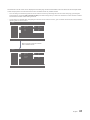
Network Connection - Wired
TV Side Panel
(Not Supplied)
(Not Supplied)
(Not Supplied)
TV Side Panel
IP Router that has a
DHCP Server
TV Side Panel
✎
✎
19
English
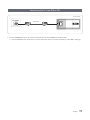
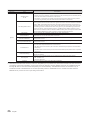
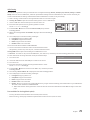
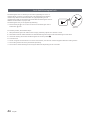
Connecting the TV to an SBB or STB
ETH MODEM
TV Rear Panel
1. Connect the DATA jack of the TV to the ETH MODEM
✎

20
English
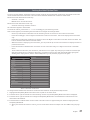
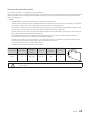
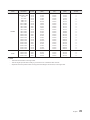
List of Hospitality SI Vendors and Compatible Data Cables Supplied with the TV
y
y
SI Vendor Pin assign Remark
Samsung
OCC
Enseo
Guest-Tek
Provided
nStreams
Provided
✎
Page is loading ...
Page is loading ...
Page is loading ...
Page is loading ...
Page is loading ...
Page is loading ...
Page is loading ...
Page is loading ...
Page is loading ...
Page is loading ...
Page is loading ...
Page is loading ...
Page is loading ...
Page is loading ...
Page is loading ...
Page is loading ...
Page is loading ...
Page is loading ...
Page is loading ...
Page is loading ...
Page is loading ...
Page is loading ...
Page is loading ...
Page is loading ...
Page is loading ...
Page is loading ...
Page is loading ...
Page is loading ...
Page is loading ...
Page is loading ...
Page is loading ...
Page is loading ...
Page is loading ...
-
 1
1
-
 2
2
-
 3
3
-
 4
4
-
 5
5
-
 6
6
-
 7
7
-
 8
8
-
 9
9
-
 10
10
-
 11
11
-
 12
12
-
 13
13
-
 14
14
-
 15
15
-
 16
16
-
 17
17
-
 18
18
-
 19
19
-
 20
20
-
 21
21
-
 22
22
-
 23
23
-
 24
24
-
 25
25
-
 26
26
-
 27
27
-
 28
28
-
 29
29
-
 30
30
-
 31
31
-
 32
32
-
 33
33
-
 34
34
-
 35
35
-
 36
36
-
 37
37
-
 38
38
-
 39
39
-
 40
40
-
 41
41
-
 42
42
-
 43
43
-
 44
44
-
 45
45
-
 46
46
-
 47
47
-
 48
48
-
 49
49
-
 50
50
-
 51
51
-
 52
52
-
 53
53


Ask a question and I''ll find the answer in the document
Finding information in a document is now easier with AI
Related papers
-
Samsung HG55NC890VF Installation guide
-
Samsung HG75NC890XF Installation guide
-
Samsung HG65NC890 Owner's manual
-
-
Samsung HG55EE890WB User manual
-
Samsung HG55EE89UAC User manual
-
-
Samsung HG55EE890UB User manual
-
Samsung HG40ND690DF Installation guide
-
Samsung HG28NE690AF User manual
Other documents
-
Omron BP 05 Blood Pressure Meter User guide
-
 Acon Big Airtrack 12m/39ft Gymnastics Tumbling Mat User manual
-
ZyXEL STB-1001S2 Quick start guide
-
 HealthCare Information BedMate III Operating instructions
-
 HCI RoomMate RM20II Operating instructions
-
Curtis PSB290 Datasheet
-
Philips 46HFL5573D/10 Installation guide
-
 Vivint CP04 User manual
-
Kogan 49″ Agora Smart 4K LED TV User manual
-
 ATA-D Samsung TV Remote BN59-01315A Owner's manual


