Kam ATD Automatic Tank Dewatering System User manual
- Type
- User manual

KAM
®
ATD AUTOMATIC TANK DEWATERING
TEL +1 713 784 0000
FAX +1 713 784 0001
Email [email protected]
KAM CONTROLS, INC.
3939 Ann Arbor Drive
Houston, Texas 77063 USA
www.KAM.com
User Manual
ATDMANUAL-0512
PTB 08 ATEX 1026
API COMPLIANT
An ISO 9001 certied company

ATDMANUAL 0512
KAM CONTROLS, INC.
1
TABLE OF CONTENTS
SECTION TITLE PAGE
1 Introduction 2
•Theory of Operation 2
2 Specications 3
3 Installation 4
•Installing ATD sensors 4
•Removing ATD sensors 5
•Wiring 6
4 ATD Operation 8
•Hyperterminal Software 8
•Testing 8
•Calibration 9
•Modbus Interface 9
APPENDIX A: Modbus Registers 10
CAUTION:
When installing the ATD sensor in tanks containing petroleum products,
petro-chemicals, waste waters with the presence of pressure & temperature, and high-pressure
steam refer to the Pipeline Operators’ "Health, Safety and Environmental Policy Procedures" to
ensure safe installation.
KAM CONTROLS, INC. reserves the right to make changes to this document without notice.

ATDMANUAL 0512
KAM CONTROLS, INC.
2
INTRODUCTION
THEORY OF OPERATION
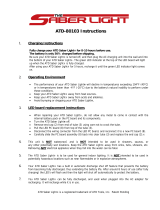
FIG. 1-1 AUTOMATED TANK DEWATERING
FIG. 1-2 AUTOMATED TANK DEWATERING ALARM SEQUENCE
KAM ATD Automated Tank Dewatering incorporates 2 microwave sensors. The rst monitors the descending
emulsion layer and triggers the closing of the MOV on the draw off line when the percentage of water falls to a
predetermined level. With the MOV closed, water concentrations increase in the bottom of the tank eventually
triggering the reopening of the MOV.
The second ATD sensor is an alarm
sensor. Should Sensor 1 fail for any
reason, Sensor 2 detects decreasing
water concentrations and triggers both
auditory and visual alarms as well as
the closing of the MOV.
Because Sensor 2 detects the descend-
ing emulsion layer well before it reaches
the draw off line outlet, no oil ever
enters the draw off line. FIG. 1-2
KAM ATD probes are designed with a
solid tubular surface to prevent the
accumulation of parrans or any other
substance from accumulating on the
probe and affecting measurement.
ALARM
EMULSION
Sensor 1
Sensor 2
Sensor 2
Draw Off Line Outlet
Emulsion Layer

ATDMANUAL 0512
KAM CONTROLS, INC.
3
SPECIFICATIONS
Media: Crude oil, rened products and chemicals
Material: Wetted parts - 316 stainless steel
Fluid temperature: To 600ºF (315ºC) *
Power requirements: 24 VDC/1 amp at 24 watts
Accuracy: ±5%
Repeatability: ±0.01%
Resolution: ±0.01%
Outputs: Selectable 4–20 mA with adjustable range
or 0–5 VDC
Alarm relay
RS232/RS485
Mounting: 2" MNPT seal housing
2", 3", or 4" anged seal housing
Pressure ratings: ANSI 150, 300, 600, 900, 1500, 2500
Sensor dimensions: Ø1.5" x 1.5" (38mmh x 38mm)
EX enclosures: Sensor electronics - 3" x 6" x 3"
(76mm x 152mm x 76mm)
Shaft length: Per user specication up to 16 feet
Weight: from 20 lbs. (9kg)

ATDMANUAL 0512
KAM CONTROLS, INC.
4
INSTALLATION
Remove all the protective packaging materials, and ensure that the ATD sensors were not damaged
during transit.
PRIOR TO INSTALLATION
INSTALLATION
Prior to mounting verify that the tip of the sensor
is all the way inside the seal housing.
FIGS. 3-1,3-2.
If sensor is not fully enclosed inside the seal
housing, pull the shaft back until the probe is
all the way in the seal housing and tighten
the Socket Cap Screws on the locking collar.
This will prevent the ATD shaft from sliding
and the probe from getting damaged during
mounting.
A full-opening ball valve is used to isolate the ATD sensors from the tank during installation or removal. The seal
housing of the ATD sensor allows the probe to be inserted and removed from the pipe under pressure conditions.
It is the user’s responsibility to ensure that the ATD sensor be placed at the optimum depth in the tank to prevent
hydrocarbons from entering the water draw off line.
1.
2.
FIG. 3-1
FIG. 3-2
Mark the ATD shaft at the predetermined insertion distance. FIG. 3-3.
3.
FIG. 3-3
Mark
Socket Cap Screw

ATDMANUAL 0512
KAM CONTROLS, INC.
5
INSTALLATION CONTINUED
4.
Bolt or screw the ATD sensor to the valve or designated installation location.
(KAM CONTROLS recommends using thread sealant and not Teon tape for the threaded ATD).
Open full opening valve.
Loosen Socket Cap Screws on the locking collar.
FIG. 3-4
5.
6.
Push ATD sensor in until the mark is at the top edge
of the locking collar. FIG. 3-4.
Re-tighten the Socket Cap Screws.
7.
8.
9.
FIG. 3-4
FIG. 3-5
Socket Cap Screws
Mark
Hex Nuts
Tighten the hex nuts holding down the Locking
Collar one half turn. (Fig. 3-5) These should never be
over-tightened. Their major function is to apply light
pressure on the chevron packing to ensure a seal be-
tween the seal housing body and the insertion shaft.
REMOVING THE ATD SENSOR
To remove the ATD sensor, rst disconnect all electrical connections to the ATD enclosure. Then, loosen the Socket
Cap Screw on the Lock Down Collar. Slide the ATD sensor upward until the probe rests inside the seal housing.
Next, close the Full-opening Ball Valve tightly. The ATD sensor may now be unbolted from the system.
Note: If pressure exceeds 100 psi, use a KAM
®
IT Insertion Tool when installing/removing
the KAM
®
ATD sensor.

ATDMANUAL 0512
KAM CONTROLS, INC.
6
INSTALLATION CONTINUED
WIRING
Kam
Controls
Incorporated
3939 Ann Arbor Drive
Houston, TX 77063 USA
Tel + 1 713 784 0000
Fax + 1 713 784 0001
www.Kam.com
E-mail [email protected]
OWD Rev. 2
KAM OWD
Made in USA
24V (+) in
4-20mA (-)
24V (-) in
4-20mA (+)
ANA OUT (-)
ANA OUT (+)
DIG OUT (-)
DIG OUT (+)
DENSITY IN (AIN2)
RS485 (+)
RS485 (-)
GND
RS232 RX
GND
RS232 TX
DIG IN (-)
DIG IN (+)
GND
FIG. 3-6 WIRING DIAGRAM
D2
R4
R5
D3
ZigBee
Bluetooth
+
+
D1
R1
+

ATDMANUAL 0512
KAM CONTROLS, INC.
7
INSTALLATION CONTINUED
INPUTS
24V (–) IN GND
24V (+) IN Power
DIG IN (–) Pulse input, discrete input for different modes of operation (0 or 5 volt)
DIG IN (+)
DENSITY IN
OUTPUTS
4-20 mA (–) Current output, source powered
4-20 mA (+)
AN OUT (–) Can be 4-20 mA or analog voltage
AN OUT (+)
DIG OUT (–) Alarm or relay (digital contact closure)
DIG OUT (+)
INPUT/OUTPUT
RS232 Consol port – communication interface for calibration, connection to PLC
RS485 Modbus interface
LED INDICATORS
D1 Power
D2 ZigBee wireless for communication interface
D3 Bluetooth wireless for communication interface
SERIAL PORT CONNECTIONS
DB9 (female)
5 GND
3 RS232RX
2 RS232TX

ATDMANUAL 0512
KAM CONTROLS, INC.
8
KAM ATD OPERATION
Connect computer via RS232, or Bluetooth or ZigBee wireless*. To launch Hyperterminal, click on OWD icon.
When Hyperterminal loads, hit ENTER/RETURN. The "OWD Optimizer" prompt menu will appear in window.
Optimizer options are as follows:
"L" to Calibrate
"Z" to display Raw Voltage
"R" to enter Range
"M" to change Modbus Address
After entering any OWD Optimizer prompt, hitting ENTER/RETURN will return you to the main OWD
Optimizer entry eld.
*Bluetooth and ZigBee are hardware options when ordering ATD. If included, corresponding LED lights on
ATD panel in EX Enclosure will indicate. See WIRING page 6.
HOW TO TEST THE KAM
®
ATD
Make all wiring connections according to FIG. 3-6.
Let the ATD sensor warm up for 20 minutes.
Insert the ATD sensor into a bucket or a jar lled with a sample of oil. In order to accurately test the ATD
sensor, you must use oil that does not have any water in it or which has a known, low percentage of water.
The water percentage reading in the Hyperterminal should show 0% or reect the known water percentage. If
you inserted the ATD sensor in oil with no water and it does not show 0%, you can adjust the calibration using
the steps outlined below.
Remove the ATD sensor from the oil and clean it. NOTE: Sensor must be completely free of oil. Oil left on the
sensor could affect the accuracy of brine test.
Insert the sensor in a bucket with brine. It should show 100% water in the Hyperterminal. As all water in crude
oil has salt, the ATD sensor has already been calibrated for salt water. You will not get an accurate
reading if you use fresh water for testing. It should also show 20mA if the mA range is calibrated for 0-100%
which you can measure at the output terminal.
1.
2.
3.
4.
5.
HYPERTERMINAL SOFTWARE
1.
2.
3.
PLEASE NOTE: the KAM ATD has been calibrated in the laboratory. Typically there is no need to calibrate the ATD
once in the eld unless process conditions have changed. If process conditions have changed or if following the
test procedures outlined below under "How to Test the KAM ATD," the user determines that the ATD requires
recalibration or ne-tuning, the user may follow the steps outlined on page 9 of this manual under "How to
Calibrate the KAM ATD."

ATDMANUAL 0512
KAM CONTROLS, INC.
9
KAM ATD OPERATION CONTINUED
HOW TO CALIBRATE THE KAM
®
ATD
Connect PC to the ATD sensor via serial port. If you do not have a serial port, use a USB to Serial Port
converter. Launch Hyperterminal and hit RETURN/ENTER.
Take an accurate (fully homogenous) sample from the pipeline close to the sensor, and at the same time
type "L" for calibration in the Hyperterminal. A "Water %" prompt will appear.
Determine water percentage in sample using a KAM Karl Fischer Moisture Analyzer.
Enter the determined sample water percentage from Karl Fischer analysis into Hyperterminal prompt and
hit ENTER/RETURN.
Type "S", then hit ENTER/RETURN to save.
The KAM
®
ATD is now calibrated.
This process can be repeated if the sample taken was a bad sample or the percent of water obtained from
the sample taken was not accurate.
1.
2.
3.
4.
5.
SETTING UP A MODBUS INTERFACE
To set Modbus variables, type "M" and hit ENTER/RETURN.
The prompt is for an ID for the slave device. This ID MUST BE UNIQUE from any other Modbus device
connected and a value between 1-255.
SYSTEM SETTINGS:
Modbus Baudrate: 9600.
Protocol is RTU Modbus.
See APPENDIX A for designated MODBUS Registers.
1.
2.
PLEASE NOTE: The KAM ATD has been calibrated in the laboratory. Users should only follow
the steps outlined below if process conditions have changed affecting performance or if, after
following the steps on page 23 under "How to Test the KAM ATD," it is determined that the ATD's
performance needs slight adjustments.

ATDMANUAL 0512
KAM CONTROLS, INC.
10
APPENDIX A: MODBUS INTERFACE REGISTERS
01 Discrete Coil Status
02 Discrete Input Status
03 Holding Register
Reads output coil status,
digital outputs
Reads state of individual
digital inputs
Reads and writes to the
DAC channels (0-3).
Takes a converted oat
value (from 2 unsigned
int values) and updates
the DAC output values
(in Volts 0-10VDC).
0x00001–0x00016: Digital outputs 0–15
0x10001–0x10024: Digital inputs 0–23
0x40001–0x40002: Float value for DAC 0
0x40003–0x40004: Float value for DAC 1
0x40005–0x40006: Float value for DAC 2
0x40007–0x40008: Float value for DAC 0
40100–40999: 16–bit values
41000–41999: 32–bit values
42000–44999: Float values
45000–47299: Modbus registers
40100: Alarm setpoint
40101: Alarm setpoint prior to change
40102: On or off alarm report
40103: On or off alarm report
40104: On or off alarm report
40105: True when value over alarm value for dead-band
time. Reset when value below alarm value for
dead-band time.
40106: Signal to reset transaction
40107: Water content integer
40108: AD0 raw value
40109: AD1 raw value
40110: Low-end output at 4ma prior to change
40111: Low-end output at 4ma
40112: High-end output at 20ma
40113: High-end output at 20ma prior to change
40114: Number of user block saves (Limit to 50,000)
41000: Sample period in seconds
41001: Sample period in seconds prior to change
41002: Alarm dead–band inter-value timer
41003: Alarm dead–band start time
41004: Alarm dead–band current time
41005: Alarm inter-value timer
41006: Alarm start time
41007: Alarm current time
41008: Array of time of alarms
41009: Array of time of alarms
41010: Array of time of alarms
41011: Value at time of alarm
41012: Value at time of alarm
41013: Value at time of alarm. Reset when value below
alarm value for dead-band time.
41014: Amount of measured material
41015: Material less water
41016: Average water
41017: Transaction intervalue timer
41018: Transaction start time
41019: Sample period in second
MODBUS FUNCTION USE REGISTERS

ATDMANUAL 0512
KAM CONTROLS, INC.
11
APPENDIX A CONTINUED
41020: Sample start time
41021: Sample current time
41022: Mode: oil continuous/water continuous
41023: Modify table: 0=oil continuous
1=water continuous
41024: Set to 1 to signal table modication ready. Reset to
–1 to indicate not ready.
41025: Set to 1 to signal write UB
41026: Modify sensor1 TempCorf: 1
Modify sensor2 TempCorf: 2
41027: Set to 0–19 to indicate temperature curve
modication ready. Reset to –1 to indicate not
ready.
41028: Temperature value input by user
41029
41030 – 41049: Temperature table temperatures
42000: Trend 0
42001: Trend 1
42002: Trend 2
42003: Trend 3
42004: Trend 4
42005: Trend 5
42006: Trend 6
42007: Trend 7
42008: Trend 8
42009: Trend 9
42010: Trend 10
42011: Trend 11
42012: Trend 12
42013: Trend 13
42014: Trend 14
42015: Trend 15
42016: Trend 16
42017: Trend 17
42018: Trend 18
42019: Trend 19
42020: AD0 input
42021: AD1 input
42022: AD2 oil/water continuous input
42023: DA0 output
42024: Water content oil continuous sensor 1
42025: Water content oil continuous sensor 2
42026: Water content water continuous sensor 1
42027: Water content water continuous sensor 2
42028: Water content oat
42029: Sensor 1 offset input by user
42030: Sensor 1 offset input by user
42031: Sensor 2 offset input by user
42032: Sensor 2 offset input by user
42033: Storage register for Modbus table index water
value
42034 Storage register for Modbus table sensor 1 value
42035 Storage register for Modbus table sensor 2 value
42036: AD3 temperature voltage input
42037: Temperature value input
MODBUS FUNCTION USE REGISTERS
03 Holding Register continued

ATDMANUAL 0512
KAM CONTROLS, INC.
12
MODBUS FUNCTION USE REGISTERS
42038: Temperature input low voltage
42039: Temperature input low value
42040: Temperature input high voltage
42041: Temperature input high value
42042: Sensor 1 temperature correction
42043: Sensor 2 temperature correction
42044: Water factor 0.00 – 9.99
42045: Sensor 1 temperature correction 0–10v
42046: Sensor 1 temperature correction 10v
42047: Sensor 1 temperature correction 0–10v
42048: Sensor 1 temperature correction 10v
42049: Sensor 1 temperature correction 0–10v
42050: Sensor 1 temperature correction 10v
42051: Sensor 1 temperature correction 0–10v
42052: Sensor 1 temperature correction 10v
42053: Sensor 1 temperature correction 0–10v
42054: Sensor 1 temperature correction 10v
42055: Sensor 1 temperature correction 0–10v
42056: Sensor 1 temperature correction 10v
42057: Sensor 1 temperature correction 0–10v
42058: Sensor 1 temperature correction 10v
42059: Sensor 1 temperature correction 0–10v
42060: Sensor 1 temperature correction 10v
42061: Sensor 1 temperature correction 0–10v
42062: Sensor 1 temperature correction 10v
42063: Sensor 1 temperature correction 0–10v
42064: Sensor 1 temperature correction 10v
42065
42066
42067
42068
42069
42070
42071
42072
42073
42074
42075: Sensor 1 temperature correction 0–10v
42076: Sensor 1 temperature correction 10v
42077: Sensor 1 temperature correction 0–10v
42078: Sensor 1 temperature correction 10v
42079: Sensor 1 temperature correction 0–10v
42080: Sensor 1 temperature correction 10v
42081: Sensor 1 temperature correction 0–10v
42082: Sensor 1 temperature correction 10v
42083: Sensor 1 temperature correction 0–10v
42084: Sensor 1 temperature correction 10v
42085: Sensor 1 temperature correction 0–10v
42086: Sensor 1 temperature correction 10v
42087: Sensor 1 temperature correction 0–10v
42088: Sensor 1 temperature correction 10v
42089: Sensor 1 temperature correction 0–10v
42090: Sensor 1 temperature correction 10v
42091: Sensor 1 temperature correction 0–10v
42092: Sensor 1 temperature correction 10v
03 Holding Register continued
APPENDIX A CONTINUED

ATDMANUAL 0512
KAM CONTROLS, INC.
13
MODBUS FUNCTION USE REGISTERS
42093: Sensor 1 temperature correction 0–10v
42094: Sensor 1 temperature correction 10v
40100: Alarm setpoint
40101: Alarm setpoint prior to change
40102: On or off alarm report
40103: On or off alarm report
40104: On or off alarm report
40105: True when value over alarm value for dead-band
time. Reset when value below alarm value for
dead-band time.
40106: Signal to reset transaction
40107: Water content integer
40108: AD0 raw value
40109: AD1 raw value
40110: Low end output at 4ma prior to change
40111: Low end output at 4ma
40112: High end output at 20ma
40113: High end output at 20ma prior to change
40114: Number of user block saves (Limit to 50,000)
41000: Sample period in seconds
41001: Sample period in seconds prior to change
41002: Alarm dead-band intervalue timer
41003: Alarm dead-band start time
41004: Alarm dead-band current time
41005: Alarm intervalue timer
41006: Alarm start time
41007: Alarm current time
41008: Array of time of alarms
41009: Array of time of alarms
41010: Array of time of alarms
41011: Value at time of alarm
41012: Value at time of alarm
41013: Value at time of alarm. Reset when value below
alarm value for dead band time.
41014: Amount of measured material
41015: Material less water
41016: Average water
41017: Transaction intervalue timer
41018: Transaction start time
41019: Sample period in second
41020: Sample start time
41021: Sample current time
41022: Mode: oil continuous/water continuous
41023: Modify Table: 0=oil continuous 1=water continuous
41024: Set to 1 to signal table modication ready. Reset to
–1 to indicate not ready.
41025: Set to 1 to signal write UB
41026: Modify sensor 1 TempCorf: 1
Modify sensor 2 TempCorf: 2
41027: Set to 0–19 to indicate temperature curve
modication ready. Reset to –1 to indicate not
ready.
41028: Temperature value input by user
41030 – 41049: Temperature table temperatures
42000: Trend 0
03 Holding Register continued
APPENDIX A CONTINUED

ATDMANUAL 0512
KAM CONTROLS, INC.
14
42001: Trend 1
42002: Trend 2
42003: Trend 3
42004: Trend 4
42005: Trend 5
42006: Trend 6
42007: Trend 7
42008: Trend 8
42009: Trend 9
42010: Trend 10
42011: Trend 11
42012: Trend 12
42013: Trend 13
42014: Trend 14
42015: Trend 15
42016: Trend 16
42017: Trend 17
42018: Trend 18
42019: Trend 19
42020: AD0 input
42021: AD1 input
42022: AD2 oil/water continuous input
42023: DA0 output
42024: Water content oil continuous sensor 1
42025: Water content oil continuous sensor 2
42026: Water content water continuous sensor 1
42027: Water content water continuous sensor 1
42028: Water content oat
42029: Sensor 1 offset input by user
42030: Sensor 1 offset input by user
42031: Sensor 2 offset input by user
42032: Sensor 2 offset input by user
42033: Storage register for Modbus table index water
value
42034 Storage register for Modbus table sensor 1 value
42035 Storage Register for Modbus table sensor 2 value
42036: Temperature voltage input
42037: Temperature value
42038: Temperature input low voltage
42039: Temperature input low value
42040: Temperature input high voltage
42041: Temperature input high value
42042: Sensor 1 temperature correction
42043: Sensor 2 temperature correction
42044: Water factor 0.00 – 9.99
41023: Modify Table: 0:oil continuous 1:water continuous
41024: Set to 1 to signal table modication ready
42031: Storage register for Modbus table index water
value
42032: Storage register for Modbus table sensor 1 value
42033: Storage register for Modbus table sensor 2 value
03 Holding Register continued
MODBUS FUNCTION USE REGISTERS
APPENDIX A CONTINUED

ATDMANUAL 0512
KAM CONTROLS, INC.
15
MODBUS FUNCTION USE REGISTERS
APPENDIX A CONTINUED
04 Input Register Reads individual
calibrated values of
each ADC input
0x30001–0x30002: Float value of ADC 0
0x30003–0x30004: Float value of ADC 1
0x30005–0x30006: Float value of ADC 2
0x30007–0x30008: Float value of ADC 3
0x30009–0x30010: Float value of ADC 4
0x30011–0x30012: Float value of ADC 5
0x30013–0x30014: Float value of ADC 6
0x30015–0x30016: Float value of ADC 7
0x30017–0x30018: Float value of ADC 8
0x30019–0x30020: Float value of ADC 9
0x30021–0x30022: Float value of ADC 10
-
 1
1
-
 2
2
-
 3
3
-
 4
4
-
 5
5
-
 6
6
-
 7
7
-
 8
8
-
 9
9
-
 10
10
-
 11
11
-
 12
12
-
 13
13
-
 14
14
-
 15
15
-
 16
16


Kam ATD Automatic Tank Dewatering System User manual
- Type
- User manual
Ask a question and I''ll find the answer in the document
Finding information in a document is now easier with AI
Related papers
-
Kam OWD Water Cut Meter User manual
-
-
-
-
-
Kam IT Insertion Tool User manual
-
-
-
-
Other documents
-
 ATD Tools ATD-5324 User manual
-
 ATD Tools ATD-343 User manual
-
 ATD Tools ATD-5286 User manual
-
UNION SQUARE USL41008 User manual
-
Wen 3939 User manual
-
 ATD Tools Saber Light ATD-80113 User manual
-
 ATD Tools ATD-80103 User manual
-
 G.B.S. Elettronica 41028 Datasheet
-
 ATD Tools ATD-6914 User manual
-
Metronic DL2 Operating instructions


