Bock Water heaters 361E User manual
- Category
- Water heaters & boilers
- Type
- User manual
This manual is also suitable for
Bock Water heaters 361E is an oil-fired water heater with a storage capacity of 113 gallons. It has a firing rate of 415,000 BTUH and an input of 190,000 BTUH. The 361E is equipped with a 1/7 HP motor and has a shipping weight of 925 lbs. It has a 3/4" cold inlet and a 3/4" hot outlet. The 361E is designed for use in unconfined spaces and requires a minimum of 50 cubic feet of space per 1,000 BTUH. It has a minimum clearance to combustible construction of 6" on the sides, 6" on the back, and 24" on the front. The 361E comes with a 1.50X80OB nozzle and has a pressure of
Bock Water heaters 361E is an oil-fired water heater with a storage capacity of 113 gallons. It has a firing rate of 415,000 BTUH and an input of 190,000 BTUH. The 361E is equipped with a 1/7 HP motor and has a shipping weight of 925 lbs. It has a 3/4" cold inlet and a 3/4" hot outlet. The 361E is designed for use in unconfined spaces and requires a minimum of 50 cubic feet of space per 1,000 BTUH. It has a minimum clearance to combustible construction of 6" on the sides, 6" on the back, and 24" on the front. The 361E comes with a 1.50X80OB nozzle and has a pressure of


-
 1
1
-
 2
2
-
 3
3
-
 4
4
-
 5
5
-
 6
6
-
 7
7
-
 8
8


Bock Water heaters 361E User manual
- Category
- Water heaters & boilers
- Type
- User manual
- This manual is also suitable for
Bock Water heaters 361E is an oil-fired water heater with a storage capacity of 113 gallons. It has a firing rate of 415,000 BTUH and an input of 190,000 BTUH. The 361E is equipped with a 1/7 HP motor and has a shipping weight of 925 lbs. It has a 3/4" cold inlet and a 3/4" hot outlet. The 361E is designed for use in unconfined spaces and requires a minimum of 50 cubic feet of space per 1,000 BTUH. It has a minimum clearance to combustible construction of 6" on the sides, 6" on the back, and 24" on the front. The 361E comes with a 1.50X80OB nozzle and has a pressure of
Ask a question and I''ll find the answer in the document
Finding information in a document is now easier with AI
Related papers
-
Bock Water heaters 72E Installation guide
-
 Bock Water heaters 50 ESPG User manual
-
 Bock Water heaters 30ST User manual
-
 Bock Water heaters OT250 User manual
-
 Bock Water heaters 250 User manual
-
 Bock Water heaters 32E User manual
-
 Bock Water heaters 32E User manual
-
 Bock Water heaters 32E Installation guide


Other documents
-
 Carlin Combustion Technology 301 Installation guide
-
 Carlin Combustion Technology EZ Installation guide
-
 Carlin Combustion Technology EZ Installation guide
-
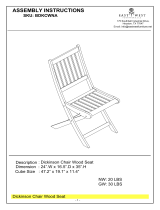 East West Furniture BDKCWNA Assembly Instructions
-
 Carlin Combustion Technology 601 Installation guide
-
 Carlin Combustion Technology 702 Installation guide
-
resideo L4103A,B,C COMBINATION AQUASTAT AND HIGH LIMIT CONTROLLER User guide
-
BCS Boiler Oil-Fired User manual
-
 Sterilite Point-of-Use Drinking Water System User manual
-
Universal Audio V230523A User guide


