ROUGHNECK 30-Gallon Fuel Caddy Gasoline Compatible Owner's manual
- Category
- Motorcycle Accessories
- Type
- Owner's manual
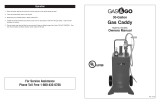
ROUGHNECK 30-Gallon Fuel Caddy Gasoline Compatible: this rugged caddy is designed to provide easy maneuverability, so you can bring the fuel source directly to where it’s needed for easy dispensing at home or in the field. Its large 30-gallon tank capacity makes it perfect for auto repair, farm, lawn and garden, small engine, motorcycle/ATV, marine uses, and more. It is UL-listed and OSHA-approved for safe, temporary storing and transferring of gasoline-type fuels, and its cart-style design allows for easy movement even when full.
ROUGHNECK 30-Gallon Fuel Caddy Gasoline Compatible: this rugged caddy is designed to provide easy maneuverability, so you can bring the fuel source directly to where it’s needed for easy dispensing at home or in the field. Its large 30-gallon tank capacity makes it perfect for auto repair, farm, lawn and garden, small engine, motorcycle/ATV, marine uses, and more. It is UL-listed and OSHA-approved for safe, temporary storing and transferring of gasoline-type fuels, and its cart-style design allows for easy movement even when full.


-
 1
1
-
 2
2
-
 3
3
-
 4
4
-
 5
5
-
 6
6
-
 7
7
-
 8
8
-
 9
9
-
 10
10
-
 11
11
-
 12
12
-
 13
13
-
 14
14
-
 15
15
-
 16
16


ROUGHNECK 30-Gallon Fuel Caddy Gasoline Compatible Owner's manual
- Category
- Motorcycle Accessories
- Type
- Owner's manual
ROUGHNECK 30-Gallon Fuel Caddy Gasoline Compatible: this rugged caddy is designed to provide easy maneuverability, so you can bring the fuel source directly to where it’s needed for easy dispensing at home or in the field. Its large 30-gallon tank capacity makes it perfect for auto repair, farm, lawn and garden, small engine, motorcycle/ATV, marine uses, and more. It is UL-listed and OSHA-approved for safe, temporary storing and transferring of gasoline-type fuels, and its cart-style design allows for easy movement even when full.
Ask a question and I''ll find the answer in the document
Finding information in a document is now easier with AI
Related papers


Other documents
-
 No Drilling Required BT150P-CHR Installation guide
-
 Gas and Go GG-30DC User manual
-
Cuisinart CSC-1000 User manual
-
 Gas and Go GG-30GC User manual
-
 JohnDow Industries HGC-30 User manual
-
 Northern Tool Equipment Mechanic's Roller Seat Owner's manual
-
 Northern Industrial Tools Low-Profile Drum Dolly Owner's manual
-
 Fuel Chief FC-P30 Owner's manual
-
 Strongway Standard Drum Plug Wrench Owner's manual
-
 Ironton 220-Lb. Steel Service Cart Owner's manual


