Panasonic CNGP50N Operating instructions
- Category
- Mobile phones
- Type
- Operating instructions

Portable Navigation System
CN-GP50N
Operating Instructions
Picture Viewer
Phone (Hands-Free)
English (UK)
• Before using this product, please read the "Safety information" in the "Important
Information" document.

Copyright
The information contained herein may be changed at any time without prior notification. This manual nor any
parts thereof may not be reproduced for any purpose whatsoever without the express written consent of
Matsushita Electric Industrial Co., Ltd., nor transmitted in any form either electronically or mechanically,
including photocopying and recording. All technical specifications, drawings etc are subject to copyright law.
© 2007, Matsushita Electric Industrial Co., Ltd.
All rights reserved.

Table of Contents
1 Introduction.............................................................................................................................. 3
1.1 About this manual............................................................................................................................................ 3
1.1.1 Conventions.................................................................................................................................................. 3
2 Picture ...................................................................................................................................... 4
2.1 Preparation ...................................................................................................................................................... 4
2.2 Picture Menu ................................................................................................................................................... 4
2.2.1 Picture Viewer .............................................................................................................................................. 5
2.2.1.1 Preview (See the figure 4)......................................................................................................................... 5
2.2.2 Opening Picture............................................................................................................................................ 5
2.2.2.1 Customize.................................................................................................................................................. 5
2.2.3 Slideshow Settings ....................................................................................................................................... 6
3 Phone (Hands-Free) ................................................................................................................ 6
3.1 Phone Menu .................................................................................................................................................... 6
3.1.1 Keypads........................................................................................................................................................ 7
3.1.1.1 Adjusting the phone status ........................................................................................................................ 8
3.1.2 Contacts ....................................................................................................................................................... 8
3.1.3 Call History ................................................................................................................................................... 9
3.1.4 Redial ........................................................................................................................................................... 9
3.1.5 Find other phone .......................................................................................................................................... 9
3.1.5.1 Registering .............................................................................................................................................. 10
3.1.5.2 Success Pairing....................................................................................................................................... 10
3.1.5.3 Failed Pairing........................................................................................................................................... 10
3.1.6 Connect ...................................................................................................................................................... 10
3.1.6.1 Success Pairing....................................................................................................................................... 10
3.1.6.2 Failed Pairing........................................................................................................................................... 10
3.1.7 Incoming call............................................................................................................................................... 11
1 Introduction
1.1 About this manual
1.1.1 Conventions
For better legibility and clarification, the following styles are used in this manual:
SMALL CAPITALS: Window and dialogue box titles.
Bold: Highlighting of important parts in the text.
Underlined: Descriptions of buttons, input fields and other elements on the user interface.
3
2 Picture
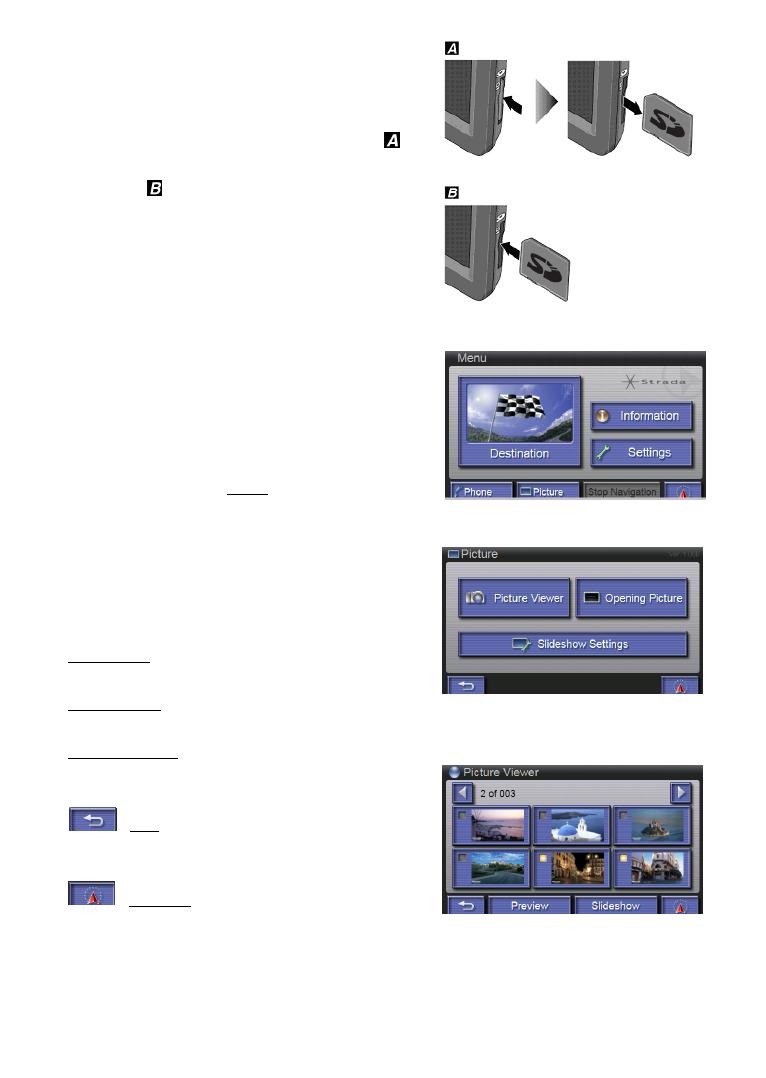
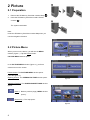
2.1 Preparation
1. Remove the SD Memory Card that contains Map. ( )
2. Insert the SD Memory Card that contains Picture
content. (
)
The system reactivates.
Note:
Insert the SD Memory Card that contains Map when you
use the navigation functions.
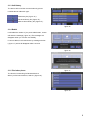
2.2 Picture Menu
When you turn on the device, you will see the MENU
window ( figure 1 ). Tap the
Picture button.
PICTURE MENU window opens.
In the PICTURE MENU window ( figure 2 ), you’ll see
several icons on the screen:
Picture viewer: The PICTURE MENU window opens.
( See the figure 3 ).
Opening Picture: The OPENING PICTURE window opens.
Slideshow Settings: The SLIDESHOW SETTINGS window
opens.
( Back ): Back to previous page ( MENU window
opens ).
( Show map ): The map opens.
figure 1
figure 2
figure 3
4

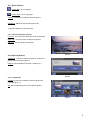
2.2.1 Picture Viewer
( To the left ): Go to left page.
( To the right ): Go to right page.
Preview: Preview and rotate the selected picture.
Slideshow: Slideshow the selected picture file.
To stop the Slideshow, tap the picture.
2.2.1.1 Preview (See the figure 4)
Left Turn: Turn the picture 90 degree Counterclockwise.
Right Turn: Turn the picture 90 degree clockwise.
Half Turn: Turn the picture 180 degree.
2.2.2 Opening Picture
Customize: To get into Customize page to customize a
picture file to be opening picture.
Default: Use the default picture file ( Strada logo ).
2.2.2.1 Customize
Preview: Preview and rotate the selected picture file
( See the figure 4 ).
OK: Set the selected picture to be opening picture.
figure 4
figure 5
figure 6
5

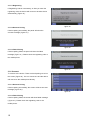
2.2.3 Slideshow Settings
Tap ( Toggle ) button to alternate between the
possible values.
Switching Time: Set each picture slideshow every 1, 2, 3, 4
or 5 second.
Mode
Normal: Picture showing by chosen sequentially.
Random: Picture showing by random type.
Note:
Switching Time might become longer than the setting
according to the file size of the picture.
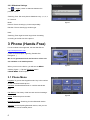
3 Phone (Hands-Free)
For the models to be supported, visit the Web Site at::
http://www.panasonic.com
( Refer to the description regarding Portable Car
Navigation. )
We do not guarantee that all the functions of this unit
are available on all mobile phones.
When you turn on the device, you will see the MENU
window ( figure 1 ). Tap the
Telephone button.
PHONE MENU window opens.
3.1 Phone Menu
Keypads: To get into the Keypads mode. Key-in the number
for the connected mobile phone.
Contacts: Contact address book. It could be stored 500
data.
Call History: The history of dial out and received message.
Redial: Redial the phone number.
Find Other Phone: Searching for other Bluetooth device.
Connect: List last 5 pairing Bluetooth device, and you can
select one to connect mobile phone.
figure 7
figure 1
figure 8
6
( Back ): Back to previous page.
( Show map ): The map opens.
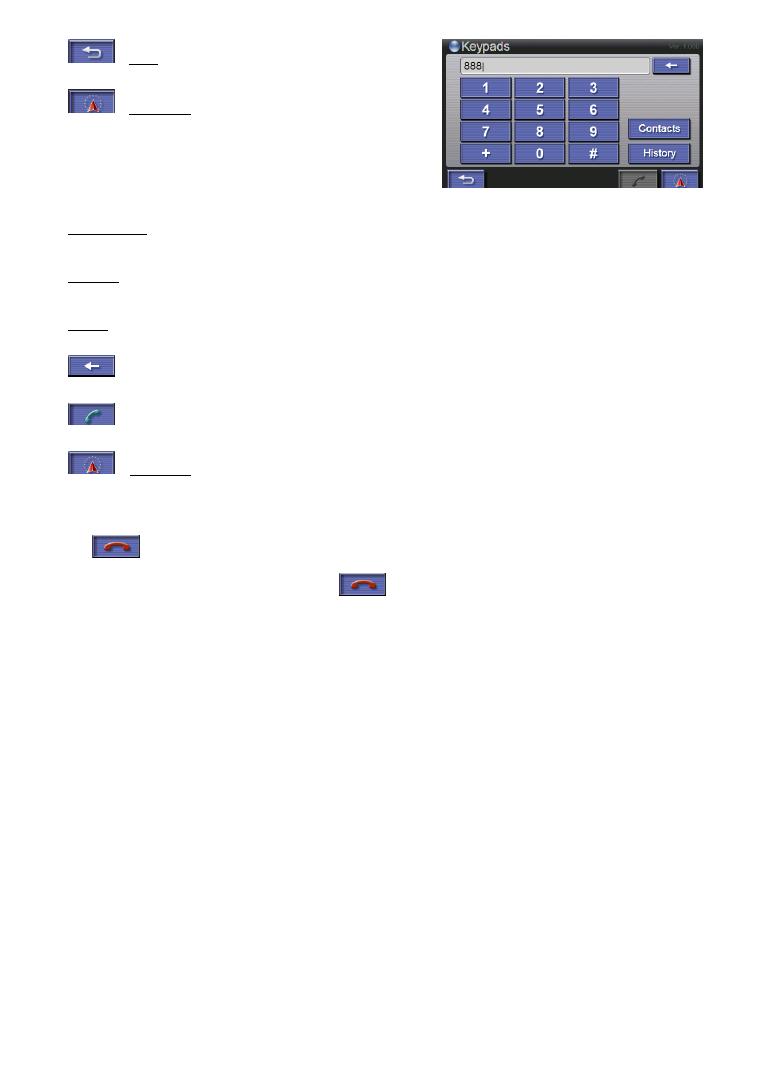
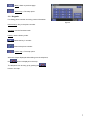
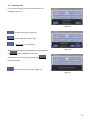
3.1.1 Keypads
For dialing phone number and using contact information.
Numeral keys: Key in the phone number.
Contacts: Into the Contacts mode.
History: Into the History mode.
: Delete the key in number.
: Dial out the phone number.
: ( Show map ): The map opens.
When the map is displayed while talking over the telephone,
the
button is displayed in the map.
The telephone can be hung up by pushing the
button in the map.
figure 9
7
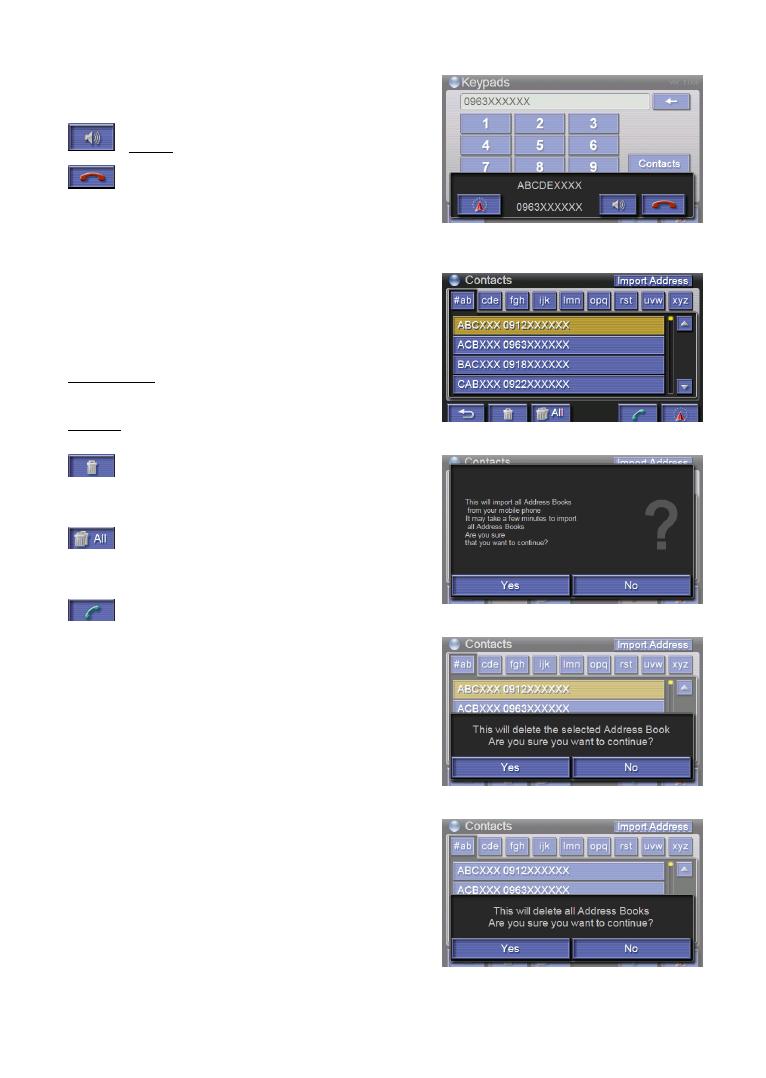
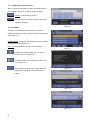
3.1.1.1 Adjusting the phone status
When you dial out the phone number, the panel will show
the message ( figure 10 ) to adjust the phone status
( Volume ) : Adjust phone volume.
: Hang up the phone. When you press the button,
the menu will clear.
3.1.2 Contacts
There are contact information that user can input the
address and phone number. The phone book can store 500
data ( figure 11 ).
Import Address: To transfer your address book from mobile
phone to this device ( figure 12 ).
#ab - xyz: Use alphabet to find out the contact data.
: To delete the selected data, then you have to
confirm Yes or No ( figure 13 ).
: To delete all data, then you have to confirm Yes
or No ( figure 14 ).
: Dial the phone number. Then screen will show
dialing page ( figure 10 ) and dial the phone
number.
figure 10
figure 11
figure 12
figure 13
figure 14
8

3.1.3 Call History
The device will record the communication by phone.
It will list last 20 calls each type.
: Dial history list ( figure 15 ).
: Received history list ( figure 15 ).
: Miss received history list ( figure 15 ).
3.1.4 Redial
It will redial the number. If you press redial button, screen
will show the message ( figure 16 ).The message will
disappear when you connect successfully.
If connect failed, it will remind user by message window
( figure 17 ) which will disappear after 5 second.
3.1.5 Find other phone
The function is searching for Bluetooth device.
When you find out the device, select it ( figure 18 ).
figure 15
figure 16
figure 17
figure 18
9

3.1.5.1 Registering
If Registering code is unnecessary, or after you enter the
registering code, the device will connect to another device
automatically ( figure 19 ).
3.1.5.2 Success Pairing
If device pairing successfully, the panel will show the
success message ( figure 20 ).
3.1.5.3 Failed Pairing
If device pairing failed, the panel will show the failed
message ( figure 21 ). Please check the registering code or
the mobile phone.
3.1.6 Connect
To connect to the device. There are last 5 pairing record on
the screen ( figure 22 ). You can choose one and the device
will connect to the mobile phone directly.
3.1.6.1 Success Pairing
If device pairing successfully, the screen will show success
message ( figure 20 ).
3.1.6.2 Failed Pairing
If device pairing failed, the screen will show failed message
( figure 21 ). Please check the registering code or the
mobile phone.
figure 19
figure 20
figure 21
figure 22
10
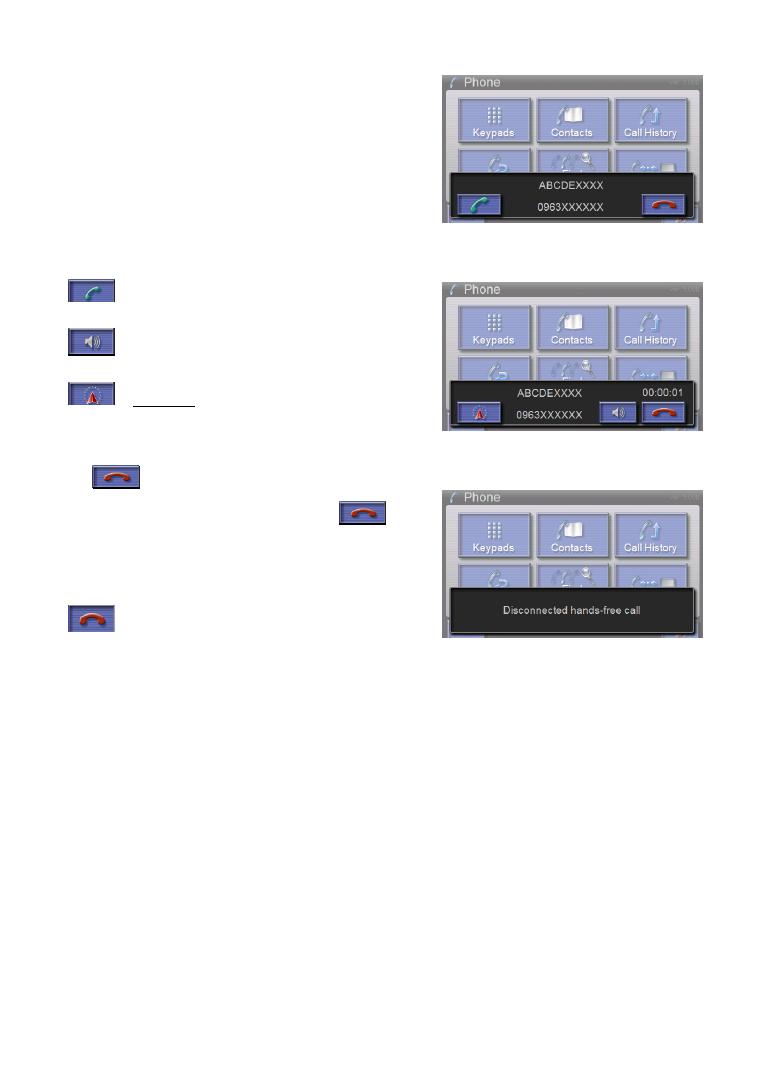
3.1.7 Incoming call
If you receive incoming call, the screen will show the
message ( figure 23 ).
: Accept incoming call ( figure 24 ).
: You can adjust the volume level.
: ( Show map ): The map opens.
When the map is displayed while talking over the telephone,
the
button is displayed in the map.
The telephone can be hung up by pushing the
button in the map.
: Disconnect the incoming call ( figure 25 ).
figure 23
figure 24
figure 25
11
-
 1
1
-
 2
2
-
 3
3
-
 4
4
-
 5
5
-
 6
6
-
 7
7
-
 8
8
-
 9
9
-
 10
10
-
 11
11


Panasonic CNGP50N Operating instructions
- Category
- Mobile phones
- Type
- Operating instructions
Ask a question and I''ll find the answer in the document
Finding information in a document is now easier with AI
Related papers
Other documents
-
Roadmate ROADMATE 6000 User manual
-
Ampire LOC200-3G Installation guide
-
Motorola MTP810Ex Feature User Manual
-
-
Casio Mobile E-mailer (Version 1.0) User manual
-
Samsung SGH-I317M User manual
-
Escort SmartMirror2 Owner's manual
-
Digi Wi-Point 3G User guide
-
Philips CT9688/00BBASIA User manual
-
Avaya 1165E User guide