GP Factor License Plate Relocation Kit Installation guide
- Type
- Installation guide

GP JEEP JL(JLU) License Plate & Backup Camera Relocation Kit w/ LED Wiring Harness
Included with your Kit:
License plate bracket stainless
Back up camera hood stainless
M14 stainless extended lug nuts
X2 M14x1.5 zinc hex screws
X2 ¼”-20 x ⅝” hex machine screws
X2 ¼”-20 nylon lock nuts
X2 8-32 screws for back up camera hood
X2 #8 split lock washers
X2 2-56 x ¾” button head screws for back up camera
X2 2-56 hex nuts
X2 #2 split lock washers
X1 pre-wired LED light with wiring harness and connector for license plate light
Instructions:
1. Remove your factory back up camera sleeve and remove your spare tire.
2. If using your factory carrier, you can leave your third brake light in its current location if it works in that spot for
your set up. Otherwise, remove your factory tire carrier and remove the third brake light, brake light wiring and
back up camera and harness from the assembly. Do not discard the wiring for the camera, it will be used.
3. Mount your camera on your new GP bracket using the supplied 2-56 hardware. Screws are only needed on the 3
o’clock and 9 o’clock positions. (Do not install your hood, as this will go on after you plug in your camera.)
4. Re-mount your spare with the supplied M14 extended lug nuts. Hand tighten. Do not use air tools on the
stainless lugs.
5. If you have wired your LED license plate harness supplied with your kit, mount the light portion to your bracket.
6. Mount your GP bracket to the M14 lug nuts using the supplied M14 hardware.
7. Plug in your back up camera with the factory harness and secure the camera hood with the 8-32 hardware
included.

8. Plug in the LED license plate light harness to the other end that is wired to your vehicle. (See below for these
specific instructions.)
9. Mount your license plate. This is the last step as you want the camera and LED light wired and connected first.
10. If relocating your third bracket light, mount that to the top of your GP bracket using the factory hardware.

For Wiring your New License plate light:
We have included 8+ feet of wire to make your install easier. There are many ways you can rewire this light. You can
choose to wire it to your passenger side brake light or any way that works for you. The license plate light can be wired to
any source that provides a constant power source when your lights are on. Our recommendation is to rewire it to the
passenger tail light. It’s the closest and easiest location on the JEEP JL. (NOTICE: factory wiring color may change with
model years so confirm your connection works prior to driving.)
1. DISCONNECT BATTERY PRIOR TO DOING ANY ELECTRICAL WORK ON YOUR JEEP.
2. Remove plastic cover inside your tailgate.
3. In your cargo area, passenger side rear plastic panel, remove the small cover and use a T40 torx wrench to
loosen and remove your taillight.
4. Remove the rubber seal for your tailgate on the passenger side.
5. Pop up the plastic trim piece on the seat belt, then remove your rear cargo area passenger side inside plastic
panel below the roll bar. They are plastic clips so be careful.
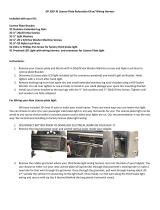
Wiring
The colors may vary but you want a positive and negative wire. We used the orange/white wire on the vehicle
side of the harness (Pictured) to connect our red wire to the orange/white and our black wire to the black wire.
Other people have used the blue and purple wires on the actual tail light end. Tap our red wire into the blue
wire and our black wire into the purple wire.
6. Check your connection. The LED light should turn on when you have your head lights and tail lights on.
7. Reassemble your rear panels securing your wiring inside your tailgate.
If you have any questions at all, please do not hesitate to email us at info@gp-factor.com. Thanks!
-
 1
1
-
 2
2
-
 3
3


GP Factor License Plate Relocation Kit Installation guide
- Type
- Installation guide
Ask a question and I''ll find the answer in the document
Finding information in a document is now easier with AI
Related papers
Other documents
-
Westin WJ2 Rear Bumper Installation guide
-
-
 Teraflex 4838500 Installation guide
-
Jeep 2020 Gladiator Owner's manual
-
-
-
 Rock Hard 4X4 Patriot Series Rear Bumper Installation guide
-
-
-

