
IMPORTANT SAFETY
INSTRUCTIONS
WARNING – READ AND SAVE THESE OPERATING
AND SAFETY INSTRUCTIONS BEFORE USING THIS
HEATER. IF YOU DO NOT UNDERSTAND THESE
INSTRUCTIONS OR PRODUCT LABELS PLEASE
CALL OUR CUSTOMER REPRESENTATIVES AT
(800) 477-0457 FOR ASSISTANCE BEFORE USING
THIS PRODUCT.
Warning – Failure to follow any of these safety
instructions could result in fire, injury or death.
YOUR RESPONSIBILITIES
Electrical appliances may expose people to hazards
that can cause severe injury as well as death. The
use of electrical products may create hazards that
include, but are not limited to, injury, fire, electrical
shock and electrical system damage. These
instructions are intended to provide you with the
information you need to use the product correctly
and to avoid such hazards.
When using electrical appliances, basic
precautions should always be followed to
reduce risk of fire, electric shock, and injury
to persons including the following:
1. Warning – Read all instructions before using
this heater.
2. Warning – This heater is hot when in use.
To avoid burns, do not let bare skin touch
hot surfaces. Use handles when moving this
heater. Keep combustible materials, such as
furniture, pillows, bedding, papers, clothes,
and curtains at least 3 feet (0.9 m) from the
front of the heater and keep them away from
all sides of the heater.
3. Warning – Extreme caution is necessary
when any heater is used by or near children
or invalids, and whenever the heater is left
operating and unattended.
4. Warning – Always unplug heater when not
in use.
5. Warning – DO NOT operate any heater with
a damaged cord or plug or after the heater
malfunctions, has been dropped or damaged
in any manner. Discard heater or return heater
to authorized service facility for examination
and/or repair.
6. Warning – For residential use only.
7. Warning – DO NOT use outdoors.
8. Warning – This heater is not intended for use
in bathrooms, laundry areas and similar indoor
locations. Never locate heater where it may fall
into a bathtub or other water container.
9. Warning – DO NOT run cord under carpeting.
DO NOT cover cord with throw rugs, runners,
or similar coverings. DO NOT route cord under
furniture or appliances. Arrange cord away
from traffic area and where it will not be
tripped over.
HeatGenius
TM
Ceramic Heater
HCE840 / HCE840C Series
Honeywell is a trademark of Honeywell International Inc., used under license by Helen of Troy Limited.
Honeywell International Inc. makes no representation or warranties with respect to this product.

2 3
ABOUT CERAMIC TECHNOLOGY
SET UP
MOVING THE HEATER
10. Warning – This appliance has a polarized plug
(one blade is wider than the other). To reduce
the risk of electric shock, this plug is intended
to fit in a polarized outlet only one way. If the
plug does not fit fully in the outlet, reverse the
plug. If it still does not fit, contact a qualified
electrician. DO NOT attempt to defeat this
safety feature.
11. Warning – This heater draws 12.5 amps
during operation. To prevent overloading a
circuit, do not plug the heater into a circuit that
already has other appliances working.
12. Warning – It is normal for the plug to feel
warm to the touch; however, a loose fit
between the AC outlet (receptacle) and plug
may cause overheating and distortion of the
plug. Contact a qualified electrician to replace
loose or worn outlet.
13. Warning – To disconnect the heater, first turn
off the product, then grip the plug body and
pull it from the wall outlet. Never pull by the
cord.
14. Warning – DO NOT insert or allow foreign
objects to enter any ventilation or exhaust
opening as this may cause an electric shock
or fire, or damage the heater.
15. Warning – To prevent a possible fire, do not
block air intakes or exhaust in any manner.
DO NOT use on soft surfaces, like a bed, or
where openings may become blocked.
16. Warning – A heater has hot and arcing or
sparking parts inside. DO NOT use it in areas
where gasoline, paint or flammable liquids are
used or stored.
17. Warning – Use this heater only as described in
this manual. Any other use not recommended
by the manufacturer may cause fire, electric
shock, or injury to persons.
18. Warning – Always plug heater directly into
a wall outlet/receptacle. Never use with an
extension cord or relocatable power tap
(outlet/power strip).
19. Warning – Never tamper with this product
or attempt to fix it. Any tampering with, or
modification of this product can result in
serious injury, death, or fire. Risk of electric
shock. DO NOT open. There are no user
serviceable parts inside.
20. Warning – DO NOT remove product labels
that contain warnings or safety instruction.
21. Caution – The output of this heater may vary
and its temperature may become intense
enough to burn exposed skin. Use of this
heater is not recommended for persons with
reduced sensitivity to heat or an inability to
react to avoid burns.
22. Caution – Before cleaning, or storage, or when
not in use, turn the product’s controls to the
OFF position and unplug the heater from the
electrical outlet and allow to cool.
23. Caution – Place the heater on a firm, level,
open surface free from obstructions and at
least 3 feet (0.9 m) away from any combustible
materials. DO NOT use on an unstable surface
such as bedding or deep carpeting. Be sure
the heater is not in a position where it may be
tripped over by small children or pets.
24. Caution – If your home has aluminum
wiring have a licensed electrician check your
receptacle’s connections. When using a 1500
watt heater, aluminum wire connections can
cause a safety issue.
25.
SAVE THESE
INSTRUCTIONS
• Ceramic heaters generate heat by passing electricity through heating wires embedded in ceramic plates.
• In the Honeywell HeatGenius
TM
Ceramic Heater, air is drawn into the back of the heater by two fans,
through the ceramic elements and out the front of the heater to gently introduce warm air into the room.
• This type of heating technology provides consistent, even heating.
• For best results, place heater on the floor and allow heater to run for 5-10 minutes to reach maximum
heat output.
• The Honeywell HeatGenius
TM
Ceramic Heater requires no assembly. Simply unpack heater and save all
packaging materials for off-season storage.
• Place the heater on a firm, level, open surface, free from obstructions and at least 3 feet (0.9m) away
from any wall or combustible material.
• DO NOT use on an unstable surface such as bedding or deep carpeting.
• BE SURE THE HEATER IS NOT IN A POSITION WHERE IT MAY BE TRIPPED OVER BY CHILDREN OR PETS.
• Turn off the heater.
• Allow it to cool for ten minutes.
• Unplug heater and move it to desired location. This heater is equipped with a Cool Touch handle for your
convenience.
• NOTE: NEVER LEAVE AN OPERATING UNIT UNATTENDED
• With heater in the OFF position (
), plug the heater into a polarized 120V outlet. DO NOT FORCE THE
POLARIZED PLUG INTO THE OUTLET; it will only fit one way.
• The Honeywell HeatGenius
TM
Ceramic Heater is designed to be placed at least 3 feet away from the wall,
allowing for convection room heating and safer operation.
• Turn heater on by pressing the Power Button (
).The Power Indicator will light and the heater will start in
the Constant HI Room Setting (Hi).
NOTE: Because the Low settings do not require as much electricity to operate, they are more energy
efficient and may be a better option if you are concerned about saving energy.
• When done using this appliance, make sure to manually turn the heater OFF.
• To shut the heater off, press the Power Button (
) and the heater will begin Powering Down. The heater will
shut off after counting down 6 seconds in the Temperature Display to cool down the internal components.
• See next section for overview of heat settings.
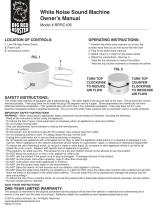
OPERATION
Power
Button
2 Hour Auto-off T
imer
with 30 minute
phased intervals
Low Heat &
White Noise
Setting
Thermostat
Control Buttons
Desired Temperature
Display
P
ersonal Space
Heat Settings
Floor
Area Heat
Setting
Whole Room Heat Settings
(Constant Hi/Lo)
Fig. 1
Note: There is a 6 second countdown delay when you
turn the power off. This is a built-in safety feature.

4 5
6 HEAT SETTINGS THAT GIVE YOU CONTROL OF YOUR COMFORT
SAFETY FEATURES
TROUBLESHOOTING
Problem Solution
If your Honeywell HeatGenius
TM
Ceramic Heater shuts off
unexpectedly or fails to
operate, one of your heater
safety features may have
been activated to prevent
overheating.
• Be sure it is plugged in and that the electrical outlet is working.
• Check for any obstructions. If you find an obstruction, turn the heater
OFF (
) and unplug it.
• Allow the heater to cool completely, then remove the obstruction.
Wait at least 10 minutes, then re-plug the heater in and follow the
OPERATION instructions.
• Press and hold both Thermostat Control Buttons (
) for three seconds to change between Fahrenheit
and Celsius and back.
It is recommended that the Honeywell HeatGenius
TM
Ceramic Heater be cleaned at least once a month and
before off-season storage.
• Turn Off (
) and unplug heater. Allow unit to cool.
• Use a dry cloth only to clean the external surfaces of the heater. DO NOT USE WATER, WAXES,
POLISHES OR ANY CHEMICAL SOLUTION.
• Before storing, clean the Ceramic Heater using the above-mentioned steps. Wrap the cord around the
unit. Place in its original box and store it in a cool, dry place.
• This heater does not disassemble.
FAHRENHEIT TO CELSIUS
CLEANING AND STORAGE
Model(s) Unit dims Amps Unit
Voltage
Max
Watts
Max BTUs
HCE840B /
HCE840C
10.2” L x 5.6” W x 17.3” H 12.5 120V, 60Hz 1575 5118
PRODUCT SPECIFICATIONS
Fig. 3
Fig. 2
Low Heat
& "White
Noise"
Setting
2 Hour
Auto-off
Timer with
30 Minute
Phased
Intervals
6 Ways to Heat the Space You are In - Once your heater is ON, use the control buttons on the bottom to
select the desired heat setting for your needs. Your heater will start on the Constant Hi Room heat setting
each time you turn the heater on. Here is a handy reference to help select the heat option that best suits
your desired comfort level:
FLOOR AREA – (LOW HEAT)
This setting uses the lower level heating element only to provide a comfortable, gentle heat to warm up the
floor area in front of the heater.
PERSONAL – (MODERATE HEAT)
This setting uses a moderate heat level to warm you personally wherever you may be relaxing (reading,
watching TV, etc.). The LO option (
) provides a soothing heat level, while the HI option ( ) slightly
increases heat output, allowing you to adjust to your desired comfort level.
ROOM – (MODERATE-HIGH HEAT)
Best for whole room heating, use this setting to bring warmth to cooler, drafty rooms. The LO option
provides a moderate heat level, while the HI option uses maximum heat output to create a warmer
environment.
THERMOSTAT – (MODERATE-HIGH HEAT)
To set the Thermostat, press the Thermostat Control Buttons (
) to choose your Desired
Temperature. The Desired Temperature will flash five times and then the Current Temperature in the room
will display as a steady number. The Thermostat can operate on either HI or LO heat levels to achieve
Desired Temperature by pressing the (
) button under Room.
NOTE: If the Current Temperature is higher than your Desired Temperature, the heater will go into cool down
mode and then shut-off until the room temperature falls below this setting or until the Desired Temperature
is changed.
HEATPHASE™ TIMER
The new HeatPhase Timer is an auto-off feature that gradually transitions the room temperature from
warmer to cooler. The timer starts at high heat and steps down 4 different heat levels until it shuts off - over
a 2 hour period. This feature is ideal for setting a comfortable, relaxing environment. (Fig. 2) The timer can
also be toggled to start at whichever level desired.
QUIET MODE
The new Quiet Mode features uses a low heat setting and fan speed to produce a gentle "white noise" and
soothing warmth. (Fig. 3)
The Honeywell HeatGenius
TM
Ceramic Heater is equipped with several devices and features for
added protection:
• A four way tip-over switch that disables the heater if it is accidently tipped in any direction. If tipped over,
the unit should be set upright and follow the OPERATION instructions.
• A high temperature safety control prevents overheating. If activated, unplug the device and wait at least
10 minutes for unit to cool. Then plug the heater back in and follow the OPERATION instructions.
• The heater is also equipped with a thermal cut-off fuse that will permanently shut down the heater should
it operate at a highter than normal temperature. If activated, the unit will need to be replaced.
• This heater was created using high quality, heat-resistant plastics and has a Cool Touch handle.

6 7
3 YEAR LIMITED WARRANTY
YOU SHOULD FIRST READ ALL INSTRUCTIONS
BEFORE ATTEMPTING TO USE THIS PRODUCT.
A. This 3 year limited warranty applies to
repair or replacement of product found to be
defective in material or workmanship. This
warranty does not apply to damage resulting
from commercial, abusive, unreasonable use
or supplemental damage. Defects that are
the result of normal wear and tear will not
be considered manufacturing defects under
this warranty. KAZ IS NOT LIABLE FOR
INCIDENTAL OR CONSEQUENTIAL DAMAGES
OF ANY NATURE, ANY IMPLIED WARRANTY
OF MERCHANTABILITY OR FITNESS FOR A
PARTICULAR PURPOSE ON THIS PRODUCT IS
LIMITED IN DURATION TO THE DURATION OF
THIS WARRANTY. Some jurisdictions do not
allow the exclusion or limitation of incidental
or consequential damages or limitations on
how long an implied warranty lasts, so the
above limitations or exclusions may not apply
to you. This warranty gives you specific legal
rights, and you also may have other rights
which vary from jurisdiction to jurisdiction.
This warranty applies only to the original
purchaser of this product from the original
date of purchase.
B. At its option, Kaz will repair or replace this
product if it is found to be defective in material
or workmanship.
C. This warranty does not cover damage
resulting from any unauthorized attempts to
repair or from any use not in accordance with
the instruction manual.
Customer Service
Questions or comments
Call us toll-free at: 1-800-477-0457
E-mail: [email protected]
Or visit our website at:
www.HoneywellPluggedIn.com/heaters
Please be sure to specify a model number.
NOTE: IF YOU EXPERIENCE A PROBLEM, PLEASE
CONTACT CONSUMER RELATIONS FIRST OR
SEE YOUR WARRANTY. DO NOT RETURN
THE PRODUCT TO THE ORIGINAL PLACE OF
PURCHASE. DO NOT ATTEMPT TO OPEN THE
MOTOR HOUSING YOURSELF, DOING SO MAY VOID
YOUR WARRANTY AND CAUSE DAMAGE TO THE
PRODUCT OR PERSONAL INJURY.
CONSIGNES
DE SÉCURITÉ
IMPORTANTES
AVERTISSEMENT – LISEZ LES CONSIGNES
D’EMPLOI ET DE SÉCURITÉ AVANT D’UTILISER
LE RADIATEUR ET GARDEZ-LES. SI VOUS NE
COMPRENEZ PAS LES INSTRUCTIONS OU LES
ÉTIQUETTES DE L’APPAREIL, APPELEZ LE SERVICE
À LA CLIENTÈLE AU (800) 477-0457 AVANT
L’UTILISATION, POUR OBTENIR DES EXPLICATIONS.
Avertissement – Ignorer les consignes de sécurité
peut être cause d’incendie, de blessures ou de mort.
VOS RESPONSABILITÉS
Les appareils électriques peuvent exposer à
des dangers aptes à causer des blessures
graves, voire la mort. Leur emploi peut entraîner
des risques, y compris mais sans s’y limiter, de
blessures, d’incendies, de choc électrique et de
dommages à l’installation électrique. L’objectif de
ces instructions est de fournir les renseignements
nécessaires pour utiliser correctement l’appareil et
ainsi éviter ces dangers..
L’emploi d’appareils électriques requiert
l’observation de précautions de base pour
réduire les risques d’incendies, de chocs
électriques et de blessures corporelles, y
compris des suivantes :
1. Avertissement – Lisez toutes les instructions
avant d’employer ce radiateur.
2. Avertissement – Un radiateur qui marche est
chaud. Pour éviter les brûlures, veillez à ce
que votre peau nue ne touche pas de surfaces
chaudes. Déplacez-le à l’aide des poignées.
Gardez les corps combustibles tels meubles,
oreillers, literie, papiers, vêtements et rideaux,
à au moins 0,9 m (3 pi) de l’avant du radiateur
et éloignez-les des côtés.
3. Avertissement – Redoublez de prudence
quand le radiateur est utilisé par des enfants
ou des personnes handicapées, ou près d’eux,
ainsi que quand vous le laissez sans surveillance.
4. Avertissement – Débranchez toujours un
radiateur qui ne sert pas.
5. Avertissement – N’employez PAS un radiateur
dont le cordon ou la fiche est abîmé, qui a mal
fonctionné, a été échappé ou endommagé de
quelque façon. Jetez-le ou faites-le vérifier
et/ou réparer à un centre de services agréé.
6. Avertissement – Pour utilisation résidentielle.
7. Avertissement – Ne PAS l’utiliser dehors.
8. Avertissement – Ce radiateur n’est pas
destiné aux salles de bains et de lavage ou
autres pièces intérieures. Ne le posez jamais
au-dessus d’une baignoire ou d’une cuve d’eau
dans laquelle il puisse tomber.
9. Avertissement – N’acheminez PAS le cordon
sous tapis ou moquette. Ne le recouvrez PAS
de carpettes, tapis de corridor, ou autres. Ne
le passez NI sous des meubles NI sous des
appareils. Éloignez le cordon du passage afin
qu’il ne puisse pas faire trébucher.
AVERTISSEMENT
Honeywell est une marque de commerce de Honeywell International, Inc. qu’utilise Helen of Troy Limited sous licence.
Honeywell International Inc. ne fait aucune assertion et n’offre aucune garantie en ce qui concerne ce produit.
HeatGenius
TM
Ceramic Heater
HCE840 / HCE840C Series

8 9
10. Avertissement – Cet appareil est équipé
d’une fiche polarisée (une branche est plus
large que l’autre). Pour réduire les risques de
choc électrique, la fiche n’enfonce dans les
prises polarisées que dans un sens. Si elle ne
s’adapte pas sûrement dans la prise, inversez-
la. Si elle ne rentre toujours pas, faites appel à
un électricien agréé. Ne tentez en AUCUN cas
de déjouer cette caractéristique de sécurité.
11. Avertissement – Ce radiateur tire 12,5 A
au réglage haut. Afin de ne pas surcharger
le circuit, ne branchez pas le radiateur sur le
même circuit que d’autres appareils en marche.
12. Avertissement – Il est normal que la fiche
soit un peu chaude au toucher; une connexion
prise de courant alternatif et fiche mal
assujettie peut surchauffer et déformer la fiche.
Demandez à un électricien de remplacer les
prises ayant du jeu ou usées.
13. Avertissement – Pour débrancher le radiateur,
éteignez-le puis tenez la fiche entre le pouce et
l’index pour la sortir de la prise. Ne tirez jamais
sur le cordon.
14. Avertissement – Veillez à ce qu’AUCUN corps
étranger ne pénètre dans les orifices d’aération
ou d’évacuation, sous peine de provoquer choc
électrique ou incendie et d’abîmer l’appareil.
15. Avertissement – Pour éviter tout risque
d’incendie, ne bouchez les orifices d’admission
d’air ou d’évacuation en aucune façon. Ne
posez PAS le radiateur sur une surface molle,
un lit par ex., qui pourrait boucher les orifices.
16. Avertissement – Un radiateur renferme des
pièces chaudes et produisant des étincelles. Ne
l’employez PAS dans les lieux où sont utilisés
ou entreposés de l’essence, de la peinture ou
des liquides inflammables.
17. Avertissement – N’utilisez le radiateur que tel
que décrit dans ce guide. Tout emploi que ne
conseille pas le fabricant pourrait entraîner choc
électrique, incendie ou blessures corporelles.
18. Avertissement – Branchez toujours le
radiateur directement sur la prise murale.
N’employez ni cordon prolongateur ni prise
déplaçable (barre multiprise).
19. Avertissement – N’altérez pas le radiateur et
ne tentez pas de le réparer. Toute altération
ou modification pourrait entraîner blessures
graves, mort ou incendie. Risque de choc
électrique. Ne l’ouvrez PAS, il ne contient pas
de pièces que vous puissiez réparer.
20. Avertissement – N’enlevez PAS les étiquettes
de mise en garde ou d’instructions de sécurité.
21. Attention – Le rendement du radiateur peut
varier et sa température être assez élevée pour
brûler la peau nue. Employer l’appareil est
déconseillé aux personnes dont la sensibilité à
la chaleur est limitée ou qui sont incapables de
vite réagir pour éviter les brûlures.
22. Attention – ÉTEIGNEZ le radiateur, débranchez-
le et laissez-le refroidir avant de le nettoyer, de
le ranger ainsi qu’entre utilisations.
23. Attention – Posez le radiateur sur une
surface rigide, plane et d’aplomb, exempte
d’obstructions et située à au moins 0,9 m
(3 pi) des matières combustibles. NE le placez
PAS sur une surface instable – literie ou
moquette épaisse, par exemple. Veillez aussi
à ce qu’il ne risque pas de faire trébucher les
jeunes enfants ou les animaux de compagnie.
24. Attention – Si l’installation électrique de
la maison comporte des fils d’aluminium,
faites vérifier la connexion à la prise par un
électricien agréé. Utiliser tout radiateur de
1500 watts avec câblage d’aluminium peut
compromettre la sécurité.
25.
GARDEZ CES
INSTRUCTIONS
QUELQUES MOTS AU SUJET DE LA TECHNOLOGIE CÉRAMIQUE
MISE EN PLACE
DÉPLACEMENT DU RADIATEUR
• Ceramic heaters generate heat by passing electricity through heating wires embedded in ceramic plates.
• In the Honeywell HeatGenius
TM
Ceramic Heater, air is drawn into the back of the heater by two fans,
through the ceramic elements and out the front of the heater to gently introduce warm air into the room.
• This type of heating technology provides consistent, even heating.
• For best results, place heater on the floor and allow heater to run for 5-10 minutes to reach maximum
heat output.
• The Honeywell HeatGenius
TM
Ceramic Heater requires no assembly. Simply unpack heater and save all
packaging materials for off-season storage.
• Place the heater on a firm, level, open surface, free from obstructions and at least 3 feet (0.9m) away
from any wall or combustible material.
• DO NOT use on an unstable surface such as bedding or deep carpeting.
• BE SURE THE HEATER IS NOT IN A POSITION WHERE IT MAY BE TRIPPED OVER BY CHILDREN OR PETS.
• Turn off the heater.
• Allow it to cool for ten minutes.
• Unplug heater and move it to desired location. This heater is equipped with a Cool Touch handle for your
convenience.
MODE D’EMPLOI
• NOTE: NEVER LEAVE AN OPERATING UNIT UNATTENDED
• With heater in the OFF position (
), plug the heater into a polarized 120V outlet. DO NOT FORCE THE
POLARIZED PLUG INTO THE OUTLET; it will only fit one way.
• The Honeywell HeatGenius
TM
Ceramic Heater is designed to be placed at least 3 feet away from the wall,
allowing for convection room heating and safer operation.
• Turn heater on by pressing the Power Button (
).The Power Indicator will light and the heater will start in
the Constant HI Room Setting (Hi).
NOTE: Because the Low settings do not require as much electricity to operate, they are more energy
efficient and may be a better option if you are concerned about saving energy.
• When done using this appliance, make sure to manually turn the heater OFF.
• To shut the heater off, press the Power Button (
) and the heater will begin Powering Down. The heater will
shut off after counting down 6 seconds in the Temperature Display to cool down the internal components.
• See next section for overview of heat settings.
Power
Button
Thermostat
Control Buttons
Desired T
emperature
Display
P
ersonal Space
Heat Settings
Whole Room Heat Settings
(Constant Hi/Lo)
Fig. 1
2 Hour Auto-off Timer
with 30 minute
phased intervals
Low Heat &
White Noise
Setting
Floor
Area Heat
Setting
Note: There is a 6 second countdown delay when you
turn the power off. This is a built-in safety feature.

10 11
CARACTÉRISTIQUES DE SÉCURITÉ
DÉPANNAGE
Problème Solution
If your Honeywell HeatGenius
TM
Ceramic Heater shuts off
unexpectedly or fails to
operate, one of your heater
safety features may have
been activated to prevent
overheating.
• Assurez-vous que le radiateur soit branché et que la prise
soit fonctionnelle.
• Vérifiez qu’il n’y ait pas d’obstructions. Si vous découvrez une
obstruction, ÉTEIGNEZ (
) le radiateur et débranchez-le.
• Laissez totalement refroidir le radiateur avant d’éliminer
l’obstruction. Attendez au moins 10 minutes, puis rebranchez
le radiateur et suivez les instructions données sous la rubrique
intitulée «MODE D’EMPLOI».
It is recommended that the Honeywell HeatGenius
TM
Ceramic Heater be cleaned at least once a month and
before off-season storage.
• Turn Off (
) and unplug heater. Allow unit to cool.
• Use a dry cloth only to clean the external surfaces of the heater. DO NOT USE WATER, WAXES, POLISHES
OR ANY CHEMICAL SOLUTION.
• Before storing, clean the Ceramic Heater using the above-mentioned steps. Wrap the cord around the
unit. Place in its original box and store it in a cool, dry place.
• This heater does not disassemble.
• Appuyez sur les deux touches du thermostat (
) pendant trois (3) secondes pour passer de l’échelle
Fahrenheit à l’échelle Celsius et vice versa.
ENTRETIEN ET RANGEMENT
ÉCHELLES FAHRENHEIT ET CELSIUS
Modèle Dimensions de l’appareil
(longueur x largeur x
hauteur)
Intensité Tension Puissance
maximale
Puissance
calorifique
HCE840B /
HCE840C
22 x 17 x 32,5 cm – 1,45 kg
8,7 x 6,7 x 12,8 po – 3,2 lb
12,5
ampères
120 volts,
60 hertz
1575 watts 5118 Btu
SPÉCIFICATIONS DU PRODUIT
6 HEAT SETTINGS THAT GIVE YOU CONTROL OF YOUR COMFORT
Fig. 3
Fig. 2
Low Heat
& "White
Noise"
Setting
2 Hour
Auto-off
Timer with
30 Minute
Phased
Intervals
6 Ways to Heat the Space You are In - Once your heater is ON, use the control buttons on the bottom to
select the desired heat setting for your needs. Your heater will start on the Constant Hi Room heat setting
each time you turn the heater on. Here is a handy reference to help select the heat option that best suits
your desired comfort level:
FLOOR AREA – (LOW HEAT)
This setting uses the lower level heating element only to provide a comfortable, gentle heat to warm up the
floor area in front of the heater.
PERSONAL – (MODERATE HEAT)
This setting uses a moderate heat level to warm you personally wherever you may be relaxing (reading,
watching TV, etc.). The LO option (
) provides a soothing heat level, while the HI option ( ) slightly
increases heat output, allowing you to adjust to your desired comfort level.
ROOM – (MODERATE-HIGH HEAT)
Best for whole room heating, use this setting to bring warmth to cooler, drafty rooms. The LO option
provides a moderate heat level, while the HI option uses maximum heat output to create a warmer
environment.
THERMOSTAT – (MODERATE-HIGH HEAT)
To set the Thermostat, press the Thermostat Control Buttons (
) to choose your Desired
Temperature. The Desired Temperature will flash five times and then the Current Temperature in the room
will display as a steady number. The Thermostat can operate on either HI or LO heat levels to achieve
Desired Temperature by pressing the (
) button under Room.
NOTE: If the Current Temperature is higher than your Desired Temperature, the heater will go into cool down
mode and then shut-off until the room temperature falls below this setting or until the Desired Temperature
is changed.
HEATPHASE™ TIMER
The new HeatPhase Timer is an auto-off feature that gradually transitions the room temperature from
warmer to cooler. The timer starts at high heat and steps down 4 different heat levels until it shuts off - over
a 2 hour period. This feature is ideal for setting a comfortable, relaxing environment. (Fig. 2) The timer can
also be toggled to start at whichever level desired.
QUIET MODE
The new Quiet Mode features uses a low heat setting and fan speed to produce a gentle "white noise" and
soothing warmth. (Fig. 3)
The Honeywell HeatGenius
TM
Ceramic Heater is equipped with several devices and features for
added protection:
• A four way tip-over switch that disables the heater if it is accidently tipped in any direction. If tipped over,
the unit should be set upright and follow the OPERATION instructions.
• A high temperature safety control prevents overheating. If activated, unplug the device and wait at least
10 minutes for unit to cool. Then plug the heater back in and follow the OPERATION instructions.
• The heater is also equipped with a thermal cut-off fuse that will permanently shut down the heater
should it operate at a highter than normal temperature. If activated, the unit will need to be replaced.
• This heater was created using high quality, heat-resistant plastics and has a Cool Touch handle.
Page is loading ...

14 15
10. Advertencia – Este calefactor cuenta con un
enchufe polarizado (una clavija es más ancha
que la otra). Para reducir el riesgo de descarga
eléctrica, este enchufe está diseñado para
encajar en un tomacorriente polarizado sólo de
manera unidireccional. Si el enchufe no encaja
completamente en el tomacorriente, inviértalo. Si
aún no encaja, contacte a un electricista calificado.
NO intente anular esta característica de seguridad.
11. Advertencia – Este calefactor utiliza 12.5 amperes
durante su operación. Para evitar una sobrecarga,
no enchufe el calefactor a un circuito que ya tenga
otros aparatos encendidos.
12. Advertencia – Es normal que el enchufe se sienta
caliente al tacto; sin embargo, una conexión suelta
entre la salida de CA (tomacorriente) y el enchufe
puede provocar sobrecarga y deformación del
enchufe. Pida a un electricista capacitado que
cambie el tomacorriente flojo o defectuoso.
13. Advertencia – Para desconectar el calefactor,
primero apague el aparato, después sujete el
enchufe y sáquelo del tomacorriente. Nunca tire
del cable.
14. Advertencia – NO introduzca ni permita que
entren objetos extraños por las aberturas de
ventilación o evacuación ya que puede causar
descarga eléctrica o incendio, o daño al calefactor.
15. Advertencia – Para prevenir un posible incendio,
no tape de ninguna manera las entradas o salidas
de aire.
NO coloque en superficies blandas, como la cama
o donde las aberturas puedan taparse.
16. Advertencia – Un calefactor contiene en su
interior piezas calientes que generan arcos
voltaicos o chispas. NO utilice el aparato en áreas
donde se utilice o almacene gasolina, pintura o
líquidos inflamables.
17. Advertencia – Utilice este calefactor sólo como
se describe en este manual. Cualquier otro uso
no recomendado por el fabricante puede causar
incendio, descarga eléctrica o heridas corporales.
18. Advertencia – Siempre conecte el calefactor
directamente en un tomacorriente/receptáculo.
Nunca utilice con un cable de extensión o un
tomacorriente móvil (enchufe/contacto múltiple).
19. Advertencia – Nunca manipule este producto o
intente arreglarlo. Cualquier manipulación con, o
modificación de este producto puede resultar en
serias heridas, la muerte, o incendio. Riesgo de
descarga eléctrica. NO lo abra. No hay piezas útiles
en el interior para el usuario.
20. Advertencia – NO quite las etiquetas del producto
que contengan advertencias o instrucciones de
seguridad.
21. Precaución – La cantidad de calor que emite
este calefactor es variable y su temperatura
puede llegar a ser lo suficientemente intensa para
quemar la piel expuesta. El uso de este calefactor
no es recomendable para personas con menor
sensibilidad al calor o incapaces de reaccionar
para evitar quemaduras.
22. Precaución – Antes de limpiar, o guardar, o
cuando no esté en uso, APAGUE los controles
del aparato y desconecte el calefactor del
tomacorriente y permita que se enfríe.
23. Precaución – Coloque el calefactor en una
superficie firme, plana y libre de obstáculos y al
menos a 0.9 m (3 pies) de distancia de cualquier
material inflamable. NO utilice en superficies
inestables como la cama o alfombras gruesas.
Asegúrese que el calefactor no esté en un lugar
en donde los niños pequeños o mascotas puedan
tropezarse con el.
24. Precaución – Si su hogar cuenta con cableado
de aluminio permita que un electricista autorizado
revise las conexiones de los tomacorrientes.
Cuando utilice un calefactor de 1500 watts, las
conexiones del cableado de aluminio puede causar
problemas de seguridad.
25.
GUARDE ESTAS
INSTRUCCIONES
ACERCA DE LA TECNOLOGÍA CERÁMICA
INSTALACIÓN
MOVER EL CALEFACTOR
• Ceramic heaters generate heat by passing electricity through heating wires embedded in ceramic plates.
• In the Honeywell HeatGenius
TM
Ceramic Heater, air is drawn into the back of the heater by two fans,
through the ceramic elements and out the front of the heater to gently introduce warm air into the room.
• This type of heating technology provides consistent, even heating.
• For best results, place heater on the floor and allow heater to run for 5-10 minutes to reach maximum
heat output.
• The Honeywell HeatGenius
TM
Ceramic Heater requires no assembly. Simply unpack heater and save all
packaging materials for off-season storage.
• Place the heater on a firm, level, open surface, free from obstructions and at least 3 feet (0.9m) away
from any wall or combustible material.
• DO NOT use on an unstable surface such as bedding or deep carpeting.
• BE SURE THE HEATER IS NOT IN A POSITION WHERE IT MAY BE TRIPPED OVER BY CHILDREN OR PETS.
• Turn off the heater.
• Allow it to cool for ten minutes.
• Unplug heater and move it to desired location. This heater is equipped with a Cool Touch handle for your
convenience.
OPERACIÓN
• NOTE: NEVER LEAVE AN OPERATING UNIT UNATTENDED
• With heater in the OFF position (
), plug the heater into a polarized 120V outlet. DO NOT FORCE THE
POLARIZED PLUG INTO THE OUTLET; it will only fit one way.
• The Honeywell HeatGenius
TM
Ceramic Heater is designed to be placed at least 3 feet away from the wall,
allowing for convection room heating and safer operation.
• Turn heater on by pressing the Power Button (
).The Power Indicator will light and the heater will start in
the Constant HI Room Setting (Hi).
NOTE: Because the Low settings do not require as much electricity to operate, they are more energy
efficient and may be a better option if you are concerned about saving energy.
• When done using this appliance, make sure to manually turn the heater OFF.
• To shut the heater off, press the Power Button (
) and the heater will begin Powering Down. The heater will
shut off after counting down 6 seconds in the Temperature Display to cool down the internal components.
• See next section for overview of heat settings.
Power
Button
2 Hour Auto-off T
imer
with 30 minute
phased intervals
Low Heat &
White Noise
Setting
Thermostat
Control Buttons
Desired Temperature
Display
P
ersonal Space
Heat Settings
Floor
Area Heat
Setting
Whole Room Heat Settings
(Constant Hi/Lo)
Fig. 1
Note: There is a 6 second countdown delay when you
turn the power off. This is a built-in safety feature.

16 17
CARACTERÍSTICAS DE SEGURIDAD
The Honeywell HeatGenius
TM
Ceramic Heater is equipped with several devices and features for
added protection:
• A four way tip-over switch that disables the heater if it is accidently tipped in any direction. If tipped over,
the unit should be set upright and follow the OPERATION instructions.
• A high temperature safety control prevents overheating. If activated, unplug the device and wait at least
10 minutes for unit to cool. Then plug the heater back in and follow the OPERATION instructions.
• The heater is also equipped with a thermal cut-off fuse that will permanently shut down the heater should
it operate at a highter than normal temperature. If activated, the unit will need to be replaced.
• This heater was created using high quality, heat-resistant plastics and has a Cool Touch handle.
SOLUCIÓN DE PROBLEMAS
Problema Solución
If your Honeywell HeatGenius
TM
Ceramic Heater shuts off
unexpectedly or fails to
operate, one of your heater
safety features may have
been activated to prevent
overheating.
• Asegúrese que esté conectado y que el tomacorriente
esté funcionando.
• Verifique si hay obstrucciones. Si encuentra alguna, APAGUE el
calefactor (
) y desconéctelo.
• Permita que el calefactor se enfríe completamente, luego quite
la obstrucción. Espere por lo menos 10 minutos, luego vuelva a
conectar el calefactor y siga las instrucciones de OPERACIÓN.
It is recommended that the Honeywell HeatGenius
TM
Ceramic Heater be cleaned at least once a month and
before off-season storage.
• Turn Off (
) and unplug heater. Allow unit to cool.
• Use a dry cloth only to clean the external surfaces of the heater. DO NOT USE WATER, WAXES, POLISHES
OR ANY CHEMICAL SOLUTION.
• Before storing, clean the Ceramic Heater using the above-mentioned steps. Wrap the cord around the unit.
Place in its original box and store it in a cool, dry place.
• This heater does not disassemble.
• Presione y mantenga presionado los Botones de Control del Termostato (
) durante tres segundos para
cambiar entre Fahrenheit y Celsius y viceversa.
LIMPIEZA Y ALMACENAJE
FAHRENHEIT A CELSIUS
Modelo(s) Dimensión de la Unidad Amperes Voltaje de la
Unidad
Watts Max BTUs
Max
HCE840B /
HCE840C
22.2 cm L x 17cm A x 32.5cm
A, 1.45 kg
12.5 120V, 60Hz 1575 5118
ESPECIFICACIONES DEL PRODUCTO
6 HEAT SETTINGS THAT GIVE YOU CONTROL OF YOUR COMFORT
Fig. 3
Fig. 2
Low Heat
& "White
Noise"
Setting
2 Hour
Auto-off
Timer with
30 Minute
Phased
Intervals
6 Ways to Heat the Space You are In - Once your heater is ON, use the control buttons on the bottom to
select the desired heat setting for your needs. Your heater will start on the Constant Hi Room heat setting
each time you turn the heater on. Here is a handy reference to help select the heat option that best suits
your desired comfort level:
FLOOR AREA – (LOW HEAT)
This setting uses the lower level heating element only to provide a comfortable, gentle heat to warm up the
floor area in front of the heater.
PERSONAL – (MODERATE HEAT)
This setting uses a moderate heat level to warm you personally wherever you may be relaxing (reading,
watching TV, etc.). The LO option (
) provides a soothing heat level, while the HI option ( ) slightly
increases heat output, allowing you to adjust to your desired comfort level.
ROOM – (MODERATE-HIGH HEAT)
Best for whole room heating, use this setting to bring warmth to cooler, drafty rooms. The LO option
provides a moderate heat level, while the HI option uses maximum heat output to create a warmer
environment.
THERMOSTAT – (MODERATE-HIGH HEAT)
To set the Thermostat, press the Thermostat Control Buttons (
) to choose your Desired
Temperature. The Desired Temperature will flash five times and then the Current Temperature in the room
will display as a steady number. The Thermostat can operate on either HI or LO heat levels to achieve
Desired Temperature by pressing the (
) button under Room.
NOTE: If the Current Temperature is higher than your Desired Temperature, the heater will go into cool down
mode and then shut-off until the room temperature falls below this setting or until the Desired Temperature
is changed.
HEATPHASE™ TIMER
The new HeatPhase Timer is an auto-off feature that gradually transitions the room temperature from
warmer to cooler. The timer starts at high heat and steps down 4 different heat levels until it shuts off - over
a 2 hour period. This feature is ideal for setting a comfortable, relaxing environment. (Fig. 2) The timer can
also be toggled to start at whichever level desired.
QUIET MODE
The new Quiet Mode features uses a low heat setting and fan speed to produce a gentle "white noise" and
soothing warmth. (Fig. 3)
Page is loading ...

© 2016 All Rights Reserved.
Kaz USA, Inc., a Helen of Troy Company
Marlborough, MA 01752
Honeywell is a trademark of Honeywell International Inc., used under license by Helen of Troy Limited.
Imported and Distributed by: Kaz Canada, Inc., Milton ON, L9T 2X6
Contact us at 1-800-477-0457 or www.HoneywellPluggedIn.com/heaters
© 2016 Tous droits réservés.
Kaz USA, Inc., une société de Helen of Troy
Marlborough, MA 01752
Honeywell est une marque de commerce de Honeywell International, Inc. qu’utilise Helen of Troy Limited sous licence.
Importé et distribué par : Kaz Canada, Inc., Milton ON, L9T 2X6
Pour nous joindre, composez le 1 800 477-0457 ou visitez www.HoneywellPluggedIn.com/heaters
© 2016 Todos los derechos reservados.
Kaz USA, Inc., una Empresa de Helen of Troy
Marlborough, MA 01752
Honeywell es una marca registrada de Honeywell International Inc., utilizada bajo licencia por Helen of Troy Limited.
Importado y Distribuido por Kaz Canada, Inc., Milton ON, L9T 2X6
Contáctenos al teléfono 1-800-477-0457 o al sitio web www.HoneywellPluggedIn.com/heaters
P/N: 31IMHC84190R0
02MAR16
For Responsible recycling, please visit:
www.RecycleNation.com
Para reciclar responsablemente, por favor visite:
www.RecycleNation.com

Spot Colors
Brand: Honeywell
Category: Air Purifier
Model:
HCE840
Agile Desc. : OM, HCE840, ENGLISH/
SPANISH/FRENCH, 2015
Subject:
Owner’s Manual
Artwork Part #: 31IMHC84190R0
Die Line Part #: NA
Region: US, CA
Flat Size:
IN: W11.0 x H8.0
Folded Size:
IN: W5.5 x H8.0
Material:
Page count: 20
Revision: 1
Release Date:
Date:
02MAR16
Scale: 1/1
70# Gloss or Matte Tex
Bindery is saddle stitch
Rerelease Date:
Colors:
Special Instructions:
Dielines (Do not print)
Cyan
100%
Magenta
100%
Yellow
100%
Black
100%
PMS
XXXX
PMS
XXXX
Kaz USA, Inc., a Helen of Troy Company
Creative Services
Marlborough, 01752 MA, USA
+1 508 490 7000
Quality Requirement of Artwork and Quality
Clarification Process of Artwork Printing:
Meet Eng-QS-06&02
CREATIVE DEPARTMENT ARTWORK SPECIFICATIONS
-
 1
1
-
 2
2
-
 3
3
-
 4
4
-
 5
5
-
 6
6
-
 7
7
-
 8
8
-
 9
9
-
 10
10
-
 11
11
-
 12
12


Honeywell HeatGenius HCE840B User manual
- Type
- User manual
- This manual is also suitable for
Ask a question and I''ll find the answer in the document
Finding information in a document is now easier with AI
in other languages
Related papers
-
Honeywell HZ-2016 User manual
-
-
-
-
Honeywell HZ-960 User manual
-
-
Honeywell HZ-7300 series User manual
-
Honeywell HZ0360 User manual
-
-
Other documents
-
World Marketing of America Oil Filled Operating instructions
-
NewAir AH-450 User manual
-
-
NuTone Big Heat 6200 User manual
-
 Big Red Rooster BRRC106B User manual
-
HeatStar MH40 LP Operating instructions
-
Mr. Heater F272200 User manual
-
-
 Pelonis HO-0221 Owner's manual
-
Empire FAW40 Owner's manual

